Knockback: Difference between revisions
mNo edit summary |
(→Formula: Using math extension.) |
||
| (218 intermediate revisions by 65 users not shown) | |||
| Line 1: | Line 1: | ||
{{ArticleIcons|series=y|featured=y}} | {{ArticleIcons|series=y|featured=y}} | ||
[[ | {{redirect|Launch|the Ultimate tournament|Tournament:Launch}} | ||
[[File:SSB4 Knockback.jpg|thumb|As the damage meter goes up, so does the knockback of most moves, as seen here with {{SSB4|Mario}}'s [[forward smash]] on {{SSB4|Link}}.]] | |||
'''Knockback''' is the measure of how far an attack sends its target. For most attacks, knockback increases as damage on a character increases. An example of an attack with high knockback is [[Bowser]]'s [[forward smash]]; it launches opponents very far, so far that at high damages it's more powerful than a [[Home-Run Bat]]'s [[smash attack]]. [[Pikachu]]'s [[neutral attack]], on the other hand, has very low knockback - it hardly sends opponents anywhere, even at ludicrous damages. Attacks with relatively low knockback tend to be good for [[combo]]s. | '''Knockback''' is the measure of how far an attack sends its target. For most attacks, knockback increases as damage on a character increases. An example of an attack with high knockback is [[Bowser]]'s [[forward smash]]; it launches opponents very far, so far that at high damages it's more powerful than a [[Home-Run Bat]]'s [[smash attack]]. [[Pikachu]]'s [[neutral attack]], on the other hand, has very low knockback - it hardly sends opponents anywhere, even at ludicrous damages. Attacks with relatively low knockback tend to be good for [[combo]]s. | ||
==Basic physics== | ==Basic physics== | ||
The knockback of almost every attack works in tandem with the target's [[damage]] - it increases as the target's damage gets higher. It is also affected by the target's [[weight]], [[gravity]], and a few other conditions (such as [[type effectiveness]]). While not the primary factor, the damage dealt by an attack is a significant factor in how much knockback it deals - this is the reason [[stale moves]] have less knockback than fresh ones, and the reason [[smash attack]]s deal significantly more knockback when fully [[charge]]d. | The knockback of almost every attack works in tandem with the target's [[damage]] - it increases as the target's damage gets higher. It is also affected by the target's [[weight]], [[gravity]], and a few other conditions (such as [[type effectiveness]]). While not the primary factor, the damage dealt by an attack is a significant factor in how much knockback it deals - this is the reason [[stale move negation|stale moves]] have less knockback than fresh ones, and the reason [[smash attack]]s deal significantly more knockback when fully [[charge]]d. | ||
Each hitbox of a move has two knockback values: a '''base knockback''' and a '''knockback scaling''' (also known as '''knockback growth'''). Base knockback is the minimum amount of knockback the attack can deliver | Each hitbox of a move has two knockback values: a '''base knockback''' and a '''knockback scaling''' (also known as '''knockback growth'''). Base knockback is the minimum amount of knockback the attack can deliver under normal circumstances, and knockback scaling is a factor that controls how much the knockback increases as damage increases. | ||
Moves with high base knockback can deal high knockback (such as performing a forward smash with the [[Home-Run Bat]]), even against fighters who haven't taken much damage, and tend to be more effective at KOing when fighters can easily be sent flying at low damage percentages (such as against lighter fighters, when near the edge of the stage, or when a fighter is [[handicap]]ped to sustain more knockback). Tiny-sized fighters are usually the most vulnerable to getting KO'd by high base knockback attacks, due to having reduced weight, and an increased knockback taken multiplier. | |||
On the other hand, moves with high knockback scaling can reach KO potential more quickly (such as Luigi's forward smash), especially if they have a high damage output, and tend to be more effective at KOing when fighters need to take greater knockback than what a high base knockback attack can deliver on its own (such as against heavier fighters, when far away from a stage's blast line, or when a fighter is handicapped to sustain less knockback). Advanced techniques to extend survival, such as [[DI]] and [[momentum canceling]], are also less effective the stronger a move's knockback scaling is. | |||
In ''[[Melee]]'', the highest knockback delivered and received by each character is given in a match's [[results screen]], labeled as "Fastest Pitch" and "Top Speed" respectively, though the numbers lack meaning. In ''[[Brawl]]'', the velocity applied (in units per 1000 frames) is provided instead of the knockback value (though it's simply knockback divided by 0.03). The unit is given as "mph"; while this would presumably mean "miles per hour", this is obviously not the case, as a 1,000 mph hit would barely send characters anywhere. In {{for3ds}}, knockback units are again shown without a meaning, while in {{forwiiu}}, they are measured in "mph" as in ''Brawl'', though in a lower scale. Strangely enough, knockback for a same move between the two games is actually shown in different scales: {{SSB4|Ganondorf}}'s [[Warlock Punch]], for instance, scores 102 units of knockback against {{SSB4|Mario}} at 0% damage (without other modifiers) in ''Smash 3DS'', while scoring 53 mph under the same conditions in ''Smash U''. Despite these differences among games, they all internally use the same knockback measurement units in accordance to the knockback formula, as evidenced by moves with unchanged damage and knockback values throughout them (such as [[Jigglypuff]]'s [[back throw]] from ''Melee'' to ''Smash 4'') keeping their knockback identical. | In ''[[Melee]]'', the highest knockback delivered and received by each character is given in a match's [[results screen]], labeled as "Fastest Pitch" and "Top Speed" respectively, though the numbers lack meaning. In ''[[Brawl]]'', the velocity applied (in units per 1000 frames) is provided instead of the knockback value (though it's simply knockback divided by 0.03). The unit is given as "mph"; while this would presumably mean "miles per hour", this is obviously not the case, as a 1,000 mph hit would barely send characters anywhere. In {{for3ds}}, knockback units are again shown without a meaning, while in {{forwiiu}}, they are measured in "mph" as in ''Brawl'', though in a lower scale. Strangely enough, knockback for a same move between the two games is actually shown in different scales: {{SSB4|Ganondorf}}'s [[Warlock Punch]], for instance, scores 102 units of knockback against {{SSB4|Mario}} at 0% damage (without other modifiers) in ''Smash 3DS'', while scoring 53 mph under the same conditions in ''Smash U''. Despite these differences among games, they all internally use the same knockback measurement units in accordance to the knockback formula, as evidenced by moves with unchanged damage and knockback values throughout them (such as [[Jigglypuff]]'s [[back throw]] from ''Melee'' to ''Smash 4'') keeping their knockback identical. | ||
| Line 40: | Line 45: | ||
|300||10000||Jigglypuff's [[shield jump]] | |300||10000||Jigglypuff's [[shield jump]] | ||
|} | |} | ||
In ''[[Super Smash Bros. Ultimate]]'', when [[hitstun]] exceeds 32 frames, the process of the character getting launched is sped up for a duration proportional to the hitstun inflicted. This is especially noticeable near KO percentages, where characters fly away very quickly, then come to a stop almost immediately, effectively causing the launch to execute much faster. The effect is also more noticeable for moves which have high hitstun modifiers, such as Isabelle's neutral attack, which can even trigger the effect before the knockback is strong enough to cause tumbling. Because of this change, the hitstun they experience scales much more slowly at higher knockback values. According to director [[Masahiro Sakurai]], this change was implemented to increase the overall speed of the game, by reducing the time during which launched characters are incapacitated.<ref>https://www.sourcegaming.info/2018/06/20/smash-is-special-part-1-sakurais-famitsu-column-vol-557/</ref> The visual and mechanical differences this effect causes on knockback are notorious enough that it is often dubbed "balloon knockback" by the community, as it has similar physics to hitting a balloon in real life. Moves with [[set knockback]] retain traditional knockback physics. | |||
===Launch rate=== | |||
{{image|Could use with a screenshot of it in the options menu, or maybe a GIF/Video with comparisons.}} | |||
:''Launch rate is not to be confused with [[handicap]].'' | |||
'''Launch rate''', also known as '''Damage %''' in ''Super Smash Bros.'' and '''Damage Ratio''' in ''Melee'' and ''Brawl'', is a feature in all ''{{b|Super Smash Bros.|series}}'' games that alters how much knockback is given and received (despite its name in ''Melee'' and ''Brawl'', damage is unaffected). | |||
All knockback in a match is multiplied by the launch rate value, which by default is 1.0×. This value can be set from as low as 0.5× ([[attack]]s have half knockback) to as high as 2.0× (attacks have double knockback). The minimum launch rate is ideal for [[combos]], while the maximum launch rate is ideal for [[KO]]ing opponents at extremely low [[percentage]]s. However, the latter also affected attacks with [[set knockback]] up until ''Smash 4'' and ''Ultimate'', causing multihit attacks to not always combo into each other. | |||
In competitive play, nonstandard launch rates are difficult to detect during games, which has led to some tournament matches unintentionally having been played at an incorrect launch rate. A notable example of this was a set between {{s|smasher|Armada}} and {{s|smasher|SilentSpectre}} at {{s|tournament|Pound 4}} in 2010 that was played at 0.9×; this remained undiscovered for nine years. The infamous matches between {{s|smasher|komorikiri}} and {{s|smasher|CaptainZack}}, and {{s|smasher|ZeRo}} and {{s|smasher|Dabuz}} at {{s|tournament|GENESIS 4}} are more recent examples. Both matches were being played at a launch rate setting of 0.9×. The latter match gained notoriety, and soon became an inside joke in the community. | |||
There has been some discussion among ''Brawl''{{'}}s competitive community as to whether using a launch rate value other than the default 1.0 results in a more healthy metagame; 1.1× is a commonly-mentioned value claimed to make many polarizing attack chains (such as using Sheik's forward tilt into itself endlessly) less viable while also shortening the length of stocks. The idea has never attained serious consideration among tournament organizers. | |||
===Angle indicator=== | ===Angle indicator=== | ||
Appearing in [[Super Smash Bros.|all]] [[Super Smash Bros. | Appearing [[Super Smash Bros.|in]] [[Super Smash Bros. Melee|all]] [[Super Smash Bros. Brawl|games]] [[Super Smash Bros. 4|to]] [[Super Smash Bros. Ultimate|date]], visual effects known as '''angle indicators''' show when a hitbox collides with an opponent; as its name suggests, the angle indicator shows the angle of said hitboxes. In ''Brawl'', angle indicators show different colors depending on who or what they hit. For player one, the angle indicator is red, with the second player's indicator being blue, and so forth. Computer-controlled opponents and objects like [[Sandbag]] have white angle indicators. Angle indicators appear in ''Super Smash Bros.'' as small "bubbles" appearing in the direction of the angle. In ''Smash 4'', angle indicators appear as colorful, stylized "debris" flying off of an impact. | ||
Smoke trails also indicate the angle at which a character is knocked away, but only appear when a character has taken a lot of damage, and are thus much less useful. In ''Smash 4'', said smoke trails at higher knockback values are accompanied by thick light trails, colored depending on the player that dealt the knockback. | Smoke trails also indicate the angle at which a character is knocked away, but only appear when a character has taken a lot of damage, and are thus much less useful. In ''Smash 4'', said smoke trails at higher knockback values are accompanied by thick light trails, colored depending on the player that dealt the knockback. | ||
<gallery> | <gallery> | ||
Skyworld3.jpg|Note the downward facing lines that indicate Donkey Kong's [[meteor smash]]. | |||
Angleindicatorssb.jpg|The angle indicator in ''Super Smash Bros.'' | |||
CaptainFTilt.JPG|An angle indicator in ''Smash 4''. | |||
</gallery> | </gallery> | ||
==Formula== | ==Formula== | ||
===''SSB''=== | ===''SSB''=== | ||
<big><math>\left ( \left ( \left ( \left ( \left ( {p \over 10} + {{p \times d} \over 20} \right ) \times w \times 1.4 \right ) + 18 \right ) \times s \right ) + b \right ) \times r</math></big> | |||
===''Melee'' onward=== | ===''Melee'' onward=== | ||
[[ | <big><math>\left ( \left ( \left ( \left ( \left ( {p \over 10} + {{p \times d} \over 20} \right ) \times { 200 \over { w + 100} } \times 1.4 \right ) + 18 \right ) \times s \right ) + b \right ) \times r</math></big> | ||
[[File:gravity knockback.gif|thumb|A demonstration of the effect of gravity on knockback, the Shulk on the left uses the hyper Speed Monado Art, increasing his gravity, and as a result, the knockback he sustains.]]<br> | |||
''Brawl'' | Starting in ''Brawl'', a second formula is also used to alter knockback based on the target's [[gravity]]: | ||
<big><math>(g - 0.075) \times 5</math></big> | |||
The result of this formula increases vertical launch speed if the target enters tumble. As a result, characters with higher gravity get launched faster than those with lower gravity, depending on how vertical the angle is | The result of this formula increases vertical launch speed if the target enters tumble. As a result, characters with higher gravity get launched faster than those with lower gravity, depending on how vertical the angle is, resulting in fighters with higher gravity stats having worsened vertical survivability, seemingly as an attempt to normalize the effect of combos and multi-hit moves on characters of differing gravity. This formula is also applied to moves that launch opponents downwards, though since vertical launch speed is negative in this case, the result of the formula effectively decreases it slightly instead, reducing the effectiveness of [[meteor smash]]es on fast fallers. | ||
In ''Ultimate'', moves that launch at angles between 70° and 110° now instead cause characters' falling speeds to be homogenized to a set value of 1.8 during hitstun. Furthermore, the additional launch speed from the gravity formula is no longer applied. As a result of these changes, falling speed no longer plays as much of a factor on determining a characters' vertical survivability, and moves that deal vertical knockback are generally easier to survive compared to ''Brawl'' and ''SSB4'', thus making vertical survivability among the cast much more consistent than in previous games. Note that weight-independent moves do not homogenize falling speeds or use the different gravity value, so gravity and fall speed (especially the latter) still have an impact on the vertical survivability against those moves. | |||
===Variables=== | ===Variables=== | ||
*'''p''' is the percentage of the target, counted after the attack's damage is added. | *'''p''' is the percentage of the target, counted after the attack's damage is added. In [[Stamina Mode]] this is set to 20. | ||
*'''d''' is the damage the attack dealt. In ''SSB'' and ''Melee'', it is the full damage without counting [[stale-move negation]] | **In ''Melee'', '''p''' is floored pre-hits percentage + sum of hitbox damage(s) dealt to the character that frame, including staling and other modifiers. | ||
*'''w''' is the [[weight]] of the target. Note that in ''SSB'', heavier characters have a lower weight value than lighter ones, in accordance with the formula. | *'''d''' is the damage the attack dealt. | ||
**In ''SSB'' and ''Melee'', it is the full damage without counting [[stale-move negation]], except for [[projectile]]s, which use the stale damage and other possible modifiers. | |||
**In ''Brawl'', it is the damage including the staleness or the freshness bonus. | |||
**In ''Smash 4'' and ''Ultimate'', it is the damage including 0.3x of the staleness or freshness bonus. | |||
*'''w''' is the [[weight]] of the target. It is set to 100 if the attack is weight independent. Note that in ''SSB'', heavier characters have a lower weight value than lighter ones, in accordance with the formula. | |||
*'''s''' is the attack's knockback scaling (also known as knockback growth) divided by 100 (so a scaling of 110 is input as 1.1). | *'''s''' is the attack's knockback scaling (also known as knockback growth) divided by 100 (so a scaling of 110 is input as 1.1). | ||
*'''b''' is the attack's base knockback. | *'''b''' is the attack's base knockback. | ||
| Line 73: | Line 98: | ||
**[[Handicap]] (in ''SSB'' and ''Melee'') | **[[Handicap]] (in ''SSB'' and ''Melee'') | ||
**Single-player mode conditions (e.g. in ''Melee''{{'}}s [[Event 24: The Yoshi Herd]], all {{SSBM|Yoshi}}s give x0.5 knockback while taking x3.7 knockback) | **Single-player mode conditions (e.g. in ''Melee''{{'}}s [[Event 24: The Yoshi Herd]], all {{SSBM|Yoshi}}s give x0.5 knockback while taking x3.7 knockback) | ||
**[[ | **[[Launch rate]] (between x0.5 and x2.0) | ||
**[[Crouching]] penalty/[[Crouch cancel]] factor (x0.67 in ''SSB'' | **[[Crouching]] penalty/[[Crouch cancel]] factor (x0.67 in ''SSB'', x0.666667 ''Melee'', and x0.85 in ''Smash 4'') | ||
**[[Smash attack|Smash]] [[charge]] interruption bonus (x1.2, ''Melee'' onwards, | **[[Smash attack|Smash]] [[charge]] interruption bonus prior to ''Ultimate'' (x1.2, ''Melee'' onwards, applied if the opponent was charging a smash attack when hit) | ||
**[[Frozen]] penalty factor (x0.25 in ''Melee''). Characters in frozen state take reduced knockback. | |||
**[[Type effectiveness]] (x1.1 for super effective, x0.9 for not very effective, specific to {{SSBB|Charizard}}, {{SSBB|Ivysaur}}, and {{SSBB|Squirtle}} in ''Brawl'') | **[[Type effectiveness]] (x1.1 for super effective, x0.9 for not very effective, specific to {{SSBB|Charizard}}, {{SSBB|Ivysaur}}, and {{SSBB|Squirtle}} in ''Brawl'') | ||
**[[Rage]] (between x1 and x1.15, ''Smash 4'' | **Size changes made by the [[Super Mushroom]], [[Poison Mushroom]], and [[Lightning Bolt]] (less knockback is dealt to giant-sized fighters, while tiny fighters take more knockback than normal) | ||
**[[Rage]] (between x1 and x1.15 in ''Smash 4'' and between x1 and x1.1 in ''Ultimate'') | |||
The total amount of knockback dealt can also be subtracted by the target's [[Armor|knockback resistance]], which is applied after all the other calculations have been made. However, hitboxes that have the [[bury]] effect can ignore the knockback resistance. | |||
If the move has a fixed knockback value set, then '''d''' is set to that value, and '''p''' is always 10. As a result, the knockback dealt is independent of current damage, damage dealt, and ignores stale-move negation's knockback modifiers. However, it still remains dependent on other factors. | |||
To determine how far a character is launched away, the numerical amount of knockback caused is multiplied by 0.03 to calculate '''launch speed''', and the initial value of launch speed then decays by 0.051 every [[frame]], so that the character eventually loses all momentum from the knockback. During this time, character-specific attributes such as [[air friction]] are disabled; however, [[falling speed]] still takes effect, giving fast fallers better endurance against vertical knockback than others of their weight. | |||
==Deadly Blow== | |||
[[File:DeadlyBlow.jpg|270px|thumb|The vibrant "Deadly Blow" effect will appear if an attack does enough knockback to KO the victim.]] | |||
Deadly Blow is an aesthetic effect in ''Smash 4'' and ''Ultimate''. Attacks dealing strong enough knockback to KO opponents before they can act afterwards produce a red-and-black lightning effect on contact. This effect tends to appear slightly after the actual damage percentage at which an attack can start KOing. For example, {{SSB4|Jigglypuff}}'s [[Rest]] can KO Mario on the 3DS version's {{SSB4|Final Destination}} with no DI starting at 60%, but the effect doesn't appear until 62%. | |||
This effect works depending on the distance required to KO the character rather than the actual strength of the knockback; for example, a forward or back throw towards a walk-off [[blast line]] will trigger the effect if the throw effectively KOs, even at low damage percentages where it would be otherwise very weak, while strong attacks launching foes from one side of the stage to the other will not display the effect if they don't KO, even if the knockback is strong enough to do so otherwise. Attacks that [[freezing|freeze]] do not produce this effect at any percentage, instead simply causing the screen to flash white. Meteor smashes also do not produce the effect until higher percentages. | |||
The Deadly Blow activating does not necessarily guarantee a KO. The game does not consider stage walls, ceilings, or other obstacles that can otherwise change the trajectory of knockback (thereby preventing or causing a KO) when determining whether the lightning appears. [[Directional Influence|DI]] Is also not taken into account, meaning players can still save themselves after the effect is displayed if the attack can just barely KO them. | |||
In ''Ultimate'', when a move is expected to end the match (that is, when all remaining opponents are on their last stock and hits the last character not already in lethal knockback or a [[Star KO]]), this effect is accompanied by a dramatic slowdown alongside a red background and a unique, much more intense sound effect, with the camera zooming in on the character. This is referred to as '''[[Finish Zoom]]''' by [[Masahiro Sakurai]] and his development team. | |||
==Other physics of knockback== | ==Other physics of knockback== | ||
{{technical data|Knockback reduction from bounce off a surface in ''SSB''}} | |||
*Bouncing off a surface reduces knockback [http://smashboards.com/threads/detailed-throws-techs-and-getups-frame-data.206469/page-2#post-5956687 by 20%] in ''Melee'' and [http://kuroganehammer.com/Smash4/Formulas ''Smash 4''] and 15% in ''Brawl''. Landing a [[meteor smash]] or [[spike]] on a grounded opponent counts as a bounce, if enough knockback was dealt. Because the bounce occurs after the hit, the amount of [[hitstun]] suffered is not reduced a corresponding amount, meaning that downwards-hitting attacks tend to be excellent combo starters. | *Bouncing off a surface reduces knockback [http://smashboards.com/threads/detailed-throws-techs-and-getups-frame-data.206469/page-2#post-5956687 by 20%] in ''Melee'' and [http://kuroganehammer.com/Smash4/Formulas ''Smash 4''] and 15% in ''Brawl'' and 5% in ''Ultimate''. Landing a [[meteor smash]] or [[spike]] on a grounded opponent counts as a bounce, if enough knockback was dealt. Because the bounce occurs after the hit, the amount of [[hitstun]] suffered is not reduced a corresponding amount, meaning that downwards-hitting attacks tend to be excellent combo starters. | ||
*In ''Brawl'', characters that take enough knockback to be sent [[tumbling]] will slightly damage opponents they run into while flying. This hitbox belongs to the character that dealt the knockback, and inflicts minor damage (usually from 1% to 4%) and knockback depending on how powerfully the character was launched. This property was later removed in ''Smash 4'', where launched opponents simply fly through other characters like in previous games. | **In ''Melee'', bouncing off a floor from spike only reduces vertical component of knockback velocity by 20%. Meanwhile, bouncing off walls and ceilings reduces total velocity by 20%. | ||
**A similar effect is used against enemies in [[The Subspace Emissary]], [[Smash Run]] and [[Master Fortress]], known as [[careening]], or the '''cannonball effect''' in ''Smash 4''. When an enemy is defeated, it is sent flying at an angle (depending on the attack that KO'd it) and deals major damage to other enemies it runs into, before | *In all games, the screen will commonly flash white when a character receives knockback that is greater than or equal to 160 units; however, the screen will flash into a different color when they're launched far by an elemental attack (i.e. red for [[flame]] attacks, blue for [[electric]] attacks, etc.). | ||
*Characters with [[armor]] will take no knockback. | *In ''Brawl'', characters that take enough knockback to be sent [[tumbling]] will slightly damage opponents they run into while flying. This hitbox belongs to the character that dealt the knockback, and inflicts minor damage (usually from 1% to 4%) and knockback depending on how powerfully the character was launched. This is also present in ''Melee'' and ''Smash 64'', but only applies to characters who receive knockback after a [[throw]] (not counting [[special move]] grabs like [[Falcon Dive|Falcon]]/[[Dark Dive]] and [[Koopa Klaw]]). This property was later removed in ''Smash 4'', where launched opponents simply fly through other characters like in previous games. | ||
*In ''Smash 4'', characters at higher percentages deal slightly more knockback, a factor popularly known as "[[rage]]".<ref>[http://smashboards.com/threads/new-mechanic-the-rage-effect.368987/ The "Rage Effect"]</ref> | **A similar effect is used against enemies in [[The Subspace Emissary]], [[Smash Run]] and [[Master Fortress]], known as [[careening]], or the '''cannonball effect''' in ''Smash 4''. When an enemy is defeated, it is sent flying at an angle (depending on the attack that KO'd it) and deals major damage to other enemies it runs into, before disappearing. | ||
*Characters with [[armor]] will take no knockback, or reduced knockback. | |||
*In ''Smash 4'' and ''Ultimate'', characters at higher percentages deal slightly more knockback, a factor popularly known as "[[rage]]".<ref>[http://smashboards.com/threads/new-mechanic-the-rage-effect.368987/ The "Rage Effect"]</ref> In ''Smash 4'', rage starts building up at 35% damage and caps at 150%, at which the character deals 15% more knockback than normal, or 10% more in ''Ultimate''. | |||
*Characters in the background plane of [[Jungle Hijinxs]] take more knockback. | *Characters in the background plane of [[Jungle Hijinxs]] take more knockback. | ||
*In ''Smash 4'', | *In ''Smash 4'', [[launch speed influence]] can increase launch speed to a maximum of x1.095 by holding up on the [[control stick]], or decrease it to a minimum of x0.92 by holding down. From update [[1.0.4]] onward, this does not apply if the target is launched at an angle between 65° and 115°, or between 245° and 295°. | ||
*In ''Smash 4'', [[buried]] characters take 30% less knockback from attacks, provided these are strong enough to hit them out of said state. | *In ''Smash 4'', [[buried]] characters take 30% less knockback from attacks, provided these are strong enough to hit them out of said state. | ||
==Set knockback== | ==Set knockback== | ||
'''Set knockback''', also referred to as '''fixed knockback''', is a property of some attacks where the amount of knockback dealt by the attack is always the same regardless of the opponent | {{incomplete|Need rest of values for SSBU}} | ||
'''Set knockback''', also referred to as '''fixed knockback''', is a property of some attacks where the amount of knockback dealt by the attack is always the same regardless of the damage the opponent has received so far, [[stale-move negation]], or how much damage the attack does. Moves with this property can be thought of as those having a knockback scaling factor of 0, though this is actually not the case. Usually, set knockback is used for the first hits of a [[natural combo]] or multi-hit move, while the last hit deals normal knockback (sometimes called "scaling knockback" to contrast), to make it easier for the entire attack to hit regardless of the opponent's damage. While damage is not a factor for set knockback, the character's [[weight]] still is, so the terms '''weight-dependent set knockback''' or '''weight based knockback''' are sometimes used. Starting in ''Brawl'', the effect of Damage Ratios (Launch Rates) for fixed knockback was drastically reduced, to the point where the in game Damage Ratio setting would have only a small effect on their knockback. Additionally, Shulk's Smash [[Monado Art]] is ignored entirely in ''Smash 4''. However, other modifiers on knockback, such as rage, crouch cancelling, or smash attack charging bonus are still calculated normally, which in the case of rage can lead to unintended early KO setups in normal gameplay. In ''Ultimate'', the effect of both types of knockback modifiers on set knockback was removed altogether, so set knockback is much harder to modify. | |||
===List of set knockback moves=== | ===List of set knockback moves=== | ||
====''[[Super Smash Bros.]]''==== | ====''[[Super Smash Bros.]]''==== | ||
With the exception of {{SSB|Captain Falcon}}, all characters in ''Super Smash Bros.'' have at least one move with set knockback. | With the exception of {{SSB|Captain Falcon}}, all characters in ''Super Smash Bros.'' have at least one move with set knockback. | ||
*{{SSB| | *{{CharHead|Donkey Kong|SSB|hsize=20px}}'s {{mvsub|Donkey Kong|SSB|dash attack}}, [[Donkey Kong (SSB)/Up special|Spinning Kong]], and [[Donkey Kong (SSB)/Down special|Hand Slap]]. | ||
*{{SSB| | *{{CharHead|Fox|SSB|hsize=20px}}'s down angled {{mvsub|Fox|SSB|forward tilt}}, {{mvsub|Fox|SSB|down aerial}}, {{mvsub|Fox|SSB|up aerial}} (first hit), [[Fox (SSB)/Neutral special|Blaster]] and [[Fox (SSB)/Down special|Reflector]]. | ||
*{{SSB|Kirby}}'s [[Final Cutter]] ( | *{{CharHead|Jigglypuff|SSB|hsize=20px}}'s {{mvsub|Jigglypuff|SSB|down aerial}} (all but landing hit). | ||
*{{SSB| | *{{CharHead|Kirby|SSB|hsize=20px}}'s [[Kirby (SSB)/Up special|Final Cutter]] (excluding the projectile), {{mvsub|Kirby|SSB|up aerial}}, {{mvsub|Kirby|SSB|forward aerial}} (all but last hit), {{mvsub|Kirby|SSB|neutral aerial}}, {{mvsub|Kirby|SSB|down aerial}} (landing hit), and [[Kirby (SSB)/Neutral special|Inhale]]. | ||
*{{SSB| | *{{CharHead|Link|SSB|hsize=20px}}'s [[up smash]] (first two hits). | ||
*{{SSB| | *{{CharHead|Luigi|SSB|hsize=20px}}'s [[sourspot]]ted [[Luigi (SSB)/Up special|Super Jump Punch]], {{mvsub|Luigi|SSB|dash attack}}, {{mvsub|Luigi|SSB|down aerial}}, and {{mvsub|Luigi|SSB|taunt}}. | ||
*{{SSB| | *{{CharHead|Mario|SSB|hsize=20px}}'s [[Mario (SSB)/Up special|Super Jump Punch]] (all but last hit), {{mvsub|Mario|SSB|down aerial}}, and [[Mario (SSB)/Down special|Mario Tornado]]. | ||
*{{SSB| | *{{CharHead|Ness|SSB|hsize=20px}}' [[Ness (SSB)/Neutral special|PK Fire]] (all but first hit). | ||
*{{SSB| | *{{CharHead|Pikachu|SSB|hsize=20px}}'s {{mvsub|Pikachu|SSB|forward aerial}}. | ||
*{{SSB| | *{{CharHead|Samus|SSB|hsize=20px}}'s {{mvsub|Samus|SSB|up aerial}} and [[Samus (SSB)/Up special|Screw Attack]]. | ||
*{{CharHead|Yoshi|SSB|hsize=20px}}'s {{mvsub|Yoshi|SSB|up tilt}}, {{mvsub|Yoshi|SSB|down tilt}}, [[Yoshi (SSB)/Neutral special|Egg Lay]], and [[Yoshi (SSB)/Down special|Yoshi Bomb]] (stars). | |||
====''[[Super Smash Bros. Melee]]''==== | ====''[[Super Smash Bros. Melee]]''==== | ||
* | *All [[windbox]]es. | ||
*{{SSBM| | *{{CharHead|Bowser|SSBM|hsize=20px}}'s [[Bowser (SSBM)/Neutral attack/Hit 1|neutral attack]] (first hit), {{mvsub|Bowser|SSBM|down aerial}}'s looping hits and {{mvsub|Bowser|SSBM|up throw}}. | ||
*Dr. Mario's first | *{{CharHead|Captain Falcon|SSBM|hsize=20px}}'s {{mvsub|Captain Falcon|SSBM|neutral attack}} (first and second hits), {{mvsub|Captain Falcon|SSBM|up smash}} (first hit), {{mvsub|Captain Falcon|SSBM|neutral aerial}} (first hit) and his uncharged smash attack with a [[Home-Run Bat]]. | ||
*{{CharHead|Donkey Kong|SSBM|hsize=20px}}'s [[Donkey Kong (SSBM)/Down special|Hand Slap]]. | |||
*{{SSBM| | *{{CharHead|Dr. Mario|SSBM|hsize=20px}}'s {{mvsub|Dr. Mario|SSBM|neutral attack}} (first and second hits), {{mvsub|Dr. Mario|SSBM|down aerial}}, [[Dr. Mario (SSBM)/Up special|Super Jump Punch]] and [[Dr. Mario (SSBM)/Down special|Dr. Tornado]] (excluding both specials' final hits). | ||
*{{ | *{{CharHead|Falco|SSBM|hsize=20px}}'s [[Falco (SSBM)/Neutral special|Blaster]]. | ||
*{{SSBM| | *{{CharHead|Fox|SSBM|hsize=20px}}'s {{mvsub|Fox|SSBM|up aerial}} (first hit), {{mvsub|Fox|SSBM|down aerial}} and [[Fox (SSBM)/Down special|Reflector]]. | ||
*{{SSBM| | *{{CharHead|Ganondorf|SSBM|hsize=20px}}'s {{mvsub|Ganondorf|SSBM|down smash}} (first hit). | ||
* | *{{CharHead|Ice Climbers|SSBM|hsize=20px}}' {{mvsub|Ice Climbers|SSBM|down aerial}}. | ||
*{{SSBM|Kirby}}'s {{b|Hammer|move}} (in the air) | *{{CharHead|Mario|SSBM|hsize=20px}}'s {{mvsub|Mario|SSBM|neutral attack}} (first and second hits), down angled {{mvsub|Mario|SSBM|forward tilt}}, {{mvsub|Mario|SSBM|down aerial}}, [[Mario (SSBM)/Up special|Super Jump Punch]], [[Mario (SSBM)/Down special|Mario Tornado]], (excluding their respective final hits). | ||
*{{SSBM| | *{{CharHead|Marth|SSBM|hsize=20px}}'s {{mvsub|Marth|SSBM|up smash}} (outer hitboxes). | ||
*{{SSBM|Peach}}'s [[Peach Parasol]] | *{{CharHead|Mewtwo|SSBM|hsize=20px}}'s [[Mewtwo (SSBM)/Neutral attack/Hit 1|neutral attack]] (first hit), {{mvsub|Mewtwo|SSBM|up smash}} and {{mvsub|Mewtwo|SSBM|neutral aerial}} (excluding their respective final hits). | ||
*{{SSBM| | *{{CharHead|Mr. Game & Watch|SSBM|hsize=20px}}'s {{mvsub|Mr. Game & Watch|SSBM|neutral attack}} (first hit and infinite) and [[Judge]] #8. | ||
* | *{{CharHead|Ness|SSBM|hsize=20px}}'s {{mvsub|Ness|SSBM|dash attack}} (first two hits). | ||
*{{SSBM| | *{{CharHead|Jigglypuff|SSBM|hsize=20px}}'s {{mvsub|Jigglypuff|SSBM|down throw}} (first four hits). | ||
* | *{{CharHead|Kirby|SSBM|hsize=20px}}'s {{mvsub|Kirby|SSBM|down aerial}} (landing hitbox), {{b|Hammer|move}} (in the air), [[Final Cutter]] (up and down cuts) and {{mvsub|Kirby|SSBM|down throw}} (first nine kicks). | ||
*{{SSBM| | *{{CharHead|Link|SSBM|hsize=20px}}'s {{mvsub|Link|SSBM|up smash}} (first two hits) and [[Link (SSBM)/Up special|Spin Attack]] (air, all but final hit). | ||
*{{SSBM|Young Link}}'s | *{{CharHead|Luigi|SSBM|hsize=20px}}'s {{mvsub|Luigi|SSBM|neutral attack}} (first and second hits), down angled {{mvsub|Luigi|SSBM|forward tilt}} and {{mvsub|Luigi|SSBM|taunt}}. | ||
*{{CharHead|Peach|SSBM|hsize=20px}}'s [[Peach (SSBM)/Neutral attack/Hit 1|neutral attack]] (first hit) and [[Peach Parasol]] (first hit). | |||
*{{SSBM| | *{{CharHead|Pichu|SSBM|hsize=20px}}'s {{mvsub|Pichu|SSBM|forward aerial}}. | ||
*{{CharHead|Pikachu|SSBM|hsize=20px}}'s {{mvsub|Pikachu|SSBM|forward aerial}}. | |||
*{{CharHead|Roy|SSBM|hsize=20px}}'s {{mvsub|Roy|SSBM|up smash}} (multihits), [[Roy (SSBM)/Side special|Double-Edge Dance]] (hit 3 down, all but final hit) and [[Roy (SSBM)/Up special|Blazer]]. | |||
*{{CharHead|Samus|SSBM|hsize=20px}}'s {{mvsub|Samus|SSBB|up aerial}} (all but final hit) and [[Samus (SSBM)/Up special|Screw Attack]] (ground, final hit only). | |||
*{{CharHead|Sheik|SSBM|hsize=20px}}'s {{mvsub|Sheik|SSBM|forward smash}} (first hit). | |||
*{{CharHead|Yoshi|SSBM|hsize=20px}}'s {{mvsub|Yoshi|SSBM|down tilt}}. | |||
*{{CharHead|Young Link|SSBM|hsize=20px}}'s {{mvsub|Young Link|SSBM|forward smash}} (first hit), {{mvsub|Young Link|SSBM|up smash}} (first two hits) and [[Young Link (SSBM)/Up special|Spin Attack]] (air, all but final hit). | |||
*{{CharHead|Zelda|SSBM|hsize=20px}}'s {{mvsub|Zelda|SSBM|forward smash}}, {{mvsub|Zelda|SSBM|up smash}}, {{mvsub|Zelda|SSBM|neutral aerial}} (excluding their respective final hits) and {{mvsub|Zelda|SSBM|down throw}} (flames). | |||
*[[Red Shell]]. | *[[Red Shell]]. | ||
====''[[Super Smash Bros. Brawl]]''==== | ====''[[Super Smash Bros. Brawl]]''==== | ||
*Many [[jab]]s, such as {{SSBB| | *Many [[jab]]s, such as {{SSBB|Mario}}'s, have set knockback for all but their last hit. | ||
*Many multi-hitting [[smash attack]]s have setup hits with set knockback (e.g., {{SSBB|Ness}}'s up and down smashes). | *Many multi-hitting [[smash attack]]s have setup hits with set knockback (e.g., {{SSBB|Ness}}'s up and down smashes). | ||
*{{SSBB|King Dedede}}'s [[down throw | *All windboxes. | ||
*{{SSBB|Luigi}}'s down taunt and sourspotted Super Jump Punch. | *{{CharHead|Bowser|SSBB|hsize=20px}}'s {{mvsub|Bowser|SSBB|down aerial}} (looping hits). | ||
*{{SSBB| | *{{CharHead|Captain Falcon|SSBB|hsize=20px}}'s {{mvsub|Captain Falcon|SSBB|neutral aerial}} and {{mvsub|Captain Falcon|SSBB|up smash}} (first hit of both). | ||
*{{SSBB| | *{{CharHead|Charizard|SSBB|hsize=20px}}'s {{mvsub|Charizard|SSBB|forward smash}} (first hit) and {{mvsub|Charizard|SSBB|up smash}} (first hit). | ||
*{{SSBB| | *{{CharHead|Diddy Kong|SSBB|hsize=20px}}'s {{mvsub|Diddy Kong|SSBB|dash attack}} (second hit), {{mvsub|Diddy Kong|SSBB|forward smash}} (first hit) and {{mvsub|Diddy Kong|SSBB|up smash}} (first two hits). | ||
*{{SSBB| | *{{CharHead|Falco|SSBB|hsize=20px}}'s {{mvsub|Falco|SSBB|up tilt}} (first hit), {{mvsub|Falco|SSBB|neutral aerial}} (all but final hit) and [[Falco (SSBB)/Neutral special|Blaster]]. | ||
*{{SSBB|Wolf}}'s neutral aerial (3rd hit | *{{CharHead|Fox|SSBB|hsize=20px}}'s {{mvsub|Fox|SSBB|up aerial}} (first hit). | ||
*{{SSBB| | *{{CharHead|Ganondorf|SSBB|hsize=20px}}'s {{mvsub|Ganondorf|SSBB|down smash}} (first hit). | ||
*{{CharHead|Ivysaur|SSBB|hsize=20px}}'s {{mvsub|Ivysaur|SSBB|down tilt}} (first hit) and {{mvsub|Ivysaur|SSBB|neutral aerial}} (all but final hit). | |||
*{{CharHead|King Dedede|SSBB|hsize=20px}}'s {{mvsub|King Dedede|SSBB|up aerial}}, {{mvsub|King Dedede|SSBB|down aerial}} (excluding their respective final hits) and {{mvsub|King Dedede|SSBB|down throw}}. | |||
*{{CharHead|Kirby|SSBB|hsize=20px}}'s {{mvsub|Kirby|SSBB|down aerial}} (landing hitbox), [[Final Cutter]] (up and down strokes) and {{mvsub|Kirby|SSBB|down throw}} (first nine kicks). | |||
*{{CharHead|Link|SSBB|hsize=20px}}'s {{mvsub|Link|SSBB|up smash}} (first two hits) and {{mvsub|Link|SSBB|back aerial}} (first hit). | |||
*{{CharHead|Lucas|SSBB|hsize=20px}}'s {{mvsub|Lucas|SSBB|up tilt}} (launcher), {{mvsub|Lucas|SSBB|up smash}} (launcher) and {{mvsub|Lucas|SSBB|down aerial}} (hitbox ID 1 only, first three hits). | |||
*{{CharHead|Luigi|SSBB|hsize=20px}}'s down angled {{mvsub|Luigi|SSBB|forward tilt}}, {{mvsub|Luigi|SSBB|down taunt}} and sourspotted [[Luigi (SSBB)/Up special|Super Jump Punch]]. | |||
*{{CharHead|Mario|SSBB|hsize=20px}}'s [[Mario (SSBB)/Down aerial|Mario Tornado]] and [[Mario (SSBB)/Up special|Super Jump Punch]] (excluding their respective final hits). | |||
*{{CharHead|Marth|SSBB|hsize=20px}}'s {{mvsub|Marth|SSBB|up smash}} (launcher). | |||
*{{CharHead|Meta Knight|SSBB|hsize=20px}}'s {{mvsub|Meta Knight|SSBB|up smash}}, {{mvsub|Meta Knight|SSBB|forward aerial}}, {{mvsub|Meta Knight|SSBB|back aerial}}, [[Meta Knight (SSBB)/Neutral special|Mach Tornado]] (excluding their respective final hits) and {{mvsub|Meta Knight|SSBB|down throw}} (first nine kicks). | |||
*{{CharHead|Mr. Game & Watch|SSBB|hsize=20px}}'s {{mvsub|Mr. Game & Watch|SSBB|neutral aerial}} (all but final hit) and [[Judge]] #8. | |||
*{{CharHead|Ness|SSBB|hsize=20px}}'s {{mvsub|Ness|SSBB|dash attack}} (first two hits), {{mvsub|Ness|SSBB|up smash}} (charging hitbox) and {{mvsub|Ness|SSBB|down smash}} (charging hitbox). | |||
*{{CharHead|Pikachu|SSBB|hsize=20px}}'s {{mvsub|Pikachu|SSBB|back aerial}} (looping hits). | |||
*{{CharHead|R.O.B.|SSBB|hsize=20px}}'s {{mvsub|R.O.B.|SSBB|up tilt}} (launcher). | |||
*{{CharHead|Samus|SSBB|hsize=20px}}'s {{mvsub|Samus|SSBM|up aerial}} (all but final hit). | |||
*{{CharHead|Sheik|SSBB|hsize=20px}}'s {{mvsub|Sheik|SSBU|up tilt}} (first hit) and {{mvsub|Sheik|SSBU|forward smash}} (first hit). | |||
*{{CharHead|Snake|SSBB|hsize=20px}}'s {{mvsub|Snake|SSBB|forward tilt}} (first hit), {{mvsub|Snake|SSBB|up smash}} (launcher), {{mvsub|Snake|SSBB|neutral aerial}} and {{mvsub|Snake|SSBB|down aerial}} (excluding their respective final hits). | |||
*{{CharHead|Squirtle|SSBB|hsize=20px}}'s {{mvsub|Squirtle|SSBB|down tilt}}, {{mvsub|Squirtle|SSBB|up smash}} (launcher) and {{mvsub|Squirtle|SSBB|down aerial}} (excluding their respective final hits). | |||
*{{CharHead|Toon Link|SSBB|hsize=20px}}'s {{mvsub|Toon Link|SSBB|forward smash}} (first hit). | |||
*{{CharHead|Wario|SSBB|hsize=20px}}'s {{mvsub|Wario|SSBB|down aerial}} (looping hits). | |||
*{{CharHead|Wolf|SSBB|hsize=20px}}'s {{mvsub|Wolf|SSBB|neutral aerial}} (3rd hit onward) and {{b|Reflector|Wolf}}. | |||
*{{CharHead|Zelda|SSBB|hsize=20px}}'s {{mvsub|Zelda|SSBB|neutral attack}}, {{mvsub|Zelda|SSBB|forward smash}}, {{mvsub|Zelda|SSBB|up smash}}, {{mvsub|Zelda|SSBB|neutral aerial}} (excluding their respective final hits) and {{mvsub|Zelda|SSBB|down throw}} (flames). | |||
*{{CharHead|Zero Suit Samus|SSBB|hsize=20px}}'s {{mvsub|Zero Suit Samus|SSBB|up smash}} (launcher). | |||
====''[[Super Smash Bros. 4]]''==== | ====''[[Super Smash Bros. 4]]''==== | ||
*Many | *Many neutral attacks, such as {{SSB4|Mario}}'s, have set knockback for all but their last hit. | ||
*{{SSB4|Bayonetta}}'s late After Burner Kick ( | *All windboxes, except for {{SSB4|Mr. Game & Watch}}'s {{mvsub|Mr. Game & Watch|SSB4|down tilt}}, {{SSB4|Ike}}'s [[Tempest]], and {{SSB4|Greninja}}'s {{mvsub|Greninja|SSB4|up special}} and down taunt. | ||
*{{ | *{{CharHead|Bayonetta|SSB4|hsize=20px}}'s [[Bayonetta (SSBU)/Neutral attack/Infinite|neutral attack infinite]] (rapid jab and first hit of finisher), {{mvsub|Bayonetta|SSB4|up tilt}} (early launcher), {{mvsub|Bayonetta|SSB4|down smash}} (Bayonetta's foot) and late [[After Burner Kick]]. | ||
*{{ | *{{CharHead|Bowser|SSB4|hsize=20px}}'s {{mvsub|Bowser|SSB4|down smash}} (first hit), [[Bowser (SSB4)/Up special|Whirling Fortress]] (ground, all but final hit) and [[Bowser (SSB4)/Down special|Bowser Bomb]] (scooping hitbox). | ||
*{{SSB4|Diddy Kong}}'s {{b|Banana Peel|move}}. | *{{CharHead|Bowser Jr.|SSB4|hsize=20px}}'s [[Mechakoopa]] (first hit). | ||
*{{SSB4|Falco}}'s Blaster. | *{{CharHead|Captain Falcon|SSB4|hsize=20px}}'s {{mvsub|Captain Falcon|SSBM|up smash}} and {{mvsub|Captain Falcon|SSB4|neutral aerial}} (first hit of both). | ||
*{{SSB4| | *{{CharHead|Charizard|SSB4|hsize=20px}}'s {{mvsub|Charizard|SSB4|up smash}} (first hit) and [[Charizard (SSB4)/Up special|Fly]] (launcher and looping hits). | ||
*{{SSB4|Kirby}}'s Final Cutter (up and down slices). | *{{CharHead|Cloud|SSB4|hsize=20px}}'s {{mvsub|Cloud|SSB4|forward smash}} (first two hits) and {{mvsub|Cloud|SSB4|down smash}} (first hit). | ||
*{{SSB4|Little Mac}}'s neutral aerial. | *{{CharHead|Diddy Kong|SSB4|hsize=20px}}'s {{mvsub|Diddy Kong|SSB4|dash attack}}, {{mvsub|Diddy Kong|SSB4|forward smash}}, {{mvsub|Diddy Kong|SSB4|up smash}} (excluding their respective final hits) and {{b|Banana Peel|move}}. | ||
*{{SSB4|Luigi}}'s down taunt and sourspotted Super Jump Punch. | *{{CharHead|Dr. Mario|SSB4|hsize=20px}}'s [[Dr. Mario (SSB4)/Down special|Dr. Tornado]] (looping hits). | ||
*{{SSB4| | *{{CharHead|Falco|SSB4|hsize=20px}}'s {{mvsub|Falco|SSB4|up tilt}} (first hit), {{mvsub|Falco|SSB4|neutral aerial}}, {{mvsub|Falco|SSB4|forward aerial}} (excluding their respective final hits) and [[Falco (SSB4)/Neutral special|Blaster]]. | ||
*{{SSB4|Mr. Game & Watch}}'s Judge #8. | *{{CharHead|Fox|SSB4|hsize=20px}}'s {{mvsub|Fox|SSB4|up aerial}} (first hit) and {{mvsub|Fox|SSB4|down aerial}} (excluding final hit). | ||
*{{SSB4|Pac-Man}}'s down aerial (first three hits). | *{{CharHead|Ganondorf|SSB4|hsize=20px}}'s {{mvsub|Ganondorf|SSB4|down smash}} (first hit). | ||
*{{SSB4|Ryu}}'s down tilt ( | *{{CharHead|Ike|SSB4|hsize=20px}}'s [[Ike (SSB4)/Up special|Aether]] (first and second hits). | ||
*{{SSB4|Sheik}}'s [[Vanish]] (reappearance hit). | *{{CharHead|King Dedede|SSB4|hsize=20px}}'s {{mvsub|King Dedede|SSB4|forward tilt}} and {{mvsub|King Dedede|SSB4|up aerial}} (excluding their respective final hits). | ||
*{{SSB4| | *{{CharHead|Kirby|SSB4|hsize=20px}}'s {{mvsub|Kirby|SSB4|down aerial}} (landing hitbox), [[Final Cutter]] (up and down slices) and {{mvsub|Kirby|SSB4|down throw}} (all kicks). | ||
*{{SSB4|Wario}}'s late [[dash attack]]. | *{{CharHead|Link|SSB4|hsize=20px}}'s {{mvsub|Link|SSB4|up smash}} (first two hits), {{mvsub|Link|SSB4|back aerial}} (first hit) and [[Link (SSB4)/Up special|Spin Attack]] (air, all but final hit). | ||
*{{SSB4|Zero Suit Samus}}'s [[Paralyzer]]. | *{{CharHead|Little Mac|SSB4|hsize=20px}}'s {{mvsub|Little Mac|SSB4|forward tilt}} (first hit), {{mvsub|Little Mac|SSB4|neutral aerial}} and {{mvsub|Little Mac|SSB4|up special}} (launcher). | ||
*{{CharHead|Lucas|SSB4|hsize=20px}}'s {{mvsub|Lucas|SSB4|up tilt}} (launcher), {{mvsub|Lucas|SSB4|up smash}} (launcher) and {{mvsub|Lucas|SSBB|down aerial}} (hitbox ID 1 only, first three hits). | |||
*{{CharHead|Luigi|SSB4|hsize=20px}}'s {{mvsub|Luigi|SSB4|down taunt}} and sourspotted [[Luigi (SSB4)/Up special|Super Jump Punch]]. | |||
*{{CharHead|Mario|SSB4|hsize=20px}}'s [[Mario (SSB4)/Down aerial|Mario Tornado]] and [[Mario (SSB4)/Up special|Super Jump Punch]] (first five hits for both). | |||
*{{CharHead|Marth|SSB4|hsize=20px}}'s {{mvsub|Marth|SSB4|up smash}} (launcher). | |||
*{{CharHead|Meta Knight|SSB4|hsize=20px}}'s {{mvsub|Meta Knight|SSB4|up smash}}, {{mvsub|Meta Knight|SSB4|forward aerial}}, {{mvsub|Meta Knight|SSB4|back aerial}} (against an aerial oponent) (excluding their respective final hits), [[Meta Knight (SSB4)/Side special|Drill Rush]] (first multihit) and {{mvsub|Meta Knight|SSB4|down throw}} (first nine kicks). | |||
*{{CharHead|Mewtwo|SSB4|hsize=20px}}'s {{mvsub|Mewtwo|SSB4|up smash}} and {{mvsub|Mewtwo|SSB4|neutral aerial}} (excluding their respective final hits). | |||
*{{CharHead|Mr. Game & Watch|SSB4|hsize=20px}}'s {{mvsub|Mr. Game & Watch|SSB4|neutral aerial}} (all but final hit), {{mvsub|Mr. Game & Watch|SSB4|back aerial}} (hitbox ID 1 only, looping hits) and [[Mr. Game & Watch (SSB4)/Side special|Judge]] #8. | |||
*{{CharHead|Ness|SSB4|hsize=20px}}'s {{mvsub|Ness|SSB4|dash attack}} (first two hits) and {{mvsub|Ness|SSB4|down smash}} (first, third and fourth hits). | |||
*{{CharHead|Pac-Man|SSB4|hsize=20px}}'s {{mvsub|Pac-Man|SSB4|down aerial}} (first three hits). | |||
*{{CharHead|Peach|SSB4|hsize=20px}}'s {{mvsub|Peach|SSB4|dash attack}} (first hit), {{mvsub|Peach|SSB4|down smash}} (looping hits), [[Peach (SSB4)/Neutral special|Toad]] (all but first and final hits) and [[Peach (SSB4)/Up special|Peach Parasol]] (launcher and multihits). | |||
*{{CharHead|Pikachu|SSB4|hsize=20px}}'s {{mvsub|Pikachu|SSB4|forward aerial}} and {{mvsub|Pikachu|SSB4|back aerial}} (both moves' looping hits). | |||
*{{CharHead|R.O.B.|SSB4|hsize=20px}}'s {{mvsub|R.O.B.|SSB4|up tilt}} (launcher) and {{mvsub|R.O.B.|SSB4|up smash}} (launcher). | |||
*{{CharHead|Ryu|SSB4|hsize=20px}}'s held {{mvsub|Ryu|SSB4|forward tilt}} (first hit), tapped {{mvsub|Ryu|SSB4|down tilt}} and {{mvsub|Ryu|SSB4|up aerial}} (first hit). | |||
*{{CharHead|Samus|SSB4|hsize=20px}}'s {{mvsub|Samus|SSB4|up smash}}, {{mvsub|Samus|SSB4|forward aerial}}, {{mvsub|Samus|SSBM|up aerial}}, [[Samus (SSB4)/Up special|Screw Attack]] (ground) and [[Samus (SSB4)/Up special/Custom 1|Screw Rush]] (excluding their respective final hits). | |||
*{{CharHead|Sheik|SSB4|hsize=20px}}'s {{mvsub|Sheik|SSB4|up tilt}} (first hit), {{mvsub|Sheik|SSB4|forward smash}} (first hit) and [[Sheik (SSB4)/Up special|Vanish]] (reappearance hit). | |||
*{{CharHead|Shulk|SSB4|hsize=20px}}'s [[Shulk (SSB4)/Up special|Air Slash]] (first hit), along with the first hits of {{mvsub|Shulk|SSB4|forward smash}}, {{mvsub|Shulk|SSB4|up smash}}, {{mvsub|Shulk|SSB4|up aerial}}, and {{mvsub|Shulk|SSB4|down aerial}}. | |||
*{{CharHead|Toon Link|SSB4|hsize=20px}}'s [[Toon Link (SSB4)/Up special|Spin Attack]] (ground: looping hits; air: first three hits). | |||
*{{CharHead|Wario|SSB4|hsize=20px}}'s late {{mvsub|Wario|SSB4|dash attack}}, {{mvsub|Wario|SSB4|down aerial}} (looping hits), [[Wario (SSB4)/Neutral special|Chomp]] (biting hitbox) and [[Wario (SSB4)/Up special|Corkscrew]] (all but final hit). | |||
*{{CharHead|Yoshi|SSB4|hsize=20px}}'s [[Yoshi (SSB4)/Down special|Yoshi Bomb]] (launcher). | |||
*{{CharHead|Zelda|SSB4|hsize=20px}}'s {{mvsub|Zelda|SSB4|neutral attack}}, {{mvsub|Zelda|SSB4|forward smash}}, {{mvsub|Zelda|SSB4|up smash}}, {{mvsub|Zelda|SSB4|neutral aerial}} (excluding their respective final hits) and {{mvsub|Zelda|SSB4|down throw}} (flames). | |||
*{{CharHead|Zero Suit Samus|SSB4|hsize=20px}}'s {{mvsub|Zero Suit Samus|SSB4|up smash}} (launcher), [[Zero Suit Samus (SSB4)/Neutral special|Paralyzer]] and [[Zero Suit Samus (SSB4)/Up special|Boost Kick]] (all but final hit). | |||
====''[[Super Smash Bros. Ultimate]]''==== | |||
*{{CharHead|Bowser|SSBU|hsize=20px}}'s {{mvsub|Bowser|SSBU|down tilt}} (first hit), [[Bowser (SSBU)/Up special|Whirling Fortress]] (ground, all but final hit) and [[Bowser (SSBU)/Down special|Bowser Bomb]] (scooping hitbox). | |||
*{{CharHead|Banjo & Kazooie|SSBU|hsize=20px}}'s {{mvsub|Banjo & Kazooie|SSBU|up smash}} (scoop, and multihits), {{mvsub|Banjo & Kazooie|SSBU|neutral aerial}} (hits 1-7), {{mvsub|Banjo & Kazooie|SSBU|back aerial}} (hits 1-2) and {{mvsub|Banjo & Kazooie|SSBU|pummel}}. | |||
*{{CharHead|Bayonetta|SSBU|hsize=20px}}'s [[Bayonetta (SSBU)/Neutral attack/Infinite|neutral attack infinite]] (first hit of finisher), {{mvsub|Bayonetta|SSBU|up tilt}} (early launcher), {{mvsub|Bayonetta|SSBU|down smash}} (Bayonetta's foot), sweetspotted {{mvsub|Bayonetta|SSBU|down aerial}} (only against a grounded opponent), late [[Bayonetta (SSBU)/Side special#After Burner Kick (Up)|After Burner Kick]] (up) and [[Bayonetta (SSBU)/Up special|Witch Twist]] (launcher and multihits). | |||
*{{CharHead|Byleth|SSBU|hsize=20px}}'s {{mvsub|Byleth|SSBU|neutral aerial}}, {{mvsub|Byleth|SSBU|up aerial}} (excluding their respective final hits) and [[Byleth (SSBU)/Up special|Sword of the Creator]] (launcher). | |||
*{{CharHead|Captain Falcon|SSBU|hsize=20px}}'s {{mvsub|Captain Falcon|SSBU|up smash}} (first hit). | |||
*{{CharHead|Charizard|SSBU|hsize=20px}}'s {{mvsub|Charizard|SSBU|up smash}} (some of first hit) and [[Charizard (SSBU)/Up special|Fly]] (launcher and looping hits). | |||
*{{CharHead|Chrom|SSBU|hsize=20px}}'s {{mvsub|Chrom|SSBU|up smash}} (multihits) and [[Chrom (SSBU)/Up special|Soaring Slash]] (excluding the landing hitbox). | |||
*{{CharHead|Cloud|SSBU|hsize=20px}}'s {{mvsub|Cloud|SSBU|forward smash}} (first two hits) and {{mvsub|Cloud|SSBU|down smash}} (first hit). | |||
*{{CharHead|Diddy Kong|SSBU|hsize=20px}}'s {{mvsub|Diddy Kong|SSBU|dash attack}}, {{mvsub|Diddy Kong|SSBU|forward smash}} and {{mvsub|Diddy Kong|SSBU|up smash}} (excluding their respective final hits). | |||
*{{CharHead|Dr. Mario|SSBU|hsize=20px}}'s [[Dr. Mario (SSBU)/Down special|Dr. Tornado]] (looping hits). | |||
*{{CharHead|Falco|SSBU|hsize=20px}}'s {{mvsub|Falco|SSBU|up tilt}} (first hit), {{mvsub|Falco|SSBU|neutral aerial}}, {{mvsub|Falco|SSBU|forward aerial}} (excluding their respective final hits), [[Falco (SSBU)/Neutral special|Blaster]] and [[Falco (SSBU)/Up special|Fire Bird]] (hits 1-8). | |||
*{{CharHead|Ganondorf|SSBU|hsize=20px}}'s {{mvsub|Ganondorf|SSBU|down smash}} (first hit). | |||
*{{CharHead|Incineroar|SSBU|hsize=20px}}'s [[Incineroar (SSBU)/Side special|Alolan Whip]] when failing and [[Incineroar (SSBU)/Down special|Revenge]] when countering an attack. | |||
*{{CharHead|Ivysaur|SSBU|hsize=20px}}'s [[Ivysaur (SSBU)/Neutral special|Bullet Seed]] (clean and late launchers). | |||
*{{CharHead|Joker|SSBU|hsize=20px}}'s [[Joker (SSBU)/Down special|Rebel's Guard]] when releasing. | |||
*{{CharHead|Ken|SSBU|hsize=20px}}'s tapped {{mvsub|Ken|SSBU|forward tilt}} (close) and tapped {{mvsub|Ken|SSBU|down tilt}}. | |||
*{{CharHead|King Dedede|SSBU|hsize=20px}}'s {{mvsub|King Dedede|SSBU|forward tilt}} and {{mvsub|King Dedede|SSBU|up aerial}} (excluding their respective final hits). | |||
*{{CharHead|Kirby|SSBU|hsize=20px}}'s {{mvsub|Kirby|SSBU|down aerial}} (landing hitbox), [[Final Cutter]] (up and down slashes) and {{mvsub|Kirby|SSB4|down throw}} (first nine kicks). | |||
*{{CharHead|Link|SSBU|hsize=20px}}'s {{mvsub|Link|SSBU|up smash}} (first two hits), {{mvsub|Link|SSBU|back aerial}} (first hit) and [[Link (SSBU)/Up special|Spin Attack]] (air, all but final hit). | |||
*{{CharHead|Little Mac|SSBU|hsize=20px}}'s {{mvsub|Little Mac|SSBU|forward tilt}} (first hit), {{mvsub|Little Mac|SSBU|neutral aerial}} and {{mvsub|Little Mac|SSBU|up special}} (launcher). | |||
*{{CharHead|Lucas|SSBU|hsize=20px}}'s {{mvsub|Lucas|SSBU|up tilt}} (launcher), {{mvsub|Lucas|SSBU|up smash}} (launcher), {{mvsub|Lucas|SSBB|down aerial}} (hitbox ID 1 only, first three hits) and [[Lucas (SSBU)/Up special|PK Thunder 2]] (looping hits). | |||
*{{CharHead|Luigi|SSBU|hsize=20px}}'s [[Luigi (SSBU)/Down special|Luigi Cyclone]] (windbox), {{mvsub|Luigi|SSBU|down taunt}} and {{mvsub|Luigi|SSBU|pummel}}. | |||
*{{CharHead|Mario|SSBU|hsize=20px}}'s [[Mario (SSBU)/Down special|F.L.U.D.D.]], {{mvsub|Mario|SSBU|down aerial}} (landing), [[Mario (SSBU)/Side special|Cape]], [[Mario (SSBU)/Up special|Super Jump Punch]] (hits 1-6) and {{mvsub|Mario|SSBU|pummel}}. | |||
*{{CharHead|Marth|SSBU|hsize=20px}}'s {{mvsub|Marth|SSBU|up smash}} (launcher). | |||
*{{CharHead|Meta Knight|SSBU|hsize=20px}}'s {{mvsub|Meta Knight|SSBU|up smash}}, {{mvsub|Meta Knight|SSBU|forward aerial}}, {{mvsub|Meta Knight|SSBU|back aerial}} (excluding their respective final hits), [[Meta Knight (SSBU)/Side special|Drill Rush]] (multihits), [[Meta Knight (SSBU)/Up special|Shuttle Loop]] (first hit) and {{mvsub|Meta Knight|SSBU|down throw}} (first nine kicks). | |||
*{{CharHead|Mewtwo|SSBU|hsize=20px}}'s {{mvsub|Mewtwo|SSBU|up smash}} and {{mvsub|Mewtwo|SSBU|neutral aerial}} (excluding their respective final hits). | |||
*{{CharHead|Mr. Game & Watch|SSBU|hsize=20px}}'s {{mvsub|Mr. Game & Watch|SSBU|neutral aerial}} (all but final hit) and [[Mr. Game & Watch (SSBU)/Side special|Judge]] #8. | |||
*{{CharHead|Ness|SSBU|hsize=20px}}'s {{mvsub|Ness|SSBU|dash attack}} (first two hits), {{mvsub|Ness|SSBU|up smash}} (charging hitbox), {{mvsub|Ness|SSBU|down smash}} (charge, first back hit and first front hit), {{mvsub|Ness|SSBU|up aerial}} (multihits) and [[Ness (SSBU)/Down special|PSI Magnet]]. | |||
*{{CharHead|Peach|SSBU|hsize=20px}}'s {{mvsub|Peach|SSBU|dash attack}} (first hit), {{mvsub|Peach|SSBU|down smash}} (looping hits) and [[Peach (SSBU)/Up special|Peach Parasol]] (launcher and multihits). | |||
*{{CharHead|Pichu|SSBU|hsize=20px}}'s {{mvsub|Pichu|SSBU|forward aerial}} and {{mvsub|Pichu|SSBU|back aerial}} (both moves' looping hits). | |||
*{{CharHead|Pikachu|SSBU|hsize=20px}}'s {{mvsub|Pikachu|SSBU|forward aerial}} and {{mvsub|Pikachu|SSBU|back aerial}} (both moves' looping hits). | |||
*{{CharHead|R.O.B.|SSBU|hsize=20px}}'s {{mvsub|R.O.B.|SSBU|up tilt}} (launcher) and {{mvsub|R.O.B.|SSBU|up smash}} (launcher) and [[R.O.B. (SSBU)/Side special|Arm Rotor]] (all but final hit). | |||
*{{CharHead|Roy|SSBU|hsize=20px}}'s {{mvsub|Roy|SSBM|up smash}} and [[Roy (SSBU)/Up special|Blazer]] (excluding their respective final hits). | |||
*{{CharHead|Ryu|SSBU|hsize=20px}}'s tapped {{mvsub|Ryu|SSBU|forward tilt}} (close), held forward tilt (first hit), tapped {{mvsub|Ryu|SSBU|down tilt}} and {{mvsub|Ryu|SSBU|up aerial}} (first hit). | |||
*{{CharHead|Samus|SSBU|hsize=20px}}'s {{mvsub|Samus|SSBU|up smash}}, {{mvsub|Samus|SSBU|forward aerial}}, {{mvsub|Samus|SSBU|up aerial}} and [[Samus (SSBU)/Up special|Screw Attack]] (excluding their respective final hits). | |||
*{{CharHead|Sheik|SSBU|hsize=20px}}'s {{mvsub|Sheik|SSBU|up tilt}} (first hit), {{mvsub|Sheik|SSBU|forward smash}} (first hit) and [[Sheik (SSBU)/Up special|Vanish]] (reappearance hit). | |||
*{{CharHead|Snake|SSBU|hsize=20px}}'s {{mvsub|Snake|SSBU|up smash}} (launcher), {{mvsub|Snake|SSBU|neutral aerial}} and {{mvsub|Snake|SSBU|down aerial}} (excluding their respective final hits). | |||
*{{CharHead|Squirtle|SSBU|hsize=20px}}'s {{mvsub|Squirtle|SSBU|up smash}} (launcher), {{mvsub|Squirtle|SSBU|down aerial}} and [[Squirtle (SSBU)/Up special|Waterfall]] (excluding their respective final hits). | |||
*{{CharHead|Toon Link|SSBU|hsize=20px}}'s [[Link (SSBU)/Up special|Spin Attack]] (ground and air, all but final hit). | |||
*{{CharHead|Wario|SSBU|hsize=20px}}'s {{mvsub|Wario|SSBU|down aerial}} (looping hits), [[Wario (SSBU)/Neutral special|Chomp]] (biting hitbox) and [[Wario (SSBU)/Up special|Corkscrew]] (all but final hit). | |||
*{{CharHead|Yoshi|SSBU|hsize=20px}}'s [[Yoshi (SSBU)/Down special|Yoshi Bomb]] (launcher). | |||
*{{CharHead|Young Link|SSBU|hsize=20px}}'s {{mvsub|Young Link|SSBU|up smash}} (first two hits), {{mvsub|Young Link|SSBU|back aerial}} (first hit) and [[Link (SSBU)/Up special|Spin Attack]] (ground and air, all but final hit). | |||
*{{CharHead|Zelda|SSBU|hsize=20px}}'s {{mvsub|Zelda|SSBU|forward smash}}, {{mvsub|Zelda|SSBU|up smash}} (excluding their respective final hits) and {{mvsub|Zelda|SSBU|down throw}} (flames). | |||
*{{CharHead|Zero Suit Samus|SSBU|hsize=20px}}'s {{mvsub|Zero Suit Samus|SSBU|up smash}} (launcher), [[Zero Suit Samus (SSBU)/Neutral special|Paralyzer]] and [[Zero Suit Samus (SSBU)/Up special|Boost Kick]] (all but final hit). | |||
==No knockback== | ==No knockback== | ||
From ''Melee'' onward, there are certain attacks that deal zero knockback, causing damage as usual but not [[flinch]]ing, meaning that the hit character can still perform any actions while being attacked. Most attacks with no knockback can rack up damage quickly, as they can hit foes repeatedly without launching them away from their range | From ''Melee'' onward, there are certain attacks that deal zero knockback, causing damage as usual but not [[flinch]]ing, meaning that the hit character can still perform any actions while being attacked. Most attacks with no knockback can rack up damage quickly, as they can hit foes repeatedly without launching them away from their range. These moves can also be used to "steal" [[KO]]s from opponents in [[free for all]] battles, as while they do not cause knockback, they will take ownership of the KO on an already fatally struck opponent. Fox's [[Blaster]] is the most well known example of an attack with no knockback. Due to the fact that it does not deal knockback, it will not interrupt an opponent's moves or force them out of a [[punish]]able state such as being [[asleep]] or being stuck in the ending [[lag]] of a missed [[Rest]]. [[Idle pose|Idle]] characters in ''Brawl'' and ''SSB4'' will also turn around if they are repeatedly struck with moves that deal no knockback, which is noticeable with {{SSB4|Fox}}'s Blaster. | ||
In ''Melee'', [[phantom hit]]s damage foes, but without any knockback. It is also possible for any character to receive no knockback from attacks by certain factors, such as by being [[giant]] and [[metal]] simultaneously on a low | In ''Melee'', [[phantom hit]]s usually damage foes, but without any knockback. It is also possible for any character to receive no knockback from attacks by certain factors, such as by being [[giant]] and [[metal]] simultaneously on a low launch rate battle, and as mentioned above, armor will prevent characters from taking knockback while active. | ||
===List of moves with no knockback=== | ===List of moves with no knockback=== | ||
*Fox's Blaster shots in both his neutral special and [[throw]]s (except his [[forward throw]]). | *{{CharHead|Fox|SSBU|hsize=20px}}'s {{b|Blaster|Fox}} shots in both his neutral special and [[throw]]s (except his [[forward throw]]) in ''Melee'' onward. | ||
*{{CharHead|Mario|SSBM|hsize=20px}}'s [[Mario (SSBM)/Down special|Mario Tornado]] in ''Melee'' (hit 1). | |||
*{{CharHead|Dr. Mario|SSBM|hsize=20px}}'s [[Dr. Mario (SSBM)/Down special|Dr. Tornado]] in ''Melee'' (hit 1). | |||
*{{CharHead|Charizard|SSBB|hsize=20px}}'s {{mvsub|Charizard|SSBB|forward aerial}} (furthest hitboxes) in ''Brawl''. | |||
*{{CharHead|Snake|SSBU|hsize=20px}}'s [[Hand Grenade]]s (when striking the opponent without exploding) in all games. | |||
*{{CharHead|Olimar|SSBB|hsize=20px}}'s antenna during his {{mvsub|Olimar|SSBB|neutral attack}} and {{mvsub|Olimar|SSBB|down tilt}} in ''Brawl''. | |||
*{{CharHead|Mr. Game & Watch|SSB4|hsize=20px}}'s [[Short-Order Chef]] (some types of food) in ''SSB4''. | |||
*{{CharHead|Mr. Game & Watch|SSBU|hsize=20px}}'s [[Judge]] #1 in all games. | |||
*{{CharHead|Falco|SSB4|hsize=20px}}'s [[Burst Blaster]] in ''SSB4''. | |||
*{{CharHead|Olimar|SSBU|hsize=20px}}'s [[Pikmin Toss]] (except for Purple Pikmin) in all games. | |||
*{{CharHead|Mario|SSBU|hsize=20px}}'s [[Cape]] in all games. While it has knockback programmed, the [[reverse]] effect overrides this, and instead adds a fixed amount of momentum to opponents. Will deal knockback to opponents hanging on the ledge in ''Ultimate'', and puts opponents on the ledge into hitstun in ''Melee''. | |||
*{{CharHead|Dr. Mario|SSBU|hsize=20px}}'s [[Super Sheet]] in all games. While it has knockback programmed, the [[reverse]] effect overrides this, and instead adds a fixed amount of momentum to opponents. Will deal knockback to opponents hanging on the ledge in ''Ultimate'', and puts opponents on the ledge into hitstun in ''Melee''. | |||
*{{CharHead|Bayonetta|SSBU|hsize=20px}}'s [[Bullet Arts]] (at a distance from Bayonetta) in all games. | |||
*{{CharHead|Piranha Plant|SSBU|hsize=20px}}'s [[Poison Breath]] in ''Ultimate''. | |||
*{{CharHead|Joker|SSBU|hsize=20px}}'s [[Gun]] (at a distance from Joker) in ''Ultimate''. | |||
*[[Togepi]]'s Leech Seed. | *[[Togepi]]'s Leech Seed. | ||
*The [[flower]] | *The [[flower]], [[poison]] and [[curse]] statuses. | ||
*The "crush" of {{SSBM|Master Hand}} and {{SSBM|Crazy Hand}} during their grab attacks in ''Melee''. | |||
*{{ | |||
*[[Amaranthine gas]] in [[The Subspace Emissary]]. | *[[Amaranthine gas]] in [[The Subspace Emissary]]. | ||
*Some consecutive-hitting attacks used by bosses (such as [[Rayquaza]]'s Thunder) | *Some consecutive-hitting attacks used by bosses (such as [[Rayquaza]]'s Thunder). | ||
==Weight independent knockback== | ==Weight-independent knockback== | ||
Introduced in version 1.1.0 of ''SSB4'', certain moves are coded to ignore the target's weight when inflicting knockback, instead using a set value of the default 100. As a result, they are much more consistent across the cast when used as set-up hits and similar. | |||
===List of moves with weight-independent knockback=== | |||
====''[[Super Smash Bros. 4]]''==== | |||
*{{CharHead|Bayonetta|SSB4|hsize=20px}}'s {{mvsub|Bayonetta|SSB4|neutral attack}} (all except infinite finisher), {{mvsub|Bayonetta|SSB4|forward tilt}} (hits 1-2), {{mvsub|Bayonetta|SSB4|forward aerial}} (hits 1-2), {{mvsub|Bayonetta|SSB4|down aerial}} (clean), [[Heel Slide]] (ground dash and last hit, air dash) and [[Witch Twist]]. | |||
*{{CharHead|Charizard|SSB4|hsize=20px}}'s {{mvsub|Charizard|SSB4|up smash}} (hit 1 clean). | |||
*{{CharHead|Cloud|SSB4|hsize=20px}}'s [[Cloud (SSB4)/Neutral attack/Hit 2|neutral attack]] (hit 2), {{mvsub|Cloud|SSB4|forward smash}} (hits 1-2), {{mvsub|Cloud|SSB4|down smash}} (hit 1), [[Cross Slash]] (hits 1-4) and [[Climhazzard]] (most of non-Limit hit 2). | |||
*{{CharHead|Corrin|SSB4|hsize=20px}}'s [[Corrin (SSB4)/Neutral attack/Hit 2|neutral attack]] (hit 2) and [[Draconic Ascent]] (loop hits). | |||
*{{CharHead|Dark Pit|SSB4|hsize=20px}}'s {{mvsub|Dark Pit|SSB4|neutral attack}} (infinite loop). | |||
*{{CharHead|Diddy Kong|SSB4|hsize=20px}}'s {{mvsub|Diddy Kong|SSB4|up smash}} (hit 1). | |||
*{{CharHead|Falco|SSB4|hsize=20px}}'s {{mvsub|Falco|SSB4|up smash}} (hit 1 clean). | |||
*{{CharHead|Ganondorf|SSB4|hsize=20px}}'s {{mvsub|Ganondorf|SSB4|neutral aerial}} (hit 1 clean (hitbox ID value 2 only)). | |||
*{{CharHead|Kirby|SSB4|hsize=20px}}'s {{mvsub|Kirby|SSB4|forward aerial}} (hits 1-2) and [[Hammer Bash]] (air hit 1). | |||
*{{CharHead|Link|SSB4|hsize=20px}}'s [[Link (SSB4)/Up special|Spin Attack]] (air all but last hit). | |||
*{{CharHead|Lucas|SSB4|hsize=20px}}'s {{mvsub|Lucas|SSB4|down tilt}}. | |||
*{{CharHead|Lucina|SSB4|hsize=20px}}'s {{mvsub|Lucina|SSB4|neutral aerial}} (hit 1) and [[Dancing Blade]] (hit 2 down, hit 3 down). | |||
*{{CharHead|Marth|SSB4|hsize=20px}}'s {{mvsub|Marth|SSB4|neutral aerial}} (hit 1) and [[Marth (SSB4)/Side special|Dancing Blade]] (hit 2 down, hit 3 down). | |||
*{{CharHead|Pit|SSB4|hsize=20px}}'s {{mvsub|Pit|SSB4|neutral attack}} (infinite loop). | |||
*{{CharHead|Robin|SSB4|hsize=20px}}'s {{mvsub|Robin|SSB4|neutral attack}} (hits 1-2). | |||
*{{CharHead|Roy|SSB4|hsize=20px}}'s {{mvsub|Roy|SSB4|neutral aerial}} (hit 2). | |||
*{{CharHead|Samus|SSB4|hsize=20px}}'s {{mvsub|Samus|SSB4|forward aerial}} (hits 1-4) and [[Samus (SSB4)/Up special|Screw Attack]] (hits 1-10). | |||
*{{CharHead|Toon Link|SSB4|hsize=20px}}'s [[Toon Link (SSB4)/Forward smash/Hit 1|forward smash]] (hit 1). | |||
*{{CharHead|Yoshi|SSB4|hsize=20px}}'s {{mvsub|Yoshi|SSB4|back aerial}} (hits 1-2). | |||
*{{CharHead|Zero Suit Samus|SSB4|hsize=20px}}'s [[Plasma Whip]] (all but last hit). | |||
A few moves not only treat the opponent's weight as 100, but also temporarily set their [[gravity]] to 0.085 and [[falling speed]] to 1.5, making their knockback even less character-dependant. However, since the gravity and falling speed alterations are temporary, the knockback is still heavily affected by them, and so the vertical KO power of such moves is heavily skewed towards fast-falling characters surviving much longer than heavy ones. | |||
*{{CharHead|Cloud|SSB4|hsize=20px}}'s [[Finishing Touch]] (hitbox on frames 16 and 19-26, but not 17-18 or 27-32) (gravity and fall speed set for 22 frames) | |||
*{{CharHead|Pac-Man|SSB4|hsize=20px}}'s [[Meteor Trampoline]] (clean meteor) (gravity and fall speed set for 5 frames) | |||
====''[[Ultimate]]''==== | |||
In ''Ultimate'', weight independence is now programmable from a standard flag within hitbox scripts, and as such its effect has been homogenised. If active, all fighters are treated as having a weight of 100 when calculating the attack's knockback, and a fall speed of 1.5 and gravity of 0.087 for the first 10 frames of the launch, before reverting back to a fighter's regular fall speed and gravity. Notably, this effect overrides the homogenised fall speed and gravity used by attacks which have an angle between 70˚ and 110˚. | |||
*{{CharHead|Bayonetta|SSBU|hsize=20px}}'s {{mvsub|Bayonetta|SSBU|neutral attack}} (all except for the rapid jab and the second hit of the rapid jab finisher), {{mvsub|Bayonetta|SSBU|forward tilt}} (hits 1-2), {{mvsub|Bayonetta|SSBU|up tilt}} (hit 1), {{mvsub|Bayonetta|SSBU|forward aerial}} (input 1-2), [[Heel Slide]], [[After Burner Kick]] and [[Bayonetta (SSBU)/Up special|Witch Twist]]. | |||
*{{CharHead|Bowser|SSBU|hsize=20px}}'s [[Bowser (SSBU)/Up special|Whirling Fortress]] (ground) and [[Bowser (SSBU)/Down special|Bowser Bomb]] (first hit and spike). | |||
*{{CharHead|Bowser Jr.|SSBU|hsize=20px}}'s {{mvsub|Bowser Jr.|SSBU|down tilt}} (hits 1-2) and [[Bowser Jr. (SSBU)/Up special|Abandon Ship!]] (hits 1-2). | |||
*{{CharHead|Byleth|SSBU|hsize=20px}}'s {{mvsub|Byleth|SSBU|up smash}} (hit 3), {{mvsub|Byleth|SSBU|neutral aerial}} (loop hits/landing hit) and {{mvsub|Byleth|SSBU|up aerial}} (loop hits). | |||
*{{CharHead|Captain Falcon|SSBU|hsize=20px}}'s {{mvsub|Captain Falcon|SSBU|neutral aerial}} (hit 1). | |||
*{{CharHead|Charizard|SSBU|hsize=20px}}'s {{mvsub|Charizard|SSBU|up smash}} (some of hit 1). | |||
*{{CharHead|Chrom|SSBU|hsize=20px}}'s {{mvsub|Chrom|SSBU|up smash}} (loop hits), {{mvsub|Chrom|SSBU|neutral aerial}} (hit 1), [[Chrom (SSBU)/Side special|Double-Edge Dance]] (input 1-3) and [[Chrom (SSBU)/Up special|Soaring Slash]] (hits 1-2). | |||
*{{CharHead|Cloud|SSBU|hsize=20px}}'s {{mvsub|Cloud|SSBU|forward smash}} (hits 1-2), {{mvsub|Cloud|SSBU|down smash}} (hit 1), [[Cross Slash]] (all hits except final) and [[Climhazzard]] (no Limit/some of hit 2). | |||
*{{CharHead|Corrin|SSBU|hsize=20px}}'s {{mvsub|Corrin|SSBU|neutral attack}} (hit 2), {{mvsub|Corrin|SSBU|down aerial}}, [[Dragon Fang Shot]] and [[Corrin (SSBU)/Up special|Draconic Ascent]] (loop hits). | |||
*{{CharHead|Daisy|SSBU|hsize=20px}}'s {{mvsub|Daisy|SSBU|dash attack}} (hit 1) and [[Daisy (SSBU)/Up special|Daisy Parasol]] (hits 1-2/when parasol is open). | |||
*{{CharHead|Dark Pit|SSBU|hsize=20px}}'s {{mvsub|Dark Pit|SSBU|forward smash}} (hit 1). | |||
*{{CharHead|Dark Samus|SSBU|hsize=20px}}'s {{mvsub|Dark Samus|SSBU|up smash}} (hits 2-4) and [[Dark Samus (SSBU)/Up special|Screw Attack]] (loop hits). | |||
*{{CharHead|Diddy Kong|SSBU|hsize=20px}}'s {{mvsub|Diddy Kong|SSBU|dash attack}} (hits 1-2), {{mvsub|Diddy Kong|SSBU|forward smash}} (hits 1-2) and {{mvsub|Diddy Kong|SSBU|up smash}} (hits 1-2). | |||
*{{CharHead|Falco|SSBU|hsize=20px}}'s {{mvsub|Falco|SSBU|up smash}} (hit 1). | |||
*{{CharHead|Ganondorf|SSBU|hsize=20px}}'s {{mvsub|Ganondorf|SSBU|down smash}} (hit 1) and {{mvsub|Ganondorf|SSBU|neutral aerial}} (hit 1). | |||
*{{CharHead|Greninja|SSBU|hsize=20px}}'s {{mvsub|Greninja|SSBU|up smash}} (hit 1) and [[Water Shuriken]] (full charge; loop hits). | |||
*{{CharHead|Hero|SSBU|hsize=20px}}'s {{mvsub|Hero|SSBU|forward tilt}} (hit 1), [[Kazap]] (hits 2-3) [[Magic Burst]] (loop hits), [[Woosh]], [[Swoosh]] (hit 1) and [[Kaswoosh]] (loop hits). | |||
*{{CharHead|Ike|SSBU|hsize=20px}}'s [[Ike (SSBU)/Up special|Aether]] (hit 1-3). | |||
*{{CharHead|Incineroar|SSBU|hsize=20px}}'s [[Cross Chop]] (hit 1/semi-spike) and [[Incineroar (SSBU)/Down special|Revenge]] when countering an attack. | |||
*{{CharHead|Inkling|SSBU|hsize=20px}}'s {{mvsub|Inkling|SSBU|down tilt}} (hit 1). | |||
*{{CharHead|Isabelle|SSBU|hsize=20px}}'s {{mvsub|Isabelle|SSBU|up smash}} (loop hits) and [[Lloid Trap]] (loop hits). | |||
*{{CharHead|Ivysaur|SSBU|hsize=20px}}'s [[Ivysaur (SSBU)/Neutral special|Bullet Seed]] (launcher). | |||
*{{CharHead|Joker|SSBU|hsize=20px}}'s {{mvsub|Joker|SSBU|forward tilt}} (hit 1) {{mvsub|Joker|SSBU|up tilt}} (loop hits) and {{mvsub|Joker|SSBU|forward aerial}} (hit 1). | |||
*{{CharHead|Kirby|SSBU|hsize=20px}}'s {{mvsub|Kirby|SSBU|forward aerial}} (hit 1-2), {{mvsub|Kirby|SSBU|pummel}} (collateral hit) and [[Kirby (SSBU)/Up special|Final Cutter]] (hit 1). | |||
*{{CharHead|Link|SSBU|hsize=20px}}'s {{mvsub|Link|SSBU|up smash}} (hit 1-2), {{mvsub|Link|SSBU|forward aerial}} (hit 1), {{mvsub|Link|SSBU|back aerial}} (hit 1) and [[Link (SSBU)/Up special|Spin Attack]] (air; all hits except final). | |||
*{{CharHead|Lucario|SSBU|hsize=20px}}'s {{mvsub|Lucario|SSBU|up smash}} (hit 1) and {{mvsub|Lucario|SSBU|down aerial}} (hit 1). | |||
*{{CharHead|Lucas|SSBU|hsize=20px}}'s {{mvsub|Lucas|SSBU|down tilt}}. | |||
*{{CharHead|Lucina|SSBU|hsize=20px}}'s {{mvsub|Lucina|SSBU|up smash}} (scooping hitbox), {{mvsub|Lucina|SSBU|neutral aerial}} (hit 1) and [[Lucina (SSBU)/Side special|Dancing Blade]] (input 1-3). | |||
*{{CharHead|Luigi|SSBU|hsize=20px}}'s [[Luigi (SSBU)/Down special|Luigi Cyclone]] (windbox) and {{mvsub|Luigi|SSBU|dash attack}} (hit 4). | |||
*{{CharHead|Mario|SSBU|hsize=20px}}'s [[Mario (SSBU)/Down aerial|Mario Tornado]] (loop hits) and [[Mario (SSBU)/Up special|Super Jump Punch]] (loop hits). | |||
*{{CharHead|Marth|SSBU|hsize=20px}}'s {{mvsub|Marth|SSBU|up smash}} (scooping hitbox), {{mvsub|Marth|SSBU|neutral aerial}} (hit 1) and [[Marth (SSBU)/Side special|Dancing Blade]] (input 1-3). | |||
*{{CharHead|Meta Knight|SSBU|hsize=20px}}'s [[Meta Knight (SSBU)/Neutral special|Mach Tornado]] (loop hits) and [[Meta Knight (SSBU)/Up special|Shuttle Loop]] (hit 1). | |||
*{{CharHead|Mr. Game & Watch|SSBU|hsize=20px}}'s {{mvsub|Mr. Game & Watch|SSBU|up tilt}} (hit 1), {{mvsub|Mr. Game & Watch|SSBU|neutral aerial}} (hits 1-3) and [[Mr. Game & Watch (SSBU)/Side special|Judge]] #8. | |||
*{{CharHead|Mythra|SSBU|hsize=20px}}'s [[Lightning Buster]] (prior to software version {{h2|List of updates (SSBU)|12.0.0}}). | |||
*{{CharHead|Pac-Man|SSBU|hsize=20px}}'s {{mvsub|Pac-Man|SSBU|up smash}} (hit 1) and {{mvsub|Pac-Man|SSBU|down aerial}} (hits 1-3). | |||
*{{CharHead|Palutena|SSBU|hsize=20px}}'s {{mvsub|Palutena|SSBU|forward tilt}} (hit 1-2). | |||
*{{CharHead|Peach|SSBU|hsize=20px}}'s {{mvsub|Peach|SSBU|dash attack}} (hit 1) and [[Peach (SSBU)/Up special|Peach Parasol]] (hits 1-2/when parasol is open). | |||
*{{CharHead|Pichu|SSBU|hsize=20px}}'s [[Pichu (SSBU)/Down special|Thunder]] (projectile). | |||
*{{CharHead|Pikachu|SSBU|hsize=20px}}'s {{mvsub|Pikachu|SSBU|neutral aerial}} (loop hits and {{mvsub|Pikachu|SSBU|forward aerial}} (loop hits). | |||
*{{CharHead|Piranha Plant|SSBU|hsize=20px}}'s [[Piranha Plant (SSBU)/Up special|Piranhacopter]] (loop hits). | |||
*{{CharHead|Pit|SSBU|hsize=20px}}'s {{mvsub|Pit|SSBU|forward smash}} (hit 1). | |||
*{{CharHead|Richter|SSBU|hsize=20px}}'s {{mvsub|Richter|SSBU|dash attack}} (loop hits), {{mvsub|Richter|SSBU|down tilt}} (hit 1) {{mvsub|Richter|SSBU|neutral aerial}} (loop hits) and [[Richter (SSBU)/Up special|Uppercut]] (loop hits). | |||
*{{CharHead|Ridley|SSBU|hsize=20px}}'s {{mvsub|Ridley|SSBU|forward aerial}} (hits 1-2). | |||
*{{CharHead|Rosalina|SSBU|hsize=20px}}'s {{mvsub|Rosalina & Luma|SSBU|forward aerial}} (Luma). | |||
*{{CharHead|Roy|SSBU|hsize=20px}}'s {{mvsub|Roy|SSBU|up smash}} (loop hits), {{mvsub|Roy|SSBU|neutral aerial}} (final hit), [[Roy (SSBU)/Side special|Double-Edge Dance]] (input 1-3) and [[Roy (SSBU)/Up special|Blazer]] (loop hits). | |||
*{{CharHead|Samus|SSBU|hsize=20px}}'s {{mvsub|Samus|SSBU|up smash}} (hits 2-4) and [[Samus (SSBU)/Up special|Screw Attack]] (loop hits). | |||
*{{CharHead|Shulk|SSBU|hsize=20px}}'s {{mvsub|Shulk|SSBU|up smash}} (hit 1). | |||
*{{CharHead|Simon|SSBU|hsize=20px}}'s {{mvsub|Simon|SSBU|dash attack}} (loop hits), {{mvsub|Simon|SSBU|down tilt}} (hit 1) {{mvsub|Simon|SSBU|neutral aerial}} (loop hits) and [[Simon (SSBU)/Up special|Uppercut]] (loop hits). | |||
*{{CharHead|Snake|SSBU|hsize=20px}}'s {{mvsub|Snake|SSBU|forward tilt}} (hit 1) and {{mvsub|Snake|SSBU|neutral aerial}} (final hit). | |||
*{{CharHead|Sonic|SSBU|hsize=20px}}'s {{mvsub|Sonic|SSBU|up smash}} (loop hits). | |||
*{{CharHead|Squirtle|SSBU|hsize=20px}}'s {{mvsub|Squirtle|SSBU|back aerial}} (loop hits). | |||
*{{CharHead|Terry|SSBU|hsize=20px}}'s [[Terry (SSBU)/Up special|Rising Tackle]] (loop hits). | |||
*{{CharHead|Toon Link|SSBU|hsize=20px}}'s [[Toon Link (SSBU)/Up special|Spin Attack]] (air; all hits except final). | |||
*{{CharHead|Villager|SSBU|hsize=20px}}'s {{mvsub|Villager|SSBU|up tilt}} (hit 1) and {{mvsub|Villager|SSBU|up smash}} (loop hits). | |||
*{{CharHead|Wario|SSBU|hsize=20px}}'s [[Wario (SSBU)/Up special|Corkscrew]]. | |||
*{{CharHead|Wolf|SSBU|hsize=20px}}'s [[Fire Wolf]] (loop hits). | |||
*{{CharHead|Yoshi|SSBU|hsize=20px}}'s {{mvsub|Yoshi|SSBU|back aerial}} (hit 1-2). | |||
*{{CharHead|Young Link|SSBU|hsize=20px}}'s {{mvsub|Young Link|SSBU|up smash}} (hit 1-2), {{mvsub|Young Link|SSBU|forward aerial}} (hit 1), {{mvsub|Young Link|SSBU|back aerial}} (hit 1) and [[Young Link (SSBU)/Up special|Spin Attack]] (air; all hits except final). | |||
*{{CharHead|Zelda|SSBU|hsize=20px}}'s {{mvsub|Zelda|SSBU|neutral aerial}} (hits 1-3). | |||
*{{CharHead|Zero Suit Samus|SSBU|hsize=20px}}'s [[Plasma Whip]] (loop hits). | |||
In addition, all throws in ''Melee'' treat the opponent's weight as 100. | |||
Lastly, some attack effects have weight independent properties, which include the [[bury]], [[paralyze]], and [[stun]] effects. However, only the bury effect can ignore [[armor|knockback resistance]]. | |||
==Knockback stacking== | ==Knockback stacking== | ||
Knockback stacking is the means by which | Knockback stacking is the means by which knockback is applied to a target that has already been launched by a previous move. Depending on the game and situation, the new knockback can replace the old knockback entirely, have no effect at all, or have its properties merged with the old knockback. In games where knockback stacking is more common, it is an important aspect to consider for [[combo]]s, as a character will have already been launched when hit by a subsequent move, therefore altering the followup move's properties. | ||
===In ''Melee''=== | ===In ''Melee''=== | ||
In ''Melee'', | In ''Melee'', knockback stacking occurs if both hits are separated by 10 or more [[frame]]s, and if the target does not stay on the ground. Otherwise, the second hit's knockback completely replaces the first's. This can lead to noticeable scenarios where strong hits can be canceled into much weaker ones, which is mostly prevalent in [[team battle]]s or with certain [[item]]s. This also prevents knockback stacking in cases such as [[waveshine]] combos, when a character heavy enough to not be knocked down by {{SSBM|Fox}}'s [[shine]] is hit back and forth in opposing directions. | ||
Knockback stacking for both hits is done separately for the horizontal and vertical components of their knockback. If both vectors have equal directions on one axis, the stronger component prevails, whereas if they have opposing directions, they are merged via vector addition. This often leads to the resulting knockback having a different angle than either of the previous hits alone. For example, if a character is struck up and right by a strong hit, then up and left by an equally strong hit, the character is sent straight up, due to the horizontal components canceling each other out. In this same example, if the second hit was stronger, the character would be launched up with the second hit's full vertical force, as well as weakly to the left. Knockback stacking occurs even if both hits come from the same character; as a result, there is often residual knockback from a previous hit in a combo, which must be taken into account when trying to follow up. | |||
While knockback stacking alters the resulting angle and launch speed, [[hitstun]] always remains the same as if the second hit had struck the target without any merging. However, [[DI]] does apply to the resulting knockback vector, so knockback stacking needs to be taken into account for optimal DI. If the victim is grounded and gets spiked towards or in parallel to the ground at non-tumble knockback, they stay grounded, unless the hit also resets. | |||
===''Brawl'' onward=== | |||
[[File:KnockbackStacking.png|thumb|300px|An infographic showing how knockback stacking behaves for Robin's Arcthunder and down aerial combo.]] | |||
From ''Brawl'' onward, knockback stacking behaves much differently, and its effects have been generally minimized. It now only occurs if both hits come from different sources, and if the second hit's resulting launch speed is lower than 0.8× of the first hit's launch speed at the time the second hit connects. Additionally, the first hit's launch speed and hitstun are retained throughout, instead of being merged and using the second hit's (respectively), and the resulting angle cannot be DIed<!--confirmed for Smash 4 and Ultimate; not sure about Brawl-->. Furthermore, if the first hit's launch speed at the time the second hit connects is 2.65× of the second hit's or higher, the second hit's knockback is ignored, though it still applies [[hitlag]]. In any other case, the second hit fully overrides the first. | |||
As a result of these changes, knockback stacking is generally no longer a factor for combos from a single character, and it is no longer possible for characters to cancel out strong knockback with significantly weaker attacks. However, [[hitbox]]es belonging to articles coded separately from a character, such as [[Bayonetta]]'s [[Wicked Weaves]], [[Fox]]'s [[Fox Illusion]], and all [[projectile]]s, are considered separate sources, and can thus be subjected to knockback stacking with physical moves from the character that produced them. In ''Smash 4'' and ''Ultimate'', this gives certain characters unique advantages with combo finishers, such as with [[Robin]] comboing [[Arcthunder]] (in ''Smash 4'') or [[Arcfire]] into his [[down aerial]]'s [[meteor smash]], or Bayonetta comboing her [[forward smash]] into her down aerial's meteor smash on a [[Witch Time]]d opponent; both of these setups cause the opponent to be launched at a [[Semi-spike|much lower angle horizontally]], better securing KOs near the edge if the meteor smash would otherwise cause the opponent to land onstage. | |||
The resulting angle from knockback stacking is determined by the {{s|wikipedia|inverse tangent}} of both hits' added knockback vectors, with the vertical component divided by the horizontal component. For example, stacking Robin's Arcthunder (50°) and down aerial meteor smash (270°) results in an angle of approximately 17.6°. This also means that moves with completely opposing horizontal strengths cannot stack, while moves with completely opposing vertical strengths will result in a perfectly horizontal angle. Worth noting is that when determining whether two moves can stack, the first hit's launch speed takes the [[Knockback#Melee onward|gravity penalty]] into consideration, while the second hit's does not. | |||
{{clr}} | |||
==Knockback chart== | ==Knockback chart== | ||
| Line 216: | Line 456: | ||
! Rank!!Character!!Knockback sustained!!Velocity applied | ! Rank!!Character!!Knockback sustained!!Velocity applied | ||
|- | |- | ||
|'''1'''||{{SSBB| | |'''1'''||{{CharHead|Bowser|SSBB|hsize=20px}}||490.8||14724 | ||
|- | |- | ||
|'''2'''||{{ | |'''2'''||{{CharHead|Donkey Kong|SSBB|hsize=20px}}||494.667||14840 | ||
|- | |- | ||
|'''3'''||{{SSBB| | |'''3'''||{{CharHead|Snake|SSBB|hsize=20px}}||499.367||14981 | ||
|- | |- | ||
|'''4'''||{{ | |'''4'''||{{CharHead|King Dedede|SSBB|hsize=20px}}||501.4||15042 | ||
|- | |- | ||
|'''5'''||{{SSBB| | |'''5'''||{{CharHead|Charizard|SSBB|hsize=20px}}||504.667||15140 | ||
|- | |- | ||
|'''6'''||{{SSBB| | |'''6'''||{{CharHead|Samus|SSBB|hsize=20px}}||505.333||15160 | ||
|- | |- | ||
|'''7'''||{{SSBB| | |'''7'''||{{CharHead|Ganondorf|SSBB|hsize=20px}}||508.467||15254 | ||
|- | |- | ||
|'''8'''||{{SSBB| | |'''8'''||{{CharHead|Yoshi|SSBB|hsize=20px}}||508.7||15261 | ||
|- | |- | ||
|'''9'''||{{ | |'''9'''||{{CharHead|R.O.B.|SSBB|hsize=20px}}||509.533||15286 | ||
|- | |- | ||
|'''10'''||{{SSBB| | |'''10'''||{{CharHead|Wario|SSBB|hsize=20px}}||509.867||15296 | ||
|- | |- | ||
|'''11'''||{{SSBB| | |'''11'''||{{CharHead|Ike|SSBB|hsize=20px}}||513.3||15399 | ||
|- | |- | ||
|'''12'''||{{SSBB| | |'''12'''||{{CharHead|Link|SSBB|hsize=20px}}||515.633||15469 | ||
|- | |- | ||
|'''13'''||{{ | |'''13'''||{{CharHead|Captain Falcon|SSBB|hsize=20px}}||517.133||15514 | ||
|- | |- | ||
|'''14'''||{{SSBB| | |'''14'''||{{CharHead|Lucario|SSBB|hsize=20px}}||520.033||15601 | ||
|- | |- | ||
|'''15'''||{{SSBB| | |'''15'''||{{CharHead|Ivysaur|SSBB|hsize=20px}}||520.833||15625 | ||
|- | |- | ||
|'''16'''||{{SSBB| | |'''16'''||{{CharHead|Mario|SSBB|hsize=20px}}||525.1||15753 | ||
|- | |- | ||
|'''17'''||{{SSBB| | |'''17'''||{{CharHead|Wolf|SSBB|hsize=20px}}||525.7||15771 | ||
|- | |- | ||
|'''18'''||{{SSBB| | |'''18'''||{{CharHead|Luigi|SSBB|hsize=20px}}||525.9||15777 | ||
|- | |- | ||
|'''19'''||{{SSBB| | |'''19'''||{{CharHead|Sonic|SSBB|hsize=20px}}||531.9||15957 | ||
|- | |- | ||
|'''20'''||{{SSBB| | |'''20'''||{{CharHead|Ness|SSBB|hsize=20px}}||532.367||15971 | ||
|- | |- | ||
|'''21'''||{{SSBB| | |'''21'''||{{CharHead|Pit|SSBB|hsize=20px}}||532.8||15984 | ||
|- | |- | ||
|'''22'''||{{SSBB| | |'''22'''||{{CharHead|Lucas|SSBB|hsize=20px}}||534.4||16032 | ||
|- | |- | ||
|'''23'''||{{ | |'''23'''||{{CharHead|Toon Link|SSBB|hsize=20px}}||536.2||16086 | ||
|- | |- | ||
|'''24'''||{{ | |'''24'''||{{CharHead|Diddy Kong|SSBB|hsize=20px}}||536.6||16098 | ||
|- | |- | ||
|'''25'''||{{ | |'''25'''||{{CharHead|Ice Climbers|SSBB|hsize=20px}}||536.967||16109 | ||
|- | |- | ||
|'''26'''||{{SSBB| | |'''26'''||{{CharHead|Peach|SSBB|hsize=20px}}||539.533||16186 | ||
|- | |- | ||
|'''27'''||{{SSBB| | |'''27'''||{{CharHead|Marth|SSBB|hsize=20px}}||546||16380 | ||
|- | |- | ||
|'''28'''||{{SSBB| | |'''28'''||{{CharHead|Zelda|SSBB|hsize=20px}}||550.467||16514 | ||
|- | |- | ||
|'''29'''||{{SSBB| | |'''29'''||{{CharHead|Olimar|SSBB|hsize=20px}}||556.267||16688 | ||
|- | |- | ||
|'''30'''||{{SSBB| | |'''30'''||{{CharHead|Sheik|SSBB|hsize=20px}}||558.5||16755 | ||
|- | |- | ||
|'''31'''||{{ | |'''31'''||{{CharHead|Zero Suit Samus|SSBB|hsize=20px}}||561.567||16847 | ||
|- | |- | ||
|'''32'''||{{SSBB| | |'''32'''||{{CharHead|Falco|SSBB|hsize=20px}}||561.9||16857 | ||
|- | |- | ||
|'''33'''||{{SSBB| | |'''33'''||{{CharHead|Kirby|SSBB|hsize=20px}}||565.5||16965 | ||
|- | |- | ||
|'''34'''||{{SSBB| | |'''34'''||{{CharHead|Pikachu|SSBB|hsize=20px}}||566||16980 | ||
|- | |- | ||
|'''35'''||{{ | |'''35'''||{{CharHead|Meta Knight|SSBB|hsize=20px}}||566.933||17008 | ||
|- | |- | ||
|'''36'''||{{SSBB| | |'''36'''||{{CharHead|Fox|SSBB|hsize=20px}}||573.367||17201 | ||
|- | |- | ||
|'''37'''||{{ | |'''37'''||{{CharHead|Mr. Game & Watch|SSBB|hsize=20px}}||574.133||17224 | ||
|- | |- | ||
|'''38'''||{{SSBB| | |'''38'''||{{CharHead|Squirtle|SSBB|hsize=20px}}||577.567||17327 | ||
|- | |- | ||
|'''39'''||{{SSBB| | |'''39'''||{{CharHead|Jigglypuff|SSBB|hsize=20px}}||589.1||17673 | ||
|} | |} | ||
==Trivia== | ==Trivia== | ||
* | *All games have a knockback cap of 2500 (or a launch speed of 75 units per frame), fast enough to move from the edge of Battlefield to the center in less than one frame. ''Smash 4'' and ''Ultimate'' have a knockback cap for vertical attacks; equal to a vertical launch speed of 10, or a little over 330 units of knockback vertically. Additionally, attacks that surpass a vertical launch speed of 4.7 when crossing the upper blast line will cause [[Star KO]]s and [[Screen KO]]s to not occur. | ||
**Because of this vertical knockback cap in ''Smash 4'', if a fighter were to have an incredibly high fall speed and gravity, it would be impossible to KO them off the upper blast line (unless using an item such as a [[Beetle]]), no matter how much knockback they were given. This can be accomplished under specific conditions in the unmodified game, via the use of customs and special smash. In ''Ultimate'', this is only possible by meteor smashing opponents off the ground, as fall speeds are set to 1.8 during hitstun for launch angles between 70° and 110°. | |||
*According to [[Masahiro Sakurai]], the knockback speed up effect seen in ''Ultimate'' was planned to be implemented in previous ''Smash'' games, but ended up being scrapped because it was easy to lose track of characters' positions, especially in {{for3ds}}. | |||
*Through hacking, the value of damage dealt in the knockback formula can be a negative number, in which case the game will run the calculation as normal, and as such knockback will decrease with percent if the damage is less than -2. Furthermore, a negative knockback value can be calculated, although this will simply result in zero knockback being dealt. | |||
==References== | ==References== | ||
Latest revision as of 14:31, March 14, 2024
- "Launch" redirects here. For the Ultimate tournament, see Tournament:Launch.

Knockback is the measure of how far an attack sends its target. For most attacks, knockback increases as damage on a character increases. An example of an attack with high knockback is Bowser's forward smash; it launches opponents very far, so far that at high damages it's more powerful than a Home-Run Bat's smash attack. Pikachu's neutral attack, on the other hand, has very low knockback - it hardly sends opponents anywhere, even at ludicrous damages. Attacks with relatively low knockback tend to be good for combos.
Basic physics[edit]
The knockback of almost every attack works in tandem with the target's damage - it increases as the target's damage gets higher. It is also affected by the target's weight, gravity, and a few other conditions (such as type effectiveness). While not the primary factor, the damage dealt by an attack is a significant factor in how much knockback it deals - this is the reason stale moves have less knockback than fresh ones, and the reason smash attacks deal significantly more knockback when fully charged.
Each hitbox of a move has two knockback values: a base knockback and a knockback scaling (also known as knockback growth). Base knockback is the minimum amount of knockback the attack can deliver under normal circumstances, and knockback scaling is a factor that controls how much the knockback increases as damage increases.
Moves with high base knockback can deal high knockback (such as performing a forward smash with the Home-Run Bat), even against fighters who haven't taken much damage, and tend to be more effective at KOing when fighters can easily be sent flying at low damage percentages (such as against lighter fighters, when near the edge of the stage, or when a fighter is handicapped to sustain more knockback). Tiny-sized fighters are usually the most vulnerable to getting KO'd by high base knockback attacks, due to having reduced weight, and an increased knockback taken multiplier.
On the other hand, moves with high knockback scaling can reach KO potential more quickly (such as Luigi's forward smash), especially if they have a high damage output, and tend to be more effective at KOing when fighters need to take greater knockback than what a high base knockback attack can deliver on its own (such as against heavier fighters, when far away from a stage's blast line, or when a fighter is handicapped to sustain less knockback). Advanced techniques to extend survival, such as DI and momentum canceling, are also less effective the stronger a move's knockback scaling is.
In Melee, the highest knockback delivered and received by each character is given in a match's results screen, labeled as "Fastest Pitch" and "Top Speed" respectively, though the numbers lack meaning. In Brawl, the velocity applied (in units per 1000 frames) is provided instead of the knockback value (though it's simply knockback divided by 0.03). The unit is given as "mph"; while this would presumably mean "miles per hour", this is obviously not the case, as a 1,000 mph hit would barely send characters anywhere. In Super Smash Bros. for Nintendo 3DS, knockback units are again shown without a meaning, while in Super Smash Bros. for Wii U, they are measured in "mph" as in Brawl, though in a lower scale. Strangely enough, knockback for a same move between the two games is actually shown in different scales: Ganondorf's Warlock Punch, for instance, scores 102 units of knockback against Mario at 0% damage (without other modifiers) in Smash 3DS, while scoring 53 mph under the same conditions in Smash U. Despite these differences among games, they all internally use the same knockback measurement units in accordance to the knockback formula, as evidenced by moves with unchanged damage and knockback values throughout them (such as Jigglypuff's back throw from Melee to Smash 4) keeping their knockback identical.
The following table gives an idea of various knockback strengths:
| Knockback | Velocity | Example |
|---|---|---|
| 10 | 333.33 | One stage builder block per second |
| 33.6 | 1120 | Jigglypuff's short hop |
| 43.2 | 1440 | Jigglypuff's first jump |
| 63 | 2100 | Fox dashing (without running) |
| 80.0001 | 2666.67 | The minimum amount of knockback required to cause tumbling |
| 102.6 | 3420 | Falco's first jump |
| 131.43 | 4381 | Sheik's footstool jump |
| 172.5 | 5750 | The approximate knockback needed to KO from the center of Final Destination with the Sakurai angle DI'd down. |
| 186 | 6200 | The approximate knockback needed to KO from the center of Final Destination with the Sakurai angle and no DI. |
| 204.75 | 6825 | The approximate knockback needed to KO from the center of Final Destination with the Sakurai angle DI'd away. |
| 300 | 10000 | Jigglypuff's shield jump |
In Super Smash Bros. Ultimate, when hitstun exceeds 32 frames, the process of the character getting launched is sped up for a duration proportional to the hitstun inflicted. This is especially noticeable near KO percentages, where characters fly away very quickly, then come to a stop almost immediately, effectively causing the launch to execute much faster. The effect is also more noticeable for moves which have high hitstun modifiers, such as Isabelle's neutral attack, which can even trigger the effect before the knockback is strong enough to cause tumbling. Because of this change, the hitstun they experience scales much more slowly at higher knockback values. According to director Masahiro Sakurai, this change was implemented to increase the overall speed of the game, by reducing the time during which launched characters are incapacitated.[1] The visual and mechanical differences this effect causes on knockback are notorious enough that it is often dubbed "balloon knockback" by the community, as it has similar physics to hitting a balloon in real life. Moves with set knockback retain traditional knockback physics.
Launch rate[edit]

- Launch rate is not to be confused with handicap.
Launch rate, also known as Damage % in Super Smash Bros. and Damage Ratio in Melee and Brawl, is a feature in all Super Smash Bros. games that alters how much knockback is given and received (despite its name in Melee and Brawl, damage is unaffected).
All knockback in a match is multiplied by the launch rate value, which by default is 1.0×. This value can be set from as low as 0.5× (attacks have half knockback) to as high as 2.0× (attacks have double knockback). The minimum launch rate is ideal for combos, while the maximum launch rate is ideal for KOing opponents at extremely low percentages. However, the latter also affected attacks with set knockback up until Smash 4 and Ultimate, causing multihit attacks to not always combo into each other.
In competitive play, nonstandard launch rates are difficult to detect during games, which has led to some tournament matches unintentionally having been played at an incorrect launch rate. A notable example of this was a set between Armada and SilentSpectre at Pound 4 in 2010 that was played at 0.9×; this remained undiscovered for nine years. The infamous matches between komorikiri and CaptainZack, and ZeRo and Dabuz at GENESIS 4 are more recent examples. Both matches were being played at a launch rate setting of 0.9×. The latter match gained notoriety, and soon became an inside joke in the community.
There has been some discussion among Brawl's competitive community as to whether using a launch rate value other than the default 1.0 results in a more healthy metagame; 1.1× is a commonly-mentioned value claimed to make many polarizing attack chains (such as using Sheik's forward tilt into itself endlessly) less viable while also shortening the length of stocks. The idea has never attained serious consideration among tournament organizers.
Angle indicator[edit]
Appearing in all games to date, visual effects known as angle indicators show when a hitbox collides with an opponent; as its name suggests, the angle indicator shows the angle of said hitboxes. In Brawl, angle indicators show different colors depending on who or what they hit. For player one, the angle indicator is red, with the second player's indicator being blue, and so forth. Computer-controlled opponents and objects like Sandbag have white angle indicators. Angle indicators appear in Super Smash Bros. as small "bubbles" appearing in the direction of the angle. In Smash 4, angle indicators appear as colorful, stylized "debris" flying off of an impact.
Smoke trails also indicate the angle at which a character is knocked away, but only appear when a character has taken a lot of damage, and are thus much less useful. In Smash 4, said smoke trails at higher knockback values are accompanied by thick light trails, colored depending on the player that dealt the knockback.
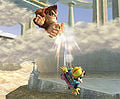
Note the downward facing lines that indicate Donkey Kong's meteor smash.
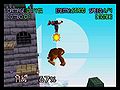
The angle indicator in Super Smash Bros.
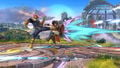
An angle indicator in Smash 4.


Formula[edit]
SSB[edit]

Melee onward[edit]


Starting in Brawl, a second formula is also used to alter knockback based on the target's gravity:

The result of this formula increases vertical launch speed if the target enters tumble. As a result, characters with higher gravity get launched faster than those with lower gravity, depending on how vertical the angle is, resulting in fighters with higher gravity stats having worsened vertical survivability, seemingly as an attempt to normalize the effect of combos and multi-hit moves on characters of differing gravity. This formula is also applied to moves that launch opponents downwards, though since vertical launch speed is negative in this case, the result of the formula effectively decreases it slightly instead, reducing the effectiveness of meteor smashes on fast fallers.
In Ultimate, moves that launch at angles between 70° and 110° now instead cause characters' falling speeds to be homogenized to a set value of 1.8 during hitstun. Furthermore, the additional launch speed from the gravity formula is no longer applied. As a result of these changes, falling speed no longer plays as much of a factor on determining a characters' vertical survivability, and moves that deal vertical knockback are generally easier to survive compared to Brawl and SSB4, thus making vertical survivability among the cast much more consistent than in previous games. Note that weight-independent moves do not homogenize falling speeds or use the different gravity value, so gravity and fall speed (especially the latter) still have an impact on the vertical survivability against those moves.
Variables[edit]
- p is the percentage of the target, counted after the attack's damage is added. In Stamina Mode this is set to 20.
- In Melee, p is floored pre-hits percentage + sum of hitbox damage(s) dealt to the character that frame, including staling and other modifiers.
- d is the damage the attack dealt.
- In SSB and Melee, it is the full damage without counting stale-move negation, except for projectiles, which use the stale damage and other possible modifiers.
- In Brawl, it is the damage including the staleness or the freshness bonus.
- In Smash 4 and Ultimate, it is the damage including 0.3x of the staleness or freshness bonus.
- w is the weight of the target. It is set to 100 if the attack is weight independent. Note that in SSB, heavier characters have a lower weight value than lighter ones, in accordance with the formula.
- s is the attack's knockback scaling (also known as knockback growth) divided by 100 (so a scaling of 110 is input as 1.1).
- b is the attack's base knockback.
- r is a series of ratios based on a number of factors, including:
- Difficulty
- Handicap (in SSB and Melee)
- Single-player mode conditions (e.g. in Melee's Event 24: The Yoshi Herd, all Yoshis give x0.5 knockback while taking x3.7 knockback)
- Launch rate (between x0.5 and x2.0)
- Crouching penalty/Crouch cancel factor (x0.67 in SSB, x0.666667 Melee, and x0.85 in Smash 4)
- Smash charge interruption bonus prior to Ultimate (x1.2, Melee onwards, applied if the opponent was charging a smash attack when hit)
- Frozen penalty factor (x0.25 in Melee). Characters in frozen state take reduced knockback.
- Type effectiveness (x1.1 for super effective, x0.9 for not very effective, specific to Charizard, Ivysaur, and Squirtle in Brawl)
- Size changes made by the Super Mushroom, Poison Mushroom, and Lightning Bolt (less knockback is dealt to giant-sized fighters, while tiny fighters take more knockback than normal)
- Rage (between x1 and x1.15 in Smash 4 and between x1 and x1.1 in Ultimate)
The total amount of knockback dealt can also be subtracted by the target's knockback resistance, which is applied after all the other calculations have been made. However, hitboxes that have the bury effect can ignore the knockback resistance.
If the move has a fixed knockback value set, then d is set to that value, and p is always 10. As a result, the knockback dealt is independent of current damage, damage dealt, and ignores stale-move negation's knockback modifiers. However, it still remains dependent on other factors.
To determine how far a character is launched away, the numerical amount of knockback caused is multiplied by 0.03 to calculate launch speed, and the initial value of launch speed then decays by 0.051 every frame, so that the character eventually loses all momentum from the knockback. During this time, character-specific attributes such as air friction are disabled; however, falling speed still takes effect, giving fast fallers better endurance against vertical knockback than others of their weight.
Deadly Blow[edit]

Deadly Blow is an aesthetic effect in Smash 4 and Ultimate. Attacks dealing strong enough knockback to KO opponents before they can act afterwards produce a red-and-black lightning effect on contact. This effect tends to appear slightly after the actual damage percentage at which an attack can start KOing. For example, Jigglypuff's Rest can KO Mario on the 3DS version's Final Destination with no DI starting at 60%, but the effect doesn't appear until 62%.
This effect works depending on the distance required to KO the character rather than the actual strength of the knockback; for example, a forward or back throw towards a walk-off blast line will trigger the effect if the throw effectively KOs, even at low damage percentages where it would be otherwise very weak, while strong attacks launching foes from one side of the stage to the other will not display the effect if they don't KO, even if the knockback is strong enough to do so otherwise. Attacks that freeze do not produce this effect at any percentage, instead simply causing the screen to flash white. Meteor smashes also do not produce the effect until higher percentages.
The Deadly Blow activating does not necessarily guarantee a KO. The game does not consider stage walls, ceilings, or other obstacles that can otherwise change the trajectory of knockback (thereby preventing or causing a KO) when determining whether the lightning appears. DI Is also not taken into account, meaning players can still save themselves after the effect is displayed if the attack can just barely KO them.
In Ultimate, when a move is expected to end the match (that is, when all remaining opponents are on their last stock and hits the last character not already in lethal knockback or a Star KO), this effect is accompanied by a dramatic slowdown alongside a red background and a unique, much more intense sound effect, with the camera zooming in on the character. This is referred to as Finish Zoom by Masahiro Sakurai and his development team.
Other physics of knockback[edit]

- Bouncing off a surface reduces knockback by 20% in Melee and Smash 4 and 15% in Brawl and 5% in Ultimate. Landing a meteor smash or spike on a grounded opponent counts as a bounce, if enough knockback was dealt. Because the bounce occurs after the hit, the amount of hitstun suffered is not reduced a corresponding amount, meaning that downwards-hitting attacks tend to be excellent combo starters.
- In Melee, bouncing off a floor from spike only reduces vertical component of knockback velocity by 20%. Meanwhile, bouncing off walls and ceilings reduces total velocity by 20%.
- In all games, the screen will commonly flash white when a character receives knockback that is greater than or equal to 160 units; however, the screen will flash into a different color when they're launched far by an elemental attack (i.e. red for flame attacks, blue for electric attacks, etc.).
- In Brawl, characters that take enough knockback to be sent tumbling will slightly damage opponents they run into while flying. This hitbox belongs to the character that dealt the knockback, and inflicts minor damage (usually from 1% to 4%) and knockback depending on how powerfully the character was launched. This is also present in Melee and Smash 64, but only applies to characters who receive knockback after a throw (not counting special move grabs like Falcon/Dark Dive and Koopa Klaw). This property was later removed in Smash 4, where launched opponents simply fly through other characters like in previous games.
- A similar effect is used against enemies in The Subspace Emissary, Smash Run and Master Fortress, known as careening, or the cannonball effect in Smash 4. When an enemy is defeated, it is sent flying at an angle (depending on the attack that KO'd it) and deals major damage to other enemies it runs into, before disappearing.
- Characters with armor will take no knockback, or reduced knockback.
- In Smash 4 and Ultimate, characters at higher percentages deal slightly more knockback, a factor popularly known as "rage".[2] In Smash 4, rage starts building up at 35% damage and caps at 150%, at which the character deals 15% more knockback than normal, or 10% more in Ultimate.
- Characters in the background plane of Jungle Hijinxs take more knockback.
- In Smash 4, launch speed influence can increase launch speed to a maximum of x1.095 by holding up on the control stick, or decrease it to a minimum of x0.92 by holding down. From update 1.0.4 onward, this does not apply if the target is launched at an angle between 65° and 115°, or between 245° and 295°.
- In Smash 4, buried characters take 30% less knockback from attacks, provided these are strong enough to hit them out of said state.
Set knockback[edit]

Set knockback, also referred to as fixed knockback, is a property of some attacks where the amount of knockback dealt by the attack is always the same regardless of the damage the opponent has received so far, stale-move negation, or how much damage the attack does. Moves with this property can be thought of as those having a knockback scaling factor of 0, though this is actually not the case. Usually, set knockback is used for the first hits of a natural combo or multi-hit move, while the last hit deals normal knockback (sometimes called "scaling knockback" to contrast), to make it easier for the entire attack to hit regardless of the opponent's damage. While damage is not a factor for set knockback, the character's weight still is, so the terms weight-dependent set knockback or weight based knockback are sometimes used. Starting in Brawl, the effect of Damage Ratios (Launch Rates) for fixed knockback was drastically reduced, to the point where the in game Damage Ratio setting would have only a small effect on their knockback. Additionally, Shulk's Smash Monado Art is ignored entirely in Smash 4. However, other modifiers on knockback, such as rage, crouch cancelling, or smash attack charging bonus are still calculated normally, which in the case of rage can lead to unintended early KO setups in normal gameplay. In Ultimate, the effect of both types of knockback modifiers on set knockback was removed altogether, so set knockback is much harder to modify.
List of set knockback moves[edit]
Super Smash Bros.[edit]
With the exception of Captain Falcon, all characters in Super Smash Bros. have at least one move with set knockback.
 Donkey Kong's dash attack, Spinning Kong, and Hand Slap.
 Fox's down angled forward tilt, down aerial, up aerial (first hit), Blaster and Reflector.
 Jigglypuff's down aerial (all but landing hit).
 Kirby's Final Cutter (excluding the projectile), up aerial, forward aerial (all but last hit), neutral aerial, down aerial (landing hit), and Inhale.
 Link's up smash (first two hits).
 Luigi's sourspotted Super Jump Punch, dash attack, down aerial, and taunt.
 Mario's Super Jump Punch (all but last hit), down aerial, and Mario Tornado.
 Ness' PK Fire (all but first hit).
 Pikachu's forward aerial.
 Samus's up aerial and Screw Attack.
 Yoshi's up tilt, down tilt, Egg Lay, and Yoshi Bomb (stars).
Super Smash Bros. Melee[edit]
- All windboxes.
 Bowser's neutral attack (first hit), down aerial's looping hits and up throw.
 Captain Falcon's neutral attack (first and second hits), up smash (first hit), neutral aerial (first hit) and his uncharged smash attack with a Home-Run Bat.
 Donkey Kong's Hand Slap.
 Dr. Mario's neutral attack (first and second hits), down aerial, Super Jump Punch and Dr. Tornado (excluding both specials' final hits).
 Falco's Blaster.
 Fox's up aerial (first hit), down aerial and Reflector.
 Ganondorf's down smash (first hit).
 Ice Climbers' down aerial.
 Mario's neutral attack (first and second hits), down angled forward tilt, down aerial, Super Jump Punch, Mario Tornado, (excluding their respective final hits).
 Marth's up smash (outer hitboxes).
 Mewtwo's neutral attack (first hit), up smash and neutral aerial (excluding their respective final hits).
 Mr. Game & Watch's neutral attack (first hit and infinite) and Judge #8.
 Ness's dash attack (first two hits).
 Jigglypuff's down throw (first four hits).
 Kirby's down aerial (landing hitbox), Hammer (in the air), Final Cutter (up and down cuts) and down throw (first nine kicks).
 Link's up smash (first two hits) and Spin Attack (air, all but final hit).
 Luigi's neutral attack (first and second hits), down angled forward tilt and taunt.
 Peach's neutral attack (first hit) and Peach Parasol (first hit).
 Pichu's forward aerial.
 Pikachu's forward aerial.
 Roy's up smash (multihits), Double-Edge Dance (hit 3 down, all but final hit) and Blazer.
 Samus's up aerial (all but final hit) and Screw Attack (ground, final hit only).
 Sheik's forward smash (first hit).
 Yoshi's down tilt.
 Young Link's forward smash (first hit), up smash (first two hits) and Spin Attack (air, all but final hit).
 Zelda's forward smash, up smash, neutral aerial (excluding their respective final hits) and down throw (flames).
- Red Shell.
Super Smash Bros. Brawl[edit]
- Many jabs, such as Mario's, have set knockback for all but their last hit.
- Many multi-hitting smash attacks have setup hits with set knockback (e.g., Ness's up and down smashes).
- All windboxes.
 Bowser's down aerial (looping hits).
 Captain Falcon's neutral aerial and up smash (first hit of both).
 Charizard's forward smash (first hit) and up smash (first hit).
 Diddy Kong's dash attack (second hit), forward smash (first hit) and up smash (first two hits).
 Falco's up tilt (first hit), neutral aerial (all but final hit) and Blaster.
 Fox's up aerial (first hit).
 Ganondorf's down smash (first hit).
 Ivysaur's down tilt (first hit) and neutral aerial (all but final hit).
 King Dedede's up aerial, down aerial (excluding their respective final hits) and down throw.
 Kirby's down aerial (landing hitbox), Final Cutter (up and down strokes) and down throw (first nine kicks).
 Link's up smash (first two hits) and back aerial (first hit).
 Lucas's up tilt (launcher), up smash (launcher) and down aerial (hitbox ID 1 only, first three hits).
 Luigi's down angled forward tilt, down taunt and sourspotted Super Jump Punch.
 Mario's Mario Tornado and Super Jump Punch (excluding their respective final hits).
 Marth's up smash (launcher).
 Meta Knight's up smash, forward aerial, back aerial, Mach Tornado (excluding their respective final hits) and down throw (first nine kicks).
 Mr. Game & Watch's neutral aerial (all but final hit) and Judge #8.
 Ness's dash attack (first two hits), up smash (charging hitbox) and down smash (charging hitbox).
 Pikachu's back aerial (looping hits).
 R.O.B.'s up tilt (launcher).
 Samus's up aerial (all but final hit).
 Sheik's up tilt (first hit) and forward smash (first hit).
 Snake's forward tilt (first hit), up smash (launcher), neutral aerial and down aerial (excluding their respective final hits).
 Squirtle's down tilt, up smash (launcher) and down aerial (excluding their respective final hits).
 Toon Link's forward smash (first hit).
 Wario's down aerial (looping hits).
 Wolf's neutral aerial (3rd hit onward) and Reflector.
 Zelda's neutral attack, forward smash, up smash, neutral aerial (excluding their respective final hits) and down throw (flames).
 Zero Suit Samus's up smash (launcher).
Super Smash Bros. 4[edit]
- Many neutral attacks, such as Mario's, have set knockback for all but their last hit.
- All windboxes, except for Mr. Game & Watch's down tilt, Ike's Tempest, and Greninja's up special and down taunt.
 Bayonetta's neutral attack infinite (rapid jab and first hit of finisher), up tilt (early launcher), down smash (Bayonetta's foot) and late After Burner Kick.
 Bowser's down smash (first hit), Whirling Fortress (ground, all but final hit) and Bowser Bomb (scooping hitbox).
 Bowser Jr.'s Mechakoopa (first hit).
 Captain Falcon's up smash and neutral aerial (first hit of both).
 Charizard's up smash (first hit) and Fly (launcher and looping hits).
 Cloud's forward smash (first two hits) and down smash (first hit).
 Diddy Kong's dash attack, forward smash, up smash (excluding their respective final hits) and Banana Peel.
 Dr. Mario's Dr. Tornado (looping hits).
 Falco's up tilt (first hit), neutral aerial, forward aerial (excluding their respective final hits) and Blaster.
 Fox's up aerial (first hit) and down aerial (excluding final hit).
 Ganondorf's down smash (first hit).
 Ike's Aether (first and second hits).
 King Dedede's forward tilt and up aerial (excluding their respective final hits).
 Kirby's down aerial (landing hitbox), Final Cutter (up and down slices) and down throw (all kicks).
 Link's up smash (first two hits), back aerial (first hit) and Spin Attack (air, all but final hit).
 Little Mac's forward tilt (first hit), neutral aerial and up special (launcher).
 Lucas's up tilt (launcher), up smash (launcher) and down aerial (hitbox ID 1 only, first three hits).
 Luigi's down taunt and sourspotted Super Jump Punch.
 Mario's Mario Tornado and Super Jump Punch (first five hits for both).
 Marth's up smash (launcher).
 Meta Knight's up smash, forward aerial, back aerial (against an aerial oponent) (excluding their respective final hits), Drill Rush (first multihit) and down throw (first nine kicks).
 Mewtwo's up smash and neutral aerial (excluding their respective final hits).
 Mr. Game & Watch's neutral aerial (all but final hit), back aerial (hitbox ID 1 only, looping hits) and Judge #8.
 Ness's dash attack (first two hits) and down smash (first, third and fourth hits).
 Pac-Man's down aerial (first three hits).
 Peach's dash attack (first hit), down smash (looping hits), Toad (all but first and final hits) and Peach Parasol (launcher and multihits).
 Pikachu's forward aerial and back aerial (both moves' looping hits).
 R.O.B.'s up tilt (launcher) and up smash (launcher).
 Ryu's held forward tilt (first hit), tapped down tilt and up aerial (first hit).
 Samus's up smash, forward aerial, up aerial, Screw Attack (ground) and Screw Rush (excluding their respective final hits).
 Sheik's up tilt (first hit), forward smash (first hit) and Vanish (reappearance hit).
 Shulk's Air Slash (first hit), along with the first hits of forward smash, up smash, up aerial, and down aerial.
 Toon Link's Spin Attack (ground: looping hits; air: first three hits).
 Wario's late dash attack, down aerial (looping hits), Chomp (biting hitbox) and Corkscrew (all but final hit).
 Yoshi's Yoshi Bomb (launcher).
 Zelda's neutral attack, forward smash, up smash, neutral aerial (excluding their respective final hits) and down throw (flames).
 Zero Suit Samus's up smash (launcher), Paralyzer and Boost Kick (all but final hit).
Super Smash Bros. Ultimate[edit]
 Bowser's down tilt (first hit), Whirling Fortress (ground, all but final hit) and Bowser Bomb (scooping hitbox).
 Banjo & Kazooie's up smash (scoop, and multihits), neutral aerial (hits 1-7), back aerial (hits 1-2) and pummel.
 Bayonetta's neutral attack infinite (first hit of finisher), up tilt (early launcher), down smash (Bayonetta's foot), sweetspotted down aerial (only against a grounded opponent), late After Burner Kick (up) and Witch Twist (launcher and multihits).
 Byleth's neutral aerial, up aerial (excluding their respective final hits) and Sword of the Creator (launcher).
 Captain Falcon's up smash (first hit).
 Charizard's up smash (some of first hit) and Fly (launcher and looping hits).
 Chrom's up smash (multihits) and Soaring Slash (excluding the landing hitbox).
 Cloud's forward smash (first two hits) and down smash (first hit).
 Diddy Kong's dash attack, forward smash and up smash (excluding their respective final hits).
 Dr. Mario's Dr. Tornado (looping hits).
 Falco's up tilt (first hit), neutral aerial, forward aerial (excluding their respective final hits), Blaster and Fire Bird (hits 1-8).
 Ganondorf's down smash (first hit).
 Incineroar's Alolan Whip when failing and Revenge when countering an attack.
 Ivysaur's Bullet Seed (clean and late launchers).
 Joker's Rebel's Guard when releasing.
 Ken's tapped forward tilt (close) and tapped down tilt.
 King Dedede's forward tilt and up aerial (excluding their respective final hits).
 Kirby's down aerial (landing hitbox), Final Cutter (up and down slashes) and down throw (first nine kicks).
 Link's up smash (first two hits), back aerial (first hit) and Spin Attack (air, all but final hit).
 Little Mac's forward tilt (first hit), neutral aerial and up special (launcher).
 Lucas's up tilt (launcher), up smash (launcher), down aerial (hitbox ID 1 only, first three hits) and PK Thunder 2 (looping hits).
 Luigi's Luigi Cyclone (windbox), down taunt and pummel.
 Mario's F.L.U.D.D., down aerial (landing), Cape, Super Jump Punch (hits 1-6) and pummel.
 Marth's up smash (launcher).
 Meta Knight's up smash, forward aerial, back aerial (excluding their respective final hits), Drill Rush (multihits), Shuttle Loop (first hit) and down throw (first nine kicks).
 Mewtwo's up smash and neutral aerial (excluding their respective final hits).
 Mr. Game & Watch's neutral aerial (all but final hit) and Judge #8.
 Ness's dash attack (first two hits), up smash (charging hitbox), down smash (charge, first back hit and first front hit), up aerial (multihits) and PSI Magnet.
 Peach's dash attack (first hit), down smash (looping hits) and Peach Parasol (launcher and multihits).
 Pichu's forward aerial and back aerial (both moves' looping hits).
 Pikachu's forward aerial and back aerial (both moves' looping hits).
 R.O.B.'s up tilt (launcher) and up smash (launcher) and Arm Rotor (all but final hit).
 Roy's up smash and Blazer (excluding their respective final hits).
 Ryu's tapped forward tilt (close), held forward tilt (first hit), tapped down tilt and up aerial (first hit).
 Samus's up smash, forward aerial, up aerial and Screw Attack (excluding their respective final hits).
 Sheik's up tilt (first hit), forward smash (first hit) and Vanish (reappearance hit).
 Snake's up smash (launcher), neutral aerial and down aerial (excluding their respective final hits).
 Squirtle's up smash (launcher), down aerial and Waterfall (excluding their respective final hits).
 Toon Link's Spin Attack (ground and air, all but final hit).
 Wario's down aerial (looping hits), Chomp (biting hitbox) and Corkscrew (all but final hit).
 Yoshi's Yoshi Bomb (launcher).
 Young Link's up smash (first two hits), back aerial (first hit) and Spin Attack (ground and air, all but final hit).
 Zelda's forward smash, up smash (excluding their respective final hits) and down throw (flames).
 Zero Suit Samus's up smash (launcher), Paralyzer and Boost Kick (all but final hit).
No knockback[edit]
From Melee onward, there are certain attacks that deal zero knockback, causing damage as usual but not flinching, meaning that the hit character can still perform any actions while being attacked. Most attacks with no knockback can rack up damage quickly, as they can hit foes repeatedly without launching them away from their range. These moves can also be used to "steal" KOs from opponents in free for all battles, as while they do not cause knockback, they will take ownership of the KO on an already fatally struck opponent. Fox's Blaster is the most well known example of an attack with no knockback. Due to the fact that it does not deal knockback, it will not interrupt an opponent's moves or force them out of a punishable state such as being asleep or being stuck in the ending lag of a missed Rest. Idle characters in Brawl and SSB4 will also turn around if they are repeatedly struck with moves that deal no knockback, which is noticeable with Fox's Blaster.
In Melee, phantom hits usually damage foes, but without any knockback. It is also possible for any character to receive no knockback from attacks by certain factors, such as by being giant and metal simultaneously on a low launch rate battle, and as mentioned above, armor will prevent characters from taking knockback while active.
List of moves with no knockback[edit]
 Fox's Blaster shots in both his neutral special and throws (except his forward throw) in Melee onward.
- Mario's Mario Tornado in Melee (hit 1).
- Dr. Mario's Dr. Tornado in Melee (hit 1).
- Charizard's forward aerial (furthest hitboxes) in Brawl.
- Snake's Hand Grenades (when striking the opponent without exploding) in all games.
 Olimar's antenna during his neutral attack and down tilt in Brawl.
- Mr. Game & Watch's Short-Order Chef (some types of food) in SSB4.
- Mr. Game & Watch's Judge #1 in all games.
- Falco's Burst Blaster in SSB4.
 Olimar's Pikmin Toss (except for Purple Pikmin) in all games.
- Mario's Cape in all games. While it has knockback programmed, the reverse effect overrides this, and instead adds a fixed amount of momentum to opponents. Will deal knockback to opponents hanging on the ledge in Ultimate, and puts opponents on the ledge into hitstun in Melee.
- Dr. Mario's Super Sheet in all games. While it has knockback programmed, the reverse effect overrides this, and instead adds a fixed amount of momentum to opponents. Will deal knockback to opponents hanging on the ledge in Ultimate, and puts opponents on the ledge into hitstun in Melee.
- Bayonetta's Bullet Arts (at a distance from Bayonetta) in all games.
 Piranha Plant's Poison Breath in Ultimate.
- Joker's Gun (at a distance from Joker) in Ultimate.
- Togepi's Leech Seed.
- The flower, poison and curse statuses.
- The "crush" of Master Hand and Crazy Hand during their grab attacks in Melee.
- Amaranthine gas in The Subspace Emissary.
- Some consecutive-hitting attacks used by bosses (such as Rayquaza's Thunder).
Weight-independent knockback[edit]
Introduced in version 1.1.0 of SSB4, certain moves are coded to ignore the target's weight when inflicting knockback, instead using a set value of the default 100. As a result, they are much more consistent across the cast when used as set-up hits and similar.
List of moves with weight-independent knockback[edit]
Super Smash Bros. 4[edit]
- Bayonetta's neutral attack (all except infinite finisher), forward tilt (hits 1-2), forward aerial (hits 1-2), down aerial (clean), Heel Slide (ground dash and last hit, air dash) and Witch Twist.
- Charizard's up smash (hit 1 clean).
- Cloud's neutral attack (hit 2), forward smash (hits 1-2), down smash (hit 1), Cross Slash (hits 1-4) and Climhazzard (most of non-Limit hit 2).
 Corrin's neutral attack (hit 2) and Draconic Ascent (loop hits).
 Dark Pit's neutral attack (infinite loop).
- Diddy Kong's up smash (hit 1).
- Falco's up smash (hit 1 clean).
- Ganondorf's neutral aerial (hit 1 clean (hitbox ID value 2 only)).
- Kirby's forward aerial (hits 1-2) and Hammer Bash (air hit 1).
- Link's Spin Attack (air all but last hit).
- Lucas's down tilt.
 Lucina's neutral aerial (hit 1) and Dancing Blade (hit 2 down, hit 3 down).
- Marth's neutral aerial (hit 1) and Dancing Blade (hit 2 down, hit 3 down).
 Pit's neutral attack (infinite loop).
 Robin's neutral attack (hits 1-2).
 Roy's neutral aerial (hit 2).
- Samus's forward aerial (hits 1-4) and Screw Attack (hits 1-10).
- Toon Link's forward smash (hit 1).
- Yoshi's back aerial (hits 1-2).
- Zero Suit Samus's Plasma Whip (all but last hit).
A few moves not only treat the opponent's weight as 100, but also temporarily set their gravity to 0.085 and falling speed to 1.5, making their knockback even less character-dependant. However, since the gravity and falling speed alterations are temporary, the knockback is still heavily affected by them, and so the vertical KO power of such moves is heavily skewed towards fast-falling characters surviving much longer than heavy ones.
- Cloud's Finishing Touch (hitbox on frames 16 and 19-26, but not 17-18 or 27-32) (gravity and fall speed set for 22 frames)
- Pac-Man's Meteor Trampoline (clean meteor) (gravity and fall speed set for 5 frames)
Ultimate[edit]
In Ultimate, weight independence is now programmable from a standard flag within hitbox scripts, and as such its effect has been homogenised. If active, all fighters are treated as having a weight of 100 when calculating the attack's knockback, and a fall speed of 1.5 and gravity of 0.087 for the first 10 frames of the launch, before reverting back to a fighter's regular fall speed and gravity. Notably, this effect overrides the homogenised fall speed and gravity used by attacks which have an angle between 70˚ and 110˚.
- Bayonetta's neutral attack (all except for the rapid jab and the second hit of the rapid jab finisher), forward tilt (hits 1-2), up tilt (hit 1), forward aerial (input 1-2), Heel Slide, After Burner Kick and Witch Twist.
- Bowser's Whirling Fortress (ground) and Bowser Bomb (first hit and spike).
 Bowser Jr.'s down tilt (hits 1-2) and Abandon Ship! (hits 1-2).
- Byleth's up smash (hit 3), neutral aerial (loop hits/landing hit) and up aerial (loop hits).
- Captain Falcon's neutral aerial (hit 1).
- Charizard's up smash (some of hit 1).
- Chrom's up smash (loop hits), neutral aerial (hit 1), Double-Edge Dance (input 1-3) and Soaring Slash (hits 1-2).
- Cloud's forward smash (hits 1-2), down smash (hit 1), Cross Slash (all hits except final) and Climhazzard (no Limit/some of hit 2).
 Corrin's neutral attack (hit 2), down aerial, Dragon Fang Shot and Draconic Ascent (loop hits).
 Daisy's dash attack (hit 1) and Daisy Parasol (hits 1-2/when parasol is open).
 Dark Pit's forward smash (hit 1).
 Dark Samus's up smash (hits 2-4) and Screw Attack (loop hits).
- Diddy Kong's dash attack (hits 1-2), forward smash (hits 1-2) and up smash (hits 1-2).
- Falco's up smash (hit 1).
- Ganondorf's down smash (hit 1) and neutral aerial (hit 1).
 Greninja's up smash (hit 1) and Water Shuriken (full charge; loop hits).
 Hero's forward tilt (hit 1), Kazap (hits 2-3) Magic Burst (loop hits), Woosh, Swoosh (hit 1) and Kaswoosh (loop hits).
 Ike's Aether (hit 1-3).
- Incineroar's Cross Chop (hit 1/semi-spike) and Revenge when countering an attack.
 Inkling's down tilt (hit 1).
 Isabelle's up smash (loop hits) and Lloid Trap (loop hits).
- Ivysaur's Bullet Seed (launcher).
- Joker's forward tilt (hit 1) up tilt (loop hits) and forward aerial (hit 1).
- Kirby's forward aerial (hit 1-2), pummel (collateral hit) and Final Cutter (hit 1).
- Link's up smash (hit 1-2), forward aerial (hit 1), back aerial (hit 1) and Spin Attack (air; all hits except final).
 Lucario's up smash (hit 1) and down aerial (hit 1).
- Lucas's down tilt.
 Lucina's up smash (scooping hitbox), neutral aerial (hit 1) and Dancing Blade (input 1-3).
- Luigi's Luigi Cyclone (windbox) and dash attack (hit 4).
- Mario's Mario Tornado (loop hits) and Super Jump Punch (loop hits).
- Marth's up smash (scooping hitbox), neutral aerial (hit 1) and Dancing Blade (input 1-3).
- Meta Knight's Mach Tornado (loop hits) and Shuttle Loop (hit 1).
- Mr. Game & Watch's up tilt (hit 1), neutral aerial (hits 1-3) and Judge #8.
 Mythra's Lightning Buster (prior to software version 12.0.0).
 Pac-Man's up smash (hit 1) and down aerial (hits 1-3).
 Palutena's forward tilt (hit 1-2).
- Peach's dash attack (hit 1) and Peach Parasol (hits 1-2/when parasol is open).
- Pichu's Thunder (projectile).
- Pikachu's neutral aerial (loop hits and forward aerial (loop hits).
- Piranha Plant's Piranhacopter (loop hits).
 Pit's forward smash (hit 1).
 Richter's dash attack (loop hits), down tilt (hit 1) neutral aerial (loop hits) and Uppercut (loop hits).
 Ridley's forward aerial (hits 1-2).
 Rosalina's forward aerial (Luma).
- Roy's up smash (loop hits), neutral aerial (final hit), Double-Edge Dance (input 1-3) and Blazer (loop hits).
- Samus's up smash (hits 2-4) and Screw Attack (loop hits).
 Shulk's up smash (hit 1).
 Simon's dash attack (loop hits), down tilt (hit 1) neutral aerial (loop hits) and Uppercut (loop hits).
- Snake's forward tilt (hit 1) and neutral aerial (final hit).
 Sonic's up smash (loop hits).
- Squirtle's back aerial (loop hits).
 Terry's Rising Tackle (loop hits).
- Toon Link's Spin Attack (air; all hits except final).
 Villager's up tilt (hit 1) and up smash (loop hits).
- Wario's Corkscrew.
 Wolf's Fire Wolf (loop hits).
- Yoshi's back aerial (hit 1-2).
- Young Link's up smash (hit 1-2), forward aerial (hit 1), back aerial (hit 1) and Spin Attack (air; all hits except final).
- Zelda's neutral aerial (hits 1-3).
- Zero Suit Samus's Plasma Whip (loop hits).
In addition, all throws in Melee treat the opponent's weight as 100.
Lastly, some attack effects have weight independent properties, which include the bury, paralyze, and stun effects. However, only the bury effect can ignore knockback resistance.
Knockback stacking[edit]
Knockback stacking is the means by which knockback is applied to a target that has already been launched by a previous move. Depending on the game and situation, the new knockback can replace the old knockback entirely, have no effect at all, or have its properties merged with the old knockback. In games where knockback stacking is more common, it is an important aspect to consider for combos, as a character will have already been launched when hit by a subsequent move, therefore altering the followup move's properties.
In Melee[edit]
In Melee, knockback stacking occurs if both hits are separated by 10 or more frames, and if the target does not stay on the ground. Otherwise, the second hit's knockback completely replaces the first's. This can lead to noticeable scenarios where strong hits can be canceled into much weaker ones, which is mostly prevalent in team battles or with certain items. This also prevents knockback stacking in cases such as waveshine combos, when a character heavy enough to not be knocked down by Fox's shine is hit back and forth in opposing directions.
Knockback stacking for both hits is done separately for the horizontal and vertical components of their knockback. If both vectors have equal directions on one axis, the stronger component prevails, whereas if they have opposing directions, they are merged via vector addition. This often leads to the resulting knockback having a different angle than either of the previous hits alone. For example, if a character is struck up and right by a strong hit, then up and left by an equally strong hit, the character is sent straight up, due to the horizontal components canceling each other out. In this same example, if the second hit was stronger, the character would be launched up with the second hit's full vertical force, as well as weakly to the left. Knockback stacking occurs even if both hits come from the same character; as a result, there is often residual knockback from a previous hit in a combo, which must be taken into account when trying to follow up.
While knockback stacking alters the resulting angle and launch speed, hitstun always remains the same as if the second hit had struck the target without any merging. However, DI does apply to the resulting knockback vector, so knockback stacking needs to be taken into account for optimal DI. If the victim is grounded and gets spiked towards or in parallel to the ground at non-tumble knockback, they stay grounded, unless the hit also resets.
Brawl onward[edit]

From Brawl onward, knockback stacking behaves much differently, and its effects have been generally minimized. It now only occurs if both hits come from different sources, and if the second hit's resulting launch speed is lower than 0.8× of the first hit's launch speed at the time the second hit connects. Additionally, the first hit's launch speed and hitstun are retained throughout, instead of being merged and using the second hit's (respectively), and the resulting angle cannot be DIed. Furthermore, if the first hit's launch speed at the time the second hit connects is 2.65× of the second hit's or higher, the second hit's knockback is ignored, though it still applies hitlag. In any other case, the second hit fully overrides the first.
As a result of these changes, knockback stacking is generally no longer a factor for combos from a single character, and it is no longer possible for characters to cancel out strong knockback with significantly weaker attacks. However, hitboxes belonging to articles coded separately from a character, such as Bayonetta's Wicked Weaves, Fox's Fox Illusion, and all projectiles, are considered separate sources, and can thus be subjected to knockback stacking with physical moves from the character that produced them. In Smash 4 and Ultimate, this gives certain characters unique advantages with combo finishers, such as with Robin comboing Arcthunder (in Smash 4) or Arcfire into his down aerial's meteor smash, or Bayonetta comboing her forward smash into her down aerial's meteor smash on a Witch Timed opponent; both of these setups cause the opponent to be launched at a much lower angle horizontally, better securing KOs near the edge if the meteor smash would otherwise cause the opponent to land onstage.
The resulting angle from knockback stacking is determined by the inverse tangent of both hits' added knockback vectors, with the vertical component divided by the horizontal component. For example, stacking Robin's Arcthunder (50°) and down aerial meteor smash (270°) results in an angle of approximately 17.6°. This also means that moves with completely opposing horizontal strengths cannot stack, while moves with completely opposing vertical strengths will result in a perfectly horizontal angle. Worth noting is that when determining whether two moves can stack, the first hit's launch speed takes the gravity penalty into consideration, while the second hit's does not.
Knockback chart[edit]
The following is a chart demonstrating how much knockback each character sustains in Brawl. While weight is the primary attribute for determining how much knockback a character sustains, there are other attributes that factor in, such as a character's gravity. This results in some characters sustaining more knockback than lighter characters.
The knockback value shown is how much knockback a character sustains when hit with Marth's Critical Hit at 0%, arranged from least knockback sustained to most knockback sustained.
| Rank | Character | Knockback sustained | Velocity applied |
|---|---|---|---|
| 1 | 490.8 | 14724 | |
| 2 | 494.667 | 14840 | |
| 3 | 499.367 | 14981 | |
| 4 | 501.4 | 15042 | |
| 5 | 504.667 | 15140 | |
| 6 | 505.333 | 15160 | |
| 7 | 508.467 | 15254 | |
| 8 | 508.7 | 15261 | |
| 9 | 509.533 | 15286 | |
| 10 | 509.867 | 15296 | |
| 11 | 513.3 | 15399 | |
| 12 | 515.633 | 15469 | |
| 13 | 517.133 | 15514 | |
| 14 | 520.033 | 15601 | |
| 15 | 520.833 | 15625 | |
| 16 | 525.1 | 15753 | |
| 17 | 525.7 | 15771 | |
| 18 | 525.9 | 15777 | |
| 19 | 531.9 | 15957 | |
| 20 | 532.367 | 15971 | |
| 21 | 532.8 | 15984 | |
| 22 | 534.4 | 16032 | |
| 23 | 536.2 | 16086 | |
| 24 | 536.6 | 16098 | |
| 25 | 536.967 | 16109 | |
| 26 | 539.533 | 16186 | |
| 27 | 546 | 16380 | |
| 28 | 550.467 | 16514 | |
| 29 | 556.267 | 16688 | |
| 30 | 558.5 | 16755 | |
| 31 | 561.567 | 16847 | |
| 32 | 561.9 | 16857 | |
| 33 | 565.5 | 16965 | |
| 34 | 566 | 16980 | |
| 35 | 566.933 | 17008 | |
| 36 | 573.367 | 17201 | |
| 37 | 574.133 | 17224 | |
| 38 | 577.567 | 17327 | |
| 39 | 589.1 | 17673 |
Trivia[edit]
- All games have a knockback cap of 2500 (or a launch speed of 75 units per frame), fast enough to move from the edge of Battlefield to the center in less than one frame. Smash 4 and Ultimate have a knockback cap for vertical attacks; equal to a vertical launch speed of 10, or a little over 330 units of knockback vertically. Additionally, attacks that surpass a vertical launch speed of 4.7 when crossing the upper blast line will cause Star KOs and Screen KOs to not occur.
- Because of this vertical knockback cap in Smash 4, if a fighter were to have an incredibly high fall speed and gravity, it would be impossible to KO them off the upper blast line (unless using an item such as a Beetle), no matter how much knockback they were given. This can be accomplished under specific conditions in the unmodified game, via the use of customs and special smash. In Ultimate, this is only possible by meteor smashing opponents off the ground, as fall speeds are set to 1.8 during hitstun for launch angles between 70° and 110°.
- According to Masahiro Sakurai, the knockback speed up effect seen in Ultimate was planned to be implemented in previous Smash games, but ended up being scrapped because it was easy to lose track of characters' positions, especially in Super Smash Bros. for Nintendo 3DS.
- Through hacking, the value of damage dealt in the knockback formula can be a negative number, in which case the game will run the calculation as normal, and as such knockback will decrease with percent if the damage is less than -2. Furthermore, a negative knockback value can be calculated, although this will simply result in zero knockback being dealt.