Link (SSBB)
| Link in Super Smash Bros. Brawl | |
|---|---|
 
| |
| Universe | The Legend of Zelda |
| Other playable appearances | in SSB in Melee in SSB4 in Ultimate |
| Availability | Starter |
| Final Smash | Triforce Slash |
| Tier | F (35) |
Link (リンク, Link) returns as a playable character in Super Smash Bros. Brawl at E3 2006. The main protagonist of The Legend of Zelda universe, he was one of the original four characters to be confirmed as returning playable characters at E3 2006, with the other three being Mario, Kirby, and Pikachu. His design has changed to reflect his incarnation as the Hero of Twilight from The Legend of Zelda: Twilight Princess.
Brawl continues the trend from the original Super Smash Bros. of using archived voice clips for Link taken from existing Zelda games. This time, they are all pulled directly from The Legend of Zelda: Twilight Princess (the concurrent Zelda game at the time) which were originally recorded by Akira Sasanuma and consist of returning voice clips with previously leftover ones. This reflects his succession of Nobuyuki Hiyama, his voice actor from The Legend of Zelda: Ocarina of Time.
Link is ranked 35th on the tier list, placing him in the middle of the F tier, a noticeable drop from his position of 18th in Melee, and roughly tied with his 11th place ranking in Smash 64 as his worst placement in the series. Link is equipped with a useful DACUS, good range and disjoint in his attacks, and many powerful moves. Like his Melee incarnation, he has multiple effective projectiles for zoning and edgeguarding. Link also has the third-best vertical endurance, courtesy of high weight and great momentum canceling.
Despite the significant burst-movement option provided by his DACUS, Link has atrocious agility, with low dash speed, air speed, and jump height. In addition, Link has lackluster frame data throughout his moveset, giving him okay-at-best out of shield options, one of the worst air games, and an unremarkable neutral game, with many fighters being able to confound him with speed once they get past his projectiles. Like many heavyweights, Link is easily chain-grabbed, and his projectiles and disjoints aren't good enough to keep grapplers at bay. His most crippling flaw, however, is his recovery, which has been nerfed from Melee to the point of being one of the worst recoveries in Brawl, often offsetting his amazing endurance. Spin Attack does not grant him much horizontal distance (and barely any without prior momentum), his Bombs are less effective for a bomb recovery, and his Hookshot can no longer wall grapple (instead targeting only the edge, making it easily edgehogged).
Overall, Link has problematic match-ups against most characters, next to no representatives, and poor tournament results, with even his best smashers in KirinBlaze and Legan hardly securing any notable placements.
Attributes[edit]
Link may be a character of poor speed, but he makes up for that with power. His sliding DACUS also helps his slow mobility and his BDACUS is very effective due to his fast sidestep. Link is moderately heavy, having the same weight as Captain Falcon. Link is also one of the heavyweight characters that has good directional influence and momentum canceling, especially vertically, which along with his extremely quick fast fall allows him to survive almost as long as Snake onstage, though he arguably has the worst recovery in the game and sometimes his fast fall can also give him problems recovering. His heavy weight backfires, however, by making him extremely vulnerable to chain grabs that force him offstage. Link's tilts are fast and powerful, and his down tilt is particularly good for getting opponents into the air. It can also meteor smash at the tip of the sword or hitting behind Link, making it respectable for edgeguarding. His up tilt is fast and good for juggling, and his forward tilt can easily KO at high percentages. Link's forward smash can become a two hit natural combo at low percentages. It is also a great KO move, depending from where the sword connects. His down smash is an easy KO move at fairly high percentages, and is Link's quickest smash attack. However, it is predictable making it easy to read at higher percentages, and has some ending lag. Link's up smash doesn't KO easily, but it racks up decent damage. Link's aerial attacks are also good, as both his neutral aerial and grab aerial (zair), combined with a short hop and fast falling, is a great option for approach. Link's back aerial is good for spacing when needed. Link's forward aerial is fairly fast, is a good set-up move and its second hit is powerful, but this KOing move is hard to land, since the first hit only set ups the second hit at very low percentages and the first hit lacks KO power. Link's up and down aerials are some of his best KO moves, having high duration and high knockback, but have high ending and landing lag. Even though his aerial attacks are effective, his slow aerial speed, fast falling speed, and small jumps give Link a very weak aerial game. His grab, like all tether grabs, has good range but has a high amount of startup lag (12 frames) and is laggy if missed. Specials for Link are also good for keeping distance, racking up damage, and great for survival. On the ground, Link can charge his up special. It is a good edge guarding tool, but is predictable. Spin Attack can also deflect projectiles if used in the air. His neutral special is a bow that charges and shoots quick projectiles. If activated in the air, just before hitting the ground, an uncharged arrow will shoot instantly, making it a fast attack that will often hit unsuspecting enemies. Link's down special allows him to pull out a bomb as an item and throw it, which can be used for mindgames, but his own bombs can be caught during the throw and used against him. His side special move, Gale Boomerang has fairly good range and can gimp some opponent's recoveries. Inputting the command like a smash attack will cause the boomerang to reach farther. Link's shield, which he holds to his front while standing, can act as a shield on its own: when Link doesn't move, many projectiles coming from the opposite direction he's facing can't hit him. Crouching can also block most attacks as well, but leaves his upper hitbox open. He also has a great spot dodge.
Link's critical problem is his abysmal recovery, being one of the worst recoveries in the game; this makes him easy to KO despite being a heavyweight with great momentum canceling. Although his projectiles, particularly Gale Boomerang help it somewhat, his poor jumping, quick fall speed, slow air speed, and poor distance on the Spin Attack make his recovery arguably the shortest in the game both horizontally and vertically and also very predictable, so it's suggested that all Link mains have good directional influence. Link's Spin Attack is also a slow recovery move, with predictable trajectory and minimal distance both vertically and horizontally, making it fairly easy to edgeguard and gimp, mostly with moves that out prioritise his projectiles, and due to the poor distance of his recovery he can get KO'd offstage with a fairly low amount of hits and not being able to recover, especially when he loses his 2nd jump, and due his poor height, that also means meteor smashes are devastating for his recovery. Link's most effective mode of recovery is to first throw the Gale Boomerang to disrupt the opponent, then use his up special right after doing his second jump to give more momentum so he can gain more height, but even this is a poor recovery option. Using Spin Attack immediately after being hit while recovering makes it give no horizontal distance at all. His Clawshot can be useful, being the second longest tether grab in the game, but, like all tether recoveries, it is easily edgehogged. Another method of recovery is where Link pulls out a bomb, uses his Spin Attack, and his bomb blows up on him for little damage but gives Link another Spin Attack. At higher percentages the knockback from the bomb can be used for additional height. Although, Link has a large ledge sweetspot, but due to his poor recovery, Link heavily relies on edge grabbing, leaving him vulnerable to edgehogging (though, this can be prevented with his projectiles). If Link is lucky, the Gale Boomerang can carry the opponent out far enough so they can't recover, but this happens rarely, making it very unreliable.
Overall, Link's high power and respectable camping ability is largely offset by his terrible recovery, unreliable frame data and poor mobility; this gives him a poor approach and almost no reliable method of recovering. Because of his overwhelming weaknesses, he is widely considered non-viable in tournament play, and his representation is almost nonexistent at a competitive level.
Changes from Super Smash Bros. Melee[edit]
Link has received some significant power buffs and is overall a much more powerful character in Brawl. Many of his attacks have been given higher knockback potential, resulting in him wielding many more KO moves. His grab aerial is a lot more useful as an attack as it no longer suffers from large amounts of landing lag, giving him a new spacing tool and more opportunities to link to his other moves. Additionally, the introduction of DACUS gives him a new much needed approach option, though his DACUS is poor as while it covers a large distance, his up smash remains a fairly poor move especially with its higher ending lag.
On the other hand, he has received some significant nerfs to his movement speed, which has made him an even slower character. His already poor out of shield game was made even worse, as all of his out of shield options (including Spin Attack, his grab, and his neutral aerial) are all slower than they were before, and his lower traction only increases this issue. His aerial game is also worse, as most of his aerials’ frame data was lengthened, making him difficult to reliably threaten opponents. His air speed is much slower, hindering both his aerial approach and recovery. His up aerial is much slower and now unviable for combos, and the removal of L-canceling drastically harmed both his up and down aerials. His biggest detriment, however, is his heavily crippled recovery in Brawl. His grab aerial can now only be used as a tether recovery, significantly reducing its utility, and his Spin Attack covers less horizontal distance, making him more reliant on prior momentum. This is especially troubling given his worse air speed and acceleration. Link can also no longer destroy Bombs with Spin Attack which also hinders his recovery.
While Link already heavily struggled to utilize his strengths in Melee, the game mechanics made this even worse in Brawl, and he has among the worst tournament results and representation.
Aesthetics[edit]
 Link's design is now based off of Twilight Princess, rather than being based of his Ocarina of Time design he had in Melee and SSB. His design has also received a significant boost in graphics quality, most notably seen on his tunic and hat, which have much more detail and textures.
- His forward helpless state is now the animation of when he finishes his double jump (from both Melee and Brawl), but his back and neutral helpless states are the same.
- Link's dark costume is now based on Dark Link and he has a new yellow costume.
- Like all characters, Link now has three taunts; his Melee has been removed and replaced with two new ones, and his down taunt is similar to his Smash 64 taunt.
Attributes[edit]
 Link dashes slightly faster (1.3 → 1.328).
 Link's air speed is drastically slower (1 → 0.8084), going from 6th best out of 26 characters to 6th worst out of 39 characters. This significantly reduces Link's already poor mobility, as well as significantly hindering his recovery and making approaching more difficult.
- Link is one of the few returning veterans whose air acceleration is lower (0.02 → 0.01 (base), 0.06 → 0.05 (max)), going from the 5th best out of 26 characters to the 4th worst out of 39 characters.
- As with the returning veterans, Link's falling speed was decreased (2.13 → 1.6). Compared to the returning veterans, however, Link falls faster. In comparison to the rest of the cast, this makes Link more vulnerable to combos and chain throws, and makes his recovery worse, while with his terrible mobility and laggy attacks, he gets no real benefit from it outside the vertical endurance boost.
- Link's fast fall speed was decreased (3 → 2.666) although relative to the cast, Link now has the 2nd highest fast fall speed and he now has the largest speed increase from his normal fall speed to his fast fall (40.8% increase → 66.625% increase). When coupled with the introduction of momentum canceling, this significantly improves his vertical endurance with his vertical endurance being the third best with momentum canceling despite only having the 9th highest vertical endurance without momentum canceling.
- Link's gravity is lower (0.11 → 0.089).
- Link's traction is significantly lower (0.1 → 0.064), especially when comparing with the returning veterans, now going from the best in Melee to the 10th highest. This makes it harder for him to punish out of shield and due to the removal of wavedashing, its benefits do not make up for it.
- Jumpsquat is longer (6 frames → 7).
- Spot dodge has a longer duration (frames 2-15 → 2-20).
Ground attacks[edit]
- Neutral attack:
- The second and third hits of neutral attack have less startup lag (frame 7 → 6), and the third hit has altered knockback (10 (base), 100 (scaling) → 70/50), improving its spacing potential. Additionally, the first hit can now be used to jab lock opponents.
- The neutral infinite has been removed and will always deal three hits, decreasing its overall damage potential.
- The first and third hits deals less damage (5% (first)/6% (third) → 4%/5%). Additionally, the first hit has more startup lag (frame 6 → 7), and the second and third hits also have more end lag (frame 18 (second)/frame 33 (third) → 21/37).
- Forward tilt:
- Forward tilt has less startup lag (frame 16 → 15) and deals more knockback (5/2 (base), 90 (scaling) → 20/96).
- Forward tilt deals consistent damage (13%/14%/15% → 13%).
- Up tilt:
- Up tilt has less startup lag (frame 9 → 8), and the universally decreased falling speeds improve its KO potential.
- Up tilt has a shorter duration (frames 9-15 → 8-12) and more ending lag (frame 30 → 36). This, combined with universally decreased fall speeds and the introduction of hitstun canceling, hinders its juggling potential.
- Down tilt:
- Down tilt deals more damage (11% → 12%) and has increased base knockback (80 → 90). This, combined with the changes to meteor canceling, significantly improves its edgeguarding potential.
- Down tilt's meteor smash hitbox is significantly smaller, and the hitbox placement is worse (now being a small hitbox on Link's body), now making it nearly impossible to land due to its impractical placement. One of its hitboxes is also no longer a meteor smash.
- Dash attack:
- Dash attack's tipper hitbox deals more damage (9% → 10%), and all hitboxes have altered knockback (10 (base), 100 (scaling) → 30/80) improving its safety.
- Dash attack has more startup lag and a shorter duration (frames 7-12 → 8-11). The introduction of hitstun cancelling also hinders its combo potential.
- The higher startup and shorter duration make the hitbox start on a lower position and end on a higher position, hindering its vertical range both above and below Link.
- Forward smash:
- Second slash of forward smash is now affected by smash charging and launches opponents at a lower angle (65° → 48°). The first hit also deals more damage (13%/14% → 14%/15%), has increased knockback (30 (base), 83/85 (scaling) → 25/90), has slightly decreased ending lag (frame 50 → 49), and can now trip opponents.
- The second hit of forward smash now has three hitboxes dealing a different amount of damage (18%/20% → 17%/19%/20%).
- Both hits of forward smash have a shorter duration (frames 15-18 → 15-17 (hit 1), frames 10-13 → 12-14 (hit 2). The second hit also has more startup lag (frame 10 → 12) and deals less knockback (30 (base), 100 (scaling) → (20/25/30)/90), making it weaker when uncharged despite its more favourable angle.
- Up smash:
- Up smash inflicts 2% more damage when all hits connect due to changes in stale-move negation (15% → 17%). It also has less startup lag (frame 11 → 10), and all hits have a longer duration (frames 11-15 → 10-15 (hit 1), frames 26-28 → 26-29 (hit 2), frames 41-43 → 41-45 (hit 3).
- Link was given a lengthy sliding DACUS, whose inputs can also be used for super glide tossing his Bombs or other items, significantly improving his grounded approach.
- Up smash has more ending lag (frame 52 → 70), significantly hindering its followup potential despite the final hit's lower base knockback (90 → 70).
- The lower base knockback also hinders its KO potential.
- Down smash:
- Down smash's weak hit deals more damage (11% → 14% (front), 16% (back)), the front hit has higher base knockback (20 → 26), and the back hit has less startup lag (frame 21 → 20).
- Down smash has more ending lag (frame 42 → 50).
Aerial attacks[edit]
- Link is arguably the character most adversely affected by the loss of L-cancelling, along with Ganondorf and Bowser, as his high-landing-lag up and down aerials were especially reliant on it, with his up aerial completely losing its comboing abilities, while his down aerial is now dangerously unsafe if he misses it.
- Neutral, forward and back aerials have less landing lag (15 frames → 9 (neutral), 10 (forward/back), although their landing lag was not fully compensated for the loss of L-cancelling.
- Neutral aerial:
- Neutral aerial auto-cancels earlier, as its hitbox is now shorter than its auto-cancel window (frame 40 → 32), allowing it to auto-cancel in a short hop. It also no longer has sourspots which deal less damage (9%/8% → 10%).
- Neutral aerial's clean sweetspot and late hit deal less damage (11% → 10% (clean), 7% → 6% (late)), although their base knockback was compensated (15 → 22 (clean), 10 → 15 (late)). The move also has more startup lag, a shorter duration (frames 4-39 → 7-27), and more ending lag (frame 36 → 40).
- Forward aerial:
- First hit of forward aerial was significantly weakened, dealing less damage (13% → 9%) with no compensation on its knockback, no longer reliably KOing. However, even with the power nerf, it does not connect with the second hit for much longer. Both hits also have a shorter duration (frames 14-16 → 14-15 (hit 1), frames 30-33 → 26-27 (hit 2)).
- The second hit of forward aerial deals more damage (8% → 12%) and knockback (0 (base), 90 (scaling) → 20/110), being stronger than the first hit in Melee. The second hit also has less startup lag (frame 30 → 26) and is much easier to use out of a short hop. The move also has less ending lag (frame 56 → 51), and it can now auto-cancel out of a full hop.
- Back aerial:
- Back aerial's first hit now has set knockback (0 (base) → 40 (set)), making it connect with the second hit much more reliably. The second hit deals more knockback (15 (base), 100 (scaling) → 70/70), improving its edgeguarding potential
- Back aerial's first hit deals less damage (7% → 4%), and the move has slightly higher ending lag (frame 30 → 31).
- Up aerial:
- Up aerial auto-cancels earlier (frames 1-4/56 → 1-10/47), enabling it to auto-cancel out of a full hop. The late hit also deals more damage (12% → 13%), although its base knockback was compensated (25 → 18).
- Up aerial has much more startup lag with a shorter duration (frames 5-49 → 11-41), and the clean hit deals less damage (16% → 15%) and has less base knockback (25 → 18).
- Down aerial:
- Down aerial's clean hit's sourspot deals more damage (20% → 22%) and launches opponents at a higher angle (65° → 90°), improving its KO potential despite its lower base knockback (40 → 30) and making it among the strongest aerials in the game. The universally decreased fall speeds also improve its KO potential. The bounce hit also deals consistent damage (6%/8% → 8%).
- If Link fast falls while using his down aerial, he will not bounce after hitting with it, plummeting straight through to the ground.
- Down aerial has more startup lag and a shorter duration (frames 13-64 → 14-64), and its early auto-cancel window is shorter (frames 1-12 → 1-9). Its previous clean hit's sweetspot deals less base knockback (50 → 40), and the late hit deals less damage (19% → 18%).
- Grab aerial:
- Grab aerial is significantly more useful for non-recovery purposes; the move now auto-cancels on landing instead of having an immense 30 frames of landing lag, and its altered angle (361° → 45°) and knockback (30 (base), 40 (scaling) → 60/30) make it useful for setting up additional blows, giving the move significant utility on stage and making it an effective spacer. It also no longer renders Link helpless after using it. It now also has a second hit increasing its maximum damage output (6% → 10%).
- Grab aerial's first hit deals less damage (6% → 4%) and has a shorter duration (frames 11-18 → 11-16).
- Grab aerial is now a tether recovery instead of a wall grapple, meaning that Link can only use it to grab the ledge and it can now be edgehogged. This makes it significantly worse for recovering. It also has less range.
Throws/other attacks[edit]
- Grabs
- Grabs have more startup lag (frame 11 → 12 (standing), frame 12 → 14 (dash)).
- Grabs have a longer duration (frames 11-17 → 12-19 (standing), frames 12-17 → 14-21 (dash)). Link also now possesses a pivot grab with a very long duration (frames 15-35).
- Pummel:
- Pummel has less end lag (frame 26 → 16).
- Pummel deals less damage (3% → 2%).
- All throws deal more damage (6% → 7%).
- Forward (25 (base), 110 (scaling) → 50/120) and back throws (24 (base) → 50) deal more knockback.
- The introduction of hitstun canceling heavily limits his up and down throws' follow-up potential beyond very low percents.
- Down throw:
- Down throw's hitbox deals more damage (2% → 3%) and has higher knockback scaling (98 → 120).
- The hitbox is larger (3.5154u → 4.32u).
- Down throw no longer put opponents into a tumble at extremely low percents, allowing for potential follow-ups.
- Link releases opponents from down throw earlier (frame 28 → 23). This makes the throw harder to DI, but increases its ending lag, as its total duration was unchanged.
- The hitbox has a shorter duration (frames 22-23 → 22). As the throw is still weight-dependent, this notably means that the hitbox will no longer come out against Jigglypuff and Zero Suit Samus (as their weight values play the throw at a speed where the frame the hitbox comes out is skipped), making the throw only deal 4% against them.
- The throw launches opponents at a lower angle (90° → 110°), and it has increased knockback scaling (50 → 90). When combined with its higher ending lag, along with the introduction of hitstun canceling, this significantly hinders its follow-up potential, while still being too weak to KO.
Special moves[edit]
- Hero's Bow:
- Hero's Bow has a slightly altered animation: instead of standing upright and gradually leaning backwards while drawing the bow, Link now kneels and draws the bow at a fixed height.
- Hero's Bow charges faster, and the arrows it fires travel faster and farther. He also now has access to Quickdrawing, improving Hero's Bow's utility.
- As a drawback of both the faster charge and the increased minimum range, it is harder to hit opponents below Link.
- Link can now B-reverse with Hero's Bow.
 Ghost Arrow glitch has been removed.
- Gale Boomerang:
- Link has a new side special: Gale Boomerang. It is considered less effective; Gale Boomerang deals significantly less damage in its initial hitboxes and has no damaging hitboxes at all in its later flight and on its return, while the opponent can still fully react when being pushed/pulled by the wind hitboxes, which makes it difficult for Link to use the move to setup additional blows. Gale Boomerang also travels more slowly and cannot be controlled.
- Gale Boomerang deals more knockback, has larger hitboxes, and is much more effective for gimping. Its new Windbox can allow for new follow ups in some situations. Link can now edge momentum shift Gale Boomerang aiding its edeguarding potential.
- Link can B-reverse with Gale Boomerang.
- Boomerang superjump glitch removed.
- Spin Attack:
- Link can now charge grounded Spin Attack, with its fully charged variant dealing more damage (15% → 19%) and knockback. Its uncharged late hit also deals more damage (5% → 9%/7%/5%), and the aerial version deals more damage due to changes to stale move negation (12% → 14%).
- Grounded Spin Attack is significantly weaker unless it is charged, making the move less effective for KOing. Its non-charged variant deals less damage (15% → 12%/9%), and its knockback was not fully compensated (15 (base) 100 (scaling) → 68/72 (clean), 60/100 → (55/20)/80 (late)). The semi-spike of its later hitboxes was also removed as in the PAL version of Melee (0° → 361°). It also has sourspots and it now has a clean hit, a mid hit and a very weak late hit. Furthermore, Aerial Spin Attack covers significantly less horizontal distance, and has a greater reliance on prior momentum, to where if Link uses the move without momentum toward the direction he was going, it'll gain almost no horizontal distance at all and the final hit has less base knockback (40 → 30). Both versions of Spin Attack have more startup lag (frame 8 → 11).
- Bomb:
- The introduction of super glide tossing gives Link an extra movement option while holding Bombs.
- Link can no longer hit his own Bombs with aerial Spin Attack, preventing Link from utilizing the most usable form of his bomb jump, thus Link can no longer use a bomb jump to extend his recovery unless he had a bomb in his hand before going offstage and it explodes in time. Bomb's maximum damage output is also lower (10% → 9%).
- Final Smash:
- Link now has a Final Smash called Triforce Slash. He emits a beam of light with the Triforce of Courage and traps a nearby opponent into it when he then proceeds to constantly slash at them with his sword. It is one of the most powerful Final Smashes in the game, dealing a total of 83%.
Moveset[edit]
For a gallery of Link's hitboxes, see here.
For a more detailed information regarding Link's moveset and attack hitboxes, see this page.
| Name | Damage | Description | ||
|---|---|---|---|---|
| Neutral attack | Slash (なぎ払い, Mow-Down) Counter Slash (返し, Return) Stab (突き) |
4% | A diagonal sword slash followed by a horizontal slash, with a lunging stab finisher. Loosely based on Link's final blow to Ganon in Ocarina of Time. The first two hits are great when jab canceled, as it can lead into his grab, up special, down smash or even to itself again if the opponent doesn't SDI out of it. | |
| 3% | ||||
| 5% | ||||
| Forward tilt | Bamboo Splitter (からたけわり, Chinese Bamboo Splitter) | 13% | An overhead swipe. An efficient KO move at higher percentages. | |
| Up tilt | Half-Moon Slash (半月斬り) | 9% | Swings sword in an arc. Has good range and knockback. Good for juggling fast-fallers at low percentages. | |
| Down tilt | Grass Cutter (草薙ぎ, Grass Mower) | 12% | Swipes sword across ground. Meteor smashes aerial opponents in contact with Link's body and the hilt of the sword. This is more difficult to use as a meteor smash than other down tilts, because the sweetspot is significantly smaller, ranging only from his head to his body (while crouching). | |
| Dash attack | Splitting Strike (たたき割り, Thrashing Splitter) | 12% (blade), 10% (tip), 11% (arm & body) | Swings sword from head to toe. Good combo starter. | |
| Forward smash | Sword Slice (スマッシュ斬り, Smash Cutter) Double Sword Slice (二段スマッシュ斬り, Two-Stage Smash Cutter) |
15% (blade), 14% (body) | Link lunges forward with a wide sword swing in front of him, dealing good damage and knockback when tipped. The base of his sword has extremely little knockback, designed to link onto an optional second hit: a sword swing with greater KO power. | |
| 17% (blade), 20% (arm), 19% (body) | ||||
| Up smash | Triple Sword Slice (三段斬り, Three-Stage Cutter) | 4% (hit 1), 3% (hit 2), 10% (hit 3 blade), 9% (hit 3 arm), 8% (hit 3 body) | Swings sword in an arc three times. First two hits have no knockback, while the 3rd hit has below average knockback. This move is easily SDIed out of the last hit. | |
| Down smash | Front and Back Sword Slice (前後足元斬り, Front and Back Underfoot Cutter) | Hit 1: 16% (blade & body), 14% (tip), 17% (arm) Hit 2: 16% (blade & body), 17% (arm) |
Swipes sword from front to back, having very quick start-up but moderately long ending lag. Opponents can be hit by both swipes if they are between Link and the Gale Boomerang during its second phase as it pulls the opponent towards Link; however, good timing is required. | |
| Neutral aerial | Link Kick (リンクキック) | 10% (clean), 6% (late) | Link thrusts his leg out in front of him for an extended time. Has sex kick properties. | |
| Forward aerial | Spinning Sweep (回転なぎ払い, Rotating Mow-Down) | 9% (hit 1), 12% (hit 2) | Swings his sword twice while spinning 360 degrees. Second hit has great knockback, though the first hit only sets up the second hit at very low percentages, making it hard to use as a KOing move. | |
| Back aerial | Double Kick (二段蹴り, Two-Stage Kick) | 4% (hit 1), 7% (hit 2) | Does a two kick combo behind himself. Has very little landing lag and low damage. | |
| Up aerial | Jump Thrust (上突き, Up Stab) | 15% (clean), 13% (late) | Thrusts his sword upward, just like the upward thrust attack in Zelda II: The Adventure of Link. Long duration and can star KO at higher damages, though it has a slow startup, little horizontal range, and significantly high ending lag. | |
| Down aerial | Downward Thrust (下突き, Down Stab) | 22% (clean), 18% (late), 8% (after bounce) | Holds his sword downward, this time based on his "Downthrust" from Zelda II: The Adventure of Link. Bounces when the attack lands, possibly scoring an additional hit, but goes through opponents if Link is fast falling. A very powerful finisher that can K.O as low as 75%, but if missed leaves Link open for 50 frames if not auto-cancelled (the laggiest aerial landing in the game). | |
| Grab aerial | Midair Clawshot (空中クローショット) | 4% (hit 1), 6% (hit 2) | Link fires his Clawshot forward, scoring two hits. Has no landing lag at all. Can be used as a tether recovery. Very useful for spacing and stopping approaches against taller characters. | |
| Grab | Clawshot (クローショット) | — | ||
| Pummel | Grab Hilt Strike (つかみ柄なぐり, Grab Hilt/Grip Punching) | 2% | Hits opponent with the hilt of the Master Sword. A fairly fast pummel. | |
| Forward throw | Kick Off (蹴り飛ばし, Kick Flying) | 3% (hit 1), 4% (throw) | Link releases the opponent then kicks them, football punt style. | |
| Back throw | Back Kick Off (後方蹴り飛ばし, Backward Kick Flying) | 3% (hit 1), 4% (throw) | Link throws the opponent behind him and kicks them away. | |
| Up throw | Throw-Away Slash (投げ捨て斬り) | 5%/4% (hit 1), 2% (throw) | Link raises the opponent above him and slashes upward. The hitbox has a sweetspot and a sourspot, although the sourspot can only connect against bystanders. | |
| Down throw | Elbow Strike (ヒジ打ち) | 3% (hit 1), 4% (throw) | Link takes the opponent onto the ground and elbow drops them. Unlike Link's other throws, this throw is weight dependent. As the throw has a hitbox which only lasts for one frame, this can cause problems (with the hitbox simply not coming out when the throw is used against Jigglypuff or Zero Suit Samus). | |
| Forward roll Back roll Spot dodge Air dodge |
— | — | ||
| Techs | — | — | ||
| Floor attack (front) Floor getups (front) |
6% | Does two slashes front and back. | ||
| Floor attack (back) Floor getups (back) |
6% | Does another two slashes front and back. | ||
| Floor attack (trip) Floor getups (trip) |
5% | Essentially the same as his other two floor attacks. | ||
| Edge attack (fast) Edge getups (fast) |
8% | Pulls himself up into a front flip and slices downward. | ||
| Edge attack (slow) Edge getups (slow) |
10% | Slowly climbs up and stabs in front of himself. | ||
| Neutral special | Hero's Bow | 4-12% | Link equips his bow, with the arrows serving as projectiles. Charging increases the speed, distance and damage dealt by an arrow. | |
| Side special | Gale Boomerang | 7% (release), 5% (flight) | Throws the Gale Boomerang, which damages at it flies away and then pulls enemies towards Link as it returns. Can be angled up or down. A "smash throw" (similar to performing a smash attack) increases the distance the boomerang can travel. | |
| Up special | Spin Attack | 12%/9%/7%/5% (ground), 4% (air hit 1), 2% (air hits 2-4), 4% (air hit 5) | This move functions differently when grounded and airborne; an aerial Spin Attack is used as recovery which grants Link height. A grounded Spin Attack is akin to most Zelda games, and functions similarly to a smash attack with great knockback. | |
| Down special | Bomb | 5% (explosion), 7% (throw), 8% (smash throw), 5-9% (dropped) | Link pulls out a bomb, based off its design from Twilight Princess. On contact with a surface, it detonates, dealing damage to opponents and can also hurt Link as well. The explosion can grant him an extra Spin Attack if used skillfully. | |
| Final Smash | Triforce Slash | 5% (traping), 4% (hits 1-15), 18% (hit 16) | Link locks onto an opponent and proceeds to slash them repeatedly with his Master Sword. A luminous image of the Triforce appears around the opponent as Link slashes them. The final strike launches the opponent. | |
Stats[edit]

| Stats | Weight | Dash speed | Walk speed | Traction | Air friction | Air speed | Air acceleration | Gravity | Falling speed | Jumpsquat | Jump height | Double jump height | Empty landing lag |
|---|---|---|---|---|---|---|---|---|---|---|---|---|---|
| Value | 104 | 1.3 – Initial dash 1.328 – Run |
1.2 | 0.064 | 0.0038 | 0.8084 | 0.01 – Base 0.04 – Additional |
0.089 | 1.6 – Base 2.666 – Fast fall |
7 | 27.57550702 - Base ? - Short hop |
? | 4 |
Announcer call[edit]

English/Japanese
Wii Remote selection sound[edit]
- Link yells, similar to his up smash.
On-screen appearance[edit]
- Appears from within a whirlwind and equips the Master Sword and Hylian Shield. Seemingly based on the warping animation seen upon using the Recorder in The Legend of Zelda.

|
|---|
Taunts[edit]
- Up taunt: Swings his sword twice and twirls the sword before sheathing it. Similar to his Twilight Princess victory pose, which he performs after defeating a boss, learning a hidden sword technique, or sheathing his sword upon the defeat of harder-to-defeat enemies.
- Side taunt: Link takes out a fairy that appears similar to Navi from Ocarina of Time, or the fairy cursor from Twilight Princess. The fairy then proceeds to fly around as Link watches it until it returns to his pocket.
- Down taunt: Link's taunt that had previously appeared in the original Super Smash Bros. He pulls his knee to his chest and draws his sword back behind his head. Similar to Lucario's down taunt. May be loosely based on the attacking pose used by the Link from Zelda II: The Adventure of Link.
| Up taunt | Side taunt | Down taunt |
|---|---|---|

|

|

|
Idle poses[edit]
- Link twirls his sword. Similar to the twirling he makes when targeting an enemy in Twilight Princess.
- Link looks at the screen, then looks back afterwards.
 |

|
|---|
Crowd cheer[edit]
| Cheer (English) | Cheer (Japanese) | Cheer (German) | Cheer (Korean) | |
|---|---|---|---|---|
| Cheer | ||||
| Description | Go - Link! *clap clap clap* | Li - n - k! | Hey Link! *claps 3 times* | |
| Cheer (French) | Cheer (Italian) | Cheer (Spanish) | ||
| Cheer | ||||
| Description | Allez Link ! *clap 3 times* | Forza Link! *claps 6 times* | Vi -- va Li-ink! *claps 5 times* | Link! |
Victory poses[edit]
- Up: Horizontal swipe with his sword, then holds it up, giving off a battle cry.
- Left: Three swipes with his sword, turns to his right. (His "character chosen" animation in Super Smash Bros.)
- Right: Gives two swipes of his sword, then sheaths it (his victory taunt from The Legend of Zelda: Twilight Princess.)
| Up | Left | Right |
|---|---|---|

|

|

|
In competitive play[edit]
Most historically significant players[edit]
- See also: Category:Link players (SSBB)
 Izaw - Known as the best Link player in Europe and one of the very few to achieve any regional notoriety with the character. Managed to place 33rd out of 140 entrants at Bushido Brawl Impact, the only Brawl major that Europe ever had.
 KirinBlaze - Known as the best Link player in the world for most of Brawl's competitive life, while playing him alongside a Mario co-main. Placed 49th out of 192 entrants at Pound 4, 33rd out of 148 entrants at MLG Raleigh 2010, and 33rd out of 151 entrants at Pound V, which, even as a co-main, remain the only times Link was ever seen in the top 64 of Brawl majors aside from Izaw's lone major placement.
- Legan - Competed with KirinBlaze as the best Link player for most of Brawl's competitive life, but unlike Kirin, he was a solo main. While Legan never competed at majors, he had some impressive placements at large Midwest regionals, including 33rd out of 117 entrants at School is in Session 3, 13th out of 70 entrants at School is in session 6, and 17th out of 89 entrants at VENGEANCE, a level of regional performance that few bottom tier mains ever touched.
- Scizor - Known as the best Link player in the world by the end of Brawl's active competitive life. While he never competed in a Brawl major during the game's active life, he got respectable placements using Link in SoCal regionals near the end of Brawl, which was considered the second strongest region in North America after Tristate. Such placements include 17th out of 70 entrants at Elite Four Unova: Remix 3 and 17th out of 59 entrants at Final Battle. In the post-Smash 4 era, he would also place 13th out of 54 entrants at Apex 2022, the highest Brawl major placement for a Link player in the post-Smash 4 era.
Tier placement and history[edit]
Despite the considerable power buffs he received in Brawl, his amazing vertical momentum cancelling, and possessing a usable DACUS, Link has perpetually hovered among Brawl's bottom four characters since the first tier list. Link's terrible and extremely gimpable recovery has always significantly limited his survivability even in the early inexperienced Brawl metagame, and his very sluggish attacks and terrible mobility significantly inhibited his ability to effectively compete even from the earliest stages of competitive play. While Link had a few renowned players, such as KirinBlaze, Legan, and Izaw, these players were never a high-placing threat at majors, with no Link player ever placing higher than 33rd at a major, and even at average regionals, making top 8 was unobtainable. Eventually, all of them either dropped Link for a better character or stopped playing Brawl competitively altogether, and while Scizor would emerge late in Brawl as a strong Link player in one of the strongest regions, he too couldn't buck this trend. As such, Link's competitive prospects have never prospered throughout Brawl's competitive lifespan, and while he is very rarely thought of as a candidate for the worst character in the game, he never rose beyond being considered a bottom tier.
In Solo Modes[edit]
Classic Mode[edit]
In Classic Mode, Link can appear as an opponent or ally in Stage 1 along with Zelda/Sheik, Ganondorf, and Toon Link on Bridge of Eldin or Pirate Ship (with the latter available if it has been unlocked). Link can also appear as an opponent in Stage 11, but only if he hasn't appeared in Stage 1.
All-Star Mode[edit]
In All-Star Mode, Link is fought in Stage 6 alongside Zelda/Sheik, Ganondorf, and Toon Link on Bridge of Eldin or Pirate Ship.
Event Matches[edit]
Solo Events[edit]
- Event 10: All-Star Battle Regulars: Link is one of the opponents that must be fought in this event. All opponents are starter characters from the original Super Smash Bros. game.
- Event 18: Dark Link Duel: Link must defeat Dark Link in a 200 HP battle on Bridge of Eldin.
- Event 33: Advent of the Evil King: As Ganondorf, the player must defeat Link, Zelda, and Pit on Temple.
Co-Op Events[edit]
- Co-Op Event 7: Battle of the Dark Sides: Link and Samus must defeat Dark Link and Dark Samus in a 200 HP battle on Bridge of Eldin.
- Co-Op Event 13: Blades of the Quick and Mighty: Marth and Ike must defeat Link, Meta Knight, and Ganondorf on Temple.
- Co-Op Event 21: The True All-Star Battle: Two players select a character and take on the entire roster on Battlefield.
Congratulations Screens[edit]
Classic Mode
All-Star Mode


Role in The Subspace Emissary[edit]

Link's role begins with him walking through a forest with his fairy companion, Navi. Upon reaching the Master Sword's resting place, Link pulls the sword from its pedestal, wielding it once more. In a clearing of the forest is a napping Yoshi, whom Link at first pays no mind to. However, the Halberd soon flies over the clearing, dropping Shadow Bugs which soon form into Primids. At this point, Link and Yoshi form a team and battle through the enemies while in pursuit of the Halberd, only to lose their aforementioned target as it flies far off into the distance, though they quickly continue their pursuit.
Link's next appearance at the Lake Shore plays out depending on which princess is saved earlier on in the story. If Peach was saved, Link and Yoshi battle with a Shadow Bug clone of Peach (who had recently been turned into a trophy by Bowser) after she attempted to turn an unsuspecting Mario and Pit into trophies until Link prevented the attack by slicing the Dark Cannon in half. Upon defeating the clone of Peach, Link is attacked by Mario, who witnessed the defeat of Peach's copy as it reverts into Shadow Bugs and drifts away, apparently mistaking it for the real Peach. Then Link and Yoshi fight him and Pit. If Zelda is saved earlier on, then it is she who is cloned, and Mario and Pit fight the clone of her, and must then fend off an attack by Link and Yoshi, when Link thinks Mario killed the real Zelda. After the defeat of Mario and Pit or Link and Yoshi, King Dedede arrives in a cargo and snatches the trophies of the fallen duo with an arm attached to it. Fortunately, Kirby (who had accompanied Peach/Zelda earlier) appears then frees and revives the two trophies. Upon revival, Pit/Link fires an arrow at the incoming cargo, slowing it down a little. The five characters then form an alliance and pursue Dedede.
During their pursuit, Link and his group find Dedede's cargo (now empty) parked outside of a cave, and decide to enter it. After getting out of the cave, they find Dedede's trashed hideout following an break in by Bowser and his army. Discovering a hole in the wall, the group enters it and fights their way through another tunnel. Once the party gets out of the hole, they find Bowser, whom Mario tries to attack until Bowser raises Peach/Zelda's trophy as a shield, forcing him to miss. Pit then fires an arrow at Bowser, which he barely dodges, before escaping in his Koopa Clown Car.
Link and his companions next pursue the Ancient Minister in a desert, trying to stop him from detonating another Subspace Bomb. Mario and Link begin to approach the Minister while dodging the lasers he fires at them. Despite their best efforts, the Subspace Bomb still explodes while the heroes barely escape the blast.
Link later appears after the team makes its way to the Canyon, where they aid another group (consisting of Marth, Ike, the Ice Climbers, Lucas, and the Pokémon Trainer) in fighting off the Subspace Army. Later, Link and the rest of the fighters journey into Subspace and come face to face with Tabuu, but they are defeated by Tabuu's Off Waves. If Link and Zelda's trophy forms are retrieved after the initial attack by Tabuu, they will both be shown agreeing to revive Ganondorf (who was turned into a trophy earlier when he tried to attack Tabuu on his own), at which point they show him where their common target is. Link helps the other heroes throughout the rest of the story.
Playable appearances[edit]
- The Forest
- The Lake Shore
- The Cave
- The Wilds (Part II)
- The Canyon
- Entrance to Subspace
- The Great Maze (if rescued in Subspace (Part II))
Exclusive stickers[edit]
These stickers can only be used by Link or a select few including him:
- Boomerang: [Weapon] Attack +4
- Colin: [Specials: Direct] Attack +4
- Daphnes Nohansen Hyrule: [Electric] Attack +31
- Darknut: [Slash] Attack +13
- Epona & Link: [Arm, Leg] Attack +9
- Fierce Deity Link: [Slash] Attack +21
- Happy Mask Salesman: [Leg] Attack +9
- Hylian Shield (The Legend of Zelda: Twilight Princess): [Slash] Resistance +10
- Lantern: [Flame] Resistance +7
- Legend of Outset: [Arm] Attack +26
- Linebeck: [Throwing] Attack +20
- Link (The Legend of Zelda: A Link to the Past): [Electric] Resistance +31
- Link (The Legend of Zelda: Twilight Princess): [Slash] Resistance +27
- Link (The Legend of Zelda: The Wind Waker): [Flame] Attack +31
- Link with Goron Mask: [Slash] Attack +17
- Link's Grandma: [Arm, Leg] Attack +2
- Lon Lon Milk: Launch Power +18
- Midna & Wolf Link: [Leg] Attack +26
- Moblin: [Slash] Attack +15
- Octorok: [Leg] Attack +4
- Piece of Heart: Heart Container Effect +50
- Salvatore: [Electric] Attack +9
- Sheik: [Body, Spin] Attack +17
- Tingle (The Legend of Zelda: The Wind Waker): [Flame] Resistance +24
- Young Zelda (The Legend of Zelda: The Minish Cap): [Normal] Resistance +16
- Zant: [Weapon] Attack +7
- Zelda (The Legend of Zelda: Ocarina of Time): [Flame] Resistance +18
Trophies[edit]
Link's main and Final Smash trophies can be obtained by clearing Classic Mode and All-Star mode respectively with him, along with his Wolf form trophy that is random.

- Link
- A young man who emerged to rescue Hyrule from peril. He's the bearer of the Triforce of Courage who fights to keep Ganondorf from conquering the world. His green outfit is a constant throughout the series. He's a skilled swordsman, horseman, and archer. He's also proficient with bombs and boomerangs.
 : The Legend of Zelda
 : The Legend of Zelda: Twilight Princess
_-_Brawl_Trophy.png)
- Triforce Slash (Link)
- Link with a Smash Ball, releasing his ultimate attack. Light flares from the Triforce symbol on the back of his hand and rushes out to meet the enemy he faces. The enemy gets trapped within the glittering Triforce, is quickly cut to shreds, and is launched by the last strike. The attack works on one enemy at a time, so it's best to go after the character in first place.
- : Super Smash Bros. Brawl

- Wolf Link
- Link's alternate form in the Twilight Realm. In this form, he cannot use weapons such as swords or shields, but he can attack with a ferocious wolf bite. He also has a number of unique skills inherent to his beast form, such as a keen sense of smell, the ability to dig, and a loud wolf howl.
- : The Legend of Zelda: Twilight Princess
Alternate costumes[edit]
.png)
| |||||
Gallery[edit]
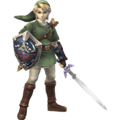
Official Artwork.
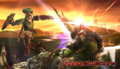
Using his forward smash on Battlefield.
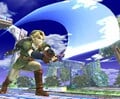
Posing on Skyworld.
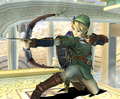
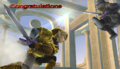
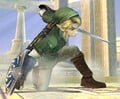
Using Hero's Bow on Skyworld.
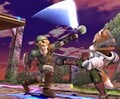
Using his forward tilt on Fox on Battlefield.


Trivia[edit]
- Even though Link in Brawl is the incarnation from Twilight Princess, he has received a few changes to his design for Brawl. First, he has blond hair in Brawl, when it originally was a dirty blond/light brown in Twilight Princess. His face is also slightly more slender and sharper, with smaller eyes and a fiercer expression.
External links[edit]
- Link's page at Smash Bros. Dojo!!
- Link Character Guide on SmashBoards
- Link's hitbox size of each of his moves
- Link's Moves - History Behind Super Smash Bros. Brawl, by CrappyCaptureDevice (part 1) (part 2)
| Fighters in Super Smash Bros. Brawl | |
|---|---|
| Veterans | Bowser · Captain Falcon · Donkey Kong · Falco · Fox · Ganondorf · Ice Climbers · Jigglypuff · Kirby · Link · Luigi · Mario · Marth · Mr. Game & Watch · Ness · Peach · Pikachu · Samus · Yoshi · Zelda / Sheik |
| Newcomers | Diddy Kong · Ike · King Dedede · Lucario · Lucas · Meta Knight · Olimar · Pit · Pokémon Trainer (Charizard · Ivysaur · Squirtle) · R.O.B. · Snake · Sonic · Toon Link · Wario · Wolf · (Zero Suit Samus) |