Zero Suit Samus (SSBB)
| Zero Suit Samus in Super Smash Bros. Brawl | |
|---|---|
 
| |
| Universe | Metroid |
| Shares character slot with | Samus |
| Other playable appearances | in SSB4 in Ultimate |
| Availability | Starter |
| Final Smash | Power Suit Samus |
| Tier | B (9) |
Zero Suit Samus (ゼロスーツサムス, Zero Suit Samus) is a newcomer that appears in Super Smash Bros. Brawl. She was revealed at E3 2006, showcasing the result of Samus using her Final Smash.
Zero Suit Samus is voiced by Alésia Glidewell in all regions, with a mix of grunts and short bits of English dialogue. She got this role and the role of Knuckle Joe in English through voicing Krystal in Brawl's English version.[1] Brawl is the first game where Samus has accessible voiced dialogue; prior to this, she had grunts and cries of pain in some past games, and extensive text dialogue and monologues in Metroid Fusion.
Zero Suit Samus can be played as by using Samus' Zero Laser, inputting Samus' up and down taunt rapidly, or by selecting Samus and holding the ![]() or
or ![]() button (GameCube/Classic Controller),
button (GameCube/Classic Controller), ![]() button (Nunchuk), or the
button (Nunchuk), or the ![]() button while transitioning to the stage select screen. In The Subspace Emissary she can be selected over Samus in The Great Maze and the post-game by hovering over Samus' slot and either tilting the
button while transitioning to the stage select screen. In The Subspace Emissary she can be selected over Samus in The Great Maze and the post-game by hovering over Samus' slot and either tilting the ![]() (GameCube/Classic Controller),
(GameCube/Classic Controller), ![]() (Nunchuk) or
(Nunchuk) or ![]() (sideways Wii Remote). She also can transform back by using her Final Smash, Power Suit Samus.
(sideways Wii Remote). She also can transform back by using her Final Smash, Power Suit Samus.
Zero Suit Samus ranks 9th out of 38 on the Brawl tier list, placing her in the B tier. Zero Suit Samus has an amazing aerial and juggle game, possessing very high jumps and powerful, low-lag aerial attacks. She also has very good mobility, and some of the game's most versatile recovery options. making her very tough to pin down. Zero Suit Samus also has powerful KO options, as well as a great combo game, courtesy of a down smash that starts easy followups at any percent, along with a ledge setup that invalidates many recoveries. Her Power Suit Pieces, in addition, function as throwable items, and some of the most powerful projectiles in the game, making her incredibly dangerous at the beginning of a match.
However, Zero Suit Samus has some weaknesses, mainly a poor ground game. Though some of her ground attacks are still effective for combos, her tilts and smashes do below average damage and mediocre knockback. On top of that, she has one of the laggiest grabs in the game. Her out of shield game is poor, with an unreliable up smash, and a slow grab, making her prone to shield pressure, and despite her good air game, she lacks reliable options for enemies below her; this can make her vulnerable to juggling from characters such as Meta Knight. Furthermore, Zero Suit Samus's recovery is reliant on tether grabs that can be edgehogged (although her high jumps and down special make her suffer less from this than other characters with tethers).
Overall, Zero Suit Samus comes with above-average matchups, representation, and tournament results, owing to great performances by the likes of Nick Riddle and Salem, and is thus seen as a narrowly viable fighter in the metagame.
Attributes[edit]
Zero Suit Samus is a tall lightweight who boasts excellent mobility overall. She has the fourth fastest dashing and walking speeds, tied with Bowser and Marth for the 11th fastest air speed, tied with Wolf and Sonic for the third highest traction, tied with Ness, Pikachu, and Zelda for the sixth fastest air acceleration, and the second highest jump. Her falling speed and gravity are above-average (15th and 13th highest, respectively). She is also able to crawl and wall jump, much like in her home series. On the downside, she has only a few reliable KO options, with only her forward aerial, back aerial, up aerial, Plasma Whip, and Flip Kick reliably KO'ing under 125%. This puts her in the "hit-and-run" archetype group.
She starts the match with a huge advantage over most characters in that she has readily throw-able projectiles that are extremely powerful and combo well with her glide toss. Many of her attacks have the advantage of coming out fast and can combo most heavyweights with her aerials very easily.
Her side special has a huge sweetspot at the end (one of the biggest in the game, second to Zelda's side special) and the sour spot can push the opponent into the sweet spot, effectively KOing most characters around 110% if it's not stale. Her down smash has deceptively long range, extreme safety on shield, and sets up many combos, as well as KO setups. Zero Suit Samus is unique in the fact that many of her moves have large hitboxes and easy-to-hit sweetspots. This can devastate opponents as they are dealt a barrage of aerials and fast ground attacks. Her up smash is decent because it has fast start-up and it's great to stop incoming opponents from above and puts them in a good position for juggling, although it can be easily escaped through SDI.
One of her few KO moves is her up aerial, a very fast flip kick that can KO as low as 90% if the opponent is near the upper blast line and possesses a very large sweetspot for such a powerful move. Both of her high jumps complement this strategy. She also has 3 meteor smashes, her Flip Jump kick, if hit when she sticks her foot out, will spike opponents hard (even without doing this, the kick is still somewhat powerful and can KO most characters at fairly moderate damage percentages with strong horizontal knockback), her up special, if hit at the tip, will meteor smash anyone it hits and her down aerial (although this is an unreliable spike). Both of these can be used for any situation, giving her multiple surprise KO methods.
Zero Suit Samus, if mastered, is extremely dangerous, and many players can find themselves down a stock or worse if they aren't careful. Her attacks and combos require a lot of precision, which makes her a difficult character to learn and play effectively. The stale move negation can complicate her ability to get a KO, despite her having only a few KO moves and good edgeguarding skills. All of her tilts are quick (although her up tilt has high ending lag), with decent range, and have the bonus of launching her opponents into the air. She has a situational though passable out of shield game (making herself prone to heavy shield pressure). Her aerial game is powerful with lethal kicks and long-ranged attacks, but her very high short hop makes approaches with aerials difficult. Her projectile, the Paralyzer, can set opponents up for KOs and deals a bit of damage. However, it's slow and needs to be charged up to go far. Her tether grab has incredible range (tied with Olimar´s Red Pikmin, only losing to White and Blue Pikmin, although her grab possesses the longest range in aerial opponents), but it leaves her vulnerable if it misses, which is dangerous for such a light character. Her smashes complement her perfectly. Her up and down smashes are useful for their range. The down smash is perfect for set-up KO's, and the up smash makes for a good launcher, and can stop opponents' midair combos, while her side smash is quite weak, in terms of damage and power, with high ending lag and considerable start-up lag, but with good range, even behind her. In terms of recovery, she can use her Plasma Wire and Whip as a tether recovery, but it can be stopped by edge-hogging, although due to her air speed and second jump being fairly high and combining with Flip Jump, she can usually come back to the stage without relying on her tether.
Moveset[edit]
For a gallery of Zero Suit Samus' hitboxes, see here.
| Name | Damage | Description | ||
|---|---|---|---|---|
| Neutral attack | Level Chop (レベルチョップ) Gun Hook (ガンフック) Back Knuckle (バックナックル) |
2% | Knifehand strike, pistol whip, elbow strike. First hit out on frame 1, being one of the fastest moves in the game. The third hit is easily powershielded, although the jab is inescapable against aerial opponents. | |
| 2% | ||||
| 3% | ||||
| Forward tilt | ↗ | Spin Kick (スピンキック) | 6% | Does an around-the-body 45° kick. Can be angled. At low percentages, it can make opponents trip if tilted down. However, at mid-high percentages, angle upward or forward will cause tripping more often. Very low knockback. Has a start-up of 6 frames. Can lock, like the dash attack. |
| → | 6% | |||
| ↘ | 9% | |||
| Up tilt | Headstand Kick (ヘッドスタンドキック) | 5% (hit 1), 6% (hit 2) | Does a handstand split while spinning in place, legs moving up vertically. Pretty good knockback at higher percentages, and at low percentages it sets up combos well. Has a start-up of 3 frames. Replaces her down smash as a semi-effective means of hitting opponents on both sides. Good OoS, although it is situational. | |
| Down tilt | Ground Sweep (グラウンドスイープ) | 6% | Does a prone leg-sweep. Knocks upwards from afar, knocks diagonally at close range. Hits on frame 5. Can combo into other moves well at low and high percentages alike. | |
| Dash attack | Jump Kick (ジャンプキック) | 7% (clean), 5% (late) | Does a sliding kick forward with her leg extended. Similar to Fox's dash attack. Hits on frame 6. Can easily be followed with tilts at low to mid percentages, and can lock if buffered properly. Has transcendent priority. | |
| Forward smash | Smash Whip (スマッシュウィップ) | 10% (gun), 9% (late gun), 11% (whip), 6% (back, whip tip), 13% (whip base) | Whips forward with her plasma whip. Great range, but has very poor knockback, especially at the tip and high startup lag and ending lag, being easy to punish (especially with shield grabs). Hits on frame 20. This move also attacks enemies from behind her, but with minimal damage and vertical knockback. The sweetspot on the whip mostly overlaps the hitbox on the gun, which outprioritizes it, making the sweetspot very difficult to land. Additionally, none of the hitboxes on the whip scale in damage when charged. | |
| Up smash | Shocker String (ショッカーストリング) | 4% (hit 1), 1% (hits 2-5), 3% (hit 6) | Spins in place, extending the Plasma Whip up above her head in a swirl. Hits multiple times, has long vertical disjointed range and decent horizontal range. Has fast startup (8 frames). Only the tip of the plasma whip does knockback (which is very low). It's easy to SDI out of it before the last hit connect. | |
| Down smash | Slant Paralyzer (スラントパラライザー) | 11% | Aims down and shoots paralyzer gun at the ground in front of her, creating a lightning effect. Only hits in front. Low damage and delayed knockback, but stuns the target in place for a short time depending on the damage that the opponent has. Unique attack that can be followed up by a side smash, a grab or another move. Double down smash followed by up smash (or whatever is appropriate at the time, like an aerial) is an effective combo and can easily rack up damage. Also moves her forward a little. Can infinite Fox at mid percentages and other fastfallers to a lesser extent. Hits on frame 20, making it somewhat difficult to land, but has extremely low ending lag with only 12 frames of ending lag making it very safe on shield when combined with the move's range. Altogether, its excellent combo and KO setup potential combined with its extreme safety on shield have made it considered one of the best down smashes in the game if not the best. | |
| Neutral aerial | Whip Guard (ウィップガード) | 10% | Spins the Plasma Whip around herself. Fairly long range, but with below average knockback. Always deals 10% damage, regardless of stale-move negation, and does not refresh stale-move negation on other moves, decent spacing option. | |
| Forward aerial | Twice Kick (トワイスキック) | 6% (hit 1), 10-11% (hit 2 clean), 7% (hit 2 late) | Two forward kicks, with the second kick being stronger and slightly faster than the first. Because of the knockback of the first kick, it is difficult to hit with both kicks unless taking advantage of upward and forward momentum from a jump. Second kick can be landed without first kick, but it requires correct timing. First hit on frame 6, second hit on frame 16. | |
| Back aerial | Sobat (ソバット) | 13% (foot), 12% (leg) | A backward kick that has high knockback. Can bait, combo at lower percentages, KO at high percentages, and can be bufferred or used twice in a short hop. Has a disjointed hitbox. Hitbox out on frame 8. | |
| Up aerial | Air Kick (エアキック) | 10% (clean), 7% (late) | Flip kicks both legs above her head. Has good KO potential on lighter characters at around 90% if they are near the upper blast line. Sweetspot is directly in front of her. Hitbox out on frame 4. At low percentages, it can chain into itself, like Meta Knight´s up aerial, being a very useful juggling move. Hits slightly behind her too with low knockback, good for setting up back aerials or up tilts on a grounded opponent. | |
| Down aerial | Slash Dive (スラッシュダイブ) | 5% (aerial), 4% (grounded), 5% (landing) | A stall-then-fall. Zero Suit Samus stalls momentarily in midair, and then shoots down diagonally. If it hits in midair, the move meteor smashes opponents but it is very weak and dangerous if she doesn't land onstage, as it will not stop until for some time, similar to Toon Link's down aerial, although, unlike Toon Link´s down aerial, it will always meteor smash. The move generally isn't used often due to being easy to SD with. It also has very high ending lag and landing lag, like most stall-then-falls, and is easily punishable. However, its extremely fast vertical descent speed makes it an effective way to counter juggling, especially since her falling speed is below average. Start-up of 14 frames. Upon hitting the ground, it hits a second time, knocking anyone close away a fair bit. | |
| Grab | Grab (つかみ) | — | ||
| Pummel | Grab Kneebutt (つかみニーバット) | 2% | Knees her victim. A fairly fast pummel. | |
| Forward throw | Stun Gun (スタンガン) | 2% (hit 1), 7% (throw) | Hits opponent forward with her gun. Can chaingrab most characters at lower percentages. | |
| Back throw | Kick Throw (キックスルー) | 2% (hit 1), 4% (throw) | Kicks opponent behind herself. Extremely low knockback, rarely used due to there usually being better options available. | |
| Up throw | Hold Somersault Kick (ホールドサマーソルトキック) | 2% (hit 1), 8% (throw) | Flips into the air and kicks the opponent upward. This is her most powerful throw knockback wise, being the only one capable of guaranteed a KO in Sudden Death. However, it has somewhat high ending lag, with a down throw being the preferred way to get opponents into the air for combos. | |
| Down throw | Knee Stamp (ニースタンプ) | 2% (hit 1), 5% (throw) | Slams opponent on ground and then axe kicks them. Ideal for combos, knocking opponents in a great position to followup with an up aerial or, depending on the opponent's DI, a forward or back aerial. | |
| Forward roll Back roll Spot dodge Air dodge |
— | — | ||
| Techs | — | — | ||
| Floor attack (front) Floor getups (front) |
6% | Flips her legs around near the ground in a spin and gets up. | ||
| Floor attack (back) Floor getups (back) |
6% | Flips her legs around upward in a spin and gets up. | ||
| Floor attack (trip) Floor getups (trip) |
5% | Flips her legs around on the ground in a spin and gets up. | ||
| Edge attack (fast) Edge getups (fast) |
8% | Gets up while doing a kick forward. | ||
| Edge attack (slow) Edge getups (slow) |
10% | Gets up slowly and punches forward. | ||
| Neutral special | Paralyzer | 4-6% | Fires a paralyzing shot. | |
| Side special | Plasma Whip | 3% (wire), 16% (tip) | Fires the whip forwards a distance. Tip hitbox has high knockback. The wire can push the opponent in the tip. | |
| Up special | Plasma Wire | 4-6% | Zero Suit Samus fires her whip upwards, pulling anyone above her downwards. If used on someone who is on the ground next to Zero Suit Samus, it will knock them up, hitting multiple times, until they hit the end, at which point it will pull them back down. If used on an airborne opponent while off the stage, it will pull them down and they will keep going, effectively spiking them, though the tip of the Plasma Wire must connect with the opponent to cause this effect. | |
| Down special | Flip Jump | 12% (kick clean), 9% (kick late) | Zero Suit Samus does a small flip jump. It functions as a third jump and grants full body intangibility on frames 1-12. If the attack button is pressed after the jump she will stick out her foot in a 45 degree angle, which has sex kick properties and functions as a powerful meteor smash on aerial opponents that can be confirmed into from her down smash with proper timing. | |
| Final Smash | Power Suit Samus | 25% (spin), 10% (shock) | Zero Suit Samus radiates energy, dragging in items and enemies towards her, then somehow regains her Power Suit. | |
Stats[edit]

| Stats | Weight | Dash speed | Walk speed | Traction | Air friction | Air speed | Air acceleration | Gravity | Falling speed | Jumpsquat | Jump height | Double jump height | Empty landing lag |
|---|---|---|---|---|---|---|---|---|---|---|---|---|---|
| Value | 81 | 1.7 – Initial dash 1.93 – Run |
1.33 | 0.07 | 0.008 | 1.034 | 0.01 – Base 0.09 – Additional |
0.0884 | 1.43 – Base 2.002 – Fast fall |
4 | 44.2109595 - Base ? - Short hop |
? | 3 |
Announcer call[edit]

English/Japanese
On-screen appearance[edit]
- Her Power Suit falls off as she stands up (similar to the result of the Zero Laser). Power Suit pieces can then be used as throwing items.

|
|---|
Taunts[edit]
- Up taunt: Throws her gun into the air, spins and catches it behind her and says "Is that all?".
- Side taunt: Activates her whip, flicks it and says "Try me".
- Down taunt: Samus spins multiple times quickly on one foot, twirling her plasma whip around her like a rhythmic gymnast and says, "You're mine".
| Up taunt | Side taunt | Down taunt |
|---|---|---|

|

|

|
Idle poses[edit]
- Checks her Paralyzer.
- Stands straightly with Paralyzer besides her head, then looks around.
 |

|
|---|
Crowd cheer[edit]
| Cheer (English) | Cheer (Japanese) | Cheer (German) | Cheer (Korean) | |
|---|---|---|---|---|
| Cheer | ||||
| Description | Ze - ro - Suit -- Sam - us! | Sam-us! | Ze - ro - Suit! Sa - mus! | |
| Cheer (French) | Cheer (Italian) | Cheer (Spanish) | ||
| Cheer | ||||
| Description | Sa - mus - sans armure ! | Sa - mus - Tu - ta - Ze - ro! | Saa - mus Ze - ro! | Zeroo - Suit - Samus! |
Victory poses[edit]
- Up: Backflips to the screen.
- Left: Slashes with her energy whip and says "Be still."
- Right: Side kick flex.
| Up | Left | Right |
|---|---|---|

|

|

|
In competitive play[edit]
Most historically significant players[edit]
- See also: Category:Zero Suit Samus players (SSBB)
 Charby - Considered the first successful Zero Suit Samus player in Europe. He was heavily active in French tournaments and commonly placed top 8 at many Bushido Impact events such as Bushido Impact 9 and placed 25th at Bushido Brawl Impact, the largest Brawl tournament seen in Europe.
 Choco - While he didn't start competing until 2013, he quickly became one of the most renowned Zero Suit Samus players in Japan. This was due to his 2nd place finish at SumabatoX 19, having defeated 9B and Daiki. He continued to place top 8 at almost every Brawl tournament he entered in 2014, winning KVO 2014 defeating Etsuji, 2nd at Umebura 5, and 3rd at Sumabato X Final.
- Kameme - Co-mained Zero Suit Samus and Wario, and was one of the best players in Japan overall. Some of his best major placements include 4th at SumabatoX 19 and 9th at Sumabato X Final, where he is credited for using both characters. He also performed well at Piosuma events, winning Piosuma 7 and placing 9th at Piosuma 2.1 using Zero Suit Samus to defeat Yui in his bracket.
 Nick Riddle - Prior to Salem's rise in the scene, he was considered the best Zero Suit Samus player in the world. He held the best placements of a Zero Suit Samus player during the MLG era, most notably placing 3rd at MLG Columbus 2010, 5th at MLG Raleigh 2010, and 9th at Pound V. Even after this era, he still remained one of Zero Suit Samus's most successful players, being ranked 32nd on the 2014 SSBBRank and placing top 16 at SKTAR 2 and Apex 2014. He is also known for his success in doubles with static partner Shaky, being considered one of the best doubles teams in Brawl.
 quiKsilver - The best Zero Suit Samus in Europe. Even outside of his results in Germany, he made a very strong case of being one of the best European players of Brawl due to remarkable peaks such as 3rd at Bushido Brawl Impact 2 and 9th at Sun Rise Tournament, the latter being in contention for one of the best Zero Suit Samus results seen prior to Apex 2013. He was ranked 58th on the 2014 SSBBRank.
- Salem - A player who quickly rose to prominence during the 2012 season, and then performed the greatest underdog run of Brawl history with his victory at Apex 2013, defeating many top players such as Mew2King and Otori. This remains the only time a Zero Suit Samus player has won a Brawl major/supermajor. As such, he is considered the greatest Zero Suit Samus player of all time, ranking 18th on the 2014 SSBBRank. He would make occasional appearances even after his focus on Smash 4 up until 2017.
 V115 - The best Zero Suit Samus player in Canada. While he started competing in 2011, he garnered notoriety for his runs at tournaments around the release of Smash 4 and onwards. He made 7th at the major SKTAR 3 and placed 26th on 2014 SSBBRank as one of the highest Zero Suit Samus players of the year. He became a top 5 player in the post-Smash 4 era from 2016-2019, due to a 5th place finish at Apex 2015 and placing 2nd at every tournament he attended after Get On My Level 2016, which included Super Smash Con 2016 and CEO Dreamland.
Tier placement and history[edit]
Zero Suit Samus was originally a mid tier character, ranked 21st on the first tier list (September 2008). However, as Zero Suit Samus mains showed increasingly promising results, her placement only rose as time went on. Climbing to 16th place on the second tier list (January 2009), and then to 15th until the fifth tier list (September 2010), where she rose to 13th place. She rose again to 12th in the sixth tier list (July 2011), and 10th in the seventh list (April 2012). After Salem won Apex 2013 using only Zero Suit Samus, she rose to 9th place in the eighth and current tier list, as of April 2013. Some people even believe that she belongs in the top tiers; whether her current position is accurate or should be higher remains disputed, but her combination of mobility, powerful low lag aerials, strong recovery, and excellent stage control with her Power Suit Pieces makes her much better than players initially thought.
In Solo Modes[edit]
Classic Mode[edit]
In Classic Mode, Samus/Zero Suit Samus can appear as an opponent in Stage 6 on Norfair or Frigate Orpheon. Samus/Zero Suit Samus can also appear as an opponent in Stage 11, but only if she hasn't appeared in Stage 6.
All-Star Mode[edit]
In All-Star Mode, Samus/Zero Suit Samus is fought in Stage 7 on Norfair or Frigate Orpheon.
Event Matches[edit]
Solo Events[edit]
- Event 16: Power Suit ON!: The player plays as Zero Suit Samus and must turn into Samus by obtaining a Smash Ball. Two other Zero Suit Samuses are also featured in this event, who will attempt to stop the player.
- Event 20: All-Star Battle x1: Zero Suit Samus is one of the eight opponents fought in this event along with Wario, Meta Knight, Pit, Olimar, Lucas, Diddy Kong, and the Pokémon Trainer.
- Event 23: Molten Norfair: Samus must survive the lava wave on Norfair by getting inside the safety capsule while fending off against both Fox and Captain Falcon. It's possible for the player to turn into Zero Suit Samus by quickly inputting her up and down taunts in rapid sucession.
Co-Op Events[edit]
- Co-Op Event 6: Unwanted Suitors: As Zelda and Zero Suit Samus, both players must defeat an invisible Captain Falcon and an invisible Luigi on Port Town Aero Dive.
- Co-Op Event 7: Battle of the Dark Sides: Link and Samus, must defeat Dark Link and Dark Samus in a 200 HP Stamina match on Bridge of Eldin. It's possible for Samus to turn into Zero Suit Samus if the player wishes.
- Co-Op Event 21: The True All-Star Battle: Both players select a character and take on the entire roster on Battlefield. Note that Zero Suit Samus may take Samus's spot in the lineup.
Congratulations Screens[edit]
Classic Mode
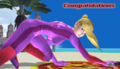
All-Star Mode


Role in The Subspace Emissary[edit]

Zero Suit Samus is first seen breaking into the base of the Subspace Army. Soon she comes across Pikachu being drained of its electrical power. Samus uses her whip to break the container the Pikachu is being held in, summoning a security force of R.O.B.s. Later, she comes across her Power Suit, but is confronted by two Shadow Bug clones mimicking the Power Suit.
After reacquiring her Power Suit, Samus and her new companion Pikachu come across Ridley. He grabs Samus and starts to drag her against the wall, until Pikachu returns Samus' favor and uses Thunder on Ridley, causing him to drop Samus. An infuriated Ridley attacks. Once they defeat him, the duo exits the base and come across a cave.
Samus and Pikachu make their way to the Subspace Bomb Factory and find the Ancient Minister with the R.O.B. Squad. They prepare to fight, but then realize that he looks very sad. Soon after, Captain Falcon, Olimar, Diddy Kong and Donkey Kong find the factory and enter. A hologram of Ganondorf appears and orders the R.O.B. Squad to activate the Subspace Bombs in the factory. The Ancient Minister tries to stop them, but is set on fire when Ganondorf orders them to retaliate. After The Ancient Minister is revealed to be a R.O.B. himself, the characters set out and all join the quest.
Samus helps the others to fight Meta Ridley, flees the island, gathers with almost all the rest of the characters, enters Subspace, is defeated by Tabuu, and revived by King Dedede, Ness, and Luigi. She can help to defeat Tabuu in the end.
Playable appearances[edit]
After Zero Suit Samus reclaims her Power Suit, players have the option to use her Zero Suit form in other levels.
- The Research Facility (Part I)
- The Research Facility (Part II)
- The Subspace Bomb Factory (Part I)
- The Subspace Bomb Factory (Part II)
- Entrance to Subspace
- The Great Maze (if rescued in Subspace (Part I)
Exclusive stickers[edit]
These stickers can only be used by Samus and Zero Suit Samus.
- Dark Samus: [Normal] Resistance +11
- Energy Tank: [Energy] Attack +12
- Gravity Suit Samus: [Weapon] Attack +11
- Metroid: [Electric] Attack +20
- Morph Ball: [Weapon] Attack +5
- Running Zero Suit Samus: [Weapon] Attack +25
- Samus (Metroid): [Specials: Indirect] Attack +15
- Samus (Metroid Fusion): [Electric] Resistance +16
- Special Token: [Arm] Attack +6
- Starship: [Weapon] Attack +9
- Zero Suit Samus: [Leg] Attack +9
Using stickers[edit]
Since Samus and Zero Suit Samus share the same trophy base, there are some cases in which certain stickers will not affect one of them. Since Smash Balls don't appear in Adventure Mode, if one transforms into Zero Suit Samus, they will be unable to change back until the end of the level (or, in The Great Maze, a save point). Aside from use of items, only Leg, Weapon, and Energy stickers will affect both characters. That said, all of Zero Suit Samus's moves consist of Leg or Weapon attacks barring the first hit of the jab, Forward Throw and Down Smash.
Trophies[edit]
Zero Suit Samus's main and Final Smash trophies can be obtained by clearing Classic Mode and All-Star mode respectively with Zero Suit Samus.

- Zero Suit Samus
- Samus Aran without her mighty Power Suit. In this condition, she does not have the firepower she's famed for but is in full possession of the agility and athleticism she gained through her childhood training with the Chozo. Without the armor, she's also much, much faster. The weapon she carries is a self-protection device known as a Paralyzer that stops enemies cold.
 : Metroid: Zero Mission

- Power Suit Samus
- Zero Suit Samus's Final Smash. Samus loses her Power Suit when she fires the Zero Laser, but she can restore it--that is, she can return from her Zero Suit form to her familiar armored form. That being said, Zero Suit Samus is very quick with great reach, so there are tactical reasons to fight as is. If that's your preference, don't pick up any Smash Balls.
 : Super Smash Bros. Brawl
Alternate costumes[edit]
.png)
| |||||
Reveal trailer[edit]
Gallery[edit]
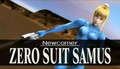
Zero Suit Samus's reveal screen in the E3 2006 trailer.
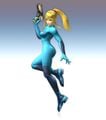
Zero Suit Samus's original artwork.
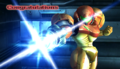
Once Samus finishes her Zero Laser, her Power suit pieces fall off of her.
The pieces then become throwable items.
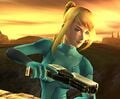
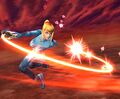
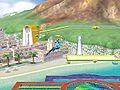
Zero Suit Samus posing while holding her Paralyzer.
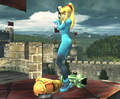
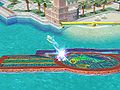
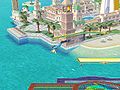
Posing on Delfino Plaza.
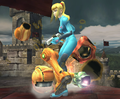
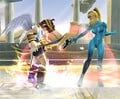
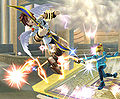
Using her back aerial on Pit on Castle Siege.
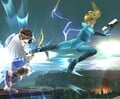
Zero Suit Samus using her neutral aerial.
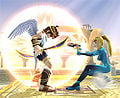
Pit being temporarily paralyzed by the Paralyzer.
Pit being temporarily paralyzed by the Slant Paralyzer.
Pit getting hit by the Plasma Whip.
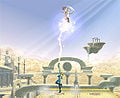
Zero Suit Samus attacking Pit with the Plasma Wire.
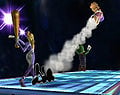
Zero Suit Samus using her Plasma Wire as a tether recovery.
Start of the Flip Jump.
Zero Suit Samus in the air after using Flip Jump.
Zero Suit Samus will kick if the special button or attack button is pressed while she is in mid-air.
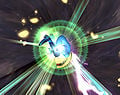
Zero Suit Samus using her Final Smash.
Zero Suit Samus using the Home-Run Bat against the Ice Climbers.


Trivia[edit]
- Zero Suit Samus's grab, while a tether grab, is not a tether recovery, although it becomes one in Super Smash Bros. 4. She shares this disability with Yoshi and Olimar. In Ultimate, this trait is also shared with Luigi.
- Zero Suit Samus's original artwork from her reveal differs from her final in-game artwork; in this case, the shading is heavier and her pose is slightly different. She shares this trait with Pit and Snake, though the differences in her artwork are not as drastic as theirs.
- Zero Suit Samus, Falco, Peach, Pikachu and Meta Knight are the only five characters who speak in all three of their taunts.
- Strangely, Zero Suit Samus's up tilt and up aerial have a slash effect along with making a slashing sound, despite that she uses her legs rather than any sharp object. Kirby's up smash also shares this trait.
- Zero Suit Samus is the only character to not appear anywhere on the character selection screen in Brawl.
- When selecting Zero Suit Samus on the tournament mode and SSE character selection screens, her name is misspelled as "Zaro Suit Samus".
- Zero Suit Samus and Sonic are the only characters who are never fought in any form in The Subspace Emissary.
- Whenever Zero Suit Samus gets Star KO'd or Screen KO'd, her Paralyzer vanishes. A similar effect happens whenever she gets hit by Blue Falcon.
- Zero Suit Samus is the only female newcomer introduced in Brawl.
References[edit]
External links[edit]
- Zero Suit Samus's page at Smash Bros. DOJO!!.
- Zero Suit Samus Character Guide on SmashBoards
- Zero Suit Samus's Moves - History Behind Super Smash Bros. Brawl, by CrappyCaptureDevice (part 2 of Samus's Moves)
| Fighters in Super Smash Bros. Brawl | |
|---|---|
| Veterans | Bowser · Captain Falcon · Donkey Kong · Falco · Fox · Ganondorf · Ice Climbers · Jigglypuff · Kirby · Link · Luigi · Mario · Marth · Mr. Game & Watch · Ness · Peach · Pikachu · Samus · Yoshi · Zelda / Sheik |
| Newcomers | Diddy Kong · Ike · King Dedede · Lucario · Lucas · Meta Knight · Olimar · Pit · Pokémon Trainer (Charizard · Ivysaur · Squirtle) · R.O.B. · Snake · Sonic · Toon Link · Wario · Wolf · (Zero Suit Samus) |
|
| |
|---|---|
| Fighters | Samus (SSB · SSBM · SSBB · SSB4 · SSBU) · Zero Suit Samus (SSBB · SSB4 · SSBU) · Ridley (SSBU) · Dark Samus (SSBU) |
| Assist Trophies | Metroid · Dark Samus · Mother Brain |
| Bosses | Ridley · Meta Ridley |
| Stages | Planet Zebes · Brinstar · Brinstar Depths · Frigate Orpheon · Norfair · Pyrosphere Brinstar Escape Shaft (Adventure Mode) |
| Item | Screw Attack · Power Suit Piece |
| Enemies | Geemer · Kihunter · Metroid · Reo · FG II-Graham · Joulion · Zero |
| Other | Gunship · Kraid |
| Trophies, Stickers and Spirits | Trophies (SSBM · SSBB · SSB4) · Stickers · Spirits |
| Music | Brawl · SSB4 · Ultimate |
| Masterpieces | Metroid · Super Metroid |