Zero Suit Samus (SSBB)/Down smash
Overview[edit]
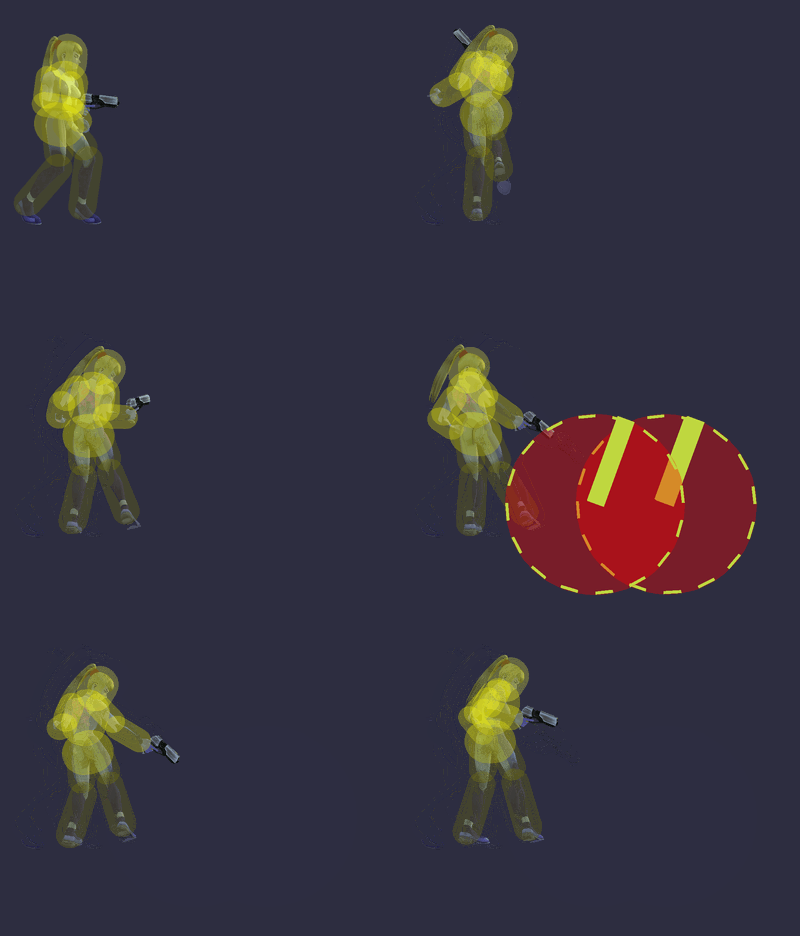
Zero Suit Samus aims her Paralyzer at the ground in front of herself, creating a lightning effect that paralyzes anyone who it hits for a short amount of time. The paralyzing effect will not last longer if used multiple times. It deals 11% damage and low vertical knockback once the paralysis effect is over. It is also one of the only down smashes that only hits in the front.
The opponent is stunned for a lengthy period of time, leaving them very vulnerable. Because of this, it is an excellent combo starter, giving Zero Suit Samus plenty of time to setup an attack. If done twice, it can rack up damage (at least 22% fresh), then depending on the situation, can be quickly followed up by a move such as a forward aerial to rack up more damage and start an aerial combo, or a grab. At high percentages, it can be followed up with a Plasma Whip, back aerial, or Flip Jump kick meteor smash offstage as a finisher, making it a very powerful setup tool.
Due to the move's low knockback, it does not put opponents into tumble until higher percents. Because of this, the opponent cannot DI the move or perform hitstun cancelling, which gives the move excellent combo potential at lower percents. Against fast fallers in particular, Zero Suit Samus can easily chain multiple down smashes to continuously stun the opponent up until higher percents. In the most extreme cases, this can even lead into a zero-death, which is particularly effective against Fox. Even at higher percents when the down smash will put opponents into tumble, Zero Suit Samus still has enough time to land two down smashes into a KO move before the opponent can avoid it.
One of the few downsides the move has is that it does not come out until frame 20, making it one of the slowest down smashes in the game. This can make the move difficult to land and Zero Suit Samus can be punished for throwing it out (or the opponent can at least avoid it before it is too late). However, the move's ending lag is incredibly short with only 12 frames of cooldown as it has an FAF of 36 which makes it very difficult to punish, especially considering its high startup lag. The move also has large, far reaching hitboxes which last for 5 frames, giving it great range.
The combination of being an indirect paralyze move means Zero Suit Samus gets no freeze frames while her opponent does. Along with its already low ending lag, this achieves two things. The first thing this does is that it gives the move even less ending lag when it connects, allowing Zero Suit Samus to act very quickly after landing it. The second thing this achieves is that this makes the move incredibly safe on shield, as the opponent goes through shield lag while Zero Suit Samus doesn't. The move is only -4 on shield, which means that Mario's Super Jump Punch is the only move in the game which can punish Zero Suit Samus' down smash on shield and even then, Mario can only punish the move if Zero Suit Samus poorly spaces it. She can shield or spot dodge through any other OoS option, and the move becomes even safer if spaced properly. Even if the move is power shielded, it can still only be punished by quick jabs or very quick tilts/specials for characters who have frame 4 or faster options. Additionally, if the move is charged, it becomes even safer on shield, to the point where the fully charged version is 0 on shield, making it completely unpunishable.
Down smash can be absorbed. Against Mr. Game & Watch, Ness, or Lucas, this is a detriment in a 1v1 battle, as they can avoid the down smash by absorbing it. Ness and especially Lucas will heal a healthy amount of damage for absorbing the move and then they can potentially punish Zero Suit Samus with an aerial (or even an up smash in Ness' case), while Mr. Game & Watch can fill his bucket to maximum power which can OHKO Zero Suit Samus (although Zero Suit Samus recovers much sooner than him, so she can easily punish him for absorbing the move). This makes down smash less useful in these matchups.
However, down smash's absorption property makes it an incredible tool in doubles. When Zero Suit Samus is paired with Mr. Game & Watch or Lucas (and Ness to a lesser extent), she can easily use her down smash combined with their down specials to great effects. Lucas can easily heal a lot of damage, allowing him to live for a very long time, while Mr. Game & Watch can fill up his bucket to maximum capacity, which can easily OHKO the opposing team. This results in down smash remaining an excellent tool in doubles, despite the fact that it is harder to utilise in most circumstances outside of its absorption properties. This also results in Mr. Game & Watch and Lucas being some of Zero Suit Samus' best teammates in doubles, as they grant her down smash some additional powerful utility.
Overall, Zero Suit Samus' down smash is one of the best in the game due to its low ending lag, great range, excellent combo potential, its extreme safety on shield and (in doubles) its ability to be absorbed. It is a very useful move in Zero Suit Samus' kit, even though its high startup lag can make it difficult to land at times.
Hitboxes[edit]
Timing[edit]
| Charge interval | 15-16 |
|---|---|
| Hitbox | 20-24 |
| Interruptible | 36 |
| Animation length | 46 |
Lag time |
Charge interval |
Hitbox |
Interruptible |
|
