SSBU Icon.png

Zero Suit Samus (SSBU)/Down smash

From SmashWiki, the Super Smash Bros. wiki
Jump to navigationJump to search
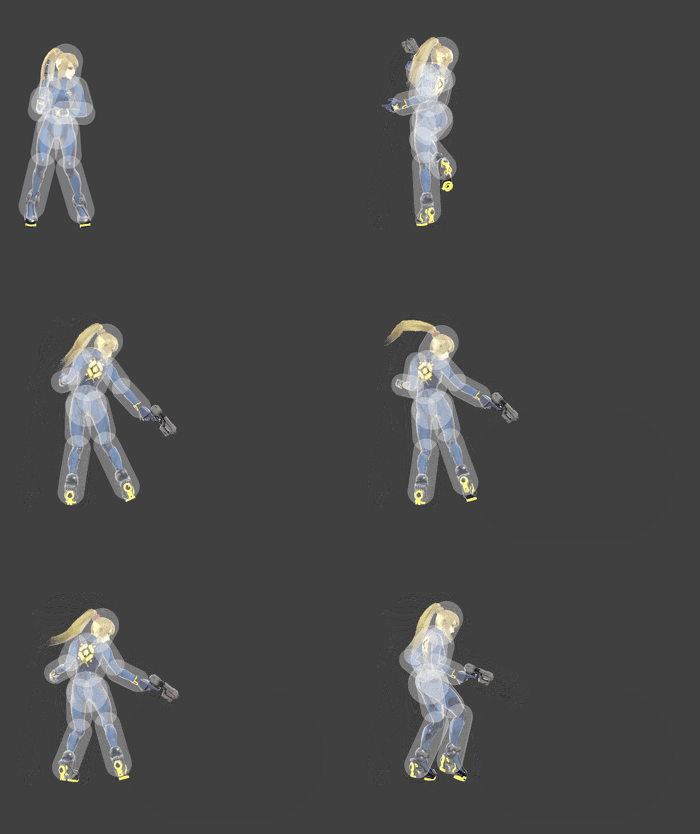
Hitbox visualization showing Zero Suit Samus's down smash.

Overview[edit]

Zero Suit Samus aims her Paralyzer downwards and fires an electrical blast towards the ground which paralyzes opponents for some time, allowing her to follow up with one of her finishers for a potential KO.

The amount of time the move keeps the opponent paralyzed depends on what percent they are at with the move keeping them stunned for longer the higher their percentage is. The move comes out quite slowly on frame 20 which makes it one of the slowest down smashes in the game. However, its ending lag is very low as it only has 17 frames of cooldown, making it difficult to punish. Additionally, it also has large hitboxes that lasts for 5 frames which gives it decent range as well as 2-frame potential. Its low ending lag combined with its decent range even makes it rather safe on shield if it is properly spaced.

The move does have some shortcomings, however. As previously mentioned, the move has slow startup which can make it difficult to land at times and unlike most down smashes, it only hits in front of the user rather than on both sides. A big nerf it has received is that the move also applies hitlag to both Zero Suit Samus and her opponent whereas in previous Smash games, only her opponent suffered from hitlag. Lastly, the move has a lower hitlag multiplier and less overall knockback which reduces the amount of time the opponent is paralyzed, particularly at low percents where it will be unsafe on hit which is exacerbated if the sourspot is landed. All of this combined prevents the move from granting Zero Suit Samus the frame advantage it did in Smash 4 and especially in Brawl, although it is still very rewarding.

Although not as potent as it was in previous Smash titles due to the nerfs it has received, it still remains as a valuable tool in Zero Suit Samus's toolkit.

Hitboxes[edit]

ID Part Rehit rate Damage SD Angle Angle type BK KS FKV Set weight Radius Bone Offset SDI× T% Clang Rebound Effect Type G A Sound Direct Hit bits Hit part Blockable Reflectable Absorbable Flinchless No GFX Heedless
0 0 0 8.0% 0 AngleIcon60.png Standard 0 90 0 HitboxTableIcon(False).png 4.0 top 0.0 3.0 13.0 to 8.0 0.6× 1.0× 0% HitboxTableIcon(NoClang).png HitboxTableIcon(NoRebound).png EffectIcon(Paralyze).png TypeIcon(Energy).png HitboxTableIcon(GroundedTrue).png HitboxTableIcon(AerialTrue).png L Electric SpecialsIndirect.png All All HitboxTableIcon(Blockable).png HitboxTableIcon(Unreflectable).png HitboxTableIcon(Absorbable).png HitboxTableIcon(False).png HitboxTableIcon(False).png HitboxTableIcon(False).png
1 0 0 6.0% 0 AngleIcon60.png Standard 0 85 0 HitboxTableIcon(False).png 7.0 top 0.0 3.0 17.0 to 10.0 0.6× 1.0× 0% HitboxTableIcon(NoClang).png HitboxTableIcon(NoRebound).png EffectIcon(Paralyze).png TypeIcon(Energy).png HitboxTableIcon(GroundedTrue).png HitboxTableIcon(AerialFalse).png L Electric SpecialsIndirect.png All All HitboxTableIcon(Blockable).png HitboxTableIcon(Unreflectable).png HitboxTableIcon(Absorbable).png HitboxTableIcon(False).png HitboxTableIcon(False).png HitboxTableIcon(False).png

Timing[edit]

Charges between 15-16
Hitboxes 20-24
Interruptible 42
Animation length 55
FrameIcon(Lag).png FrameIcon(Lag).png FrameIcon(Lag).png FrameIcon(Lag).png FrameIcon(Lag).png FrameIcon(Lag).png FrameIcon(Lag).png FrameIcon(Lag).png FrameIcon(Lag).png FrameIcon(Lag).png FrameIcon(Lag).png FrameIcon(Lag).png FrameIcon(Lag).png FrameIcon(Lag).png FrameIcon(LagChargeS).png FrameIcon(LagChargeE).png FrameIcon(Lag).png FrameIcon(Lag).png FrameIcon(Lag).png FrameIcon(Hitbox).png FrameIcon(Hitbox).png FrameIcon(Hitbox).png FrameIcon(Hitbox).png FrameIcon(Hitbox).png FrameIcon(Lag).png FrameIcon(Lag).png FrameIcon(Lag).png FrameIcon(Lag).png FrameIcon(Lag).png FrameIcon(Lag).png FrameIcon(Lag).png FrameIcon(Lag).png FrameIcon(Lag).png FrameIcon(Lag).png FrameIcon(Lag).png FrameIcon(Lag).png FrameIcon(Lag).png FrameIcon(Lag).png FrameIcon(Lag).png FrameIcon(Lag).png FrameIcon(Lag).png FrameIcon(Interruptible).png FrameIcon(Interruptible).png FrameIcon(Interruptible).png FrameIcon(Interruptible).png FrameIcon(Interruptible).png FrameIcon(Interruptible).png FrameIcon(Interruptible).png FrameIcon(Interruptible).png FrameIcon(Interruptible).png FrameIcon(Interruptible).png FrameIcon(Interruptible).png FrameIcon(Interruptible).png FrameIcon(Interruptible).png FrameIcon(Interruptible).png
Legend (1 square = 1 frame)
FrameIcon(Lag).png
Lag time
FrameIcon(LagChargeS).pngFrameIcon(LagChargeE).png
Charge interval
FrameIcon(Hitbox).png
Hitbox
FrameIcon(Interruptible).png
Interruptible