SSBU Icon.png

Zero Suit Samus (SSBU)/Neutral aerial

From SmashWiki, the Super Smash Bros. wiki
Jump to navigationJump to search
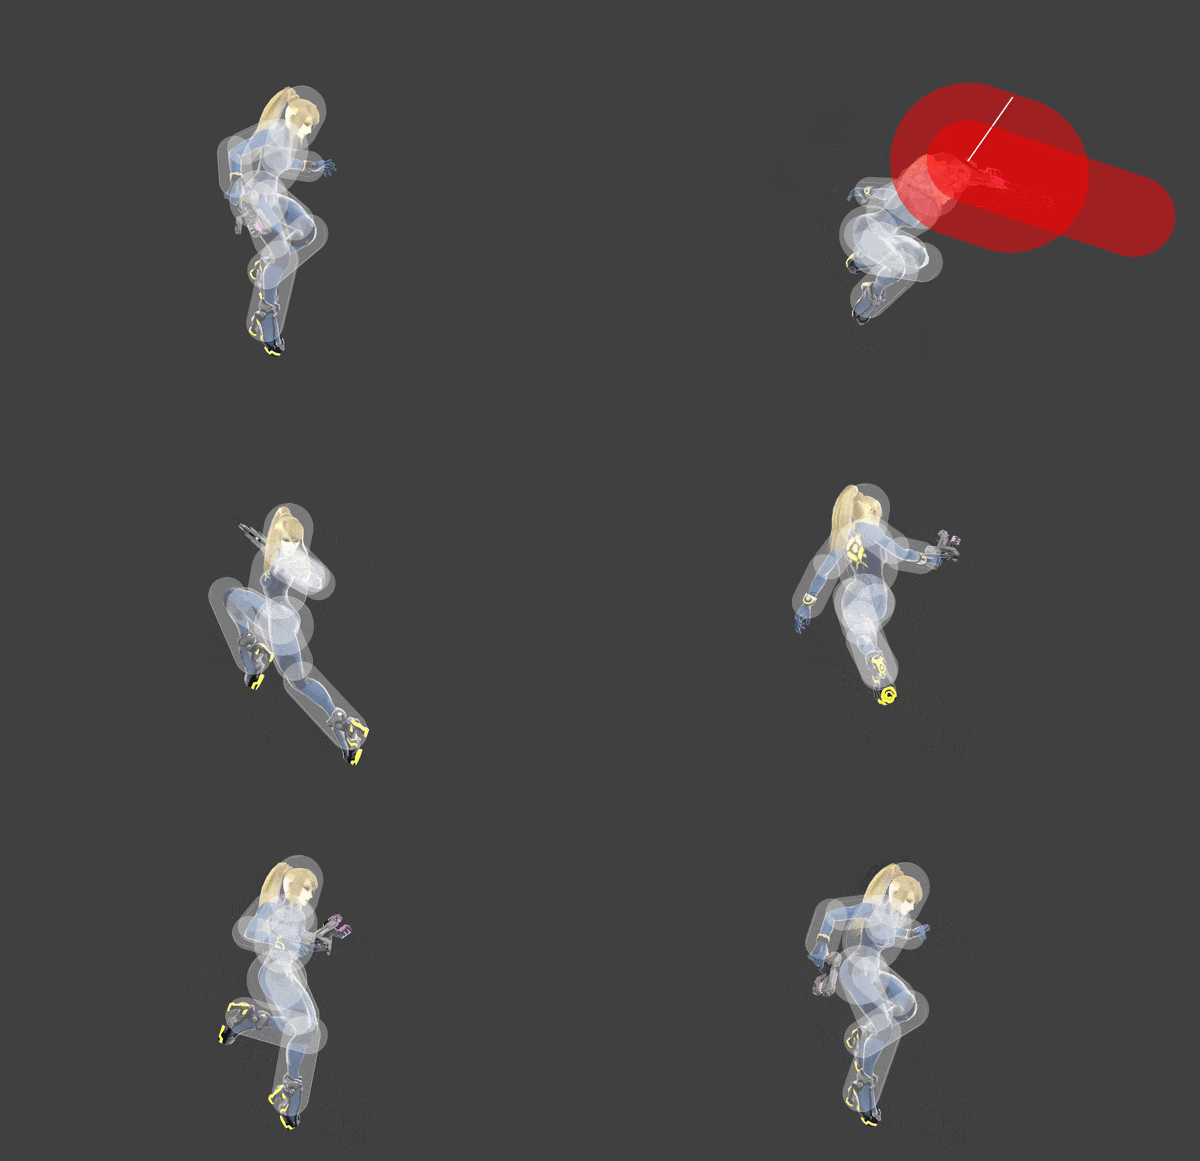
Hitbox visualization showing Zero Suit Samus's neutral aerial.

Overview[edit]

Zero Suit Samus twirls her Plasma Whip around her in midair. The move has some startup as it comes out on frame 10, however it is an excellent combo starter due to its angle and very low landing lag (8 frames). It is able to combo into any aerial attack at many different percentages including a back aerial at high percents which can KO, an up smash which at low percents can start deadly combos and can KO at very high percents, and even a potential KO setup into a Flip Kick spike at low-mid percents (somewhere between in the 40s to 60 percent depending on the character). It also has good disjointed range due to the whip traveling all the way around her which, along with its low landing lag, makes Zero Suit Samus almost unpunishable by any move if the move is properly spaced. The move is only -4 on shield, meaning that only a handful of characters can punish the move on shield (although if Zero Suit Samus spaces the move well, even they cannot punish it).

One problem the move has it that it is inconsistent at hitting small characters such as Pichu and Olimar due to its hitboxes being placed high above the ground. Because of this, she will have to time it when falling as well as space it properly so that it will connect with the opponent or use one of her other combo starters such as her down tilt.

Overall, despite the move's difficulty hitting smaller characters, it still boasts amazing combo starting potential and KO setups along with being safe on shield, especially when spaced. This makes it arguably Zero Suit Samus's best aerial and one of her best moves altogether.

Update History[edit]

In earlier versions of the game, neutral aerial was an even more effective move, as it only had 6 frames of landing lag. This not only made it easier to combo out of but this also made it completely safe on shield against the entire cast, with the move only being -2 on shield.

In update 11.0.0 however, the move received two more frames of landing lag. This made it a little bit harder to combo out of (especially into Boost Kick, due to said move gaining higher startup lag in the same patch), with her combos having a tighter window although they are still possible. The higher landing lag also resulted on the move going from -2 to -4 on shield, which now allows certain characters to punish the move. The move is still safe against most of the cast however, and Zero Suit Samus can still space the move to make it safe against characters who have fast enough out of shield options to punish it at close range.

Overall, neutral aerial has been slightly toned down since the game's initial release due to its higher landing lag however, it still remains one of Zero Suit Samus' strongest moves. The main strengths the move has had since launch are still there, with the move's lower safety and higher difficulty to combo not significantly impacting the move overall.

Super Smash Bros. Ultimate 11.0.0

  • Nerf Neutral aerial has increased landing lag (6 frames → 8).

Hitboxes[edit]

ID Part Rehit rate Damage SD Angle Angle type BK KS FKV Set weight Radius Bone Offset SDI× T% Clang Rebound Effect Type G A Sound Direct Hit bits Hit part Blockable Reflectable Absorbable Flinchless No GFX Heedless
Hit 1
0 0 0 8.0% 0 AngleIcon55.png Standard 38 96 0 HitboxTableIcon(False).png 5.7 top 0.0 11.0 to 10.0 7.0 to 10.0 1.0× 1.0× 0% HitboxTableIcon(Clang).png HitboxTableIcon(Rebound).png EffectIcon(Electric).png TypeIcon(Whip).png HitboxTableIcon(GroundedTrue).png HitboxTableIcon(AerialTrue).png M Electric SpecialsDirect.png All All HitboxTableIcon(Blockable).png HitboxTableIcon(Unreflectable).png HitboxTableIcon(Unabsorbable).png HitboxTableIcon(False).png HitboxTableIcon(False).png HitboxTableIcon(False).png
1 0 0 8.0% 0 AngleIcon55.png Standard 38 96 0 HitboxTableIcon(False).png 3.0 top 0.0 11.0 to 7.0 7.0 to 19.0 1.0× 1.0× 0% HitboxTableIcon(Clang).png HitboxTableIcon(Rebound).png EffectIcon(Electric).png TypeIcon(Whip).png HitboxTableIcon(GroundedTrue).png HitboxTableIcon(AerialTrue).png M Electric SpecialsDirect.png All All HitboxTableIcon(Blockable).png HitboxTableIcon(Unreflectable).png HitboxTableIcon(Unabsorbable).png HitboxTableIcon(False).png HitboxTableIcon(False).png HitboxTableIcon(False).png
Hit 2
0 0 0 8.0% 0 AngleIcon55.png Standard 38 96 0 HitboxTableIcon(False).png 5.6 top 0.0 13.0 to 13.8 -3.0 to -6.6 1.0× 1.0× 0% HitboxTableIcon(Clang).png HitboxTableIcon(Rebound).png EffectIcon(Electric).png TypeIcon(Whip).png HitboxTableIcon(GroundedTrue).png HitboxTableIcon(AerialTrue).png M Electric SpecialsDirect.png All All HitboxTableIcon(Blockable).png HitboxTableIcon(Unreflectable).png HitboxTableIcon(Unabsorbable).png HitboxTableIcon(False).png HitboxTableIcon(False).png HitboxTableIcon(False).png
1 0 0 8.0% 0 AngleIcon55.png Standard 38 96 0 HitboxTableIcon(False).png 3.0 top 0.0 13.0 to 16.5 -3.0 to -15.0 1.0× 1.0× 0% HitboxTableIcon(Clang).png HitboxTableIcon(Rebound).png EffectIcon(Electric).png TypeIcon(Whip).png HitboxTableIcon(GroundedTrue).png HitboxTableIcon(AerialTrue).png M Electric SpecialsDirect.png All All HitboxTableIcon(Blockable).png HitboxTableIcon(Unreflectable).png HitboxTableIcon(Unabsorbable).png HitboxTableIcon(False).png HitboxTableIcon(False).png HitboxTableIcon(False).png

Timing[edit]

Attack[edit]

Initial autocancel 1-3
Hit 1 10-11
Hit 2 15-16
Ending autocancel 42-
Interruptible 52
Animation length 51
FrameIcon(Lag).png FrameIcon(Lag).png FrameIcon(Lag).png FrameIcon(Lag).png FrameIcon(Lag).png FrameIcon(Lag).png FrameIcon(Lag).png FrameIcon(Lag).png FrameIcon(Lag).png FrameIcon(Hitbox).png FrameIcon(Hitbox).png FrameIcon(Lag).png FrameIcon(Lag).png FrameIcon(Lag).png FrameIcon(Hitbox).png FrameIcon(Hitbox).png FrameIcon(Lag).png FrameIcon(Lag).png FrameIcon(Lag).png FrameIcon(Lag).png FrameIcon(Lag).png FrameIcon(Lag).png FrameIcon(Lag).png FrameIcon(Lag).png FrameIcon(Lag).png FrameIcon(Lag).png FrameIcon(Lag).png FrameIcon(Lag).png FrameIcon(Lag).png FrameIcon(Lag).png FrameIcon(Lag).png FrameIcon(Lag).png FrameIcon(Lag).png FrameIcon(Lag).png FrameIcon(Lag).png FrameIcon(Lag).png FrameIcon(Lag).png FrameIcon(Lag).png FrameIcon(Lag).png FrameIcon(Lag).png FrameIcon(Lag).png FrameIcon(Lag).png FrameIcon(Lag).png FrameIcon(Lag).png FrameIcon(Lag).png FrameIcon(Lag).png FrameIcon(Lag).png FrameIcon(Lag).png FrameIcon(Lag).png FrameIcon(Lag).png FrameIcon(Lag).png
FrameIcon(Autocancel).png FrameIcon(Autocancel).png FrameIcon(Autocancel).png FrameIcon(Blank).png FrameIcon(Blank).png FrameIcon(Blank).png FrameIcon(Blank).png FrameIcon(Blank).png FrameIcon(Blank).png FrameIcon(Blank).png FrameIcon(Blank).png FrameIcon(Blank).png FrameIcon(Blank).png FrameIcon(Blank).png FrameIcon(Blank).png FrameIcon(Blank).png FrameIcon(Blank).png FrameIcon(Blank).png FrameIcon(Blank).png FrameIcon(Blank).png FrameIcon(Blank).png FrameIcon(Blank).png FrameIcon(Blank).png FrameIcon(Blank).png FrameIcon(Blank).png FrameIcon(Blank).png FrameIcon(Blank).png FrameIcon(Blank).png FrameIcon(Blank).png FrameIcon(Blank).png FrameIcon(Blank).png FrameIcon(Blank).png FrameIcon(Blank).png FrameIcon(Blank).png FrameIcon(Blank).png FrameIcon(Blank).png FrameIcon(Blank).png FrameIcon(Blank).png FrameIcon(Blank).png FrameIcon(Blank).png FrameIcon(Blank).png FrameIcon(Autocancel).png FrameIcon(Autocancel).png FrameIcon(Autocancel).png FrameIcon(Autocancel).png FrameIcon(Autocancel).png FrameIcon(Autocancel).png FrameIcon(Autocancel).png FrameIcon(Autocancel).png FrameIcon(Autocancel).png FrameIcon(Autocancel).png

Landing lag[edit]

Interruptible 9
Animation length 34
FrameIcon(Lag).png FrameIcon(Lag).png FrameIcon(Lag).png FrameIcon(Lag).png FrameIcon(Lag).png FrameIcon(Lag).png FrameIcon(Lag).png FrameIcon(Lag).png FrameIcon(Interruptible).png FrameIcon(Interruptible).png FrameIcon(Interruptible).png FrameIcon(Interruptible).png FrameIcon(Interruptible).png FrameIcon(Interruptible).png FrameIcon(Interruptible).png FrameIcon(Interruptible).png FrameIcon(Interruptible).png FrameIcon(Interruptible).png FrameIcon(Interruptible).png FrameIcon(Interruptible).png FrameIcon(Interruptible).png FrameIcon(Interruptible).png FrameIcon(Interruptible).png FrameIcon(Interruptible).png FrameIcon(Interruptible).png FrameIcon(Interruptible).png FrameIcon(Interruptible).png FrameIcon(Interruptible).png FrameIcon(Interruptible).png FrameIcon(Interruptible).png FrameIcon(Interruptible).png FrameIcon(Interruptible).png FrameIcon(Interruptible).png FrameIcon(Interruptible).png
Legend (1 square = 1 frame)
FrameIcon(Lag).png
Lag time
FrameIcon(Hitbox).png
Hitbox
FrameIcon(Autocancel).png
Autocancel
FrameIcon(Interruptible).png
Interruptible