Home-Run Contest: Difference between revisions
Gligar2007 (talk | contribs) m (→Subcategories) |
|||
| (48 intermediate revisions by 17 users not shown) | |||
| Line 1: | Line 1: | ||
{{ArticleIcons|melee=y|brawl=y|ssb4=y|ssbu=y}} | {{ArticleIcons|melee=y|brawl=y|ssb4=y|ssbu=y}} | ||
[[File:Home-Run Stadium SSBM.png|thumb|The Home-Run Platform in ''Melee''.]] | [[File:Home-Run Stadium SSBM.png|thumb|The Home-Run Platform in ''Melee''.]] | ||
The '''Home-Run Contest''' ({{ja|ホームランコンテスト|Hōmurankontesuto}}, ''Home-Run Contest'') is a [[Stadium]] minigame introduced in ''[[Super Smash Bros. Melee]]'' and returning in all games since then, although it was initially absent from ''Ultimate'' until the [[List of updates (SSBU)#5.0|5.0.0 update]]. The player(s) must knock a [[Sandbag]] as far as possible, usually with the [[Home-Run Bat]] given. The player has ten seconds to rack up [[damage]] to lengthen the home-run. The most effective technique for dealing high damage very quickly is known as [[bat dropping]]. | The '''Home-Run Contest''' ({{ja|ホームランコンテスト|Hōmurankontesuto}}, ''Home-Run Contest'') is a [[Stadium]] minigame introduced in ''[[Super Smash Bros. Melee]]'' and returning in all games since then, although it was initially absent from ''Ultimate'' until the [[List of updates (SSBU)#5.0.0|5.0.0 update]]. The player(s) must knock a [[Sandbag]] as far as possible, usually with the [[Home-Run Bat]] given. The player has ten seconds to rack up [[damage]] to lengthen the home-run. The most effective technique for dealing high damage very quickly is known as [[bat dropping]]. | ||
The minigame takes place in the [[Home-Run Stadium]], a unique [[stage]] otherwise inaccessible in other game modes without [[hacking]]. | The minigame takes place in the [[Home-Run Stadium]], a unique [[stage]] otherwise inaccessible in other game modes without [[hacking]]. | ||
| Line 7: | Line 7: | ||
==Overview== | ==Overview== | ||
[[File:SmashBrosUltimateHomeRunContest.jpg|thumb|{{SSBU|Banjo & Kazooie}} preparing to send Sandbag flying with two seconds left in ''[[Super Smash Bros. Ultimate]]''.]] | [[File:SmashBrosUltimateHomeRunContest.jpg|thumb|{{SSBU|Banjo & Kazooie}} preparing to send Sandbag flying with two seconds left in ''[[Super Smash Bros. Ultimate]]''.]] | ||
The player starts on a platform with a Sandbag in the center, and the character about 1/3 of the way from the left of the platform facing right. On the left edge is a [[Home-Run Bat]], which can be used to hit the bag extremely far. Hitting with the very end of the bat, known as a "[[tipper]]", makes Sandbag go farther than hitting with the middle of the bat, which goes farther than a close hit. Every game has a ten-second time limit. During that time, the player is expected to deal as much damage to the Sandbag as possible. After five seconds, | The player starts on a platform with a Sandbag in the center, and the character about 1/3 of the way from the left of the platform facing right. On the left edge is a [[Home-Run Bat]], which can be used to hit the bag extremely far. Hitting with the very end of the bat, known as a "[[tipper]]", makes Sandbag go farther than hitting with the middle of the bat, which goes farther than a close hit. Every game has a ten-second time limit. During that time, the player is expected to deal as much damage to the Sandbag as possible. After five seconds, a countdown will occur just like in a [[Match timer#Final countdown timer|standard timed match with only five seconds remaining]] before the player hits the bag with the bat or an attack. When the Sandbag lands on the field after being launched, that will be the player's total distance for the game. If the player chooses not to launch the Sandbag, or the Sandbag is launched to the wrong side, the game automatically ends and a distance of zero is recorded. | ||
In ''Melee'', it is also possible for some characters to hit the Sandbag with the handle of the bat, causing what is known as a no-[[ping]] hit, which sends the Sandbag at a much sharper angle. A no-ping hit only does 8% damage rather than 20%, but the change in angle causes the Sandbag to fly much farther when its damage is relatively low (lower than about 120%). For example, using a no-ping hit when Sandbag is only at 35% damage sends the Sandbag over 1000 feet (304.8 meters). {{SSBM|Pichu}}, {{SSBM|Pikachu}}, and {{SSBM|Mr. Game & Watch}} can take advantage of their unique swing animations to perform a no-ping hit simply by walking next to the bag, facing away, and swinging. Most other characters require the bag to be in the air to perform a no-ping hit. The [[character]]s that cannot do a no-ping hit or it does not go farther than their normal Home-Run swing at any percent are {{SSBM|Dr. Mario}}, {{SSBM|Mario}}, {{SSBM|Luigi}}, {{SSBM|Donkey Kong}}, {{SSBM|Captain Falcon}}, and {{SSBM|Ganondorf}}. While the technique is possible in ''Brawl'' onwards, it is unconfirmed whether they have similar uses as in ''Melee''; the fact that most characters' Home-Run swings have been standardized to a single unique animation may be relevant. | In ''Melee'', it is also possible for some characters to hit the Sandbag with the handle of the bat, causing what is known as a no-[[ping]] hit, which sends the Sandbag at a much sharper angle. A no-ping hit only does 8% damage rather than 20%, but the change in angle causes the Sandbag to fly much farther when its damage is relatively low (lower than about 120%). For example, using a no-ping hit when Sandbag is only at 35% damage sends the Sandbag over 1000 feet (304.8 meters). {{SSBM|Pichu}}, {{SSBM|Pikachu}}, and {{SSBM|Mr. Game & Watch}} can take advantage of their unique swing animations to perform a no-ping hit simply by walking next to the bag, facing away, and swinging. Most other characters require the bag to be in the air to perform a no-ping hit. The [[character]]s that cannot do a no-ping hit or it does not go farther than their normal Home-Run swing at any percent are {{SSBM|Dr. Mario}}, {{SSBM|Mario}}, {{SSBM|Luigi}}, {{SSBM|Donkey Kong}}, {{SSBM|Captain Falcon}}, and {{SSBM|Ganondorf}}. While the technique is possible in ''Brawl'' onwards, it is unconfirmed whether they have similar uses as in ''Melee''; the fact that most characters' Home-Run swings have been standardized to a single unique animation may be relevant. | ||
| Line 14: | Line 14: | ||
*2-player Co-Op is now supported, both in simultaneous and alternating modes and can also be played online with a friend. | *2-player Co-Op is now supported, both in simultaneous and alternating modes and can also be played online with a friend. | ||
*There is a shield around the platform which prevents Sandbag from being knocked out without sufficient force. The shield is breakable after being struck enough times (usually up to five times) or with sufficient force, but it greatly lowers the difficulty of bringing Sandbag's damage up. The shield automatically disappears when time is up. | *There is a shield around the platform which prevents Sandbag from being knocked out without sufficient force. The shield is breakable after being struck enough times (usually up to five times) or with sufficient force, but it greatly lowers the difficulty of bringing Sandbag's damage up. The shield automatically disappears when time is up. | ||
*Bat drops are generally more difficult to do because [[A button|A]] and [[C-Stick]] grab items. | *Bat drops are generally more difficult to do because [[A button|A]] and the [[C-Stick]] grab items. | ||
*Knocking Sandbag to the platform's left will automatically result in no distance. | *Knocking Sandbag to the platform's left will automatically result in no distance. | ||
*Sandbag cannot be grabbed. | *Sandbag cannot be grabbed. | ||
*A small, original tune is now played for the duration of the game, rather than being shared with [[Target Smash!]] like in ''Melee''; this tune is an extract from the credits music from the original ''Smash Bros.'' game with an exclusive ending added | *A small, original tune is now played for the duration of the game, rather than being shared with [[Target Smash!]] like in ''Melee''; this tune is an extract from the credits music from the original ''Smash Bros.'' game with an exclusive ending added after the [[announcer]]'s countdown. | ||
*The Home-Run Stadium is endless; the measuring counter, however, cannot exceed 999999.9 ft. | *The Home-Run Stadium is endless; the measuring counter, however, cannot exceed 999999.9 ft. | ||
*At 10000 ft, the number on the sign will wrap around to 0. | *At 10000 ft, the number on the sign will wrap around to 0. | ||
| Line 23: | Line 23: | ||
===Changes in ''[[Super Smash Bros. 4]]''=== | ===Changes in ''[[Super Smash Bros. 4]]''=== | ||
*The barrier is no longer breakable by being hit | *The barrier is no longer breakable by being hit with multiple weak attacks. It can now only be broken with sufficient knockback. | ||
*In {{forwiiu}} only, the Home-Run Contest is now playable with up to four players by taking turns. The playing order is random. | *In {{forwiiu}} only, the Home-Run Contest is now playable with up to four players by taking turns. The playing order is random. | ||
*Hitting the Sandbag far enough will cause the gameplay to fast-forward until it becomes visible again. | *Hitting the Sandbag far enough will cause the gameplay to fast-forward until it becomes visible again. | ||
| Line 37: | Line 37: | ||
===Changes in ''[[Super Smash Bros. Ultimate]]''=== | ===Changes in ''[[Super Smash Bros. Ultimate]]''=== | ||
[[File:HRC threshold.png|thumb | [[File:HRC threshold.png|thumb|300px|A graph demonstrating 2 major knockback thresholds in Home-Run Contest]] | ||
*As with [[Multi-Man Smash|Mob Smash]], Home-Run Contest is no longer a Stadium mode, instead located directly in the Games & More menu along with Mob Smash, {{SSBU|Classic Mode}}, [[Training mode]], [[Stage Builder]], and others. | *As with [[Multi-Man Smash|Mob Smash]], Home-Run Contest is no longer a Stadium mode, instead located directly in the Games & More menu along with Mob Smash, {{SSBU|Classic Mode}}, [[Training mode]], [[Stage Builder]], and others. | ||
*The setting has been changed to a runway in the middle of a lake. The background stadium is replaced with a lavish ''Smash'' themed fortress. The lake eventually turns into a series of waterfalls that lead into a canyon, where the runway turns into an isolated bridge to keep a level surface. | |||
*The Sandbag has infinite [[knockback resistance]] when the first hit connects. | *The Sandbag has infinite [[knockback resistance]] when the first hit connects. | ||
*The Sandbag's launch physics now change when certain horizontal launch speed thresholds are exceeded, becoming easier to launch further. | *The Sandbag's launch physics now change when certain horizontal launch speed thresholds are exceeded, becoming easier to launch further. | ||
**Oddly, the final threshold appears to cap the launch speed of the Sandbag, meaning that moves with higher launch angles have higher absolute limits. | **Oddly, the final threshold appears to cap the launch speed of the Sandbag, meaning that moves with higher launch angles have higher absolute limits. | ||
*When the Sandbag is launched, a dynamic camera effect similar to those used in certain [[Final Smash]]es occurs. Particularly strong swings are shown from a different angle, behind the player character. | *When the Sandbag is launched, a dynamic camera effect similar to those used in certain [[Final Smash]]es occurs. Particularly strong swings are shown from a different angle, behind the player character. (The angled camera effect does not occur if Sandbag is launched while to the right of the stadium, however.) | ||
*The Sandbag has a much higher top falling speed when launched. | *The Sandbag has a much higher top falling speed when launched. | ||
*While flying, the camera now attempts to follow Sandbag rather than letting it disappear off the top of the screen; however, if Sandbag is launched hard enough, it will still be launched above where the camera is allowed to follow. As Sandbag flies, it may be launched out of the atmosphere into a starlit night sky in outer space, and launching Sandbag particularly hard will show it flying in front of the moon, before eventually plummeting below the cloud layer again. | *While flying, the camera now attempts to follow Sandbag rather than letting it disappear off the top of the screen; however, if Sandbag is launched hard enough, it will still be launched above where the camera is allowed to follow. As Sandbag flies, it may be launched out of the atmosphere into a starlit night sky in outer space, and launching Sandbag particularly hard will show it flying in front of the moon, before eventually plummeting below the cloud layer again. [[Rosalina]]'s {{s|mariowiki|Comet Observatory}} is visible in the background if Sandbag is launched this high. | ||
*While Sandbag is in flight, the player can toggle fast-forward on and off by pressing and holding the B button. | *While Sandbag is in flight, the player can toggle fast-forward on and off by pressing and holding the B button. | ||
*Distance is now measured in kilometers | *Distance is now measured in kilometers regardless of language or regional settings, rather than feet in American English and meters in all other languages of previous games. | ||
**Distance markers have been changed from signposts to drones. | |||
*The bat only appears after six seconds have passed, removing opportunities for early bat drop combos. It is still possible to do bat drop combos, but it only allows for a maximum of 25-45 drops before disallowing anymore (as the time runs out). | *The bat only appears after six seconds have passed, removing opportunities for early bat drop combos. It is still possible to do bat drop combos, but it only allows for a maximum of 25-45 drops before disallowing anymore (as the time runs out). | ||
*Major sources of [[randomness]] are removed: | *Major sources of [[randomness]] are removed: | ||
| Line 54: | Line 56: | ||
**Hero's smash attacks can never have a critical hit. | **Hero's smash attacks can never have a critical hit. | ||
*Some characters' moves work differently against the Sandbag: | *Some characters' moves work differently against the Sandbag: | ||
**Unlike the regular Sandbag, this one | **Unlike the regular Sandbag, this one cannot be grabbed. | ||
**Sandbag is completely immune to [[windbox]]es from certain moves such as [[Inhale]], [[Blunderbuss]], [[F.L.U.D.D.]], and {{SSBU|Palutena}}'s forward smash. | **Sandbag is completely immune to [[windbox]]es from certain moves such as [[Inhale]], [[Blunderbuss]], [[F.L.U.D.D.]], and {{SSBU|Palutena}}'s forward smash. | ||
**Ridley's [[Skewer]] cannot connect with its 50% sweetspot. | **Ridley's [[Skewer]] cannot connect with its 50% sweetspot. | ||
**Joker's [[Rebellion Gauge]] immediately starts out full and never drains, causing | **Joker's [[Rebellion Gauge]] immediately starts out full and never drains, causing Arséne to always be active. | ||
**Min Min immediately starts out with her left ARM always in powered-up state. | **Min Min immediately starts out with her left ARM always in powered-up state. | ||
**Steve lacks a crafting table but starts out with a full set of diamond equipment. | **Steve lacks a crafting table, but starts out with a full set of diamond equipment. | ||
*In addition to the new "happy" expression added to the Sandbag in ''Ultimate'', during Home-Run Contest only, it will blush at high damage. | *In addition to the new "happy" expression added to the Sandbag in ''Ultimate'', during Home-Run Contest only, it will blush at high damage. | ||
| Line 67: | Line 69: | ||
Exact damage thresholds for some moves are unknown and are only given as bounded ranges. For example, if a move is listed as outperforming the Home-Run swing after "100% - 200%", the Home-Run swing is confirmed to be better at 99% or lower, and the other move is confirmed to be better at 200% or higher, but it is not known which move is better between these two numbers and the actual threshold may be as low as 100% or as high as 200%. | Exact damage thresholds for some moves are unknown and are only given as bounded ranges. For example, if a move is listed as outperforming the Home-Run swing after "100% - 200%", the Home-Run swing is confirmed to be better at 99% or lower, and the other move is confirmed to be better at 200% or higher, but it is not known which move is better between these two numbers and the actual threshold may be as low as 100% or as high as 200%. | ||
Moves that would require an unreachably high damage to outperform the Home-Run Bat are not listed. | |||
{{incomplete|Cleanup; imprecise data. Also, Ultimate data}} | {{incomplete|Cleanup; imprecise data. Also, Ultimate data}} | ||
===''Super Smash Bros. Melee''=== | ===''Super Smash Bros. Melee''=== | ||
{|class=wikitable | {|class=wikitable | ||
!width=15%|Character | !width=15%|Character | ||
!width=20%|Attack | !width=20%|Attack | ||
| Line 78: | Line 79: | ||
!width=50%|Notes | !width=50%|Notes | ||
|- | |- | ||
|{{CharHead|Captain Falcon|SSBM}} || [[Falcon Punch]] (used right next to Sandbag) || | |{{CharHead|Captain Falcon|SSBM}} || [[Falcon Punch]] (used right next to Sandbag) || {{rollover|Always|since Captain Falcon's Home-Run swing sends the Sandbag upwards instead of forwards|?}} || 27% || | ||
|- | |- | ||
|rowspan=2|{{CharHead|Roy|SSBM}} || [[Flare Blade]] (fully charged) || 18% || 50% || | |rowspan=2|{{CharHead|Roy|SSBM}} || [[Flare Blade]] (fully charged) || 18% || 50% || | ||
|- | |- | ||
| [[Flare Blade]] (1 frame before becoming fully charged) || | | [[Flare Blade]] (1 frame before becoming fully charged) || {{rollover|120%|Hits farther than the Home-Run swing at 28%, hits farther than the fully charged Flare Blade at 120%|?}} || 41% || | ||
|- | |- | ||
|{{CharHead|Jigglypuff|SSBM}} || [[Rest]] || 69% || 28% || | |{{CharHead|Jigglypuff|SSBM}} || [[Rest]] || 69% || 28% || | ||
| Line 88: | Line 89: | ||
|rowspan=3|{{CharHead|Ganondorf|SSBM}} || [[Warlock Punch]] (sweetspotted) || 76% || 34% || The very top of Warlock Punch's hitbox (near Ganondorf's head) does more damage and significantly more knockback. Usually performed by jumping and throwing the bat upwards above Sandbag, then pressing B while landing on the opposite side of Sandbag. When timed properly, the falling bat should knock Sandbag into the top of the punch's hitbox. Generally called the "Reverse Warlock Punch" in the HRC community since Ganondorf faces away from the Sandbag as the move is performed (predating the maneuver introduced in ''Brawl'' where Ganondorf actually turns around in the middle of the windup).<br/>Without the sweetspot, the regular Warlock Punch does 30% damage and only outperforms the Home-Run Bat at 154%. | |rowspan=3|{{CharHead|Ganondorf|SSBM}} || [[Warlock Punch]] (sweetspotted) || 76% || 34% || The very top of Warlock Punch's hitbox (near Ganondorf's head) does more damage and significantly more knockback. Usually performed by jumping and throwing the bat upwards above Sandbag, then pressing B while landing on the opposite side of Sandbag. When timed properly, the falling bat should knock Sandbag into the top of the punch's hitbox. Generally called the "Reverse Warlock Punch" in the HRC community since Ganondorf faces away from the Sandbag as the move is performed (predating the maneuver introduced in ''Brawl'' where Ganondorf actually turns around in the middle of the windup).<br/>Without the sweetspot, the regular Warlock Punch does 30% damage and only outperforms the Home-Run Bat at 154%. | ||
|- | |- | ||
| | | {{mvsub|Ganondorf|SSBM|Up tilt}} || 450% || 27% || | ||
|- | |- | ||
| Forward smash (fully charged) || 400% || 30% || | | Forward smash (fully charged) || 400% || 30% || | ||
| Line 96: | Line 97: | ||
|{{CharHead|Pichu|SSBM}} || [[Skull Bash]] (fully charged) || 95% || 39% || | |{{CharHead|Pichu|SSBM}} || [[Skull Bash]] (fully charged) || 95% || 39% || | ||
|- | |- | ||
|{{CharHead|Bowser|SSBM}} || | |{{CharHead|Bowser|SSBM}} || {{mvsub|Bowser|SSBM|Forward smash}} (fully charged) || 120% || 32-33% || | ||
|- | |- | ||
|{{CharHead|Mr. Game & Watch|SSBM}} || [[Judgment]] #9 || 138% || 32% || | |{{CharHead|Mr. Game & Watch|SSBM}} || [[Judgment]] #9 || 138% || 32% || | ||
| Line 102: | Line 103: | ||
|rowspan="2"|{{CharHead|Donkey Kong|SSBM}} || [[Giant Punch]] (fully charged) || 175% || 30% || | |rowspan="2"|{{CharHead|Donkey Kong|SSBM}} || [[Giant Punch]] (fully charged) || 175% || 30% || | ||
|- | |- | ||
| Forward smash (fully charged) || 300% || 27% || | | {{mvsub|Donkey Kong|SSBM|Forward smash}} (fully charged) || 300% || 27% || | ||
|- | |- | ||
|{{CharHead|Luigi|SSBM}} || [[Green Missile]] (misfire, 1/8 chance) || 269% - 310% || 25% || Luigi can only inflict this much damage to the Sandbag through [[TAS]]. | |{{CharHead|Luigi|SSBM}} || [[Green Missile]] (misfire, 1/8 chance) || 269% - 310% || 25% || Luigi can only inflict this much damage to the Sandbag through [[TAS]]. | ||
|- | |||
|{{CharHead|Marth|SSBM}} || [[Shield Breaker]] (fully charged) || 189% || 28% || | |||
|- | |- | ||
| Any || Smash throwing the bat down || 345% - 406% || 12-13% || The only character legitimately able to do this much damage to the Sandbag before the final hit is the {{SSBM|Ice Climbers}} through the [[freeze glitch]]. | | Any || Smash throwing the bat down || 345% - 406% || 12-13% || The only character legitimately able to do this much damage to the Sandbag before the final hit is the {{SSBM|Ice Climbers}} through the [[freeze glitch]]. | ||
| Line 111: | Line 114: | ||
===''Super Smash Bros. Brawl''=== | ===''Super Smash Bros. Brawl''=== | ||
{|class=wikitable width=100% | {|class=wikitable width=100% | ||
!width=15%|Character | !width=15%|Character | ||
!width=20%|Attack | !width=20%|Attack | ||
| Line 118: | Line 120: | ||
!width=50%|Notes | !width=50%|Notes | ||
|- | |- | ||
|{{CharHead|Link|SSBB}} || Down smash hit 2 (fully charged) || 440% || 23% || | |{{CharHead|Link|SSBB}} || {{mvsub|Link|SSBB|Down smash}} hit 2 (fully charged) || 440% || 23% || | ||
|- | |- | ||
|rowspan=3|{{CharHead|Kirby|SSBB}} || Up smash (fully charged) || 415% || || | |rowspan=3|{{CharHead|Kirby|SSBB}} || {{mvsub|Kirby|SSBB|Up smash}} (fully charged) || 415% || || | ||
|- | |- | ||
| Forward smash (angled up, fully charged) || 500% || || | | {{mvsub|Kirby|SSBB|Forward smash}} (angled up, fully charged) || 500% || || | ||
|- | |- | ||
| Down smash (fully charged, inner hitbox) || 510% || || | | {{mvsub|Kirby|SSBB|Down smash}} (fully charged, inner hitbox) || 510% || || | ||
|- | |- | ||
|{{CharHead|Fox|SSBB}} || Up smash (fully charged) || 465% || || | |{{CharHead|Fox|SSBB}} || {{mvsub|Fox|SSBB|Up smash}} (fully charged) || 465% || || | ||
|- | |- | ||
|rowspan=2|{{CharHead|Marth|SSBB}} || Down smash (hit 1 tipper, fully charged) || 405% || || | |rowspan=2|{{CharHead|Marth|SSBB}} || {{mvsub|Marth|SSBB|Down smash}} (hit 1 tipper, fully charged) || 405% || || | ||
|- | |- | ||
| [[Shield Breaker]] (tipper, fully charged) || 965% || || Caused by the knockback cap, and the bat's low launch angle | | [[Shield Breaker]] (tipper, fully charged) || 965% || || Caused by the knockback cap, and the bat's low launch angle | ||
| Line 134: | Line 136: | ||
|rowspan=3|{{CharHead|Ganondorf|SSBB}} || Reverse [[Warlock Punch]] || ~110% || 36% || | |rowspan=3|{{CharHead|Ganondorf|SSBB}} || Reverse [[Warlock Punch]] || ~110% || 36% || | ||
|- | |- | ||
| Forward smash (fully charged, angled up) || 180% || || | | {{mvsub|Ganondorf|SSBB|Forward smash}} (fully charged, angled up) || 180% || || | ||
|- | |- | ||
| Up smash (sweetspot, fully charged) || 550% || || | | {{mvsub|Ganondorf|SSBB|Up smash}} (sweetspot, fully charged) || 550% || || | ||
|- | |- | ||
|rowspan=2|{{CharHead|King Dedede|SSBB}} || Forward smash (fully charged) || ~144% || 35% || | |rowspan=2|{{CharHead|King Dedede|SSBB}} || {{mvsub|King Dedede|SSBB|Forward smash}} (fully charged) || ~144% || 35% || | ||
|- | |- | ||
| [[Jet Hammer]] (1 frame before fully charged) || 275% || || | | [[Jet Hammer]] (1 frame before fully charged) || 275% || || | ||
|- | |- | ||
|rowspan=4|{{CharHead|Ike|SSBB}} || Forward smash (fully charged | |rowspan=4|{{CharHead|Ike|SSBB}} || {{mvsub|Ike|SSBB|Forward smash}} (fully charged, sweetspotted) || 180% || 31-32% || The sweetspot is on the clean hit, or at the center of the blade on the late hit (as opposed to the tip or the hilt). | ||
|- | |- | ||
| Up smash (fully charged, shockwave) || 245% || || | | {{mvsub|Ike|SSBB|Up smash}} (fully charged, shockwave) || 245% || || | ||
|- | |- | ||
| Down smash (fully charged, hit 2 clean hit) || 275% || || | | {{mvsub|Ike|SSBB|Down smash}} (fully charged, hit 2 clean hit) || 275% || || | ||
|- | |- | ||
|[[Eruption]] (Stage 8) || | |[[Eruption]] (Stage 8) || {{rollover|208% upper bound|Hits farther than the Home-Run swing at 133%, hits farther than the forward smash at an upper bound of 208%|?}} || 39.5% || Ike's Eruption reaches Stage 8 when released 1 frame before becoming fully charged. | ||
|- | |- | ||
|rowspan=5|{{CharHead|Mr. Game & Watch|SSBB}} || [[Judge]] #9 || 410% || 32-34% || | |rowspan=5|{{CharHead|Mr. Game & Watch|SSBB}} || [[Judge]] #9 || 410% || 32-34% || | ||
|- | |- | ||
| | |{{mvsub|Mr. Game & Watch|SSBB|Forward smash}} (fully charged) || {{rollover|~250% - 399%|Hits farther than the Home-Run swing at ~203%, hits farther than Judge #9 at the given bounds|?}} || 26% || Reaching this much damage requires a co-op partner or TAS. | ||
|- | |- | ||
| | |{{mvsub|Mr. Game & Watch|SSBB|Up smash}} (fully charged) || 515% || 26% || Reaching this much damage requires TAS. | ||
|- | |- | ||
|Down smash (sweetspot, fully charged) || 540% || || | |{{mvsub|Mr. Game & Watch|SSBB|Down smash}} (sweetspot, fully charged) || 540% || || | ||
|- | |- | ||
|[[Oil Panic]] (capped) || {{fact}} || 63% || This requires a co-op partner. | |[[Oil Panic]] (capped) || {{fact}} || 63% || This requires a co-op partner. | ||
|- | |- | ||
|rowspan=4|{{CharHead|Luigi|SSBB}} || Forward smash (angled up | |rowspan=4|{{CharHead|Luigi|SSBB}} || {{mvsub|Luigi|SSBB|Forward smash}} (angled up, fully charged) || ~180% || 22-23% || | ||
|- | |- | ||
| Down smash (hit 2, fully charged) || 490% || || | | {{mvsub|Luigi|SSBB|Down smash}} (hit 2, fully charged) || 490% || || | ||
|- | |- | ||
| Up smash (fully charged) || 370% || || | | {{mvsub|Luigi|SSBB|Up smash}} (fully charged) || 370% || || | ||
|- | |- | ||
| Green Missile (misfire) || 945% || || | | [[Green Missile]] (misfire) || 945% || || | ||
|- | |- | ||
|{{CharHead|Ivysaur|SSBB}} || Up smash (fully charged) || 550% || || | |{{CharHead|Ivysaur|SSBB}} || {{mvsub|Ivysaur|SSBB|Up smash}} (fully charged) || 550% || || | ||
|- | |- | ||
|{{CharHead|Charizard|SSBB}} || Forward smash (fully charged) || 475% || || | |{{CharHead|Charizard|SSBB}} || {{mvsub|Charizard|SSBB|Forward smash}} (fully charged) || 475% || || | ||
|- | |- | ||
|rowspan=3|{{CharHead|Donkey Kong|SSBB}} || Forward smash (fully charged) || ~190% || 29-31% || | |rowspan=3|{{CharHead|Donkey Kong|SSBB}} || {{mvsub|Donkey Kong|SSBB|Forward smash}} (fully charged) || ~190% || 29-31% || | ||
|- | |- | ||
| | |{{mvsub|Donkey Kong|SSBB|Down smash}} (sweetspot, fully charged) || {{rollover|203% - 246%|Hits farther than the Home-Run swing at an unknown %, hits farther than the forward smash at the given bounds|?}} || 25% || The move's knockback hits the target upwards and towards Donkey Kong, so it must be performed while standing to the right of the Sandbag to hit it to the right. The move has a sweetspot on Donkey Kong's hands/fists and a sourspot on his arms. | ||
|- | |- | ||
|[[Giant Punch]] (stage 10 | |[[Giant Punch]] (stage 10, sweetspotted) || {{rollover|392% - 396%|Hits farther than the Home-Run swing at ~200%(???), hits farther than the down smash at the given bounds|?}} || 29-32% || Racking up this much damage to the Sandbag requires a co-op partner. Giant Punch has 11 stages of charging (one for each swing of his arm) with the 11th being fully charged; the 10th stage has the greatest knockback. When not fully charged, the move also has a sweetspot at the body of the punch (approximately at Donkey Kong's elbow) that deals even more knockback and sends the target behind Donkey Kong (therefore Donkey Kong must face left while performing this move). | ||
|- | |- | ||
|rowspan=2|{{CharHead|Bowser|SSBB}} || Forward smash (fully charged) || 155% || 48% (both hits) || Connecting both hits with the Sandbag at heavy damage rarely works. | |rowspan=2|{{CharHead|Bowser|SSBB}} || {{mvsub|Bowser|SSBB|Forward smash}} (fully charged) || 155% || 48% (both hits) || Connecting both hits with the Sandbag at heavy damage rarely works. | ||
|- | |- | ||
| | |{{mvsub|Bowser|SSBB|Down smash}} (fully charged) || 350% || || | ||
|- | |- | ||
|{{CharHead|Ness|SSBB}} || [[PK Flash]] (fully charged) || 240% || 39% || | |{{CharHead|Ness|SSBB}} || [[PK Flash]] (fully charged) || 240% || 39% || | ||
| Line 186: | Line 188: | ||
|rowspan=2|{{CharHead|Captain Falcon|SSBB}} || Reverse [[Falcon Punch]] || 660% || 28-30% || | |rowspan=2|{{CharHead|Captain Falcon|SSBB}} || Reverse [[Falcon Punch]] || 660% || 28-30% || | ||
|- | |- | ||
| Forward smash (angled up, fully charged) || 390% || || | | {{mvsub|Captain Falcon|SSBB|Forward smash}} (angled up, fully charged) || 390% || || | ||
|- | |- | ||
|rowspan=2|{{CharHead|Peach|SSBB}} || [[Vegetable]]: [[Bob-omb]] (1/384 chance; smash thrown up) || 192% - 234% || 38-39% || | |rowspan=2|{{CharHead|Peach|SSBB}} || [[Vegetable]]: [[Bob-omb]] (1/384 chance; smash thrown up) || 192% - 234% || 38-39% || | ||
|- | |- | ||
| Forward smash (fully charged, pan) || 940% || || | | {{mvsub|Peach|SSBB|Forward smash}} (fully charged, pan) || 940% || || | ||
|- | |- | ||
|{{CharHead|Yoshi|SSBB}} || Up smash (fully charged) || 625% || || | |{{CharHead|Yoshi|SSBB}} || {{mvsub|Yoshi|SSBB|Up smash}} (fully charged) || 625% || || | ||
|- | |- | ||
|{{CharHead|Olimar|SSBB}} || Forward smash (fully charged | |{{CharHead|Olimar|SSBB}} || {{mvsub|Olimar|SSBB|Forward smash}} (fully charged, Purple Pikmin) || 251% - 273% || 27% || | ||
|- | |- | ||
|Multiple || Smash throwing the bat up || 359% - 371% || 25-26% || The only solo character able to deal this much damage to the Sandbag in real time is the {{SSBB|Ice Climbers}}. Other characters can pull this off in co-op mode or by using [[TAS]]. Not all characters can hit a grounded Sandbag with an up throw while standing next to it. | |Multiple || Smash throwing the bat up || 359% - 371% || 25-26% || The only solo character able to deal this much damage to the Sandbag in real time is the {{SSBB|Ice Climbers}}. Other characters can pull this off in co-op mode or by using [[TAS]]. Not all characters can hit a grounded Sandbag with an up throw while standing next to it. | ||
| Line 201: | Line 203: | ||
===''Super Smash Bros. 4''=== | ===''Super Smash Bros. 4''=== | ||
{|class=wikitable | {|class=wikitable | ||
!width=15%|Character | !width=15%|Character | ||
!width=20%|Attack | !width=20%|Attack | ||
| Line 210: | Line 211: | ||
|{{CharHead|Roy|SSB4}} || [[Flare Blade]] (1 frame before becoming fully charged) || 76% upper bound || 47-48% || | |{{CharHead|Roy|SSB4}} || [[Flare Blade]] (1 frame before becoming fully charged) || 76% upper bound || 47-48% || | ||
|- | |- | ||
|{{CharHead|Bowser|SSB4}} || | |{{CharHead|Bowser|SSB4}} || {{mvsub|Bowser|SSB4|Forward smash}} (fully charged) || 157% upper bound || 34% || | ||
|- | |- | ||
|{{CharHead|King Dedede|SSB4}} || | |{{CharHead|King Dedede|SSB4}} || {{mvsub|King Dedede|SSB4|Forward smash}} (fully charged) || 168% - 172% || 35-36% || | ||
|- | |- | ||
|{{CharHead|Ganondorf|SSB4}} || Reverse [[Warlock Punch]] || 179% upper bound || 39% || | |{{CharHead|Ganondorf|SSB4}} || Reverse [[Warlock Punch]] || 179% upper bound || 39% || | ||
| Line 219: | Line 220: | ||
===''Super Smash Bros. Ultimate''=== | ===''Super Smash Bros. Ultimate''=== | ||
{{cleanup|A lot of the "citations" on these do not properly demonstrate that the claimed move actually outperforms the bat.}} | {{cleanup|A lot of the "citations" on these do not properly demonstrate that the claimed move actually outperforms the bat.}} | ||
In ''Ultimate'', the Home-Run Bat's launch power is nerfed in the Home-Run Contest. This makes it easier for moves to outperform the bat, thereby leading to a much greater diversity of moves that outperform the bat than in ''Smash 4''. | |||
{|class=wikitable | {|class=wikitable | ||
!width=15%|Character | !width=15%|Character | ||
!width=20%|Attack | !width=20%|Attack | ||
!width=9%|Outperforms after | !width=9%|Outperforms after | ||
!width=6%|Damage | !width=6%|{{rollover|Damage dealt|Includes 1v1 multiplier and freshness bonus.|y}} | ||
!width=50%|Notes | !width=50%|Notes | ||
|- | |- | ||
|{{CharHead| | |{{CharHead|Mario|SSBU}} || {{mvsub|Mario|SSBU|Forward smash}} (fully charged, angled up, sweetspotted) {{YouTube|12W1IoHxdWE|t=18}} || 272% upper bound || 31.3% || | ||
|- | |- | ||
|{{CharHead| | |{{CharHead|Donkey Kong|SSBU}} || {{mvsub|Donkey Kong|SSBU|Forward smash}} (fully charged, sweetspotted) [https://twitter.com/ToySatoshi/status/1193073857294299136] || 237% upper bound || 38.8% || | ||
|- | |- | ||
|{{CharHead| | |{{CharHead|Kirby|SSBU}} || [[Hammer Flip]] (fully charged) {{YouTube|_s9pA2IOroE}} || 230% upper bound || 44.1% || | ||
|- | |- | ||
|{{CharHead| | |{{CharHead|Luigi|SSBU}} || {{mvsub|Luigi|SSBU|Forward smash}} (fully charged, angled up) {{YouTube|0Ea2-fzw6KQ|t=5m4s}} || 238% upper bound || 26.4% || | ||
|- | |- | ||
|{{CharHead| | |rowspan=2|{{CharHead|Ness|SSBU}} || [[PK Thunder 2]] (strong hit) {{YouTube|snJBpZ6aRyo|t=5m2s}} || 360% upper bound || 31.5% || | ||
|- | |- | ||
|{{ | |{{mvsub|Ness|SSBU|Forward smash}} (fully charged, sweetspotted) {{YouTube|21tJE1FEE-0|t=134}}||333% lower bound|| 38.8% ||Ness's forward smash is actually stronger than PK Thunder 2, though this is impractical because it takes longer to use and even then is only slightly stronger. {{YouTube|KW-LhzqWW28|t=553}} | ||
|- | |- | ||
|{{CharHead| | |{{CharHead|Captain Falcon|SSBU}} || {{mvsub|Captain Falcon|SSBU|Forward smash}} (fully charged, angled up) {{YouTube|CKDoE-9eKTk|t=2m55s}} || 260% upper bound || 35.2% || | ||
|- | |- | ||
|{{CharHead| | |{{CharHead|Bowser|SSBU}}|| {{mvsub|Bowser|SSBU|Forward smash}} (fully charged) {{YouTube|81mQAaiRgzk|t=111}} || 190% upper bound || 40.5% || | ||
|- | |- | ||
|{{CharHead| | |rowspan=2|{{CharHead|Dr. Mario|SSBU}}|| {{mvsub|Dr. Mario|SSBU|Forward smash}} (fully charged, sweetspotted) {{YouTube|1DERad3dTOQ|t=4}}||234% lower bound|| 36.9% || | ||
|- | |- | ||
|{{ | |{{mvsub|Dr. Mario|SSBU|Up smash}} (fully charged, sweetspotted) [https://drive.google.com/file/d/1iDB_n5W74L1UvFXHYQWFOUW2wsamjPCH/view] ||279% upper bound || 29.0% ||The actual value is likely around 267% | ||
|- | |- | ||
|{{CharHead| | |rowspan=2|{{CharHead|Ganondorf|SSBU}} || Reverse [[Warlock Punch]] [https://twitter.com/leafbarrett/status/1169710708314918912]|| 28.4% || 46.6% || | ||
|- | |- | ||
|{{ | |{{mvsub|Ganondorf|SSBU|Forward smash}} (fully charged) {{YouTube|awYLHS5iYFY|t=18}} || 261% upper bound || 42.3% || | ||
|- | |- | ||
|{{CharHead| | |{{CharHead|Mewtwo|SSBU}} || {{mvsub|Mewtwo|SSBU|Down smash}} (fully charged) {{YouTube|5zB6WFm5f6Y|t=763s}} || 230% lower bound || 28.2% || | ||
|- | |- | ||
|{{CharHead| | |{{CharHead|Roy|SSBU}}<br>{{CharHead|Chrom|SSBU}}|| [[Flare Blade]] (critical charge)<br>Flare Blade (fully charged) || Always<br>Always || 60.2%<br>63.0% || Critical charge deals more knockback than the fully charged variant at higher percentages due to differences in knockback scaling | ||
|- | |- | ||
|{{CharHead| | |rowspan=2|{{CharHead|Mr. Game & Watch|SSBU}}|| [[Oil Panic]] (sufficient damage) {{YouTube|sYUQRaQpzT4}} || 250% upper bound || varies || The actual value is much less than 250%, likely around 150%. Can only be done in Co-op mode with absorbable friendly-fire attacks such as {{SSBU|Snake}}'s [[Hand Grenade]]s | ||
|- | |- | ||
|{{ | |{{mvsub|Mr. Game & Watch|SSBU|Forward smash}} (fully charged, sweetspotted) {{YouTube|5zB6WFm5f6Y|t=916}} || 280% upper bound || 31.7% || | ||
|- | |- | ||
|{{CharHead| | |{{CharHead|Wario|SSBU}}|| {{mvsub|Wario|SSBU|Forward smash}} (fully charged) {{YouTube|0Ea2-fzw6KQ|t=6m24s}} || 265% upper bound || 35.2% || | ||
|- | |- | ||
|{{CharHead| | |{{CharHead|Ike|SSBU}}|| {{mvsub|Ike|SSBU|Down smash}} (fully charged, 2nd hit) {{YouTube|SlQbDvlYL78|t=97}} || 245% upper bound || 33.5% || | ||
|- | |- | ||
|{{CharHead| | |{{CharHead|Charizard|SSBU}}|| {{mvsub|Charizard|SSBU|Forward smash}} (fully charged) {{YouTube|fskGdVtl5X8|t=18}} || 258% upper bound || 33.5% || | ||
|- | |- | ||
|{{CharHead| | |rowspan=2|{{CharHead|King Dedede|SSBU}}|| [[Jet Hammer]] (critical charge) {{YouTube|nMUNBkmqW-w|t=696}} || 212% upper bound || 37.6% || | ||
|- | |- | ||
|{{ | |{{mvsub|King Dedede|SSBU|Forward smash}} (fully charged, sweetspotted) {{YouTube|1AdXssKzGwM}} || 214% upper bound || 44.1% || | ||
|- | |- | ||
|{{CharHead| | |{{CharHead|Wii Fit Trainer|SSBU}}|| {{mvsub|Wii Fit Trainer|SSBU|Forward smash}} (fully charged, with [[Deep Breathing]]) {{YouTube|4bZ64IU5Ro4}} || 240% lower bound || 34.1% || A Home-Run Bat swing with Deep Breathing is still stronger than this at currently achievable percents. | ||
|- | |- | ||
|{{CharHead| | |{{CharHead|Little Mac|SSBU}}|| [[Straight Lunge]] (fully charged) {{YouTube|0-zB-ITzqsE|t=9m6s}} || 300% upper bound || 37.8% || | ||
|- | |- | ||
|{{CharHead| | |{{CharHead|Mii Brawler|SSBU}}|| {{mvsub|Mii Brawler|SSBU|Forward smash}} (fully charged) {{YouTube|D1dezKwB0Zk|t=557}} || 270% upper bound || 31.7% || | ||
|- | |- | ||
|{{CharHead| | |rowspan=2|{{CharHead|Shulk|SSBU}}|| {{mvsub|Shulk|SSBU|Forward smash}} (fully charged, angled up, with Smash [[Monado Art]] active) {{YouTube|GqgQqIEJF_0|t=75}} || 265% upper bound || 9.7% (both hits) <br>6.0% (2nd hit only) || A Home-Run Bat swing with the Smash Monado Art active is still stronger than this at currently achievable percents | ||
|- | |||
|[[Vision]] (dash, with Smash [[Monado Art]] active) {{YouTube|o__UCGAFm2k}} || 300% upper bound || varies || Can only be done in Co-op mode with absorbable friendly-fire attacks such as {{SSBU|Snake}}'s [[Hand Grenade]]s | |||
|- | |||
|{{CharHead|King K. Rool|SSBU}}|| {{mvsub|King K. Rool|SSBU|Forward smash}} (fully charged, angled up) {{YouTube|0Ea2-fzw6KQ|t=6m24s}} || 250% upper bound || 35.1% || | |||
|- | |||
|rowspan=2|{{CharHead|Incineroar|SSBU}}|| {{mvsub|Incineroar|SSBU|Forward smash}} (fully charged, sweetspotted) {{YouTube|4HKCgh24PPk|t=31}} || 220% upper bound || 35.2% || | |||
|- | |||
|Forward smash (fully charged, sweetspotted, with max [[Revenge]]) {{YouTube|g9e9xxUOTZU|t=48}} || 183% upper bound || 105.8% ||The actual damage output is less than this, since it can only be done in Co-op mode with absorbable friendly-fire attacks such as {{SSBU|Snake}}'s [[Hand Grenade]]s | |||
|- | |||
|{{CharHead|Piranha Plant|SSBU}}|| {{mvsub|Piranha Plant|SSBU|Forward smash}} (fully charged, sweetspotted) {{YouTube|0Ea2-fzw6KQ|t=10m23s}} || 280% upper bound || 33.5% || | |||
|- | |||
|{{CharHead|Hero|SSBU}}|| [[Zap / Zapple / Kazap|Kazap]] {{YouTube|kZTs35vZgso|t=18}} || 280% lower bound || 47.8% || | |||
|- | |||
|{{CharHead|Byleth|SSBU}}|| [[Aymr]] [https://www.youtube.com/watch?v=0Ea2-fzw6KQ&t=13m23s] || 240% lower bound [https://twitter.com/I07Leo/status/1434516950944788487] || 37.8% || | |||
|- | |||
|{{CharHead|Min Min|SSBU}}|| [[Punch]] (fully charged, middle hit, with Megawatt) {{YouTube|HYEW-x-FSKA}} || 280% upper bound || 42.6% || | |||
|- | |||
|{{CharHead|Steve|SSBU}}|| {{mvsub|Steve|SSBU|Forward smash}} (fully charged) {{YouTube|zDo9f-Rrr5o}} || 260% upper bound || 35.7% || | |||
|- | |||
|{{CharHead|Kazuya|SSBU}}|| {{mvsub|Kazuya|SSBU|Forward smash}} (fully charged, sweetspotted) {{YouTube|xyjfeIvwGz8|t=22}} || 224% upper bound || 45.8% | |||
|} | |} | ||
Note: in theory any move with a higher launch angle than 30˚ would eventually outperform the bat due to maximum horizontal launch speed being restricted, | Note: in theory, any move with a higher launch angle than 30˚ would eventually outperform the bat due to maximum horizontal launch speed being restricted; however, in practice, the 999% damage cap prevents this from being a reality. | ||
==Rewards== | ==Rewards== | ||
| Line 288: | Line 309: | ||
====In ''Super Smash Bros. Brawl''==== | ====In ''Super Smash Bros. Brawl''==== | ||
*300 meters/990 feet: [[Boo|Boo (Mario Tennis)]] [[sticker]] | *300 meters/990 feet: [[Boo|Boo (Mario Tennis)]] [[sticker]] | ||
*400 meters/1,200 feet: | *400 meters/1,200 feet: {{SSBBMusicLink|Nintendo|Clu Clu Land}} music track | ||
*500 meters/1,500 feet: [[Home-Run Bat]] trophy | *500 meters/1,500 feet: [[Home-Run Bat]] trophy | ||
*5,000 meters/15,000 feet total: [[Bumper]] trophy | *5,000 meters/15,000 feet total: [[Bumper]] trophy | ||
*8,000 meters/24,000 feet total: [[Xananab]] trophy | *8,000 meters/24,000 feet total: [[Xananab]] trophy | ||
*10,000 meters/30,000 feet total: [[Shy Guy]] trophy | *10,000 meters/30,000 feet total: [[Shy Guy]] trophy | ||
*12,500 meters/37,500 feet total: | *12,500 meters/37,500 feet total: {{SSBBMusicLink|Pikmin|Ai no Uta (French Version)}} music track - if not obtained, nothing appears. | ||
*15,000 meters/45,000 feet total: [[Golden Hammer]] trophy | *15,000 meters/45,000 feet total: [[Golden Hammer]] trophy | ||
*Use every character in Home-Run Contest: [[Sandbag]] trophy | *Use every character in Home-Run Contest: [[Sandbag]] trophy | ||
| Line 306: | Line 327: | ||
====In ''Super Smash Bros. for Wii U''==== | ====In ''Super Smash Bros. for Wii U''==== | ||
*100 meters/328 feet as solo {{SSB4|Charizard}} with no bat: [[ | *100 meters/328 feet as solo {{SSB4|Charizard}} with no bat: [[Rock Hurl]] (custom move) | ||
*320 meters/1,049 feet as solo {{SSB4|Peach}}: | *320 meters/1,049 feet as solo {{SSB4|Peach}}: {{SSB4MusicLink|Super Mario Bros.|Title/Ending (Super Mario World)}} music | ||
*Between 500 and 505 meters/1,640 and 1,656 feet: | *Between 500 and 505 meters/1,640 and 1,656 feet: {{h2|List of SSB4 trophies (Others)|Wonder-Green}} trophy | ||
*Between 500 and 505 meters/1,640 and 1,656 feet as solo {{SSB4|R.O.B.}}: | *Between 500 and 505 meters/1,640 and 1,656 feet as solo {{SSB4|R.O.B.}}: {{h2|List of SSB4 trophies (Mega Man series)|Dr. Light}} trophy | ||
*600 meters/1,968 feet: | *600 meters/1,968 feet: {{b|EarthBound|game}} masterpiece | ||
*1,000 meters/3,280 feet: | *1,000 meters/3,280 feet: {{h2|List of SSB4 trophies (Super Mario Bros. series)|Daisy (Baseball)}} trophy | ||
*1,000 meters/3,280 feet as solo {{SSB4|Ganondorf}}: | *1,000 meters/3,280 feet as solo {{SSB4|Ganondorf}}: {{h2|List of SSB4 trophies (Donkey Kong series)|King K.Rool}} trophy | ||
==Competitive Home-Run Contest== | ==Competitive Home-Run Contest== | ||
| Line 323: | Line 344: | ||
Records for ''Ultimate'' are maintained through [https://discord.gg/E4EkwfE The SSBU Home Run Contest Discord Server], and are viewable on the [https://docs.google.com/spreadsheets/d/1PJXXUsU7e2ncxhuwRQlbTogqw-PnL8rQwZAqwo6Zs_I/edit?usp=sharing leaderboard]. | Records for ''Ultimate'' are maintained through [https://discord.gg/E4EkwfE The SSBU Home Run Contest Discord Server], and are viewable on the [https://docs.google.com/spreadsheets/d/1PJXXUsU7e2ncxhuwRQlbTogqw-PnL8rQwZAqwo6Zs_I/edit?usp=sharing leaderboard]. | ||
==Subcategories== | ===Subcategories=== | ||
In competitive Home-Run Contest, there are several subcategories, which use unique playing styles. The most popular two (which have been around the longest, since the start of competitive HRC) are: | In competitive Home-Run Contest, there are several subcategories, which use unique playing styles. The most popular two (which have been around the longest, since the start of competitive HRC) are: | ||
*'''NBA: No Bat Allowed.''' The bat cannot be used to attack in any way. The bat can be picked up, as long as it is not used. NBA strategies are usually unique, as it requires a completely different playing style. Bat swing cannot be used. | *'''NBA: No Bat Allowed.''' The bat cannot be used to attack in any way. The bat can be picked up, as long as it is not used. NBA strategies are usually unique, as it requires a completely different playing style. Bat swing cannot be used. | ||
| Line 329: | Line 350: | ||
Two other subcategories that were created during ''Melee'''s lifetime were BMO and NJA: | Two other subcategories that were created during ''Melee'''s lifetime were BMO and NJA: | ||
*'''BMO: B Moves Only.''' Only | *'''BMO: B Moves Only.''' Only special moves are allowed, and the last attack to hit Sandbag must be a special move. The bat can be used, so somewhat unique bat drops / throws are utilized. Bat swing cannot be used, as it counts as a forward smash. In ''Brawl'' with the advent of the barrier, the record strategies for this subcategory have mostly turned into multiple bat drops with a single special move used to finish, which some argue is against the category's original purpose. | ||
*'''NJA: No Jump Allowed.''' Players may not jump at any time. | *'''NJA: No Jump Allowed.''' Players may not jump at any time. | ||
| Line 340: | Line 361: | ||
===''Melee''=== | ===''Melee''=== | ||
*Ganondorf and the Ice Climbers are tied for the world record of 11,347.2 feet (3458.5 meters). | *Ganondorf and the Ice Climbers are tied for the world record of 11,347.2 feet (3458.5 meters). | ||
**Ganondorf's record was set by YouTube user Sin2324, as seen here: | **Ganondorf's record was set by YouTube user Sin2324, as seen here: {{YouTube|UBm9-at9UGs}} | ||
**The Ice Climbers' record was set by Joe Bushman using the [[freeze glitch]], as seen here: [ | **The Ice Climbers' record was set by Joe Bushman using the [[freeze glitch]], as seen here: {{YouTube|PRazZUl4Mzc}} | ||
**Utilizing [[TAS]], Peach is also able to reach this limit, record set by PracticalTAS {{YouTube|u38iaS9NZ7U}} | |||
*It is impossible to ever exceed a score of 11,347.2 feet because beyond this point, the ground stops being solid and the Sandbag will fall through it. Since the Sandbag never lands, no score is recorded (the game eventually crashes once the Sandbag goes past 4990.0 m or too far beyond the screen). | *It is impossible to ever exceed a score of 11,347.2 feet because beyond this point, the ground stops being solid and the Sandbag will fall through it. Since the Sandbag never lands, no score is recorded (the game eventually crashes once the Sandbag goes past 4990.0 m or too far beyond the screen). {{YouTube|XLc8eagt9dk}} | ||
**Ganondorf and the Ice Climbers can both hit the Sandbag over the limit, with informal distance record videos here: | **Ganondorf and the Ice Climbers can both hit the Sandbag over the limit, with informal distance record videos here: {{YouTube|nrDpj6QBi10}} {{YouTube|0neBFKVcbjc}} | ||
** | **Peach is also able to hit the Sandbag over the limit, though this is only known to be possible in a TAS. {{YouTube|pQetwMVP2S4}}. | ||
** | **The game can be hacked to remove the distance limitation. | ||
***With theoretically perfect | ***Under this change, the Ice Climbers' record is 25,542.3 feet, set by maple0810 {{YouTube|5UF0SpChC4s}} | ||
***With TAS, Ganondorf's record is 21,788.2 feet {{YouTube|o_xdUnCZv9k}} | |||
***With TAS, the Ice Climbers' record is 80,341.7 feet {{YouTube|Q9w25h4APd0}} | |||
****With theoretically perfect randomisation, Peach can achieve a TAS distance of 300,510.2 feet {{YouTube|pkW7JDXeqCE}}, though it has not been proven if the game's pseudorandom algorithm is sufficiently high-quality to actually generate the needed sequence in time. | |||
===''Brawl''=== | ===''Brawl''=== | ||
*The solo world record is held by the Ice Climbers at | *The solo world record is held by the Ice Climbers at 25,451.8 feet (7,757.7 meters) by YouTube user Solon {{YouTube|9zK3c0LF9_g}}, performed by trapping the Sandbag underneath the lip of the platform, then keeping it stuck there with [[freeze frame]]s while Popo and Nana alternate bat throws twice as fast as any other character can. | ||
**Excluding off-stage mechanics, the solo world record is held by Peach, at | **Excluding off-stage mechanics, the solo world record is held by Peach, at 16,751.0 feet (5,105.7 meters), by YouTube user Solon ykms {{YouTube|EXItXvP0xjc&t}}. | ||
*The co-operative world record is held by Ike and the Ice Climbers at 114,594.8 feet (34,928.5 meters), by YouTube user Teitoku06142 {{YouTube|hfZ6uTKMwLI}}. | |||
*The co-operative world record is held by Ike and the Ice Climbers at 114,594.8 feet (34,928.5 meters), by YouTube user Teitoku06142 | *With TAS, the solo world record is held by Peach at 59,455.7 feet (18,122.1 meters), by YouTube user timi1016 {{YouTube|vn4HPsqdHOk}}. | ||
*With TAS, the co-op world record is held by Ike and Mario at 120,572.5 feet (36,750.5 meters), by YouTube user Icesg det {{YouTube|8PfgMgcfBYk}}. | |||
*With TAS, the solo world record is held by Peach at 59,455.7 feet (18,122.1 meters), by YouTube user timi1016 | **Excluding off-stage mechanics, the TAS co-op world record is held by Ike and Peach at 114,723.7 feet (34,967.8 meters), by YouTube user LPZampa {{YouTube|yLbQuLxokP0}}. The Sandbag reaches 999% damage while there are still over 4 seconds left on the clock, and a finisher with the strongest known hitbox (stage 8 [[Eruption]]) is used to send the bag flying. | ||
*With TAS, the co-op world record is held by Ike and Mario at | |||
**Excluding off-stage mechanics, the TAS co-op world record is held by Ike and Peach at 114,723.7 feet (34,967.8 meters), by YouTube user LPZampa | |||
===''Smash 4''=== | ===''Smash 4''=== | ||
*The solo world record is held by Roy at 19,411.7 feet (5,916.7 meters), by YouTube user Teitoku06142. | *The solo world record is held by Roy at 19,411.7 feet (5,916.7 meters), by YouTube user Teitoku06142. {{YouTube|uY4evTGeurU}} | ||
*The co-operative world record is held by Wario and Roy at 88,001.3 feet (26,822.8 meters), again accomplished by YouTube user Teitoku06142. {{YouTube|9QciRgo4hos}} | |||
*The co-operative world record is held by Wario and Roy at 88,001.3 feet (26,822.8 meters), again accomplished by YouTube user Teitoku06142. | |||
===''Ultimate''=== | ===''Ultimate''=== | ||
*The solo world record is held by Peach | *The solo world record is held by Peach & Daisy at 4,135.314 kilometers by YouTube user Desu_nossu. {{YouTube|175XNCEeHLA|t=181}} | ||
*The co-op world record is held by Roy and Peach at 15, | *The co-op world record is held by Roy and Peach at 15,677.188 kilometers by YouTube user Teitoku06142. {{YouTube|5zB6WFm5f6Y|t=1428}} | ||
==Gallery== | ==Gallery== | ||
| Line 396: | Line 416: | ||
|nl=Honkbalsmash | |nl=Honkbalsmash | ||
|nlM=Baseball Smash | |nlM=Baseball Smash | ||
|ru={{rollover|Смэш-бейсбол| | |ru={{rollover|Смэш-бейсбол|Smèsh-beysbol|?}} | ||
|ruM=Smash Baseball | |ruM=Smash Baseball | ||
|ko={{rollover|홈런 콘테스트| | |ko={{rollover|홈런 콘테스트|Homneon Konteseuteu|?}} | ||
|koM=Home-Run Contest | |koM=Home-Run Contest | ||
|zh_tw={{rollover|全壘打競賽|Quánlěidǎ jìngsài|?}} | |zh_tw={{rollover|全壘打競賽|Quánlěidǎ jìngsài|?}} | ||
| Line 409: | Line 429: | ||
===In ''Melee''=== | ===In ''Melee''=== | ||
*There is a wall approximately 50 feet/15 metres to the left of the platform (off screen) that Sandbag can bounce off of. | *There is a wall approximately 50 feet/15 metres to the left of the platform (off screen) that Sandbag can bounce off of. | ||
[[File:Ssbm homeruncomparison.png|thumb | [[File:Ssbm homeruncomparison.png|thumb|Sandbag's position and scale are identical between versions while the platform's scale isn't, proving the US version has a smaller platform.]] | ||
*The platform changes size depending on what language the game is set to. The | *The platform changes size depending on what language the game is set to. The American version is slightly smaller than the Japanese and PAL versions. (This can be demonstrated by hitting the Sandbag from its starting position with a [[dash attack]] from the Home-Run Bat; the Sandbag will fall off the platform in the American version but stay on in the Japanese and PAL versions.) | ||
*In the NTSC version, the distance counter will stop at 9999.9 feet as it has run out of digits. However, values beyond this are still properly recorded under each characters' high score. | *In the NTSC English version, the distance counter will stop at 9999.9 feet as it has run out of digits. However, values beyond this are still properly recorded under each characters' high score. | ||
**Four characters | **Four characters — Ganondorf, the Ice Climbers, Captain Falcon, and Peach — can exceed 10,000 feet. Of these, Ganondorf is the only one that can do so in real time without using a glitch. | ||
***The Ice Climbers require using the [[freeze glitch]], while Captain Falcon and Peach require [[TAS]] to pull off their strategies, and so they cannot reasonably be performed in real time. | ***The Ice Climbers require using the [[freeze glitch]], while Captain Falcon and Peach require [[TAS]] to pull off their strategies, and so they cannot reasonably be performed in real time. | ||
| Line 418: | Line 438: | ||
*The stage is composed of a unique [[terrain]] type designed so that {{SSBB|Olimar}} can only get Purple Pikmin. This is likely so that Olimar players would not constantly restart to get a Purple at an opportune moment, as the mechanics of the mode cause Purples to be the most useful Pikmin almost without question. (Even in ''Smash 4'', where terrain no longer affects Pikmin plucking and they are normally plucked in a fixed order, {{SSB4|Olimar}} still begins with three Purple Pikmin. ''Smash 4'' would go on to introduce additional mechanics to reduce randomness.) | *The stage is composed of a unique [[terrain]] type designed so that {{SSBB|Olimar}} can only get Purple Pikmin. This is likely so that Olimar players would not constantly restart to get a Purple at an opportune moment, as the mechanics of the mode cause Purples to be the most useful Pikmin almost without question. (Even in ''Smash 4'', where terrain no longer affects Pikmin plucking and they are normally plucked in a fixed order, {{SSB4|Olimar}} still begins with three Purple Pikmin. ''Smash 4'' would go on to introduce additional mechanics to reduce randomness.) | ||
*The highest number the distance counter can reach is 999,999.9, only visible with hacks. If the Sandbag is hit this far, it can also be seen that the signs on the ground start getting pushed along with the camera. | *The highest number the distance counter can reach is 999,999.9, only visible with hacks. If the Sandbag is hit this far, it can also be seen that the signs on the ground start getting pushed along with the camera. | ||
*In co-op mode, it is possible to view the area to the | *In co-op mode, it is possible to view the area to the {{YouTube|PF3HYj5Ws2c|left of the main platform}}. This can be done by having one player hit Sandbag off the platform, then having the other player send Sandbag flying to the left of the stage with the [[Home-Run Bat]]; the camera will continue to follow Sandbag, showing the backside of the stage, as well as its "end" if Sandbag is hit far enough. | ||
===In ''For 3DS''=== | ===In ''For 3DS''=== | ||
| Line 428: | Line 448: | ||
===In ''Ultimate''=== | ===In ''Ultimate''=== | ||
*[[Special Zoom]] does not occur on moves that trigger the effect, unless Sandbag is launched by it. | *[[Special Zoom]] does not occur on moves that trigger the effect, unless Sandbag is launched by it. | ||
*The maximum possible distance using the Home-Run swing is 4,135.3 km | *The maximum possible distance using the Home-Run swing is 4,135.3 km {{YouTube|rDbWVxNjHkc}}. The limit is reached at 880% damage (upper bound){{YouTube|MUnkXVOXd0I|t=27}}. | ||
*The maximum possible distance is 4,294,967.295 km | *The maximum possible distance is 4,294,967.295 km {{YouTube|DT6p0dUU0Fg|t=142}}, as that number is the {{s|wikipedia|32-bit}} {{iw|wikipedia|integer|computer science}} limit for representation as an (unsigned) binary number. | ||
*The maximum distance that the top left counter can show is 2,147,483.647 km | *The maximum distance that the top left counter can show is 2,147,483.647 km {{YouTube|DT6p0dUU0Fg|t=142}}, as that number is the {{s|wikipedia|32-bit}} {{iw|wikipedia|integer|computer science}} limit for representation as two's complement. | ||
*The maximum distance that the ground counters can show is 9,999.999 km | *The maximum distance that the ground counters can show is 9,999.999 km {{YouTube|r6llZDm6Qro|t=141}}. | ||
==Trivia== | ==Trivia== | ||
*''Melee'' and ''Ultimate''{{'}}s Home-Run Contests | *''Melee'' and ''Ultimate''{{'}}s Home-Run Contests do not have the announcer say "Go!", unlike ''Brawl'' and ''Smash 4''{{'}}s Home-Run Contests. | ||
*[[Jigglypuff]] is the | *In ''Melee'', Sheik ends up sending opponents flying vertically with the Home-Run Bat. As a result, she needs to transform into Zelda to use the Home-Run Bat properly in the Home-Run Contest. | ||
**At least in ''Melee'', with theoretically perfect | *[[Jigglypuff]] is one of the few characters in the mode that can be KO'd, by breaking its shield. Also, [[Snake]] can be KO'd by blowing himself up with [[C4]], and [[Steve]] can be KO'd by blowing himself up with [[TNT]]. Should this happen, these characters will respawn from the [[revival platform]]. | ||
**At least in ''Melee'', with theoretically perfect randomization, it is possible for {{SSBM|Peach}} to KO herself by pulling at least 6 [[Bob-omb]]s within the 10 seconds {{YouTube|np3MmCwyik8}}, though it has not been proven if the game's pseudorandom algorithm is sufficiently high-quality to actually generate this. | |||
==External links== | ==External links== | ||
*[http://www.gamefaqs.com/console/gamecube/file/516492/17242 GameFAQs: Home-Run Contest guide by SSKeeto (Melee)] | *[http://www.gamefaqs.com/console/gamecube/file/516492/17242 GameFAQs: Home-Run Contest guide by SSKeeto (Melee)] | ||
*Examples of Subcategories by SSBMstuff: | *Examples of Subcategories by SSBMstuff: | ||
**BMO ROB | **BMO ROB {{YouTube|Q1U4bE6viac}} | ||
**NBA Samus | **NBA Samus {{YouTube|W-dlNL_44mA}} | ||
* | *{{YouTube|2CVh3GbsUok|Video summary of the modifications present in Home-Run Contest in ''Ultimate'', as of Version 5.0.0}} | ||
* | *{{YouTube|3EOhtTuhYm4|Video inspecting the removal of randomness in ''Ultimate''}} | ||
{{SSBMMenus}} | {{SSBMMenus}} | ||
| Line 453: | Line 473: | ||
{{SSBUMenus}} | {{SSBUMenus}} | ||
[[Category:Single | [[Category:Single-player modes]] | ||
[[Category:Co-op modes]] | [[Category:Co-op modes]] | ||
[[Category:Modes (SSBM)]] | [[Category:Modes (SSBM)]] | ||
Revision as of 04:25, February 4, 2024

The Home-Run Contest (ホームランコンテスト, Home-Run Contest) is a Stadium minigame introduced in Super Smash Bros. Melee and returning in all games since then, although it was initially absent from Ultimate until the 5.0.0 update. The player(s) must knock a Sandbag as far as possible, usually with the Home-Run Bat given. The player has ten seconds to rack up damage to lengthen the home-run. The most effective technique for dealing high damage very quickly is known as bat dropping.
The minigame takes place in the Home-Run Stadium, a unique stage otherwise inaccessible in other game modes without hacking.
Overview

The player starts on a platform with a Sandbag in the center, and the character about 1/3 of the way from the left of the platform facing right. On the left edge is a Home-Run Bat, which can be used to hit the bag extremely far. Hitting with the very end of the bat, known as a "tipper", makes Sandbag go farther than hitting with the middle of the bat, which goes farther than a close hit. Every game has a ten-second time limit. During that time, the player is expected to deal as much damage to the Sandbag as possible. After five seconds, a countdown will occur just like in a standard timed match with only five seconds remaining before the player hits the bag with the bat or an attack. When the Sandbag lands on the field after being launched, that will be the player's total distance for the game. If the player chooses not to launch the Sandbag, or the Sandbag is launched to the wrong side, the game automatically ends and a distance of zero is recorded.
In Melee, it is also possible for some characters to hit the Sandbag with the handle of the bat, causing what is known as a no-ping hit, which sends the Sandbag at a much sharper angle. A no-ping hit only does 8% damage rather than 20%, but the change in angle causes the Sandbag to fly much farther when its damage is relatively low (lower than about 120%). For example, using a no-ping hit when Sandbag is only at 35% damage sends the Sandbag over 1000 feet (304.8 meters). Pichu, Pikachu, and Mr. Game & Watch can take advantage of their unique swing animations to perform a no-ping hit simply by walking next to the bag, facing away, and swinging. Most other characters require the bag to be in the air to perform a no-ping hit. The characters that cannot do a no-ping hit or it does not go farther than their normal Home-Run swing at any percent are Dr. Mario, Mario, Luigi, Donkey Kong, Captain Falcon, and Ganondorf. While the technique is possible in Brawl onwards, it is unconfirmed whether they have similar uses as in Melee; the fact that most characters' Home-Run swings have been standardized to a single unique animation may be relevant.
Changes in Super Smash Bros. Brawl
- 2-player Co-Op is now supported, both in simultaneous and alternating modes and can also be played online with a friend.
- There is a shield around the platform which prevents Sandbag from being knocked out without sufficient force. The shield is breakable after being struck enough times (usually up to five times) or with sufficient force, but it greatly lowers the difficulty of bringing Sandbag's damage up. The shield automatically disappears when time is up.
- Bat drops are generally more difficult to do because A and the C-Stick grab items.
- Knocking Sandbag to the platform's left will automatically result in no distance.
- Sandbag cannot be grabbed.
- A small, original tune is now played for the duration of the game, rather than being shared with Target Smash! like in Melee; this tune is an extract from the credits music from the original Smash Bros. game with an exclusive ending added after the announcer's countdown.
- The Home-Run Stadium is endless; the measuring counter, however, cannot exceed 999999.9 ft.
- At 10000 ft, the number on the sign will wrap around to 0.
Additionally, the Home-Run Bat sports its own unique Smash attack animations, allowing Captain Falcon and Sheik to properly use it for the contest.
Changes in Super Smash Bros. 4
- The barrier is no longer breakable by being hit with multiple weak attacks. It can now only be broken with sufficient knockback.
- In Super Smash Bros. for Wii U only, the Home-Run Contest is now playable with up to four players by taking turns. The playing order is random.
- Hitting the Sandbag far enough will cause the gameplay to fast-forward until it becomes visible again.
- The Sandbag has more traction.
- The total distance is now shown with Global Smash Power.
- Major sources of randomness are removed:
- Luigi's Green Missile can never misfire.
- Peach can only pluck the dot-eyes Vegetable.
- Mr. Game & Watch always gets a 6 with Judge.
- Villager's up and down aerials always throw three turnips.
- Duck Hunt's Wild Gunman always summons the leader.
- Timber always spawns a woodchip.
Changes in Super Smash Bros. Ultimate

- As with Mob Smash, Home-Run Contest is no longer a Stadium mode, instead located directly in the Games & More menu along with Mob Smash, Classic Mode, Training mode, Stage Builder, and others.
- The setting has been changed to a runway in the middle of a lake. The background stadium is replaced with a lavish Smash themed fortress. The lake eventually turns into a series of waterfalls that lead into a canyon, where the runway turns into an isolated bridge to keep a level surface.
- The Sandbag has infinite knockback resistance when the first hit connects.
- The Sandbag's launch physics now change when certain horizontal launch speed thresholds are exceeded, becoming easier to launch further.
- Oddly, the final threshold appears to cap the launch speed of the Sandbag, meaning that moves with higher launch angles have higher absolute limits.
- When the Sandbag is launched, a dynamic camera effect similar to those used in certain Final Smashes occurs. Particularly strong swings are shown from a different angle, behind the player character. (The angled camera effect does not occur if Sandbag is launched while to the right of the stadium, however.)
- The Sandbag has a much higher top falling speed when launched.
- While flying, the camera now attempts to follow Sandbag rather than letting it disappear off the top of the screen; however, if Sandbag is launched hard enough, it will still be launched above where the camera is allowed to follow. As Sandbag flies, it may be launched out of the atmosphere into a starlit night sky in outer space, and launching Sandbag particularly hard will show it flying in front of the moon, before eventually plummeting below the cloud layer again. Rosalina's Comet Observatory is visible in the background if Sandbag is launched this high.
- While Sandbag is in flight, the player can toggle fast-forward on and off by pressing and holding the B button.
- Distance is now measured in kilometers regardless of language or regional settings, rather than feet in American English and meters in all other languages of previous games.
- Distance markers have been changed from signposts to drones.
- The bat only appears after six seconds have passed, removing opportunities for early bat drop combos. It is still possible to do bat drop combos, but it only allows for a maximum of 25-45 drops before disallowing anymore (as the time runs out).
- Major sources of randomness are removed:
- All randomness-related changes from Smash 4 return.
- Like Peach, Daisy can only pluck the dot-eyes Vegetable.
- Hero's Command Selection will always show Sizzle, Kaboom, Flame Slash, and Hatchet Man in that order.
- Hero's smash attacks can never have a critical hit.
- Some characters' moves work differently against the Sandbag:
- Unlike the regular Sandbag, this one cannot be grabbed.
- Sandbag is completely immune to windboxes from certain moves such as Inhale, Blunderbuss, F.L.U.D.D., and Palutena's forward smash.
- Ridley's Skewer cannot connect with its 50% sweetspot.
- Joker's Rebellion Gauge immediately starts out full and never drains, causing Arséne to always be active.
- Min Min immediately starts out with her left ARM always in powered-up state.
- Steve lacks a crafting table, but starts out with a full set of diamond equipment.
- In addition to the new "happy" expression added to the Sandbag in Ultimate, during Home-Run Contest only, it will blush at high damage.
Moves that can hit farther than a Home-Run swing
Due to differences in knockback scaling, certain moves can send the Sandbag farther than a Home-Run swing once the Sandbag's accumulated damage has become high enough.
Exact damage thresholds for some moves are unknown and are only given as bounded ranges. For example, if a move is listed as outperforming the Home-Run swing after "100% - 200%", the Home-Run swing is confirmed to be better at 99% or lower, and the other move is confirmed to be better at 200% or higher, but it is not known which move is better between these two numbers and the actual threshold may be as low as 100% or as high as 200%.
Moves that would require an unreachably high damage to outperform the Home-Run Bat are not listed.

Super Smash Bros. Melee
| Character | Attack | Outperforms after | Damage Dealt | Notes |
|---|---|---|---|---|
| Falcon Punch (used right next to Sandbag) | Always | 27% | ||
| Flare Blade (fully charged) | 18% | 50% | ||
| Flare Blade (1 frame before becoming fully charged) | 120% | 41% | ||
| Rest | 69% | 28% | ||
| Warlock Punch (sweetspotted) | 76% | 34% | The very top of Warlock Punch's hitbox (near Ganondorf's head) does more damage and significantly more knockback. Usually performed by jumping and throwing the bat upwards above Sandbag, then pressing B while landing on the opposite side of Sandbag. When timed properly, the falling bat should knock Sandbag into the top of the punch's hitbox. Generally called the "Reverse Warlock Punch" in the HRC community since Ganondorf faces away from the Sandbag as the move is performed (predating the maneuver introduced in Brawl where Ganondorf actually turns around in the middle of the windup). Without the sweetspot, the regular Warlock Punch does 30% damage and only outperforms the Home-Run Bat at 154%. | |
| Up tilt | 450% | 27% | ||
| Forward smash (fully charged) | 400% | 30% | ||
| Vegetable: Bob-omb (1/300 chance; smash thrown down) | 90% | 38% | Peach should face left and away from the Sandbag while smash throwing the Bob-omb down. | |
| Skull Bash (fully charged) | 95% | 39% | ||
| Forward smash (fully charged) | 120% | 32-33% | ||
| Judgment #9 | 138% | 32% | ||
| Giant Punch (fully charged) | 175% | 30% | ||
| Forward smash (fully charged) | 300% | 27% | ||
| Green Missile (misfire, 1/8 chance) | 269% - 310% | 25% | Luigi can only inflict this much damage to the Sandbag through TAS. | |
| Shield Breaker (fully charged) | 189% | 28% | ||
| Any | Smash throwing the bat down | 345% - 406% | 12-13% | The only character legitimately able to do this much damage to the Sandbag before the final hit is the Ice Climbers through the freeze glitch. |
Super Smash Bros. Brawl
| Character | Attack | Outperforms after | Damage Dealt | Notes |
|---|---|---|---|---|
| Down smash hit 2 (fully charged) | 440% | 23% | ||
| Up smash (fully charged) | 415% | |||
| Forward smash (angled up, fully charged) | 500% | |||
| Down smash (fully charged, inner hitbox) | 510% | |||
| Up smash (fully charged) | 465% | |||
| Down smash (hit 1 tipper, fully charged) | 405% | |||
| Shield Breaker (tipper, fully charged) | 965% | Caused by the knockback cap, and the bat's low launch angle | ||
| Reverse Warlock Punch | ~110% | 36% | ||
| Forward smash (fully charged, angled up) | 180% | |||
| Up smash (sweetspot, fully charged) | 550% | |||
| Forward smash (fully charged) | ~144% | 35% | ||
| Jet Hammer (1 frame before fully charged) | 275% | |||
| Forward smash (fully charged, sweetspotted) | 180% | 31-32% | The sweetspot is on the clean hit, or at the center of the blade on the late hit (as opposed to the tip or the hilt). | |
| Up smash (fully charged, shockwave) | 245% | |||
| Down smash (fully charged, hit 2 clean hit) | 275% | |||
| Eruption (Stage 8) | 208% upper bound | 39.5% | Ike's Eruption reaches Stage 8 when released 1 frame before becoming fully charged. | |
| Judge #9 | 410% | 32-34% | ||
| Forward smash (fully charged) | ~250% - 399% | 26% | Reaching this much damage requires a co-op partner or TAS. | |
| Up smash (fully charged) | 515% | 26% | Reaching this much damage requires TAS. | |
| Down smash (sweetspot, fully charged) | 540% | |||
| Oil Panic (capped) | [citation needed] | 63% | This requires a co-op partner. | |
| Forward smash (angled up, fully charged) | ~180% | 22-23% | ||
| Down smash (hit 2, fully charged) | 490% | |||
| Up smash (fully charged) | 370% | |||
| Green Missile (misfire) | 945% | |||
| Up smash (fully charged) | 550% | |||
| Forward smash (fully charged) | 475% | |||
| Forward smash (fully charged) | ~190% | 29-31% | ||
| Down smash (sweetspot, fully charged) | 203% - 246% | 25% | The move's knockback hits the target upwards and towards Donkey Kong, so it must be performed while standing to the right of the Sandbag to hit it to the right. The move has a sweetspot on Donkey Kong's hands/fists and a sourspot on his arms. | |
| Giant Punch (stage 10, sweetspotted) | 392% - 396% | 29-32% | Racking up this much damage to the Sandbag requires a co-op partner. Giant Punch has 11 stages of charging (one for each swing of his arm) with the 11th being fully charged; the 10th stage has the greatest knockback. When not fully charged, the move also has a sweetspot at the body of the punch (approximately at Donkey Kong's elbow) that deals even more knockback and sends the target behind Donkey Kong (therefore Donkey Kong must face left while performing this move). | |
| Forward smash (fully charged) | 155% | 48% (both hits) | Connecting both hits with the Sandbag at heavy damage rarely works. | |
| Down smash (fully charged) | 350% | |||
| PK Flash (fully charged) | 240% | 39% | ||
| Reverse Falcon Punch | 660% | 28-30% | ||
| Forward smash (angled up, fully charged) | 390% | |||
| Vegetable: Bob-omb (1/384 chance; smash thrown up) | 192% - 234% | 38-39% | ||
| Forward smash (fully charged, pan) | 940% | |||
| Up smash (fully charged) | 625% | |||
| Forward smash (fully charged, Purple Pikmin) | 251% - 273% | 27% | ||
| Multiple | Smash throwing the bat up | 359% - 371% | 25-26% | The only solo character able to deal this much damage to the Sandbag in real time is the Ice Climbers. Other characters can pull this off in co-op mode or by using TAS. Not all characters can hit a grounded Sandbag with an up throw while standing next to it. |
Super Smash Bros. 4
| Character | Attack | Outperforms after | Damage Dealt | Notes |
|---|---|---|---|---|
| Flare Blade (1 frame before becoming fully charged) | 76% upper bound | 47-48% | ||
| Forward smash (fully charged) | 157% upper bound | 34% | ||
| Forward smash (fully charged) | 168% - 172% | 35-36% | ||
| Reverse Warlock Punch | 179% upper bound | 39% |
Super Smash Bros. Ultimate

In Ultimate, the Home-Run Bat's launch power is nerfed in the Home-Run Contest. This makes it easier for moves to outperform the bat, thereby leading to a much greater diversity of moves that outperform the bat than in Smash 4.
| Character | Attack | Outperforms after | Damage dealt | Notes |
|---|---|---|---|---|
| Forward smash (fully charged, angled up, sweetspotted) [1] | 272% upper bound | 31.3% | ||
| Forward smash (fully charged, sweetspotted) [2] | 237% upper bound | 38.8% | ||
| Hammer Flip (fully charged) [3] | 230% upper bound | 44.1% | ||
| Forward smash (fully charged, angled up) [4] | 238% upper bound | 26.4% | ||
| PK Thunder 2 (strong hit) [5] | 360% upper bound | 31.5% | ||
| Forward smash (fully charged, sweetspotted) [6] | 333% lower bound | 38.8% | Ness's forward smash is actually stronger than PK Thunder 2, though this is impractical because it takes longer to use and even then is only slightly stronger. [7] | |
| Forward smash (fully charged, angled up) [8] | 260% upper bound | 35.2% | ||
| Forward smash (fully charged) [9] | 190% upper bound | 40.5% | ||
| Forward smash (fully charged, sweetspotted) [10] | 234% lower bound | 36.9% | ||
| Up smash (fully charged, sweetspotted) [11] | 279% upper bound | 29.0% | The actual value is likely around 267% | |
| Reverse Warlock Punch [12] | 28.4% | 46.6% | ||
| Forward smash (fully charged) [13] | 261% upper bound | 42.3% | ||
| Down smash (fully charged) [14] | 230% lower bound | 28.2% | ||
| Flare Blade (critical charge) Flare Blade (fully charged) |
Always Always |
60.2% 63.0% |
Critical charge deals more knockback than the fully charged variant at higher percentages due to differences in knockback scaling | |
| Oil Panic (sufficient damage) [15] | 250% upper bound | varies | The actual value is much less than 250%, likely around 150%. Can only be done in Co-op mode with absorbable friendly-fire attacks such as Snake's Hand Grenades | |
| Forward smash (fully charged, sweetspotted) [16] | 280% upper bound | 31.7% | ||
| Forward smash (fully charged) [17] | 265% upper bound | 35.2% | ||
| Down smash (fully charged, 2nd hit) [18] | 245% upper bound | 33.5% | ||
| Forward smash (fully charged) [19] | 258% upper bound | 33.5% | ||
| Jet Hammer (critical charge) [20] | 212% upper bound | 37.6% | ||
| Forward smash (fully charged, sweetspotted) [21] | 214% upper bound | 44.1% | ||
| Forward smash (fully charged, with Deep Breathing) [22] | 240% lower bound | 34.1% | A Home-Run Bat swing with Deep Breathing is still stronger than this at currently achievable percents. | |
| Straight Lunge (fully charged) [23] | 300% upper bound | 37.8% | ||
| Forward smash (fully charged) [24] | 270% upper bound | 31.7% | ||
| Forward smash (fully charged, angled up, with Smash Monado Art active) [25] | 265% upper bound | 9.7% (both hits) 6.0% (2nd hit only) |
A Home-Run Bat swing with the Smash Monado Art active is still stronger than this at currently achievable percents | |
| Vision (dash, with Smash Monado Art active) [26] | 300% upper bound | varies | Can only be done in Co-op mode with absorbable friendly-fire attacks such as Snake's Hand Grenades | |
| Forward smash (fully charged, angled up) [27] | 250% upper bound | 35.1% | ||
| Forward smash (fully charged, sweetspotted) [28] | 220% upper bound | 35.2% | ||
| Forward smash (fully charged, sweetspotted, with max Revenge) [29] | 183% upper bound | 105.8% | The actual damage output is less than this, since it can only be done in Co-op mode with absorbable friendly-fire attacks such as Snake's Hand Grenades | |
| Forward smash (fully charged, sweetspotted) [30] | 280% upper bound | 33.5% | ||
| Kazap [31] | 280% lower bound | 47.8% | ||
| Aymr [32] | 240% lower bound [33] | 37.8% | ||
| Punch (fully charged, middle hit, with Megawatt) [34] | 280% upper bound | 42.6% | ||
| Forward smash (fully charged) [35] | 260% upper bound | 35.7% | ||
| Forward smash (fully charged, sweetspotted) [36] | 224% upper bound | 45.8% |
Note: in theory, any move with a higher launch angle than 30˚ would eventually outperform the bat due to maximum horizontal launch speed being restricted; however, in practice, the 999% damage cap prevents this from being a reality.
Rewards
In Super Smash Bros. Melee
- 300 meters/984.3 feet: Sandbag trophy
- 400 meters/1,312.4 feet: Yoshi's Island N64 stage
- 450 meters/1,476.4 feet: Paper Mario trophy
- 5,000 meters/16,404.2 feet total: Unown trophy
In Super Smash Bros. Brawl
- 300 meters/990 feet: Boo (Mario Tennis) sticker
- 400 meters/1,200 feet: Clu Clu Land music track
- 500 meters/1,500 feet: Home-Run Bat trophy
- 5,000 meters/15,000 feet total: Bumper trophy
- 8,000 meters/24,000 feet total: Xananab trophy
- 10,000 meters/30,000 feet total: Shy Guy trophy
- 12,500 meters/37,500 feet total: Ai no Uta (French Version) music track - if not obtained, nothing appears.
- 15,000 meters/45,000 feet total: Golden Hammer trophy
- Use every character in Home-Run Contest: Sandbag trophy
In Super Smash Bros. for Nintendo 3DS
- Play Home-Run Contest for the first time: Home-Run Bat trophy
- Play Home-Run Contest with 15 or more fighters: Quick Batter Brawn Badge (equipment)
- 300 meters/984 feet: Bonkers trophy
- 600 meters/1,968 feet: Home-Run Bat Agility Badge (equipment)
- 1,000 meters/3,280 feet: Lv. 3 Ore Club (power)
- 15,000 meters/49,212 feet total: Sandbag trophy
In Super Smash Bros. for Wii U
- 100 meters/328 feet as solo Charizard with no bat: Rock Hurl (custom move)
- 320 meters/1,049 feet as solo Peach: Title/Ending (Super Mario World) music
- Between 500 and 505 meters/1,640 and 1,656 feet: Wonder-Green trophy
- Between 500 and 505 meters/1,640 and 1,656 feet as solo R.O.B.: Dr. Light trophy
- 600 meters/1,968 feet: EarthBound masterpiece
- 1,000 meters/3,280 feet: Daisy (Baseball) trophy
- 1,000 meters/3,280 feet as solo Ganondorf: King K.Rool trophy
Competitive Home-Run Contest
Since almost the beginning of Super Smash Bros. Melee, Home-Run Contest has been played competitively. Originally, before the game's release in Europe, North America and Japan had a competition between each other for the highest Home-Run Contest scores. This then moved out to include Europe when the game was released in its PAL version. This competitive nature has continued and grown onto Super Smash Bros. Brawl, both versions of Super Smash Bros. 4, and Super Smash Bros Ultimate especially due to the replay function (thus making video production easier) and video streaming sites such as YouTube. However, due to the large technique changes from game to game, most notably the introduction of the barrier and multiple bat drops in one jump in Brawl, there is very little player overlap between games.
The Home-Run Contest world records' list was maintained on the smash site All is Brawl but its record keeping was lost upon the site's demise. A history of Home-Run Contest and its milestones up until about 2005 can be found on the site Folderol, but note that the Home-Run Contest record's list is out of date.
The Home-Run Contest was notably played competitively during the 2017 Nintendo World Championships.
Records for Ultimate are maintained through The SSBU Home Run Contest Discord Server, and are viewable on the leaderboard.
Subcategories
In competitive Home-Run Contest, there are several subcategories, which use unique playing styles. The most popular two (which have been around the longest, since the start of competitive HRC) are:
- NBA: No Bat Allowed. The bat cannot be used to attack in any way. The bat can be picked up, as long as it is not used. NBA strategies are usually unique, as it requires a completely different playing style. Bat swing cannot be used.
- NBD: No Bat Drops. Players can do everything except aerial bat drops. Grounded bat drops are allowed, as it is considered a bat discard. Bat swing may be used.
Two other subcategories that were created during Melee's lifetime were BMO and NJA:
- BMO: B Moves Only. Only special moves are allowed, and the last attack to hit Sandbag must be a special move. The bat can be used, so somewhat unique bat drops / throws are utilized. Bat swing cannot be used, as it counts as a forward smash. In Brawl with the advent of the barrier, the record strategies for this subcategory have mostly turned into multiple bat drops with a single special move used to finish, which some argue is against the category's original purpose.
- NJA: No Jump Allowed. Players may not jump at any time.
Since Brawl's lifetime, with the advent of the barrier, three additional subcategories have been created and become quite popular, in chronological order:
- NSA: No Shield Allowed. Originally called "No Barrier Allowed". The Sandbag cannot bounce off the barrier.
- 3SS: Three Smash Strategy. Players must use all three of the character's smashes (forward, up and down).
- AAA: All Aerial Attacks. Players must use all five of the character's aerial attacks.
World records
Melee
- Ganondorf and the Ice Climbers are tied for the world record of 11,347.2 feet (3458.5 meters).
- Ganondorf's record was set by YouTube user Sin2324, as seen here: [37]
- The Ice Climbers' record was set by Joe Bushman using the freeze glitch, as seen here: [38]
- Utilizing TAS, Peach is also able to reach this limit, record set by PracticalTAS [39]
- It is impossible to ever exceed a score of 11,347.2 feet because beyond this point, the ground stops being solid and the Sandbag will fall through it. Since the Sandbag never lands, no score is recorded (the game eventually crashes once the Sandbag goes past 4990.0 m or too far beyond the screen). [40]
- Ganondorf and the Ice Climbers can both hit the Sandbag over the limit, with informal distance record videos here: [41] [42]
- Peach is also able to hit the Sandbag over the limit, though this is only known to be possible in a TAS. [43].
- The game can be hacked to remove the distance limitation.
- Under this change, the Ice Climbers' record is 25,542.3 feet, set by maple0810 [44]
- With TAS, Ganondorf's record is 21,788.2 feet [45]
- With TAS, the Ice Climbers' record is 80,341.7 feet [46]
- With theoretically perfect randomisation, Peach can achieve a TAS distance of 300,510.2 feet [47], though it has not been proven if the game's pseudorandom algorithm is sufficiently high-quality to actually generate the needed sequence in time.
Brawl
- The solo world record is held by the Ice Climbers at 25,451.8 feet (7,757.7 meters) by YouTube user Solon [48], performed by trapping the Sandbag underneath the lip of the platform, then keeping it stuck there with freeze frames while Popo and Nana alternate bat throws twice as fast as any other character can.
- Excluding off-stage mechanics, the solo world record is held by Peach, at 16,751.0 feet (5,105.7 meters), by YouTube user Solon ykms [49].
- The co-operative world record is held by Ike and the Ice Climbers at 114,594.8 feet (34,928.5 meters), by YouTube user Teitoku06142 [50].
- With TAS, the solo world record is held by Peach at 59,455.7 feet (18,122.1 meters), by YouTube user timi1016 [51].
- With TAS, the co-op world record is held by Ike and Mario at 120,572.5 feet (36,750.5 meters), by YouTube user Icesg det [52].
- Excluding off-stage mechanics, the TAS co-op world record is held by Ike and Peach at 114,723.7 feet (34,967.8 meters), by YouTube user LPZampa [53]. The Sandbag reaches 999% damage while there are still over 4 seconds left on the clock, and a finisher with the strongest known hitbox (stage 8 Eruption) is used to send the bag flying.
Smash 4
- The solo world record is held by Roy at 19,411.7 feet (5,916.7 meters), by YouTube user Teitoku06142. [54]
- The co-operative world record is held by Wario and Roy at 88,001.3 feet (26,822.8 meters), again accomplished by YouTube user Teitoku06142. [55]
Ultimate
- The solo world record is held by Peach & Daisy at 4,135.314 kilometers by YouTube user Desu_nossu. [56]
- The co-op world record is held by Roy and Peach at 15,677.188 kilometers by YouTube user Teitoku06142. [57]
Gallery
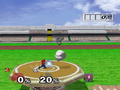
Mario hitting Sandbag with a Home-Run Bat in Melee.
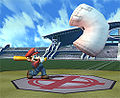
Mario hitting Sandbag with a Home-Run Bat in Brawl.

Two-player co-op in Brawl.
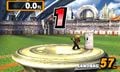
Mii Brawler in the contest as seen in Super Smash Bros. for Nintendo 3DS.
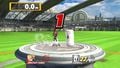
Zero Suit Samus in the contest in Super Smash Bros. for Wii U.


.jpg)
.jpg)
Names in other languages
| Language | Name | Meaning |
|---|---|---|
| ホームランコンテスト | Home-Run Contest | |
| Home-Run Contest | — | |
| Home Run Smash | — | |
| Coup de circuit Smash | Home-Run Smash | |
| Home-Run-Wettkampf | Home-Run Contest | |
| Béisbol Smash | Baseball Smash | |
| El rey del jonrón | Home-Run King | |
| Gara di Home-Run | Home-Run Race | |
| 全垒打竞赛 | Home-Run Contest | |
| 全壘打競賽 | Home-Run Contest | |
| 홈런 콘테스트 | Home-Run Contest | |
| Honkbalsmash | Baseball Smash | |
| Смэш-бейсбол | Smash Baseball |
Notes
In Melee
- There is a wall approximately 50 feet/15 metres to the left of the platform (off screen) that Sandbag can bounce off of.

- The platform changes size depending on what language the game is set to. The American version is slightly smaller than the Japanese and PAL versions. (This can be demonstrated by hitting the Sandbag from its starting position with a dash attack from the Home-Run Bat; the Sandbag will fall off the platform in the American version but stay on in the Japanese and PAL versions.)
- In the NTSC English version, the distance counter will stop at 9999.9 feet as it has run out of digits. However, values beyond this are still properly recorded under each characters' high score.
- Four characters — Ganondorf, the Ice Climbers, Captain Falcon, and Peach — can exceed 10,000 feet. Of these, Ganondorf is the only one that can do so in real time without using a glitch.
- The Ice Climbers require using the freeze glitch, while Captain Falcon and Peach require TAS to pull off their strategies, and so they cannot reasonably be performed in real time.
- Four characters — Ganondorf, the Ice Climbers, Captain Falcon, and Peach — can exceed 10,000 feet. Of these, Ganondorf is the only one that can do so in real time without using a glitch.
In Brawl
- The stage is composed of a unique terrain type designed so that Olimar can only get Purple Pikmin. This is likely so that Olimar players would not constantly restart to get a Purple at an opportune moment, as the mechanics of the mode cause Purples to be the most useful Pikmin almost without question. (Even in Smash 4, where terrain no longer affects Pikmin plucking and they are normally plucked in a fixed order, Olimar still begins with three Purple Pikmin. Smash 4 would go on to introduce additional mechanics to reduce randomness.)
- The highest number the distance counter can reach is 999,999.9, only visible with hacks. If the Sandbag is hit this far, it can also be seen that the signs on the ground start getting pushed along with the camera.
- In co-op mode, it is possible to view the area to the left of the main platform. This can be done by having one player hit Sandbag off the platform, then having the other player send Sandbag flying to the left of the stage with the Home-Run Bat; the camera will continue to follow Sandbag, showing the backside of the stage, as well as its "end" if Sandbag is hit far enough.
In For 3DS
- Attacks that usually cause a "screen-shaking" effect will not shake the screen while in the Home-Run Contest stadium. The same goes for the Target Blast stadium.
In For Wii U
- Some tickets in Master Orders involve reaching a certain distance in the Home-Run Contest. These tickets allow custom moves to be used (and used to allow equipment as well until version 1.0.8), something that is not normally possible when playing the Home-Run Contest. If Mr. Game & Watch uses Extreme Judge (which normally only lands on 1 or 9), it will be changed to regular Judge and always land a 6 as usual.
In Ultimate
- Special Zoom does not occur on moves that trigger the effect, unless Sandbag is launched by it.
- The maximum possible distance using the Home-Run swing is 4,135.3 km [58]. The limit is reached at 880% damage (upper bound)[59].
- The maximum possible distance is 4,294,967.295 km [60], as that number is the 32-bit integer limit for representation as an (unsigned) binary number.
- The maximum distance that the top left counter can show is 2,147,483.647 km [61], as that number is the 32-bit integer limit for representation as two's complement.
- The maximum distance that the ground counters can show is 9,999.999 km [62].
Trivia
- Melee and Ultimate's Home-Run Contests do not have the announcer say "Go!", unlike Brawl and Smash 4's Home-Run Contests.
- In Melee, Sheik ends up sending opponents flying vertically with the Home-Run Bat. As a result, she needs to transform into Zelda to use the Home-Run Bat properly in the Home-Run Contest.
- Jigglypuff is one of the few characters in the mode that can be KO'd, by breaking its shield. Also, Snake can be KO'd by blowing himself up with C4, and Steve can be KO'd by blowing himself up with TNT. Should this happen, these characters will respawn from the revival platform.
External links
- GameFAQs: Home-Run Contest guide by SSKeeto (Melee)
- Examples of Subcategories by SSBMstuff:
- Video summary of the modifications present in Home-Run Contest in Ultimate, as of Version 5.0.0
- Video inspecting the removal of randomness in Ultimate
| Super Smash Bros. Melee menu items | |
|---|---|
| Vs. Mode | Melee (Time · Stock · Coin Battle · Bonus · Team Battle) · Custom Rules · Special Melee · Tournament Mode · Names |
| 1-P Mode | Regular Match (Classic Mode · All-Star Mode · Adventure Mode) · Event Match · Stadium (Target Test · Home-Run Contest · Multi-Man Melee) · Training |
| Trophies | Gallery · Collection · Lottery |
| Options | Rumble · Sound · Screen Display · Language · Erase Data |
| Data | Snapshots · Melee Records · Sound Test · Archives (NTSC only) · How to Play (PAL only) |
| Unused | Debug menu · Debug sound test menu |
| Super Smash Bros. Brawl menu items | |
|---|---|
| Group | Brawl (Time · Stock · Coin Battle · Team Battle) · Rules · Special Brawl · Rotation · Tourney · Names |
| Solo | Classic · All-Star · Adventure Mode: The Subspace Emissary · Events · Stadium (Target Smash!! · Home-Run Contest · Multi-Man Brawl · Boss Battles) · Training |
| Wi-Fi | Spectator Mode · With Anyone · With Friends |
| Vault | Trophies & Stickers (Trophy Gallery · Trophy Hoard · Coin Launcher · Sticker Album · Sticker Center) · Stage Builder · Album · Challenges · Replays · Masterpieces · Chronicle |
| Options | Screen · Deflicker · Rumble · Controls · Sound · My Music · Erase Data |
| Data | Movies · Records (Group Records · Brawl Records · Notices) · Sound Test |
| Super Smash Bros. for Nintendo 3DS menu items | |
|---|---|
| Smash | Smash (Solo · Group · Time · Stock · Team Battle) · Rules |
| Smash Run | Solo · Group · Custom · Select Music |
| Games & More | Classic · All-Star · Stadium (Multi-Man Smash · Target Blast · Home-Run Contest) · Training · Custom · amiibo · Vault (Trophies · Trophy Rush · Album · Replays · Sounds · Records · Tips) · Options (Controls · Sound · Character Outline · Damage Display · Internet Options) |
| Online | Spectator Mode · With Anyone (For Fun · For Glory) · With Friends · Conquest · Share |
| Other | Challenge · StreetPass · Wii U |
| Super Smash Bros. for Wii U menu items | |
|---|---|
| Smash | Smash (Time · Stock · Coin Battle · Team Battle) · 8-Player Smash · Special Smash · Rules · Controls |
| Games & More | Classic · All-Star · Stadium (Target Blast · Home-Run Contest · Multi-Man Smash) · Training · Events · Special Orders (Master Orders · Crazy Orders) · Custom · Stage Builder · amiibo · Vault (Trophies · Trophy Rush · Album · Replays · Movies · Sounds · Records · Tips · Masterpieces) · Options (Controls · Sound · My Music · Internet Options) |
| Online | Spectator Mode · With Anyone (For Fun · For Glory) · With Friends · Online Events (Tourney · Conquest) · Share |
| Other | Challenge · Smash Tour · 3DS |