Little Mac (SSBU)
| Little Mac in Super Smash Bros. Ultimate | |
|---|---|
 
| |
| Universe | Punch-Out!! |
| Other playable appearance | in SSB4 |
| Availability | Unlockable |
| Final Smash | Giga Mac Rush |
| “ | As a boxer, Little Mac fights with his fists alone—no kicks! When his Power Meter fills up, he can use a special KO Uppercut, which can really turn a battle around. For his Final Smash, he turns into Giga Mac and pummels the opponent with a furious rush of punches! | ” |
| —Super Smash Blog, Super Smash Bros. Ultimate Official Site | ||
Little Mac (リトル・マック, Little Mac) is a playable character in Super Smash Bros. Ultimate, officially confirmed on June 12th, 2018. Little Mac is classified as fighter #49.
Kosuke Toriumi reprises his role as Little Mac in the game, via reused voice clips from Smash 4.
How to unlock
Complete one of the following:
- Play VS. matches, with Little Mac being the 20th character to be unlocked.
- Clear Classic Mode with Mario or any character in his unlock tree, being the third character unlocked after Bayonetta.
- Have Little Mac join the player's party in World of Light.
With the exception of the third method, Little Mac must then be defeated on Boxing Ring.
Changes from Super Smash Bros. 4
Despite being a lower mid tier character in Smash 4, Little Mac has been drastically nerfed in the transition to Ultimate. While he has received notable improvements both directly and from game engine changes, he received more heavy nerfs to his damage, combo potential, and frame data. He also is mostly harmed by the universal engine changes in Ultimate compared to most of the cast who benefit from said changes.
His biggest buff involves his notoriously poor recovery: it has been extended and has greater mixup potential due to readdition of directional air dodges, Jolt Haymaker no longer causing helplessness while traveling more distance, and KO Uppercut granting recovery distance in midair. His attributes have also been modified, as he now has a considerably faster air speed which helps him recover easier, higher jumps which no longer make him as vulnerable to platform camping (while also improving his recovery), and the second highest falling speed which makes it easier for him to return to the ground.
He also benefits heavily from some universal changes: the readdition of dash dancing grants him one of the game's best dash dances, the universal nerf to grabs and shield grabs makes him more difficult to punish out of shield, and dash cancels give him arguably the biggest benefit of any fighter, as he now has access to all his grounded options at any time. Some of his ground moves have been improved: all versions of forward smash have lost their sourspots, while Straight Lunge gains damage while charging, can now be shield-canceled and can be turned around if needed, and deals a consistent 30% when fully charged.
However, Little Mac has received significant nerfs. Many engine changes have removed some of his strongest ground advantages: the inability to run past shields make it easier to corner Little Mac and read his fairly linear approach, the removal of perfect pivoting eliminates his extremely strong microspacing tactics, and Straight Lunge's armor can no longer withstand edge attacks due to them now doing more than 8% throughout the cast. He has also been nerfed directly: KO Uppercut KOs very slightly later, his best damage-racking abilities are weaker as neutral attack, neutral infinite and up tilt all deal less damage (with the latter being less safe at low percents), while his down tilt is slower and can no longer combo reliably, removing most of his damage racking abilities as well as kill confirms. His weaker neutral attack and down tilt also make them less likely to out-prioritize attacks (since they offer anti-rebounding priority). As a result, Little Mac's ground game has actually become worse, as he has to deal more hits and has less followup potential, while still lacking useful moves to edgeguard or attack offstage opponents with (apart from Jolt Haymaker and down smash).
In addition, despite some of the universal changes improving Mac, other indirect changes have significantly harmed him. Since defensive options (shielding, air dodges, rolls, and spot dodges) have been nerfed, Little Mac's defense is more exploitable since he is extremely reliant on dodges and shielding, and the limitation to a single air dodge makes him even more susceptible to juggling and gimps despite his improved recovery. The universal changes to jabs make it so that Little Mac can no longer jab cancel into moves such as KO Uppercut and Rising Uppercut. His recovery has ironically become less consistent than before, as Jolt Haymaker can now only be used once before landing (making misuse or interception usually fatal for him), and the ending lag of directional air dodges makes it difficult to fully extend his recovery. Finally, the universal reduction of jumpsquats and landing lag benefits him far less while strengthening most of the cast's aerial games, making it even harder for him to contest against aerial rushdowns.
Overall, despite some changes to Little Mac's notorious recovery and the ability to dash cancel moves, Little Mac has indirectly lost many tools that made him effective in the previous game, making him perform worse than his iteration in Smash 4. As a result of this, his reception within the competitive community has been notoriously negative, to the point that he is almost unanimously considered the worst character in the game, including from professionals such as ZeRo. Regardless, he still has several dedicated mains to his credit, including Sol, all who continue to attain respectable results with him at the regional levels.
Aesthetics
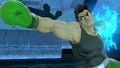
 As with all veterans returning from SSB4, Little Mac's model features a more subdued color scheme. His clothing now features simple detailing and his muscles are slightly more pronounced.
- Little Mac no longer has sixteen alternate costumes, only eight. Of the cut costumes, his blue and orange outfits have been removed, while Wire-Frame Mac has notably been reduced to just two outfits: his standard and sweatshirt outfits.
- For certain attacks, the visual trail textures will match the color of Little Mac's boxing gloves.
- Side taunt has been altered to have a significantly more noticeable glove-tightening and arm-swinging animation.
- Air dodge has an altered animation.
- Once KO Uppercut is used or lost, the Power Meter now shows the meter physically draining to zero, rather than cutting immediately to the lowest level.
- Little Mac now winces and frowns while clapping during the results screen.
- Doc Louis' quotes have been shortened in Little Mac's victory poses.
- Doc Louis no longer appears in Little Mac's victory pose during Team Battles.
Attributes
 Like all characters, Little Mac's jumpsquat animation now takes three frames to complete (down from 5).
- Little Mac benefits from the re-addition of directional air dodges, which grant him a new option to mix up his landings.
 However, Little Mac's directional airdodge has the shortest distance in the game, preventing him from using it as a conventional recovery option, unlike most other fighters.
- Little Mac benefits significantly from the ability to dash cancel almost any grounded attack, increasing the versatility of his ground game.
- In turn, Little Mac suffers from the removal of perfect pivoting due to his previous heavy reliance on the technique in Smash 4.
- As characters no longer dash through each other, many of Little Mac's moves now connect consistently better, most notably with forward smash, Straight Lunge, and KO Uppercut.
- This change hinders his mixup options, as he can no longer run through opponents for a positional advantage.
- Little Mac dashes much faster (2.24 → 2.464).
- Little Mac walks slightly faster (1.32 → 1.386).
- Little Mac's air speed is much faster (1 → 1.208), going from tied for 31st fastest in Smash 4 to tied for 12th in Ultimate. Among other things, this improves his recovery.
- Little Mac's max additional air acceleration is slightly higher (0.028 → 0.03).
- Little Mac jumps higher, now being able to reach the lower platforms of Battlefield with one full hop, and the top platform with both jumps. This improves his offstage survivability and prevents him from being camped as easily.
- Little Mac's falling speed (1.8 → 1.95) and fast falling speed (1.95 → 3.12) are much faster, now tied with King Dedede for the 2nd highest falling speed. This increases his survivability but makes him easier to combo.
- Little Mac is heavier (82 → 87). This increases his survivability but makes him easier to combo.
Ground attacks
- Like most neutral attacks in the game, the first two hits of Mac's jab can jab reset, though it can be difficult to land on smaller characters.
- Due to the universal improvements to neutral infinites, Little Mac's neutral infinite connects significantly better, as it could be escaped from relatively easily in SSB4.
- Neutral attack's third hit has less ending lag (FAF 32→30).
- All hits of neutral attack deal less damage (2% → 1.5% (hit 1), 2% → 1.5% (hit 2), 7% → 5% (hit 3)).
- Neutral infinite deals less damage (0.7% → 0.5% (loop)).
- Neutral attack is less effective for out-prioritizing attacks with its anti-rebounding priority, due to the move's lowered damage.
- Holding down the standard attack button causes Little Mac to do his three hit jab, while mashing it causes him to perform his neutral infinite. Previously, the infinite would be initiated by holding down standard attack.
- Up tilt:
- The removal of perfect pivoting significantly harms up tilt's overall versatility.
- Up tilt deals less damage (9% → 6.5%).
- Up tilt's base knockback was not compensated for the damage reduction, while its knockback growth was increased. This makes up tilt unsafe on hit at very low percents while still sending opponents too far at higher percents to kill confirm.
- Up tilt is less effective for out-prioritizing attacks with its anti-rebounding priority, due to the move's lowered damage.
- Down tilt:
- Down tilt has more ending lag (FAF 22 → 26), significantly reducing its combo ability and followups.
- Down tilt's sends at a more diagonal trajectory. While some of its combos remain intact, its angle and higher ending lag makes majority of its followups only usable at extremely low percents, while limiting its few consistent followups at higher percents (Jolt Haymaker and Rising Uppercut).
- All smash attacks cause the screen to shake.
- While using any smash attack, Little Mac voices out with his weak knockback voice clip if he takes damage during the move. This allows for a minor mindgame when Mac is hit during his super armor state, but is otherwise a small detail.
- All smash attacks trigger Special Zoom if Little Mac is hit during their startup and lands the move on an opponent.
- Forward smash:
- Unangled forward smash produces a softer "wind" sound, rather than the sharp punching sound effect used in Smash 4.
- All versions of forward smash no longer have a sourspot. As a result, all of them deal consistent damage (20% (up, forward), 24% (down)).
- Unangled forward smash deals less knockback.
- Downward angled forward smash deals more knockback, harming its combo potential while still being too weak to KO.
- Forward smash no longer has a blindspot.
- Forward smash gains armor at half-charge or greater.
- Up smash:
- Up smash's first frame produces a spark akin to a glancing blow, which visualizes its stronger flame sweetspot.
Aerial attacks
- All aerials have less landing lag.
- Due to Little Mac's faster falling speed, forward air and back air no longer autocancel in a shorthop.
Throws/other attacks
- Grab range has been increased.
- Dash grab and pivot grab have increased startup (Dash grab: frame 10 → 13, Pivot grab: frame 11 → 14).
- All grabs have more ending lag (Standing: FAF 33 → 39, Dash: FAF 41 → 47, Pivot: FAF 34 → 42).
- Pummel is much faster, but deals less damage (2.1% → 1%).
- Down throw deals less base knockback, but higher knockback scaling.
- The lower base knockback allows Mac to combo into moves besides Rising Uppercut at low percents.
- The higher knockback scaling combined with Ultimate's knockback and hitstun changes makes down throw combo less reliably at higher percents.
- Little Mac has altered swing animations for battering items like the Beam Sword, no longer performing a stab forward when using a forward smash. This applies to all except his dash attack. Like in Smash 4, he shares this change with Captain Falcon.
Special Moves
- Straight Lunge:
- Straight Lunge can be canceled by shielding.
- Like with most non-storable charge moves, Straight Lunge can be unleashed in the opposite direction upon releasing the move.
- Fully-charged Straight Lunge no longer has a blind spot, as characters can no longer pass through each other.
- Straight Lunge gains power and damage as it is charged; previously, it had fixed damage values for an uncharged and fully-charged attack.
- Uncharged Straight Lunge deals less damage (14% → 12%).
- Fully-charged Straight Lunge deals more damage (25% → 30%), and deals consistent damage throughout the move instead of having a weaker late hit.
- Straight Lunge's heavy armor doesn't scale with the 1v1 multiplier, resulting it it becoming less effective in non-doubles gameplay.
- Because all edge attacks now do at least 9% damage, Straight Lunge can no longer tank through them as its heavy armor caps at 8%, removing a key ledge trapping option for Mac.
- KO Uppercut:
- KO Uppercut has a new animation. Little Mac performs a jumping uppercut while facing the screen, making it appear more identical to the Star Punch from Punch-Out!! on the NES.
- The new animation is treated as an actual jump, meaning it is possible to use the grounded variant and end up offstage, especially if the punch is used out of a dash.
- KO Uppercut no longer zooms in on Little Mac in a non-1v1 match due to the new Special Zoom mechanic.
- KO Uppercut's new animation gives the move more vertical range, allowing it to hit opponents on the lower platforms of Battlefield. It also grants recovery distance if used in midair.
- KO Uppercut is performed faster in general, making it harder to punish.
- KO Uppercut no longer has a windbox, making the hitbox connect more consistently.
- KO Uppercut has marginally lowered knockback, causing it to KO slightly later.
- Aerial KO Uppercut is no longer unblockable. [1]
- Jolt Haymaker:
- Grounded Jolt Haymaker makes Little Mac spend less time in the air. He also lands with significantly more traction.
- Jolt Haymaker has 1 less frame of startup (frame 9 → 8).
- Grounded Jolt Haymaker has reduced ending lag.
- Jolt Haymaker deals more base knockback, sending opponents into tumble at 0%.
- Jolt Haymaker has less knockback scaling, killing slightly later.
- Grounded Jolt Haymaker travels a shorter distance.
- Jolt Haymaker no longer renders Little Mac helpless and keeps more forward momentum, thus granting more distance. This significantly improves his recovery and turns what was previously a common suicidal mistake into a potent edge guarding tool.
- All versions of Jolt Haymaker can only be used once until Mac touches the ground again, even if he is hit out of it. This makes it less safe to use, especially if at the risk of being sent offstage.
- Grounded Jolt Haymaker will stop Little Mac from going over the ledge in the last few frames, preventing him from just barely overshooting the ledge and having to get back to the stage.
- Rising Uppercut:
- Little Mac no longer suffers from RCO lag if he is hit out of Rising Uppercut.
- Rising Uppercut is stronger and travels a higher distance when performed on the ground.
- Aerial Rising Uppercut snaps to the ledge earlier on during the move, instead of only during startup and after the final hitbox appears.
- Aerial Rising Uppercut travels slightly higher.
- Aerial Rising Uppercut keeps a small amount of forward momentum, slightly improving its horizontal distance.
- Rising Uppercut's first hit has a trail to highlight its hitbox.
- Slip Counter:
- Slip Counter grants less momentum after an aerial counter. This lowers its recovery potential, but makes it less likely that Mac gets accidentally sent offstage by a counter.
- Slip Counter produces an aesthetic spark upon retaliating.
- When Slip Counter connects, the opponent's knockback is initially slowed before going to normal speed.
- Final Smash:
- Little Mac has a new Final Smash called Giga Mac Rush. Rather than using Giga Mac as a controllable transformation, Little Mac transforms into his Giga Mac form and rushes forward, and if he comes into contact with an opponent, he unleashes a rush of punches before launching them.
Update History
![]() 2.0.0
2.0.0
- Neutral aerial auto-cancels earlier (frame 25 → 16), matching the move's interruptibility.
- The amount of time Little Mac cannot grab the ledge after performing neutral aerial has been shortened (46 frames → 40).
- The amount of time Little Mac cannot grab the ledge after performing up aerial has been shortened (73 frames → 66).
Moveset
- Little Mac can wall jump.
Note: All numbers are listed as base damage, without the 1v1 multiplier.
| Name | Damage | Description | ||
|---|---|---|---|---|
| Neutral attack | 1.5% | A left jab, followed by a right hook, followed by a left uppercut. If the button is mashed, Little Mac will perform an extremely fast flurry of alternating punches, followed by a right uppercut. Holding the attack button will have Little Mac repeat the first hit rapidly. Like in Smash 4, it is one of the fastest attacks in the game, with the first hit coming out on frame 1. As it offers anti-rebounding priority, it can also beat out most weak attacks. As a result, it is an excellent point-blank interrupting tool. The first two hits can lock floored characters, although this is difficult to perform on most characters due to the move's height. | ||
| 1.5% | ||||
| 5% | ||||
| 0.5% (loop), 3% (final hit) | ||||
| Forward tilt | 4% (hit 1), 8% (hit 2) | A one-two combo. The first hit leads into the second hit, which deals excellent knockback that can KO Mario from the edge of Final Destination at 90%. It also has anti-rebounding priority and the longest range of his tilts, making it useful out of a dash. However, the first hit's angle can cause airborne, light or extremely damaged fighters to be knocked away from the second hit, making the move whiff. | ||
| Up tilt | 6.5% | An overhead arcing backfist. It covers the entirety of Little Mac's body, which allows him to use it as a quick option to punish overhead attacks or rolls. It is Little Mac's best combo initiator in general due to its anti-rebounding priority, low knockback and speed. The back hit combos better due to Mac having less endlag after. Combos include itself at low percents, and Rising Uppercut or KO Uppercut at low/mid percents if the opponent is close to him. It can also lead into tilts or smash attacks depending on an opponent's reaction. It resembles Don Flamenco's Twirling Backhand used during Title Defense Mode in the Wii version of Punch-Out!!, albeit performed vertically instead of horizontally. | ||
| Down tilt | 8% | A crouching short straight-punch. Like his neutral attack and tilts, it has anti-rebounding priority and has very fast startup. However, it has lost its formidable combo potential from Smash 4 due to its higher ending lag and altered knockback angle, which sends opponents diagonally in front of Little Mac. As a result, it can only combo into tilts at 0%, and its only consistent combos at higher percents are Jolt Haymaker, forward aerial, dashing Rising Uppercut, or KO Uppercut on heavyweights. Otherwise, it is mainly used to force opponents into a landing situation for Mac to capitalize on. | ||
| Dash attack | 10% | A lunging overhand. It is extremely fast for a dash attack (frame 7), travels a long distance, and acts as a situational KO option, doing so on Mario at 136% from the edge of Final Destination. However, it is notoriously punishable on shield, and is easily punished with a grab and throw, which puts Little Mac at a severe disadvantage due to his abysmal air game. The first frame has an early hitbox that deals the same damage, but KOs much later. | ||
| Forward smash | ↗ | Straight Smash | 20% | Steps forward and throws one of three right-handed punch variations, depending on which angle the control stick is tilted.
Up: An uppercut. It launches opponents vertically and has the largest hitbox out of all three punch variations, which makes it the easiest to connect while also being a decent anti-air. It deals powerful vertical knockback that KOs Mario at 102%, allowing it to finish off fighters with poor vertical endurance. It also grants super armor on frames 8-15. It resembles Little Mac's Star Punch and One-Star Punch in the NES and Wii versions of Punch-Out!!, respectively. Forward: A cross. It has the highest knockback scaling out of all three punch variations, KOing Mario from center-stage at 89%. This makes it the most reliable out of the three in regard to KOing. It also grants super armor on frames 8-15. It is based on the cross Little Mac hits King Hippo with during the cutscene in which he defeats Hippo in the Wii version of Punch-Out!! Down: A body hook. It deals the most damage out of all three punch variations, but its extremely low knockback scaling makes it unusable for KOing. Its high shieldstun makes it safer on shield than the other two punch variations, and it deals heavy shield damage, allowing it to deplete more than half a shield. It also grants super armor on frames 9-15. |
| → | 20% | |||
| ↘ | 24% | |||
| Up smash | 21% (clean), 16% (late) | A wide uppercut. Its first frame is highlighted by a spark, which acts as a sweetspot that possesses a flame effect and deals significant shield damage. Its sourspot also makes it useful for aerial protection, thanks to its respectable damage output, high knockback scaling, and hitbox placement. However, it has the highest amount of ending lag out of his grounded moves. Despite its appearance, it also only hits in front of Little Mac, but it reaches high enough to challenge opponents standing on the bottom platforms of Battlefield. It also grants super armor on frames 8-11. | ||
| Down smash | 13% | Spins 180° to throw a quick, downward angled right hook in each direction. It is very fast and acts as a powerful semi-spike which hits on both sides. Coupled with its long range, it is one of Little Mac's only edgeguarding options. Like his other smash attacks, it grants super armor (frames 7-10 and 15-17). Unlike most down smashes, both of its hits have the same damage outputs. | ||
| Neutral aerial | Weak Jab | 2% | A downward angled straight jab. Due to it hitting on frame 2, it is the fastest neutral aerial in the game. When coupled with its very minimal ending lag, it can be used as a combo breaker of sorts when in the air. However, it has extremely low range, making it risky and difficult to use. | |
| Forward aerial | 5% | A hook. It has slight start-up and a low damage output, but hits at a semi-spike angle, allowing it to act as a niche gimp. It can combo out of several of Little Mac's moves, though this is offset by its meager damage. It can combo into Jolt Uppercut, though this is extremely situational. | ||
| Back aerial | 6% | A backfist. Like his forward aerial, it has a low damage output and hits at a semi-spike angle, but comes out slightly faster and deals 1% more damage. | ||
| Up aerial | 5% | An upward arcing hook. It is extremely fast for an up aerial (frame 5), though this is significantly offset by its short range, low hitbox duration, and high ending lag. If used while near the ground, it can combo into up tilt and Rising Uppercut at high percents. It appears to be based on the jump Little Mac performs during his victory animation in the Wii version of Punch-Out!! | ||
| Down aerial | 4% | A downwards palm thrust. The fist hitbox acts as a meteor smash. It is one of the quickest meteor smashes in the game, but is extremely situational due to its extremely low knockback and damage, with its meteor smash being ineffective against anyone but fast-fallers unless Little Mac footstool jumps on the opponent immediately after. However, it can lock floored opponents, allowing Mac to finish them with any of his strongest attacks. | ||
| Grab | — | Clinches the opponent. In addition to having average range, Little Mac possesses one of the slowest non-tether grabs in the game. Its range can be increased by performing a roll cancel boost grab and it can even be used to cross-up opponents, although this is difficult to pull off. | ||
| Pummel | 1% | A body hook. | ||
| Forward throw | 4% (hit), 4% (throw) | Rears his arm back and throws an overhand. Its low knockback scaling and slight endlag makes this move virtually impossible to lead into any combos: its only other utility is dealing damage. Nearby opponents will be launched at a near-perfect vertical trajectory. | ||
| Back throw | 4% (hit), 5% (throw) | Spins the opponent around and throws an uppercut. The most damaging out of all of Little Mac's throws, as well as the highest knockback scaling. This is the only move with any KO potential, although it is unimpressive as a KOing option as it KOs Mario starting at 140% from the very edge of Final Destination. Nearby opponents will be launched at a near-perfect vertical trajectory. | ||
| Up throw | 4% (hit), 3% (throw) | An uppercut. Nearby opponents will be launched at a near-perfect vertical trajectory. Due to Mac's weak aerial presence, this throw has little use apart from mixups involving forcing opponents to land. | ||
| Down throw | 4% (hit), 3% (throw) | A double axe handle. Its knockback was increased from the previous installment, which makes it much more difficult to lead into combos. Nearby opponents will be launched at a near-perfect vertical trajectory. | ||
| Floor attack (front) | 7% | Gets up while throwing a punch behind himself, then in front of himself. | ||
| Floor attack (back) | 7% | Gets up while throwing a punch in front of himself, then behind himself | ||
| Floor attack (trip) | 5% | Gets up while throwing a punch in front of himself, then behind himself | ||
| Edge attack | 9% | Throws a lunging punch while climbing up the ledge. | ||
| Neutral special | Straight Lunge | 12%/10%/8% (uncharged), 10%/8% (uncharged, reversed), 30% (fully charged), 28% (fully charged, reversed), 35% (KO Uppercut), 13% (midair KO Uppercut) | Rears his arm back and then throws a dashing cross. It is chargeable, grants 8% heavy armor while charging, can be reversed upon release, and moves Little Mac forward. The charge can be cancelled by pressing the shield button. When fully charged, it deals consistent damage throughout the move, lacking a weaker late hit. If the Power Meter is fully charged, it becomes the KO Uppercut, a fast and extremely powerful leaping uppercut, with the ability to pierce shields and also has enough range to reach through the bottom platform of Battlefield. Despite the name, however, it is not a true one-hit KO, but instead KOs at low to mid percentages (KO's the lightest character starting at 12%, and the heaviest starting at 36%), while also granting super armor on frames 8-9. However, KO Uppercut possesses a considerable amount of ending lag, making it punishable regardless if it hits or not, and the Uppercut is immediately lost if Little Mac holds it for 4 seconds and is then hit by any move that causes tumbling. A midair KO Uppercut, although weaker and blockable/counterable, can also be used as a recovery option. | |
| Side special | Jolt Haymaker | 14% | An overhand version of the Superman punch. It can be used almost instantly by pressing the special button immediately after first pressing it. Grants brief intangibility on the ground during startup, and its long hitbox duration allows it to punish moves effectively. It does not render him helpless if used in midair, making it a good horizontal recovery option. However, it can only be used once before landing, making it extremely risky to use predictably due to Little Mac's mediocre recovery. | |
| Up special | Rising Uppercut | 3% (hit 1), 1% (hits 2 - 5), 3% (hit 6) | A right-handed, jumping corkscrew uppercut, followed immediately by a left-handed uppercut. The first uppercut hits multiple times, whereas the second uppercut hits once and has extremely high knockback. Thanks to Little Mac's excellent traction, it is a very potent out of shield option, and is also one of his only reliable aerial finishers aside from Jolt Haymaker. It also grants 3 frames of intangibility on start-up, while the grounded version covers a decent amount of vertical distance. Conversely, the aerial version is half as effective at covering vertical distance and granting maneuverability compared to the grounded version, which make it extremely ineffective for recovery. It appears to be based on Little Mac's Three-Star Punch in the Wii version of Punch-Out!! | |
| Down special | Slip Counter | 1.3× (minimum 10%) | Assumes a full crouch stance and, if hit, immediately counterattacks by slipping inside to throw an uppercut. It shoots Little Mac forward during the counterattack, allowing it to hit distant opponents and act as a recovery extended offstage, albeit with high risk. It has one of the fastest startups of any counter, making it an effective defensive option, though it has relatively high ending lag. It appears to be based on Glass Joe's Delayed Right Hook used during Title Defense Mode in the Wii version of Punch-Out!! | |
| Final Smash | Giga Mac Rush | 3% (beginning), 2% (beginning, late), 59% (entire) | Little Mac transforms into his Giga Mac form and rushes forward, attacking any caught opponents with an uppercut. He then proceeds to unleash a rush of punches that concludes with an uppercut. For a Final Smash, it deals a massive amount of damage, and the initial dash can be used as a niche recovery option. | |
Power Meter and KO Uppercut

| “ | Deal damage to opponents or receive damage to charge the meter. Charge it to the max to make your neutral special a KO Uppercut. | ” |
| —Move List Description for the Power Meter. | ||
| “ | Unleash a powerful uppercut that launches opponents.You get various perks for using this on the ground. | ” |
| —Move List Description for the KO Uppercut. | ||
Little Mac has a unique mechanic known as the Power Meter, which is permanently shown above his damage meter. Dealing damage or receiving damage from opponents will charge the meter; when full, Little Mac's neutral special (Straight Lunge) is replaced by the KO Uppercut. KO Uppercut has multiple perks: it can KO almost the entire cast around 35%, has very fast startup, grants super armor right before the hitbox appears, is unblockable, and cannot be countered. This only applies to the grounded version, as the aerial version is significantly weaker and blockable; however, it grants good recovery distance.
KO Uppercut will replace Straight Lunge until it is used, Little Mac is KO'd, or if he is sent tumbling 4 seconds after he gains a KO Uppercut.
Victory poses
- Does a fakeout punch against Doc Louis, who stumbles, before they both pose with an arm raised while facing towards the camera.
- Doc Louis bumps Little Mac with his belly before holding up Mac's arm, like a referee would after a boxing match. Little Mac shows an angry expression at the end, though he will eventually show a more neutral look after some time passes.
- Runs and turns his back towards the screen, shuffles his feet, then performs a spinning uppercut while Doc Louis cheers him on.
- Doc Louis can say any of these at random, depending on which costume and pose.
| Pose 1 | Pose 2 | Pose 3 |
|---|---|---|
| Normal Costumes | ||
| "You win, Mac!" | "World Circuit's all yours Mac!" | "Ahh, winnin' feels good, don't it?" |
| "Was that a little too easy for ya, son?" | "(in tandem with the announcer) And the winner is… Little Mac!" | "Way to go, Mac! You're the champ, baby!" |
| "Nice work, Mac. You got it all figured out." | "Ya got what it takes, Mac!" | "I think I hear a chocolate bar callin'." |
| Wireframe Costumes | ||
| "I could barely keep my eyes on ya, son." | "You making my eyes water, son." | "Just like old times, huh?" |


Classic Mode: Friendly Sparring
Little Mac fights fighters that are close range martial artists. During the battles, every item except the Sandbag is disabled. As such, the Sandbag can be hit but will only spawn visual confetti.
| Round | Opponent | Stage | Music | Notes |
|---|---|---|---|---|
| 1 | Incineroar | Boxing Ring | Battle! (Elite Four) / Battle! (Solgaleo/Lunala) | |
| 2 | Ryu | Suzaku Castle | Ryu Stage | |
| 3 | 4 Mii Brawlers | Arena Ferox | Battlefield - Super Smash Bros. Brawl | |
| 4 | Captain Falcon | Port Town Aero Dive | Dream Chaser | |
| 5 | Wireframe Mac | Boxing Ring | Jogging / Countdown | If playing as Wireframe Mac, he faces the default Little Mac instead. |
| 6 | Donkey Kong | Boxing Ring (Ω form) | Donkey Kong / Donkey Kong Jr. Medley | |
| Bonus Stage | ||||
| Final | Master Hand | Final Destination | Master Hand | On intensity 7.0 and higher, Crazy Hand fights alongside Master Hand, and the track Master Hand / Crazy Hand plays during the battle. |
Role in World of Light

Although Little Mac does not appear in the World of Light opening cutscene, he was vaporized and later imprisoned alongside the rest of the fighters (sans Kirby) when Galeem unleashed his beams of light.
Little Mac can be found near a city area blocked through a door. To reach him, the player must first complete the Power Plant sub-area so the door can open.
Fighter Battle
| No. | Image | Name | Type | Power | Stage | Music |
|---|---|---|---|---|---|---|
| 49 | |
Little Mac | Attack | 3,300 | Boxing Ring (Ω form) | Jogging / Countdown |
Spirits
Little Mac's Fighter Spirit can be obtained by completing Classic Mode. It is also available periodically for purchase in the shop for 500 coins. Unlocking Little Mac in World of Light allows the player to preview the first spirit below in the Spirit List under the name "???". As a Fighter Spirit, it cannot be used in Spirit Battles and is purely aesthetic. Each Fighter Spirit has an alternate version that replaces them with their artwork in Ultimate.
Additionally, Little Mac makes an appearance as a Primary Spirit as Giga Mac.

932. Little Mac
- Giga Mac Spirit.png
933. Giga Mac

In Spirit battles
As the main opponent
| Spirit | Battle parameters | |||||||||
|---|---|---|---|---|---|---|---|---|---|---|
| No. | Image | Name | Series | Enemy Fighter(s) | Type | Power | Stage | Rules | Conditions | Music |
| 217 |  |
Ricky | The Legend of Zelda series | •Little Mac |
Attack | 1,800 | Bridge of Eldin (Battlefield form) | N/A | •The enemy loves to jump •The enemy has increased jump power |
Tal Tal Heights |
| 460 |  |
Porygon | Pokémon series | •Little Mac |
Shield | 1,700 | Pokémon Stadium | •Assist Trophy Enemies (Akira) | •Hostile assist trophies will appear | Main Theme - Pokémon Red & Pokémon Blue (Melee) |
| 568 | Teddy | Earthbound series | •Little Mac |
Attack | 3,600 | Onett | N/A | •The enemy's melee weapons have increased power •The enemy starts the battle with a Killing Edge |
Bein' Friends | |
| 933 | Giga Mac | Punch-Out!! series | •Giant Little Mac |
Attack | 13,900 | Boxing Ring | N/A | •The enemy has super armor and is hard to launch or make flinch •Stamina battle •The enemy is giant |
Title Theme - Punch-Out!! (Wii) | |
| 934 | Doc Louis | Punch-Out!! series | •Little Mac |
Neutral | 3,300 | Boxing Ring | •Attack Power ↑ •Defense ↑ •Move Speed ↑ |
•Stamina battle •The enemy has increased move speed •The enemy has increased defense after a little while |
Jogging / Countdown | |
| 936 | Bald Bull | Punch-Out!! series | •Giant Little Mac |
Shield | 4,400 | Boxing Ring | N/A | •The enemy's dash attacks have increased power •The enemy has super armor but moves slower •Stamina battle |
Jogging / Countdown | |
| 945 | Piston Hondo | Punch-Out!! series | •Giant Little Mac |
Attack | 2,000 | Boxing Ring | N/A | •Stamina battle •The enemy favors smash attacks •The enemy is giant |
Jogging / Countdown | |
| 986 | Balrog | Street Fighter series | •Giant Little Mac |
Attack | 9,100 | Fourside (Ω form) | •Jump Power ↓ | •Stamina battle •All fighters have reduced jump power •The enemy doesn't like to jump |
Balrog Stage Type A | |
| 1,120 | Urban Champion Fighter | Urban Champion series | •Little Mac |
Attack | 2,100 | New Donk City Hall (Ω form) | •Assist Trophy Enemies (Kapp'n) | •Timed battle •Hostile assist trophies will appear after a little while •The enemy doesn't like to jump |
Wrecking Crew Retro Medley | |
| 1,142 | Commander | X | •Little Mac |
Shield | 2,300 | Lylat Cruise | •Assist Trophy Enemies (Andross) | •Hostile assist trophies will appear | Tunnel Scene - X | |
| 1,157 | Harry | Teleroboxer | •Little Mac •Mega Man |
Shield | 1,900 | Boxing Ring | N/A | •The enemy's punches and elbow strikes have increased power | Tunnel Scene - X-Scape | |
Alternate costumes

| |||||||

|

|

|

|

|

|

|

|
Gallery
Little Mac's fighter card.
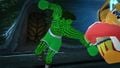
Using Jolt Haymaker on Shadow Moses Island.

Performing his side taunt on Wrecking Crew.
A bruised Little Mac with Dr. Mario on Tomodachi Life.
Wireframe Mac using his down smash against King Dedede on Luigi's Mansion.
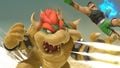
Attacking Bowser on Mushroomy Kingdom.
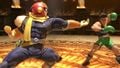
Little Mac being taunted by Captain Falcon on Arena Ferox.

Little Mac struck by Corrin's forward smash on Kalos Pokémon League.
Hit by Incineroar on Big Blue.
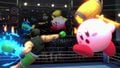
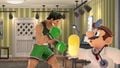
Using Jolt Haymaker on Kirby in the Boxing Ring.
Getting slammed by Pikachu’s down throw in the Boxing Ring.
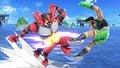
Getting kicked by Snake on Kalos Pokémon League.
Little Mac struck by Rodin's version of After-Burner Kick on the Great Plateau Tower.

Performing his up taunt on the Bridge of Eldin.


Character Showcase Video
Trivia
- Little Mac's Showcase Video has him follow Wario's motor bike while wearing his pink sweatsuit. This is a reference to the Punch-Out!! series, where Little Mac runs alongside Doc Louis on his bicycle.
- Little Mac's pose in his official art resembles the pose he performs while using Slip Counter.
- Little Mac's Classic Mode has a high spawn rate of Sandbag, as a reference to his reveal video where he has a Sandbag in his training ring, as well as usage of similar punching bags by real boxers.
- Little Mac's penultimate battle in Classic Mode is against Donkey Kong, which alludes to their previous bout in the Wii version of Punch-Out!!.
- There's an animation error in Little Mac's on-screen appearance when facing to the left; before removing his sweatsuit, he will be facing away from the camera. This did not occur in Smash 4.
|
| |
|---|---|
| Fighter | Little Mac (SSB4 · SSBU) |
| Assist Trophy | Little Mac |
| Stage | Boxing Ring |
| Other | Doc Louis |
| Trophies and Spirits | Trophies · Spirits |
| Music | SSB4 · Ultimate |
| Masterpiece | Punch-Out!! Featuring Mr. Dream |