Final stage (World of Light): Difference between revisions
(→Trivia: Dealing with naming ambiguity; I titled the article as “final stage”, while the game uses the terms “final battle” and “final round,” but neither of those two is clearly officially the name so I think it’s fine to use a different descriptor as was done) |
|||
| (8 intermediate revisions by 6 users not shown) | |||
| Line 4: | Line 4: | ||
The stage is accessed by going to the top-center section of the map of The Final Battle after the message "You have conquered both light and darkness!" is triggered. | The stage is accessed by going to the top-center section of the map of The Final Battle after the message "You have conquered both light and darkness!" is triggered. | ||
[[File:WoL_Final_stage_fighter_select.jpg|thumb | [[File:WoL_Final_stage_fighter_select.jpg|thumb|The fighter selection screen for the final stage]] | ||
After entering the stage, the player will be given the choice of three characters to bring, akin to [[Squad Strike]], before getting the chance to configure their Spirits. The final stage is split up into three sections, with the song ''{{SSBUMusicLink|Super Smash Bros.|Galeem / Dharkon}}'' playing continuously during each phase. At the start of each phase, the music restarts and all lost stock are restored, though the active fighter is maintained. Additionally, the player can start over from the beginning of any given phase should they lose all of their stock. | After entering the stage, the player will be given the choice of three characters to bring, akin to [[Squad Strike]], before getting the chance to configure their Spirits. The final stage is split up into three sections, with the song ''{{SSBUMusicLink|Super Smash Bros.|Galeem/Dharkon}}'' playing continuously during each phase. At the start of each phase, the music restarts and all lost stock are restored, though the active fighter is maintained. Additionally, the player can start over from the beginning of any given phase should they lose all of their stock. | ||
Like the individual rematches against Galeem and Dharkon, this stage can be repeated indefinitely by re-entering the World of Light save file. | Like the individual rematches against Galeem and Dharkon, this stage can be repeated indefinitely by re-entering the World of Light save file. | ||
==First phase== | ==First phase== | ||
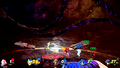
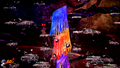
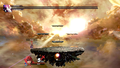
[[File:Stairwaystart.png|thumb | [[File:Stairwaystart.png|thumb|The beginning of the vertical scrolling section of the final stage.]] | ||
This phase is a vertically scrolling section, akin to the platforming stages of ''[[Super Smash Bros. Melee]]''{{'}}s {{SSBM|Adventure Mode}} and ''[[Super Smash Bros. Brawl]]''{{'}}s [[Adventure Mode: The Subspace Emissary]]. The phase begins on a platform resembling {{SSBU|Final Destination}}, though with a unique scrolling background through which Galeem and Dharkon move. | This phase is a vertically scrolling section, akin to the platforming stages of ''[[Super Smash Bros. Melee]]''{{'}}s {{SSBM|Adventure Mode}} and ''[[Super Smash Bros. Brawl]]''{{'}}s [[Adventure Mode: The Subspace Emissary]]. The phase begins on a platform resembling {{SSBU|Final Destination}}, though with a unique scrolling background through which Galeem and Dharkon move. | ||
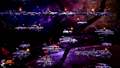
At set intervals throughout the phase, the scrolling will stop and the screen will lock down as [[False character|puppet fighter]]s appear, with those belonging to Galeem's forces being blue and those belonging to Dharkon's forces being red. The opposing | At set intervals throughout the phase, the scrolling will stop and the screen will lock down as [[False character|puppet fighter]]s appear, with those belonging to Galeem's forces being blue and those belonging to Dharkon's forces being red. The opposing puppet fighters can damage each other, but do not explode like in Galeem's or Dharkon's boss fights. All base game fighters can appear except for {{SSBU|Kirby}}, {{SSBU|Olimar}}, and the {{SSBU|Mii Fighter}}s. The first lockdown has two Light Realm fighters and two Dark Realm fighters, and each subsequent pitstop will increase the numbers of Light Realm and Dark Realm puppet fighters each by one. The puppet fighters chosen for the battle will always be an equal amount of Light and Dark but are completely random otherwise. After a set number are defeated, a [[Maxim Tomato]] spawns and scrolling resumes. [[Rocket Belt]]s appear throughout the stage to help traverse the platforms. | ||
Between the first and second lockdowns, Dharkon appears and attacks with | Between the first and second lockdowns, Dharkon appears and attacks with his tentacles until his eye is damaged sufficiently (when it crawls onto the screen) or enough time passes. After the second lockdown, the background transitions from the sky to space, and between the second and third lockdowns, Dharkon uses his tentacles to attack the player and destroy the platforms. | ||
Between the third and fourth lockdowns, Galeem attacks in the foreground, multiple levels of [[Bob-omb]]s must be evaded, and | Between the third and fourth lockdowns, Galeem attacks in the foreground, multiple levels of [[Bob-omb]]s must be evaded, and he attacks using his wings as drills. After the fourth lockdown is completed, the phase ends. | ||
The speed of the camera scroll is affected by the [[difficulty]] setting; compared to Normal difficulty, the scroll is 10% slower on Easy and 10% faster on Hard. Additionally, the bosses' attacks have more power the higher the difficulty. On Very Easy difficulty, Galeem and Dharkon will not attack the player and destroy platforms, and Bob-ombs will not spawn. | |||
<gallery> | <gallery> | ||
| Line 33: | Line 35: | ||
==Second phase== | ==Second phase== | ||
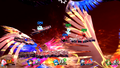
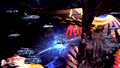
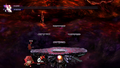
[[File: | [[File:WoL Final stage orbs Marx Rathalos.jpg|thumb|Orbs of the bosses Marx and Rathalos battling over the stage]] | ||
The active fighter is transported to Final Destination, with the background evenly split with a dark section on the left and a light section on the right. This phase is a boss rush, with orbs containing images of all the various sub-area [[boss]]es appearing on the stage and fighting against each other. Attacking a given boss’s orb will start a battle against that boss, with their normal music replaced by ''Galeem/Dharkon'' as with the rest of the stage. However leaving the orbs alone for too long will cause them to shoot smaller orbs that will damage the fighter. The boss orbs appear in a set order and start out fighting a set boss orb from the other faction, though defeating bosses will cause their respective orb to disappear and thus change who a given orb may be fighting. | The active fighter is transported to [[Final Destination (SSBU)|Final Destination]], with the background evenly split with a dark section on the left and a light section on the right. This phase is a boss rush, with orbs containing images of all the various sub-area [[boss]]es appearing on the stage and fighting against each other. Attacking a given boss’s orb will start a battle against that boss, with their normal music replaced by ''Galeem/Dharkon'' as with the rest of the stage. However leaving the orbs alone for too long will cause them to shoot smaller orbs that will damage the fighter. The boss orbs appear in a set order and start out fighting a set boss orb from the other faction, though defeating bosses will cause their respective orb to disappear and thus change who a given orb may be fighting. | ||
Boss order: | Boss order: | ||
| Line 43: | Line 45: | ||
After defeating a boss, the active fighter returns to the stage. With any given boss’s defeat, the opposing faction will increase its dominance over the background, appearing as either entirely light or entirely darkness if all bosses under Dharkon or Galeem, respectively, are defeated first. After every two fights, a [[Heart Container]] will spawn and stay on the stage until the end of the phase, even if further Heart Containers spawn. After defeating all six bosses, the fighter is teleported back to the stage for a final brief moment before the phase ends. | After defeating a boss, the active fighter returns to the stage. With any given boss’s defeat, the opposing faction will increase its dominance over the background, appearing as either entirely light or entirely darkness if all bosses under Dharkon or Galeem, respectively, are defeated first. After every two fights, a [[Heart Container]] will spawn and stay on the stage until the end of the phase, even if further Heart Containers spawn. After defeating all six bosses, the fighter is teleported back to the stage for a final brief moment before the phase ends. | ||
<gallery> | <gallery> | ||
Bossrushstart.png|The boss rush arena with its balanced background | |||
Bossrushdark.png|After defeating a Light Realm boss, the background favors the dark side more. | Bossrushdark.png|After defeating a Light Realm boss, the background favors the dark side more. | ||
</gallery> | </gallery> | ||
==Third phase== | ==Third phase== | ||
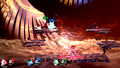
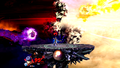
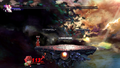
[[File: | [[File:world-of-light-final-battle.jpg|thumb| The final battle between the player, Galeem, and Dharkon.]] | ||
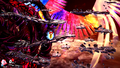
As the third phase begins, a short scene plays of Galeem and Dharkon clashing, before zooming out to the stage as the battle begins. The bosses are fought on the same Final Destination-like stage as in their solo fights, but with a background containing a light half and a dark half. A unique aspect of this phase is that Galeem and Dharkon can damage each other during the fight. In fact, they primarily fight each other, with the player initially being only an incidental part of the battle. When either of the two is stunned, the other will use a very powerful attack against them, provided they are not in the middle of certain attacks. | As the third phase begins, a short scene plays of Galeem and Dharkon clashing, before zooming out to the stage as the battle begins. The bosses are fought on the same Final Destination-like stage as in their solo fights, but with a background containing a light half and a dark half. A unique aspect of this phase is that Galeem and Dharkon can damage each other during the fight. In fact, they primarily fight each other, with the player initially being only an incidental part of the battle. When either of the two is stunned, the other will use a very powerful attack against them, provided they are not in the middle of certain attacks. (Galeem morphs his wings into a spear and pokes Dharkon's core if the player stuns the latter, while if Galeem gets stunned Dharkon morphs his tentacles into a hammer and smashes Galeem's core with it.) | ||
When either boss is close to defeat, the background changes to a more disordered-looking version. After one of the two is defeated, the background changes to reflect the motif of the one that remains. The remaining boss then focuses on the player, fighting them directly with targeted attacks. | When either boss is close to defeat, the background changes to a more disordered-looking version. After one of the two is defeated, the background changes to reflect the motif of the one that remains (Galeem uses a spectacular yellow-tinted nebula with stars in the background which is also used in his second solo battle which leads to the bad ending where Dharkon takes over, while Dharkon uses a dark red stormy background which is also used in his second solo battle which leads to the bad ending where Galeem takes over.). The remaining boss then focuses on the player, fighting them directly with targeted attacks. | ||
After the remaining boss is defeated, the battle ends and the true ending cutscene ''Restoration'' plays, with the Adventure Mode now completed. | After the remaining boss is defeated, the battle ends and the true ending cutscene ''Restoration'' plays, with the Adventure Mode now completed. | ||
<gallery> | <gallery> | ||
Finalbattlegaleem.png|The sunset-like background for Galeem and Dharkon's shared final battle. | |||
WoL Final stage Dharkon opportunity attack.jpg|Dharkon unleashing a powerful attack on a stunned Galeem. | |||
WoL Final stage Galeem opportunity attack.jpg|Galeem unleashing a powerful attack on a stunned Dharkon. | |||
Finalbattleneardeath.png|The background when either Galeem or Dharkon is nearly defeated. | Finalbattleneardeath.png|The background when either Galeem or Dharkon is nearly defeated. | ||
Finalbattlelight.png|The background when Dharkon is defeated first. | Finalbattlelight.png|The background when Dharkon is defeated first; this background is also used when Galeem is fought on his own the second time. | ||
Finalbattledark.png|The background when Galeem is defeated first. | Finalbattledark.png|The background when Galeem is defeated first; this is also used when Dharkon fights the player on his own the second time. | ||
Galeem Dharkon defeated.png|Galeem and Dharkon before exploding. | Galeem Dharkon defeated.png|Galeem and Dharkon before exploding. | ||
</gallery> | </gallery> | ||
| Line 65: | Line 72: | ||
*This is the only stage of the World of Light to: | *This is the only stage of the World of Light to: | ||
**Not begin with the party configuration menu, with fighter selection taking place first. | **Not begin with the party configuration menu, with fighter selection taking place first. | ||
**Allow the player to start with more than one stock, and to use multiple fighters in a single match. | **Allow the player to start with more than one [[stock]], and to use multiple fighters in a single match. | ||
**Include vertical scrolling. | **Include vertical scrolling. | ||
**Include a section where camera rotation is prohibited. | **Include a section where camera rotation is prohibited. | ||
Latest revision as of 18:53, February 19, 2024
The unnamed final stage of Adventure Mode: World of Light in Super Smash Bros. Ultimate, located at the end of the area The Final Battle, is the last challenge in World of Light, in which the bosses Galeem and Dharkon are fought to earn the true ending. This stage differs mechanically from all other battles in the game mode, being neither a spirit battle nor wholly a boss battle.
The stage is accessed by going to the top-center section of the map of The Final Battle after the message "You have conquered both light and darkness!" is triggered.

After entering the stage, the player will be given the choice of three characters to bring, akin to Squad Strike, before getting the chance to configure their Spirits. The final stage is split up into three sections, with the song Galeem/Dharkon playing continuously during each phase. At the start of each phase, the music restarts and all lost stock are restored, though the active fighter is maintained. Additionally, the player can start over from the beginning of any given phase should they lose all of their stock.
Like the individual rematches against Galeem and Dharkon, this stage can be repeated indefinitely by re-entering the World of Light save file.
First phaseEdit

This phase is a vertically scrolling section, akin to the platforming stages of Super Smash Bros. Melee's Adventure Mode and Super Smash Bros. Brawl's Adventure Mode: The Subspace Emissary. The phase begins on a platform resembling Final Destination, though with a unique scrolling background through which Galeem and Dharkon move.
At set intervals throughout the phase, the scrolling will stop and the screen will lock down as puppet fighters appear, with those belonging to Galeem's forces being blue and those belonging to Dharkon's forces being red. The opposing puppet fighters can damage each other, but do not explode like in Galeem's or Dharkon's boss fights. All base game fighters can appear except for Kirby, Olimar, and the Mii Fighters. The first lockdown has two Light Realm fighters and two Dark Realm fighters, and each subsequent pitstop will increase the numbers of Light Realm and Dark Realm puppet fighters each by one. The puppet fighters chosen for the battle will always be an equal amount of Light and Dark but are completely random otherwise. After a set number are defeated, a Maxim Tomato spawns and scrolling resumes. Rocket Belts appear throughout the stage to help traverse the platforms.
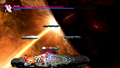
Between the first and second lockdowns, Dharkon appears and attacks with his tentacles until his eye is damaged sufficiently (when it crawls onto the screen) or enough time passes. After the second lockdown, the background transitions from the sky to space, and between the second and third lockdowns, Dharkon uses his tentacles to attack the player and destroy the platforms.
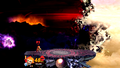
Between the third and fourth lockdowns, Galeem attacks in the foreground, multiple levels of Bob-ombs must be evaded, and he attacks using his wings as drills. After the fourth lockdown is completed, the phase ends.
The speed of the camera scroll is affected by the difficulty setting; compared to Normal difficulty, the scroll is 10% slower on Easy and 10% faster on Hard. Additionally, the bosses' attacks have more power the higher the difficulty. On Very Easy difficulty, Galeem and Dharkon will not attack the player and destroy platforms, and Bob-ombs will not spawn.
The 1st lockdown of the vertical scrolling section of the final battle.
The 2nd lockdown of the vertical scrolling section of the final battle.
The 3rd lockdown of the vertical scrolling section of the final battle.

The 4th lockdown of the vertical scrolling section of the final battle.
A section of the vertical scrolling section where the player must escape Bob-ombs instead.
Dharkon’s first attack in the vertical scrolling section.
Dharkon’s second attack in the vertical scrolling section.

Galeem’s first attack in the vertical scrolling section.
Galeem’s second attack in the vertical scrolling section.


Second phaseEdit

The active fighter is transported to Final Destination, with the background evenly split with a dark section on the left and a light section on the right. This phase is a boss rush, with orbs containing images of all the various sub-area bosses appearing on the stage and fighting against each other. Attacking a given boss’s orb will start a battle against that boss, with their normal music replaced by Galeem/Dharkon as with the rest of the stage. However leaving the orbs alone for too long will cause them to shoot smaller orbs that will damage the fighter. The boss orbs appear in a set order and start out fighting a set boss orb from the other faction, though defeating bosses will cause their respective orb to disappear and thus change who a given orb may be fighting.
Boss order:
After defeating a boss, the active fighter returns to the stage. With any given boss’s defeat, the opposing faction will increase its dominance over the background, appearing as either entirely light or entirely darkness if all bosses under Dharkon or Galeem, respectively, are defeated first. After every two fights, a Heart Container will spawn and stay on the stage until the end of the phase, even if further Heart Containers spawn. After defeating all six bosses, the fighter is teleported back to the stage for a final brief moment before the phase ends.
The boss rush arena with its balanced background
After defeating a Light Realm boss, the background favors the dark side more.


Third phaseEdit

As the third phase begins, a short scene plays of Galeem and Dharkon clashing, before zooming out to the stage as the battle begins. The bosses are fought on the same Final Destination-like stage as in their solo fights, but with a background containing a light half and a dark half. A unique aspect of this phase is that Galeem and Dharkon can damage each other during the fight. In fact, they primarily fight each other, with the player initially being only an incidental part of the battle. When either of the two is stunned, the other will use a very powerful attack against them, provided they are not in the middle of certain attacks. (Galeem morphs his wings into a spear and pokes Dharkon's core if the player stuns the latter, while if Galeem gets stunned Dharkon morphs his tentacles into a hammer and smashes Galeem's core with it.)
When either boss is close to defeat, the background changes to a more disordered-looking version. After one of the two is defeated, the background changes to reflect the motif of the one that remains (Galeem uses a spectacular yellow-tinted nebula with stars in the background which is also used in his second solo battle which leads to the bad ending where Dharkon takes over, while Dharkon uses a dark red stormy background which is also used in his second solo battle which leads to the bad ending where Galeem takes over.). The remaining boss then focuses on the player, fighting them directly with targeted attacks.
After the remaining boss is defeated, the battle ends and the true ending cutscene Restoration plays, with the Adventure Mode now completed.
The sunset-like background for Galeem and Dharkon's shared final battle.
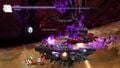
Dharkon unleashing a powerful attack on a stunned Galeem.
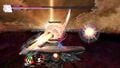
Galeem unleashing a powerful attack on a stunned Dharkon.
The background when either Galeem or Dharkon is nearly defeated.
The background when Dharkon is defeated first; this background is also used when Galeem is fought on his own the second time.
The background when Galeem is defeated first; this is also used when Dharkon fights the player on his own the second time.

Galeem and Dharkon before exploding.


TriviaEdit
- While this stage has no official name given during World of Light, it is referred to in the Challenges menu by two separate names: “the final battle” and “the final round,” with no indication of whether either is meant to be its proper name.
- This is the only stage of the World of Light to:
- Not begin with the party configuration menu, with fighter selection taking place first.
- Allow the player to start with more than one stock, and to use multiple fighters in a single match.
- Include vertical scrolling.
- Include a section where camera rotation is prohibited.
- Feature multiple points from which the player can restart.
- The scrolling section of the stage appears in the image for multiple Challenges, though with some elements that are impossible to see in normal gameplay, such as the appearance of the Thwomp Assist Trophy.