Smash Tour: Difference between revisions
KirbyMelee (talk | contribs) mNo edit summary |
m (Text replacement - "|thumb|right" to "|thumb") |
||
| (46 intermediate revisions by 22 users not shown) | |||
| Line 1: | Line 1: | ||
{{ArticleIcons|ssb4-u=y | {{ArticleIcons|ssb4-u=y}} | ||
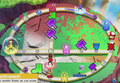
[[File:Smashtourmap.PNG|thumb|300px|A round of Smash Tour in action using the normal map size.]] | [[File:Smashtourmap.PNG|thumb|300px|A round of Smash Tour in action using the normal map size.]] | ||
| Line 5: | Line 5: | ||
==Overview== | ==Overview== | ||
Smash Tour plays as a board game, in which players use [[Mii]] characters to move around the board. There are three different boards - small, normal, and big - and every game can be set to last for 15 to 25 turns. The goal is to move around the board | Smash Tour plays as a board game, in which players use [[Mii]] characters to move around the board. There are three different boards - small, normal, and big - and every game can be set to last for 15 to 25 turns. The goal is to move around the board and collect powerups and fighters, who will face off in a final battle. If [[customization]]s are turned on, the characters may possess custom special moves, indicated by the number 1, 2, or 3 on the character's icon. | ||
At the game's start, each player is given two random characters. At the beginning of each turn but the first, each player receives a random item, and may then choose to use any item they have. Then a spinner starts moving, and after stopping it, the player will be able to move by the number of spaces indicated, which ranges from 1 to 6 in normal conditions: it is possible to change direction at every crossroad. | At the game's start, each player is given two random characters. At the beginning of each turn but the first, each player receives a random item, and may then choose to use any item they have. Then a spinner starts moving, and after stopping it, the player will be able to move by the number of spaces indicated, which ranges from 1 to 6 in normal conditions: it is possible to change direction at every crossroad. | ||
By moving around the board, players can collect powerups, which raise their characters' stats | By moving around the board, players can collect powerups, which raise their characters' stats; items, which possess various effects; and playable fighters, which will be put into use during battles: the characters are used in the order they were obtained. Each player may hold up to ten characters and four items. | ||
Battles are initiated by landing on the same space as another player or landing on a battle space. At the beginning of a battle, a player may select an item to use, and will then face the others. There are several types of battles: only specific items may appear, the players are put in a specific state, or instead of a battle, a round of [[Home-Run Contest]] or [[Target Blast]] might play. The winner will receive a prize shown before the battle, which is always an item plus sometimes a character: in the case of a team battle, the item will be given to all the members of the winning team. If a player gets KO'd , they will lose their current fighter: the last character KO'd will be given to the player who defeated them. After the battle, any player who shares a space with the player who KO'd them will be launched away, possibly dropping some of their characters. | Battles are initiated by landing on the same space as another player or landing on a battle space. At the beginning of a battle, a player may select an item to use, and will then face the others. There are several types of battles: only specific items may appear, the players are put in a specific state, or instead of a battle, a round of [[Home-Run Contest]] or [[Target Blast]] might play. The winner will receive a prize shown before the battle, which is always an item plus sometimes a character: in the case of a team battle, the item will be given to all the members of the winning team. If a player gets KO'd, they will lose their current fighter: the last character KO'd will be given to the player who defeated them. After the battle, any player who shares a space with the player who KO'd them will be launched away, possibly dropping some of their characters. | ||
During gameplay, random events can occur: they range from non-playable characters roaming the board and giving bonuses of some kind to players who touch them, to alterations of the map, to boss battles. | During gameplay, random events can occur: they range from non-playable characters roaming the board and giving bonuses of some kind to players who touch them, to alterations of the map, to boss battles. | ||
When the turn counter runs out, the board phase of the game ends. The players' stats are shown, and some further bonuses may be awarded if some special conditions are met: | When the turn counter runs out, the board phase of the game ends and the [[announcer]] will call out "GAME!". The players' stats are shown, and some further bonuses may be awarded if some special conditions are met: | ||
*'''Distance Traveled''': each player's Speed attribute increases based on the number of spaces crossed. | *'''Distance Traveled''': each player's Speed attribute increases based on the number of spaces crossed. | ||
*'''Trophies Used''': each player's Arms attribute increases based on the number of trophies used. | *'''Trophies Used''': each player's Arms attribute increases based on the number of trophies used. | ||
| Line 23: | Line 23: | ||
*'''Booby Prize''': the player(s) with the least characters get a bonus character, if they have no characters or every other player has at least two more characters. | *'''Booby Prize''': the player(s) with the least characters get a bonus character, if they have no characters or every other player has at least two more characters. | ||
The winner is then determined by a special timed stock battle that always takes place on the stage [[Battlefield]]. Every fighter that the player has collected counts as one stock | The winner is then determined by a special timed stock battle that always takes place on the stage [[Battlefield]]. Every fighter that the player has collected counts as one stock; once a fighter is defeated, the player's next fighter enters the field until they have no fighters left, a concept that was carried over to [[Squad Strike]]. The winner is always decided by KO count: in other words, being the last player standing does not necessarily equate to victory. In the case of a tie, the winner is decided by a [[Sudden Death]] finale between the last fighters used. | ||
After the game ends, several trophies, [[equipment]] items, Mii costumes, [[customization|custom special moves]], [[Coins (collectable)|gold]], and [[Crazy Orders]] passes may be received. | After the game ends, several trophies, [[equipment]] items, Mii costumes, [[customization|custom special moves]], [[Coins (collectable)|gold]], and [[Crazy Orders]] passes may be received. | ||
==Space types== | ==Space types== | ||
*''' | *'''Fighter Space''': a collectible character may appear here. | ||
*'''Checkpoint''': touching it awards the correspondent symbol to the player, as well as a stat boost. Collecting all five symbols gives a player a checkpoint bonus, similar to the ''{{s|wikipedia|Fortune Street}}'' series of games. | *'''Checkpoint''': touching it awards the correspondent symbol to the player, as well as a stat boost. Collecting all five symbols gives a player a checkpoint bonus, similar to the ''{{s|wikipedia|Fortune Street}}'' series of games. | ||
*'''Stat | *'''Stat Boost Space''': a player's stats may be raised, lowered, or swapped with one another. The effects become stronger when approaching the game's end. | ||
*'''Battle''': automatically starts a battle at the end of the turn. Only appears on the big map. | *'''Warp Space''': contains a pipe which warps the player to another pipe with the same color in another space on the map. | ||
*'''Battle Space''': automatically starts a battle at the end of the turn. Only appears on the big map. | |||
Additionally, powerups and items may appear on any empty normal space. | Additionally, powerups and items may appear on any empty normal space. | ||
==Possible Fighters== | |||
Every fighter aside from the Mii Fighters can appear on the board, and if custom fighters are turned on, there are preset alternate costumes for each of the custom movesets. Most of the costumes for Moveset 2 are the costumes on the Alternate fighter trophies. The same applies to the 3DS's versions of the Alternate fighter trophies' costumes for Moveset 3. The custom moves in these sets always match their number with the costume number, so moveset 1 is always 1111, moveset 2 is always 2222 and moveset 3 is always 3333. | |||
{|class="wikitable" | |||
! Fighter !! Moveset 1 Costume !! Moveset 2 Costume !! Moveset 3 Costume | |||
|- | |||
|Mario||{{Head|Mario|g=SSB4|s=50px}}||{{Head|Mario|g=SSB4|s=50px|cl=Blue}}||{{Head|Mario|g=SSB4|s=50px|cl=Striped}} | |||
|- | |||
|Luigi||{{Head|Luigi|g=SSB4|s=50px}}||{{Head|Luigi|g=SSB4|s=50px|cl=Pink}}||{{Head|Luigi|g=SSB4|s=50px|cl=White}} | |||
|- | |||
|Peach||{{Head|Peach|g=SSB4|s=50px}}||{{Head|Peach|g=SSB4|s=50px|cl=White}}||{{Head|Peach|g=SSB4|s=50px|cl=Green}} | |||
|- | |||
|Bowser||{{Head|Bowser|g=SSB4|s=50px}}||{{Head|Bowser|g=SSB4|s=50px|cl=Red}}||{{Head|Bowser|g=SSB4|s=50px|cl=Green}} | |||
|- | |||
|Yoshi||{{Head|Yoshi|g=SSB4|s=50px}}||{{Head|Yoshi|g=SSB4|s=50px|cl=Yellow}}||{{Head|Yoshi|g=SSB4|s=50px|cl=Red}} | |||
|- | |||
|Rosalina & Luma||{{Head|Rosalina|g=SSB4|s=50px}}||{{Head|Rosalina|g=SSB4|s=50px|cl=White}}||{{Head|Rosalina|g=SSB4|s=50px|cl=Pink}} | |||
|- | |||
|Bowser Jr.||{{Head|Bowser Jr.|g=SSB4|s=50px}}||{{Head|Bowser Jr.|g=SSB4|s=50px}}||{{Head|Bowser Jr.|g=SSB4|s=50px}} | |||
|- | |||
|Wario||{{Head|Wario|g=SSB4|s=50px}}||{{Head|Wario|g=SSB4|s=50px|cl=Yellow}}||{{Head|Wario|g=SSB4|s=50px|cl=Red}} | |||
|- | |||
|Donkey Kong||{{Head|Donkey Kong|g=SSB4|s=50px}}||{{Head|Donkey Kong|g=SSB4|s=50px|cl=White}}||{{Head|Donkey Kong|g=SSB4|s=50px|cl=Blue}} | |||
|- | |||
|Diddy Kong||{{Head|Diddy Kong|g=SSB4|s=50px}}||{{Head|Diddy Kong|g=SSB4|s=50px|cl=White}}||{{Head|Diddy Kong|g=SSB4|s=50px|cl=Pink}} | |||
|- | |||
|Mr. Game & Watch||{{Head|Mr. Game & Watch|g=SSB4|s=50px}}||{{Head|Mr. Game & Watch|g=SSB4|s=50px|cl=Green}}||{{Head|Mr. Game & Watch|g=SSB4|s=50px|cl=Red}} | |||
|- | |||
|Little Mac||{{Head|Little Mac|g=SSB4|s=50px}}||{{Head|Little Mac|g=SSB4|s=50px|cl=White}}||{{Head|Little Mac|g=SSB4|s=50px|cl=Pink}} | |||
|- | |||
|Link||{{Head|Link|g=SSB4|s=50px}}||{{Head|Link|g=SSB4|s=50px|cl=White}}||{{Head|Link|g=SSB4|s=50px|cl=Black}} | |||
|- | |||
|Zelda||{{Head|Zelda|g=SSB4|s=50px}}||{{Head|Zelda|g=SSB4|s=50px|cl=Purple}}||{{Head|Zelda|g=SSB4|s=50px|cl=White}} | |||
|- | |||
|Sheik||{{Head|Sheik|g=SSB4|s=50px}}||{{Head|Sheik|g=SSB4|s=50px|cl=Purple}}||{{Head|Sheik|g=SSB4|s=50px|cl=Yellow}} | |||
|- | |||
|Ganondorf||{{Head|Ganondorf|g=SSB4|s=50px}}||{{Head|Ganondorf|g=SSB4|s=50px|cl=Red}}||{{Head|Ganondorf|g=SSB4|s=50px|cl=Blue}} | |||
|- | |||
|Toon Link||{{Head|Toon Link|g=SSB4|s=50px}}||{{Head|Toon Link|g=SSB4|s=50px|cl=Teal}}||{{Head|Toon Link|g=SSB4|s=50px|cl=Black}} | |||
|- | |||
|Samus||{{Head|Samus|g=SSB4|s=50px}}||{{Head|Samus|g=SSB4|s=50px|cl=Black}}||{{Head|Samus|g=SSB4|s=50px|cl=White}} | |||
|- | |||
|Zero Suit Samus||{{Head|Zero Suit Samus|g=SSB4|s=50px}}||{{Head|Zero Suit Samus|g=SSB4|s=50px|cl=White}}||{{Head|Zero Suit Samus|g=SSB4|s=50px|cl=ShortsBlue}} | |||
|- | |||
|Pit||{{Head|Pit|g=SSB4|s=50px}}||{{Head|Pit|g=SSB4|s=50px|cl=Blue}}||{{Head|Pit|g=SSB4|s=50px|cl=Red}} | |||
|- | |||
|Palutena||{{Head|Palutena|g=SSB4|s=50px}}||{{Head|Palutena|g=SSB4|s=50px|cl=Red}}||{{Head|Palutena|g=SSB4|s=50px|cl=Purple}} | |||
|- | |||
|Marth||{{Head|Marth|g=SSB4|s=50px}}||{{Head|Marth|g=SSB4|s=50px|cl=White}}||{{Head|Marth|g=SSB4|s=50px|cl=Purple}} | |||
|- | |||
|Ike||{{Head|Ike|g=SSB4|s=50px}}||{{Head|Ike|g=SSB4|s=50px|cl=Black}}||{{Head|Ike|g=SSB4|s=50px|cl=Red}} | |||
|- | |||
|Robin||{{Head|Robin|g=SSB4|s=50px}}||{{Head|Robin|g=SSB4|s=50px|cl=Pink}}||{{Head|Robin|g=SSB4|s=50px|cl=White}} | |||
|- | |||
|Duck Hunt||{{Head|Duck Hunt|g=SSB4|s=50px}}||{{Head|Duck Hunt|g=SSB4|s=50px|cl=Blue}}||{{Head|Duck Hunt|g=SSB4|s=50px|cl=White}} | |||
|- | |||
|Kirby||{{Head|Kirby|g=SSB4|s=50px}}||{{Head|Kirby|g=SSB4|s=50px|cl=Yellow}}||{{Head|Kirby|g=SSB4|s=50px|cl=Green}} | |||
|- | |||
|King Dedede||{{Head|King Dedede|g=SSB4|s=50px}}||{{Head|King Dedede|g=SSB4|s=50px|cl=Cyan}}||{{Head|King Dedede|g=SSB4|s=50px|cl=Green}} | |||
|- | |||
|Meta Knight||{{Head|Meta Knight|g=SSB4|s=50px}}||{{Head|Meta Knight|g=SSB4|s=50px|cl=White}}||{{Head|Meta Knight|g=SSB4|s=50px|cl=Navy}} | |||
|- | |||
|Fox||{{Head|Fox|g=SSB4|s=50px}}||{{Head|Fox|g=SSB4|s=50px|cl=Green}}||{{Head|Fox|g=SSB4|s=50px|cl=Purple}} | |||
|- | |||
|Falco||{{Head|Falco|g=SSB4|s=50px}}||{{Head|Falco|g=SSB4|s=50px|cl=White}}||{{Head|Falco|g=SSB4|s=50px|cl=Red}} | |||
|- | |||
|Pikachu||{{Head|Pikachu|g=SSB4|s=50px}}||{{Head|Pikachu|g=SSB4|s=50px|cl=Cyan}}||{{Head|Pikachu|g=SSB4|s=50px|cl=White}} | |||
|- | |||
|Charizard||{{Head|Charizard|g=SSB4|s=50px}}||{{Head|Charizard|g=SSB4|s=50px|cl=Green}}||{{Head|Charizard|g=SSB4|s=50px|cl=White}} | |||
|- | |||
|Lucario||{{Head|Lucario|g=SSB4|s=50px}}||{{Head|Lucario|g=SSB4|s=50px|cl=Grey}}||{{Head|Lucario|g=SSB4|s=50px|cl=Purple}} | |||
|- | |||
|Jigglypuff||{{Head|Jigglypuff|g=SSB4|s=50px}}||{{Head|Jigglypuff|g=SSB4|s=50px|cl=Blue}}||{{Head|Jigglypuff|g=SSB4|s=50px|cl=White}} | |||
|- | |||
|Greninja||{{Head|Greninja|g=SSB4|s=50px}}||{{Head|Greninja|g=SSB4|s=50px|cl=Green}}||{{Head|Greninja|g=SSB4|s=50px|cl=Grey}} | |||
|- | |||
|R.O.B.||{{Head|R.O.B.|g=SSB4|s=50px}}(JP) {{Head|R.O.B.|g=SSB4|s=50px|cl=Grey}}(US)||{{Head|R.O.B.|g=SSB4|s=50px|cl=Green}}||{{Head|R.O.B.|g=SSB4|s=50px|cl=Red}} | |||
|- | |||
|Ness||{{Head|Ness|g=SSB4|s=50px}}||{{Head|Ness|g=SSB4|s=50px|cl=Yellow}}||{{Head|Ness|g=SSB4|s=50px|cl=Black}} | |||
|- | |||
|Captain Falcon||{{Head|Captain Falcon|g=SSB4|s=50px}}||{{Head|Captain Falcon|g=SSB4|s=50px|cl=White}}||{{Head|Captain Falcon|g=SSB4|s=50px|cl=Black}} | |||
|- | |||
|Villager||{{Head|Villager|g=SSB4|s=50px}}||{{Head|Villager|g=SSB4|s=50px|cl=Pink}}||{{Head|Villager|g=SSB4|s=50px|cl=Cyan}} | |||
|- | |||
|Olimar||{{Head|Olimar|g=SSB4|s=50px}}||{{Head|Olimar|g=SSB4|s=50px|cl=Green}}||{{Head|Olimar|g=SSB4|s=50px|cl=Red}} | |||
|- | |||
|Wii Fit Trainer||{{Head|Wii Fit Trainer|g=SSB4|s=50px}}||{{Head|Wii Fit Trainer|g=SSB4|s=50px|cl=MaleGreen}}||{{Head|Wii Fit Trainer|g=SSB4|s=50px|cl=Yellow}} | |||
|- | |||
|Shulk||{{Head|Shulk|g=SSB4|s=50px}}||{{Head|Shulk|g=SSB4|s=50px|cl=Trunks}}||{{Head|Shulk|g=SSB4|s=50px|cl=White}} | |||
|- | |||
|Dr. Mario||{{Head|Dr. Mario|g=SSB4|s=50px}}||{{Head|Dr. Mario|g=SSB4|s=50px|cl=Black}}||{{Head|Dr. Mario|g=SSB4|s=50px|cl=Blue}} | |||
|- | |||
|Dark Pit||{{Head|Dark Pit|g=SSB4|s=50px}}||{{Head|Dark Pit|g=SSB4|s=50px|cl=Purple}}||{{Head|Dark Pit|g=SSB4|s=50px|cl=White}} | |||
|- | |||
|Lucina||{{Head|Lucina|g=SSB4|s=50px}}||{{Head|Lucina|g=SSB4|s=50px|cl=White}}||{{Head|Lucina|g=SSB4|s=50px|cl=Red}} | |||
|- | |||
|Pac-Man||{{Head|Pac-Man|g=SSB4-U|s=50px}}||{{Head|Pac-Man|g=SSB4-U|s=50px|cl=Plaid}}||{{Head|Pac-Man|g=SSB4-U|s=50px|cl=Blue}} | |||
|- | |||
|Mega Man||{{Head|Mega Man|g=SSB4|s=50px}}||{{Head|Mega Man|g=SSB4|s=50px|cl=Orange}}||{{Head|Mega Man|g=SSB4|s=50px|cl=Red}} | |||
|- | |||
|Sonic||{{Head|Sonic|g=SSB4|s=50px}}||{{Head|Sonic|g=SSB4|s=50px|cl=Black}}||{{Head|Sonic|g=SSB4|s=50px|cl=Yellow}} | |||
|- | |||
|Mewtwo||{{Head|Mewtwo|g=SSB4|s=50px}}||N/A||N/A | |||
|- | |||
|Lucas||{{Head|Lucas|g=SSB4|s=50px}}||N/A||N/A | |||
|- | |||
|Roy||{{Head|Roy|g=SSB4|s=50px}}||N/A||N/A | |||
|- | |||
|Ryu||{{Head|Ryu|g=SSB4|s=50px}}||N/A||N/A | |||
|- | |||
|Cloud||{{Head|Cloud|g=SSB4|s=50px}}||N/A||N/A | |||
|- | |||
|Corrin||{{Head|Corrin|g=SSB4|s=50px}}||N/A||N/A | |||
|- | |||
|Bayonetta||{{Head|Bayonetta|g=SSB4|s=50px}}||N/A||N/A | |||
|} | |||
==Tour items== | ==Tour items== | ||
[[File:MajoraSmashTourItem.png|thumb | [[File:MajoraSmashTourItem.png|thumb|100px|A red Smash Tour item.]] | ||
Items take the form of [[trophies]] from the game. The following is a list of known items and their effects in Smash Tour. There are red, blue, and green items, with red items being used in battle, blue items being used on the game board, and green items being usable in both. | Items take the form of [[trophies]] from the game. The following is a list of known items and their effects in Smash Tour. There are red, blue, and green items, with red items being used in battle, blue items being used on the game board, and green items being usable in both. | ||
{|class="wikitable sortable" | {|class="wikitable sortable" | ||
! Icon !! Name !! Type !! Targets !! Description | ! Icon !! Name !! Type !! Targets !! Description !! Series | ||
|- | |- | ||
| [[File:BackShieldSmashTour.png|50px]] || [[Back Shield]] || Red || Self || Start battle with a Back Shield. | | [[File:BackShieldSmashTour.png|50px]] || [[Back Shield]] || Red || Self || Start battle with a Back Shield. || {{symbol|kidicarus|24px}} {{uv|Kid Icarus}} | ||
|- | |- | ||
| [[File:BlackKnightSmashTour.png|50px]] || [[Black Knight]] || Red || Self || On occasion, turns [[smash attack]]s into [[one-hit KO]]s. | | [[File:BlackKnightSmashTour.png|50px]] || [[Black Knight]] || Red || Self || On occasion, turns [[smash attack]]s into [[one-hit KO]]s. || {{symbol|fireemblem|24px}} {{uv|Fire Emblem}} | ||
|- | |- | ||
| [[File:BobOmbSmashTour.png|50px]] || [[Bob-omb]] || Red || Self || Start battle with a Bob-omb. | | [[File:BobOmbSmashTour.png|50px]] || [[Bob-omb]] || Red || Self || Start battle with a Bob-omb. || {{symbol|mario|24px}} {{uv|Mario}} | ||
|- | |- | ||
| [[File:BooSmashTour.png|50px]] || [[Boo]] || Red || Self || Start battle invisible. | | [[File:BooSmashTour.png|50px]] || [[Boo]] || Red || Self || Start battle [[Clear|invisible]]. || {{symbol|mario|24px}} {{uv|Mario}} | ||
|- | |- | ||
| [[File:BunnyHoodSmashTour.png|50px]] || [[Bunny Hood]] || Red || Self || Start battle wearing a Bunny Hood. | | [[File:BunnyHoodSmashTour.png|50px]] || [[Bunny Hood]] || Red || Self || Start battle wearing a Bunny Hood. || {{symbol|zelda|24px}} {{uv|The Legend of Zelda}} | ||
|- | |- | ||
| [[File:DaisyBaseballSmashTour.png|50px]] || [[Daisy]] (Baseball) || Red || Self || Automatically catch thrown items. | | [[File:DaisyBaseballSmashTour.png|50px]] || [[Daisy]] (Baseball) || Red || Self || Automatically [[Air grab|catch]] thrown items. || {{symbol|mario|24px}} {{uv|Mario}} | ||
|- | |- | ||
| [[File:DKBarrelSmashTour.png|50px]] || [[DK Barrel]] || Red || Self || Allows the user to have one of their characters as a CPU ally. | | [[File:DKBarrelSmashTour.png|50px]] || [[DK Barrel]] || Red || Self || Allows the user to have one of their characters as a CPU ally. || {{symbol|dk|24px}} {{uv|Donkey Kong}} | ||
|- | |- | ||
| [[File:DixieKongSmashTour.png|50px]] || [[Dixie Kong]] || Red || Self || Adds one to the user's number of midair | | [[File:DixieKongSmashTour.png|50px]] || [[Dixie Kong]] || Red || Self || Adds one to the user's number of [[midair jump]]s. || {{symbol|dk|24px}} {{uv|Donkey Kong}} | ||
|- | |- | ||
| [[File:EnergyTankSmashTour.png|50px]] || [[Energy Tank]] || Red || Self || Heals the user once if their damage exceeds 100%. | | [[File:EnergyTankSmashTour.png|50px]] || [[Energy Tank]] || Red || Self || Heals the user once if their damage exceeds 100%. || {{symbol|megaman|24px}} {{uv|Mega Man}} | ||
|- | |- | ||
| [[File:FranklinBadgeSmashTour.png|50px]] || [[Franklin Badge]] || Red || Self || Start battle wearing a Franklin Badge. | | [[File:FranklinBadgeSmashTour.png|50px]] || [[Franklin Badge]] || Red || Self || Start battle wearing a Franklin Badge. || {{symbol|eb|24px}} {{uv|EarthBound}} | ||
|- | |- | ||
| [[File:HammerSmashTour.png|50px]] || {{b|Hammer|item}} || Red || Self || Start battle with a Hammer. | | [[File:HammerSmashTour.png|50px]] || {{b|Hammer|item}} || Red || Self || Start battle with a Hammer. || {{symbol|dk|24px}} {{uv|Donkey Kong}} | ||
|- | |- | ||
| [[File:HomeRunBatSmashTour.png|50px]] || [[Home-Run Bat]] || Red || Self || Start battle with a Home-Run Bat. | | [[File:HomeRunBatSmashTour.png|50px]] || [[Home-Run Bat]] || Red || Self || Start battle with a Home-Run Bat. || {{symbol|SSB|24px}} {{uv|Super Smash Bros.}} | ||
|- | |- | ||
| [[File:KatAnaSmashTour.png|50px]] || [[Kat & Ana]] || Red || Self || All collisions with walls and ceilings are automatically [[tech]]ed. | | [[File:KatAnaSmashTour.png|50px]] || [[Kat & Ana]] || Red || Self || All collisions with walls and ceilings are automatically [[tech]]ed. || {{symbol|wario|24px}} {{uv|Wario}} | ||
|- | |- | ||
| [[File:MajorasMaskSmashTour.png|50px]] || [[Majora's Mask]] || Red || Self || Inflicts 50% damage to the user, but doubles their stats. | | [[File:MajorasMaskSmashTour.png|50px]] || [[Majora's Mask]] || Red || Self || Inflicts 50% damage to the user, but doubles their stats. || {{symbol|zelda|24px}} {{uv|The Legend of Zelda}} | ||
|- | |- | ||
| [[File:MechaFioraSmashTour.png|50px]] || [[Fiora|Mecha-Fiora]] || Red || Self || Boosts the user's attack power the more they take damage. Stacks with Lucario's Aura. | | [[File:MechaFioraSmashTour.png|50px]] || [[Fiora|Mecha-Fiora]] || Red || Self || Boosts the user's attack power the more they take damage. Stacks with Lucario's [[Aura]]. || {{symbol|xenoblade|24px}} {{uv|Xenoblade Chronicles}} | ||
|- | |- | ||
| [[File:MetalBoxSmashTour.png|50px]] || [[Metal Box]] || Red || Self || Start battle in metal form. | | [[File:MetalBoxSmashTour.png|50px]] || [[Metal Box]] || Red || Self || Start battle in metal form. || {{symbol|mario|24px}} {{uv|Mario}} | ||
|- | |- | ||
| [[File:MrSaturnSmashTour.png|50px]] || [[Mr. Saturn]] || Red || Self || Makes it easier to break shields with attacks. | | [[File:MrSaturnSmashTour.png|50px]] || [[Mr. Saturn]] || Red || Self || Makes it easier to break shields with attacks. || {{symbol|eb|24px}} {{uv|EarthBound}} | ||
|- | |- | ||
| [[File:OreClubSmashTour.png|50px]] || [[Ore Club]] || Red || Self || Start battle with an Ore Club. | | [[File:OreClubSmashTour.png|50px]] || [[Ore Club]] || Red || Self || Start battle with an Ore Club. || {{symbol|kidicarus|24px}} {{uv|Kid Icarus}} | ||
|- | |- | ||
| [[File:PhosphoraSmashTour.png|50px]] || [[Phosphora]] || Red || Self || Allows the user to land instantly by tapping down. | | [[File:PhosphoraSmashTour.png|50px]] || [[Phosphora]] || Red || Self || Allows the user to land instantly by tapping down. || {{symbol|kidicarus|24px}} {{uv|Kid Icarus}} | ||
|- | |- | ||
| [[File:PlasmWraithSmashTour.png|50px]] || [[Plasm Wraith]] || Red || Self || Heals the user when they block attacks with their shield. | | [[File:PlasmWraithSmashTour.png|50px]] || [[Plasm Wraith]] || Red || Self || Heals the user when they block attacks with their [[shield]]. || {{symbol|pikmin|24px}} {{uv|Pikmin}} | ||
|- | |- | ||
| [[File:RocketBeltSmashTour.png|50px]] || [[Rocket Belt]] || Red || Self || Start battle with a Rocket Belt. | | [[File:RocketBeltSmashTour.png|50px]] || [[Rocket Belt]] || Red || Self || Start battle with a Rocket Belt. || {{symbol|pilotwings|24px}} {{uv|Pilotwings}} | ||
|- | |- | ||
| [[File:SidesteppersSmashTour.png|50px]] || [[Sidestepper]] || Red || Self || Speeds up the user's sideways dodges. | | [[File:SidesteppersSmashTour.png|50px]] || [[Sidestepper]] || Red || Self || Speeds up the user's [[Sidestep|sideways dodges]]. || {{symbol|mario|24px}} {{uv|Mario}} | ||
|- | |- | ||
| [[File:SteelDiverSmashTour.png|50px]] || [[Steel Diver]] || Red || Self || Start battle with a Steel Diver. | | [[File:SteelDiverSmashTour.png|50px]] || [[Steel Diver]] || Red || Self || Start battle with a Steel Diver. || {{symbol|other|24px}} {{uv|Steel Diver}} | ||
|- | |- | ||
| [[File:SuperMushroomSmashTour.png|50px]] || [[Super Mushroom]] || Red || Self || Start battle in giant form. | | [[File:SuperMushroomSmashTour.png|50px]] || [[Super Mushroom]] || Red || Self || Start battle in giant form. || {{symbol|mario|24px}} {{uv|Mario}} | ||
|- | |- | ||
| [[File:SuperScopeSmashTour.png|50px]] || [[Super Scope]] || Red || Self || Start battle with a Super Scope. | | [[File:SuperScopeSmashTour.png|50px]] || [[Super Scope]] || Red || Self || Start battle with a Super Scope. || {{symbol|other|24px}} ''[[Nintendo]]'' | ||
|- | |- | ||
| [[File:XBombSmashTour.png|50px]] || [[X Bomb]] || Red || Self || Start battle with an X Bomb. | | [[File:XBombSmashTour.png|50px]] || [[X Bomb]] || Red || Self || Start battle with an X Bomb. || {{symbol|kidicarus|24px}} {{uv|Kid Icarus}} | ||
|- | |- | ||
| [[File:DarkraiSmashTour.png|50px]] || [[Darkrai]] || Red || Opponent || Puts an opponent to sleep at the start of battle. | | [[File:DarkraiSmashTour.png|50px]] || [[Darkrai]] || Red || Opponent || Puts an opponent to [[asleep|sleep]] at the start of battle. || {{symbol|pokemon|24px}} {{uv|Pokémon}} | ||
|- | |- | ||
| [[File:LatiasAndLatiosSmashTour.png|50px]] || [[Latias and Latios]] || Red || Opponent || Allows the user to choose an opponent to be their teammate in a battle. | | [[File:LatiasAndLatiosSmashTour.png|50px]] || [[Latias and Latios]] || Red || Opponent || Allows the user to choose an opponent to be their teammate in a battle. || {{symbol|pokemon|24px}} {{uv|Pokémon}} | ||
|- | |- | ||
| [[File:MrResettiSmashTour.png|50px]] || [[Mr. Resetti]] || Red || Opponent || Reduces a chosen opponent's stats to 0 for one battle. | | [[File:MrResettiSmashTour.png|50px]] || [[Mr. Resetti]] || Red || Opponent || Reduces a chosen opponent's stats to 0 for one battle. || {{symbol|ac|24px}} {{uv|Animal Crossing}} | ||
|- | |- | ||
| [[File:PoisonMushroomSmashTour.png|50px]] || [[Poison Mushroom]] || Red || Opponent || Shrinks a foe at the start of battle. | | [[File:PoisonMushroomSmashTour.png|50px]] || [[Poison Mushroom]] || Red || Opponent || Shrinks a foe at the start of battle. || {{symbol|mario|24px}} {{uv|Mario}} | ||
|- | |- | ||
| [[File:WolfenSmashTour.png|50px]] || [[Wolfen]] || Red || Opponent || Inflicts 100% damage on a chosen opponent at the start of battle. | | [[File:WolfenSmashTour.png|50px]] || [[Wolfen]] || Red || Opponent || Inflicts 100% damage on a chosen opponent at the start of battle. || {{symbol|starfox|24px}} {{uv|Star Fox}} | ||
|- | |- | ||
| [[File:MagnusSmashTour.png|50px]] || [[Magnus]] || Red || Other || After battle, launches all players the user KO'd during the fight. | | [[File:MagnusSmashTour.png|50px]] || [[Magnus]] || Red || Other || After battle, launches all players the user KO'd during the fight. || {{symbol|kidicarus|24px}} {{uv|Kid Icarus}} | ||
|- | |- | ||
| [[File:UltimateChimeraSmashTour.png|50px]] || [[Ultimate Chimera]] || Red || Other || Takes two fighters from the last opponent KO'd instead of just one. It will activate even if the user did not place first in the battle. | | [[File:UltimateChimeraSmashTour.png|50px]] || [[Ultimate Chimera]] || Red || Other || Takes two fighters from the last opponent KO'd instead of just one. It will activate even if the user did not place first in the battle. || {{symbol|eb|24px}} {{uv|EarthBound}} | ||
|- | |- | ||
| [[File:AshleySmashTour.png|50px]] || [[Ashley]] || Blue || Self || Slows down the spinner. | | [[File:AshleySmashTour.png|50px]] || [[Ashley]] || Blue || Self || Slows down the spinner. || {{symbol|wario|24px}} {{uv|Wario}} | ||
|- | |- | ||
| [[File:DocLouisSmashTour.png|50px]] || [[Doc Louis]] || Blue || Self || Increases the effect of collected stat boosts by 1.5x. | | [[File:DocLouisSmashTour.png|50px]] || [[Doc Louis]] || Blue || Self || Increases the effect of collected stat boosts by 1.5x. || {{symbol|punchout|24px}} {{uv|Punch-Out!!}} | ||
|- | |- | ||
| [[File:ExcitebikeSmashTour.png|50px]] || [[Excitebike]] || Blue || Self || Doubles the result of the user's spin. | | [[File:ExcitebikeSmashTour.png|50px]] || [[Excitebike]] || Blue || Self || Doubles the result of the user's spin. || {{symbol|other|24px}} {{uv|Excite}} | ||
|- | |- | ||
| [[File:GhostsSmashTour.png|50px]] || [[Ghosts (Luigi's Mansion)]] || Blue || Self || Allows the user to walk through stationary opponents without triggering a battle. | | [[File:GhostsSmashTour.png|50px]] || [[Ghosts (Luigi's Mansion)]] || Blue || Self || Allows the user to walk through stationary opponents without triggering a battle. || {{symbol|mario|24px}} {{uv|Mario}} | ||
|- | |- | ||
| [[File:GreatFoxSmashTour.png|50px]] || [[Great Fox]] || Blue || Self || Warps the player to a checkpoint that they have not yet visited. | | [[File:GreatFoxSmashTour.png|50px]] || [[Great Fox]] || Blue || Self || Warps the player to a checkpoint that they have not yet visited. || {{symbol|starfox|24px}} {{uv|Star Fox}} | ||
|- | |- | ||
| [[File:RikiSmashTour.png|50px]] || [[Riki]] || Blue || Self || Allows the user to collect items two spaces away. | | [[File:RikiSmashTour.png|50px]] || [[Riki]] || Blue || Self || Allows the user to collect items two spaces away. || {{symbol|xenoblade|24px}} {{uv|Xenoblade Chronicles}} | ||
|- | |- | ||
| [[File:SnorlaxSmashTour.png|50px]] || [[Snorlax]] || Blue || Self || Temporarily makes the user | | [[File:SnorlaxSmashTour.png|50px]] || [[Snorlax]] || Blue || Self || Temporarily makes the user immune to being launched away on the map, be it from other items or being defeated. || {{symbol|pokemon|24px}} {{uv|Pokémon}} | ||
|- | |- | ||
| [[File:SuperStarSmashTour.png|50px]] || [[Super Star]] || Blue || Self || Makes the player invincible and twice as fast. | | [[File:SuperStarSmashTour.png|50px]] || [[Super Star]] || Blue || Self || Makes the player invincible and twice as fast. || {{symbol|mario|24px}} {{uv|Mario}} | ||
|- | |- | ||
| [[File:YellowWollywogSmashTour.png|50px]] || [[Yellow Wollywog]] || Blue || Self || Nullifies traps that the user steps on. | | [[File:YellowWollywogSmashTour.png|50px]] || [[Yellow Wollywog]] || Blue || Self || Nullifies traps that the user steps on. || {{symbol|pikmin|24px}} {{uv|Pikmin}} | ||
|- | |- | ||
| [[File:BossGalagaSmashTour.png|50px]] || [[Boss Galaga]] || Blue || Opponents || Switches the other players around. | | [[File:BossGalagaSmashTour.png|50px]] || [[Boss Galaga]] || Blue || Opponents || Switches the other players around. || {{symbol|other|24px}} {{uv|Galaxian}} | ||
|- | |- | ||
| [[File:BusToTheCitySmashTour.png|50px]] || [[Bus to the City]] || Blue || Opponents || Calls everyone to the user's space. | | [[File:BusToTheCitySmashTour.png|50px]] || [[Kapp'n|Bus to the City]] || Blue || Opponents || Calls everyone to the user's space. || {{symbol|ac|24px}} {{uv|Animal Crossing}} | ||
|- | |- | ||
| [[File:ChainChompSmashTour.png|50px]] || [[Chain Chomp]] || Blue || Opponents || Launches away nearby opponents. | | [[File:ChainChompSmashTour.png|50px]] || [[Chain Chomp]] || Blue || Opponents || Launches away nearby opponents. || {{symbol|mario|24px}} {{uv|Mario}} | ||
|- | |- | ||
| [[File:DillonSmashTour.png|50px]] || [[Dillon]] || Blue || Opponents || Launches other players encountered. | | [[File:DillonSmashTour.png|50px]] || [[Dillon]] || Blue || Opponents || Launches other players encountered. || {{symbol|other|24px}} {{uv|Dillon's Rolling Western}} | ||
|- | |- | ||
| [[File:POWBlockSmashTour.png|50px]] || [[POW Block]] || Blue || Opponents || Makes all other players drop fighters. | | [[File:POWBlockSmashTour.png|50px]] || [[POW Block]] || Blue || Opponents || Makes all other players drop fighters. || {{symbol|mario|24px}} {{uv|Mario}} | ||
|- | |- | ||
| [[File:TingleSmashTour.png|50px]] || [[Tingle]] || Blue || All || Shuffles the fighters of all players. | | [[File:TingleSmashTour.png|50px]] || [[Tingle]] || Blue || All || Shuffles the fighters of all players. || {{symbol|zelda|24px}} {{uv|The Legend of Zelda}} | ||
|- | |- | ||
| [[File:IsabelleSmashTour.png|50px]] || [[Isabelle]] || Blue || Board || Changes nearby stat boosts to maximum size. | | [[File:IsabelleSmashTour.png|50px]] || [[Isabelle]] || Blue || Board || Changes nearby stat boosts to maximum size. || {{symbol|ac|24px}} {{uv|Animal Crossing}} | ||
|- | |- | ||
| [[File:TetraSmashTour.png|50px]] || [[Tetra]] || Blue || Board || Places a trap that can steal fighters. | | [[File:TetraSmashTour.png|50px]] || [[Tetra]] || Blue || Board || Places a trap that can steal fighters. || {{symbol|zelda|24px}} {{uv|The Legend of Zelda}} | ||
|- | |- | ||
| [[File:TimmyTommyNookSmashTour.png|50px]] || [[Timmy & Tommy]] || Blue || Board || Transforms nearby items into different items. Fighters do not turn into other fighters, and instead will be replaced with items or stat boosts. | | [[File:TimmyTommyNookSmashTour.png|50px]] || [[Timmy & Tommy]] || Blue || Board || Transforms nearby items into different items. Fighters do not turn into other fighters, and instead will be replaced with items or stat boosts. || {{symbol|ac|24px}} {{uv|Animal Crossing}} | ||
|- | |- | ||
| [[File:ZingerSmashTour.png|50px]] || [[Zinger]] || Blue || Board || Places a trap that can launch an opponent. | | [[File:ZingerSmashTour.png|50px]] || [[Zinger]] || Blue || Board || Places a trap that can launch an opponent. || {{symbol|dk|24px}} {{uv|Donkey Kong}} | ||
|- | |- | ||
| [[File:PorkySmashTour.png|50px]] || [[Porky Minch]] || Green || Opponents || Steals a Tour Item used by another player. | | [[File:PorkySmashTour.png|50px]] || [[Porky Minch]] || Green || Opponents || Steals a Tour Item used by another player. || {{symbol|eb|24px}} {{uv|EarthBound}} | ||
|- | |- | ||
| [[File:ProtoManSmashTour.png|50px]] || [[Proto Man]] || Green || Other || If a tour item specifically targets this item's user, it is reflected back to that item's user. | | [[File:ProtoManSmashTour.png|50px]] || [[Proto Man]] || Green || Other || If a tour item specifically targets this item's user, it is reflected back to that item's user. || {{symbol|megaman|24px}} {{uv|Mega Man}} | ||
|- | |- | ||
| [[File:SubstituteDollSmashTour.png|50px]] || [[Substitute]] Doll || Green || Other || If a tour item specifically targets this item's user, it is redirected to a random other player. Can also be used to exclude the user from the effect of an item that affects all players (like Boss Galaga or Tingle). | | [[File:SubstituteDollSmashTour.png|50px]] || [[Substitute]] Doll || Green || Other || If a tour item specifically targets this item's user, it is redirected to a random other player. Can also be used to exclude the user from the effect of an item that affects all players (like Boss Galaga or Tingle). || {{symbol|pokemon|24px}} {{uv|Pokémon}} | ||
|} | |} | ||
| Line 160: | Line 278: | ||
|<center>[[File:SmashRunSpeed.png]]</center> || '''Speed ({{ja|移動|Idō}}, ''Movement'')''' || A green item resembling a boot. Known to boost [[dashing]] speed; may also boost [[walking]] and [[air speed]]. | |<center>[[File:SmashRunSpeed.png]]</center> || '''Speed ({{ja|移動|Idō}}, ''Movement'')''' || A green item resembling a boot. Known to boost [[dashing]] speed; may also boost [[walking]] and [[air speed]]. | ||
|- | |- | ||
|<center>[[File:SmashRunJump.png]]</center> || '''Jump ({{ja|ジャンプ|Janpu}}, ''Jump'')''' || A yellow item resembling a wing. Increases [[jumping]] height (includes midair | |<center>[[File:SmashRunJump.png]]</center> || '''Jump ({{ja|ジャンプ|Janpu}}, ''Jump'')''' || A yellow item resembling a wing. Increases [[jumping]] height (includes [[midair jump]] height and [[wall jump]] height); also appears to increase [[Fall speed|falling speed]]. | ||
|- | |- | ||
|<center>[[File:SmashRunAttack.png]]</center> || '''Attack ({{ja|通常ワザ|Tsūjō Waza}}, ''Normal Art'')''' || An orange item resembling a boxing glove. Boosts power of all normal [[attack]]s. | |<center>[[File:SmashRunAttack.png]]</center> || '''Attack ({{ja|通常ワザ|Tsūjō Waza}}, ''Normal Art'')''' || An orange item resembling a boxing glove. Boosts power of all normal [[attack]]s. | ||
|- | |- | ||
|<center>[[File:SmashRunSpecial.png]]</center> || '''Special ({{ja|必殺ワザ|Hissatsu Waza}}, ''Sure-Killing Art'')''' || A red item shaped like a starburst. Boosts power of all [[special move]]s. Additionally, some special moves may gain increased range or a shortened charge time. | |<center>[[File:SmashRunSpecial.png]]</center> || '''Special ({{ja|必殺ワザ|Hissatsu Waza}}, ''Sure-Killing Art'')''' || A red item shaped like a starburst. Boosts power of all [[special move]]s. Additionally, some special moves may gain increased range or a shortened [[charge]] time. | ||
|- | |- | ||
|<center>[[File:SmashRunArms.png]]</center> || '''Arms ({{ja|投げ・アイテム|Nage Aitemu}}, ''Throw/Item'')''' || A purple item resembling a sledge-hammer. Increases strength of [[projectile]]s, [[item]] attacks, healing effects from items, and [[throw]]s. Additionally, | |<center>[[File:SmashRunArms.png]]</center> || '''Arms ({{ja|投げ・アイテム|Nage Aitemu}}, ''Throw/Item'')''' || A purple item resembling a sledge-hammer. Increases strength of [[projectile]]s, [[item]] attacks, healing effects from items, and [[throw]]s. Additionally, [[grab]]bing range is increased and the user is less likely to drop items when attacked. | ||
|- | |- | ||
|<center>[[File:SmashRunDefense.png]]</center> || '''Defense ({{ja|防御|Bōgyo}}, ''Defense'')''' || A blue item resembling a generic shield. Makes it more difficult to launch characters; it is currently unknown whether this is an increase in [[weight]] or a decrease in [[knockback]] taken (which may also result in [[flinch]] resistance). Additionally, the [[shield]] becomes harder to break and the timing for a [[Powershield|perfect shield]] becomes more lenient. | |<center>[[File:SmashRunDefense.png]]</center> || '''Defense ({{ja|防御|Bōgyo}}, ''Defense'')''' || A blue item resembling a generic shield. Makes it more difficult to launch characters; it is currently unknown whether this is an increase in [[weight]] or a decrease in [[knockback]] taken (which may also result in [[flinch]] resistance). Additionally, the [[shield]] becomes harder to break and the timing for a [[Powershield|perfect shield]] becomes more lenient. | ||
|} | |} | ||
== | ==Enemies== | ||
The following is a list of all known random events and their effects, if known. Some | The following is a list of all known enemies on the board that involve random events and their effects, if known. Some events begin boss battles, granting stat boosts to the player who defeats it. If they fail to defeat this boss, it will reappear elsewhere on the map. | ||
*[[Banzai Bill]]: Explodes upon the end of the current turn, dropping numerous stat boosts and launching any Miis caught in the blast. | *{{symbol|mario|20px}} [[Banzai Bill]]: Explodes upon the end of the current turn, dropping numerous stat boosts and launching any Miis caught in the blast. | ||
*[[Flying Man]]: Aids the first player who bumps into him by launching one of their opponents. | *{{symbol|eb|20px}} [[Flying Man]]: Aids the first player who bumps into him by launching one of their opponents. | ||
*[[Iridescent Glint Beetle]]: Carries various treasures, which will be awarded to any player that walks into it. These include items and even fighters. | *{{symbol|pikmin|20px}} [[Iridescent Glint Beetle]]: Carries various treasures, which will be awarded to any player that walks into it. These include items and even fighters. | ||
*[[Kamek]]: Uses his magic to change the position of the checkpoints. | *{{symbol|mario|20px}} [[Kamek]]: Uses his magic to change the position of the checkpoints. | ||
*[[Koffing]]: Obscures the map, causing all players to be unable to see the board. | *{{symbol|pokemon|20px}} [[Koffing]]: Obscures the map, causing all players to be unable to see the board. | ||
*[[Metal Face]]: Initiates a battle on [[Gaur Plain]], where Metal Face appears earlier. | *{{symbol|xenoblade|20px}} [[Metal Face]]: Initiates a battle on [[Gaur Plain]], where Metal Face appears earlier. | ||
*{{b|Metroid|creature}} | *{{symbol|metroid|20px}} {{b|Metroid|creature}}: Steals stats from the first player to touch it, and grants the stats to whichever player bumps into it next. | ||
*[[Nabbit]]: Collects all items it comes across as it moves along the map. Whoever catches it will receive all items Nabbit has stolen. | *{{symbol|mario|20px}} [[Nabbit]]: Collects all items it comes across as it moves along the map. Whoever catches it will receive all items Nabbit has stolen. | ||
*[[Reaper]]: Forces an exchange of three fighters for a checkpoint bonus. Having two or less fighters will cause the Reaper to launch the player. | *{{symbol|ki|20px}} [[Reaper]]: Forces an exchange of three fighters for a checkpoint bonus. Having two or less fighters will cause the Reaper to launch the player. | ||
*[[Ridley]]: Initiates a battle on [[Pyrosphere]], where Ridley appears earlier. | *{{symbol|metroid|20px}} [[Ridley]]: Initiates a battle on [[Pyrosphere]], where Ridley appears earlier. | ||
*[[Souflee]]: Grants a checkpoint bonus to players that walk into it. | *{{symbol|ki|20px}} [[Souflee]]: Grants a checkpoint bonus to players that walk into it. | ||
*[[Tac]]: Carries stat boosts, which will be awarded to any player that walks into it. | *{{symbol|kirby|20px}} [[Tac]]: Carries stat boosts, which will be awarded to any player that walks into it. | ||
*[[Yellow Devil]]: Initiates a battle on [[Wily Castle]], where the Yellow Devil appears earlier. | *{{symbol|megaman|20px}} [[Yellow Devil]]: Initiates a battle on [[Wily Castle]], where the Yellow Devil appears earlier. | ||
==List of battle types== | ==List of battle types== | ||
Most of these matches may also be team battles. If so, they will have "Team" at the start of the match name. | |||
Most of these matches may also be team battles. If so, they have "Team" at the start of the match name. | |||
{| class="wikitable" | {| class="wikitable" | ||
|- | |- | ||
! Match Type !! Description | ! Match Type !! Description | ||
|- | |||
| Smash || A regular match. Items can appear, with some exceptions such as the [[Special Flag]]. | |||
|- | |- | ||
| 300% Smash || A match where players start with 300% damage, akin to [[Super Sudden Death]]. | | 300% Smash || A match where players start with 300% damage, akin to [[Super Sudden Death]]. | ||
|- | |- | ||
| Battering Smash || A match where only battering | | Battering Smash || A match where only [[battering item]]s appear. | ||
|- | |- | ||
| Boss Galaga Smash || A match where only the [[Boss Galaga]] item appears. | | Boss Galaga Smash || A match where only the [[Boss Galaga]] item appears. | ||
|- | |- | ||
| Explosive Smash || A match where only explosive items appear. | | Explosive Smash || A match where only [[explosive]] items appear. | ||
|- | |- | ||
| Flower Smash || A match where all | | Flower Smash || A match where all fighters suffer from a permanent [[flower]] effect. | ||
|- | |- | ||
| Glorious Smash || A match where no items appear | | Glorious Smash || A match where no items appear and the stage is an [[Ω form]], as in [[For Glory]]. | ||
|- | |- | ||
| High-Launch Smash || A match where the | | High-Launch Smash || A match where the [[launch rate]] is set very high, resulting in greater [[knockback]]. | ||
|- | |- | ||
| Home-Run Contest || A multiplayer round of [[Home-Run Contest]], with each player taking turns to get the highest score. | | Home-Run Contest || A multiplayer round of [[Home-Run Contest]], with each player taking turns to get the highest score. | ||
|- | |- | ||
| Mega Smash || A match where all | | Mega Smash || A match where all fighters are giant. | ||
|- | |- | ||
| Mr. Saturn Smash || A match where only the [[Mr. Saturn]] item appears. | | Mr. Saturn Smash || A match where only the [[Mr. Saturn]] item appears. | ||
| Line 226: | Line 345: | ||
| Warp Star Smash || A match where only the [[Warp Star]] item appears. | | Warp Star Smash || A match where only the [[Warp Star]] item appears. | ||
|- | |- | ||
| Boss Battle || A match against [[Yellow Devil]], [[Ridley]], or [[Metal Face]]. The winner of the battle is either whoever deals the final blow or is the last fighter standing. The winner gains extra stat boosts as well, | | Boss Battle || A match against [[Yellow Devil]], [[Ridley]], or [[Metal Face]]. The winner of the battle is either whoever deals the final blow or is the last fighter standing. The winner gains extra stat boosts as well, and this reward will be greater if they initiated the Boss Battle. | ||
|} | |} | ||
| Line 244: | Line 363: | ||
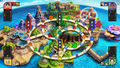
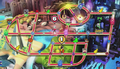
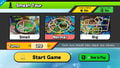
<gallery> | <gallery> | ||
SmashTourMap2.png|The small map. | SmashTourMap2.png|The small map. | ||
SSBUSmashTourPotD.jpg|A gameplay screenshot of the medium map. | |||
SmashTourMap3.png|The big map. | SmashTourMap3.png|The big map. | ||
SSBUSmashTourPotD2.jpg|Settings and map selection. | SSBUSmashTourPotD2.jpg|Settings and map selection. | ||
</gallery> | </gallery> | ||
| Line 255: | Line 374: | ||
**When Metal Face appears, ''{{SSB4MusicLink|Xenoblade|You Will Know Our Names}}'' is used. | **When Metal Face appears, ''{{SSB4MusicLink|Xenoblade|You Will Know Our Names}}'' is used. | ||
**When the Yellow Devil appears, ''{{SSB4MusicLink|Mega Man|Mega Man 2 Medley}}'' is used. | **When the Yellow Devil appears, ''{{SSB4MusicLink|Mega Man|Mega Man 2 Medley}}'' is used. | ||
*If in a battle, one player has at least one fighter and the others don't have any, the battle ends automatically as soon as it starts, being a [[ | *If in a battle, one player has at least one fighter and the others don't have any, the battle ends automatically as soon as it starts, being a [[single person match]]. This also happens if players use the Latias & Latios item to put all fighters on the same team. | ||
*If a player reflects a ''Bus to the City'' trophy by using a Proto Man, all players are called to the Proto Man user's space. | *If a player reflects a ''Bus to the City'' trophy by using a Proto Man, all players are called to the Proto Man user's space. | ||
*If [[Mew]] is summoned during any Smash Tour battle, it will drop absolutely nothing. | *If [[Mew]] is summoned during any Smash Tour battle, it will drop absolutely nothing. | ||
*Similar to the [[Wii Remote selection sound]]s in ''[[Brawl]]'', collecting a fighter will have the players hear a phrase or sound specific to that character. For example, {{SSB4|Wii Fit Trainer}} will say "Let's get fired up". | *Similar to the [[Wii Remote selection sound]]s in ''[[Brawl]]'', collecting a fighter will have the players hear a phrase or sound specific to that character. For example, {{SSB4|Wii Fit Trainer}} will say "Let's get fired up". | ||
**Interestingly, if {{SSB4|Dr. Mario}} is collected, he will say "Let's-a go", normally only said by {{SSB4|Mario}}. | **Interestingly, if {{SSB4|Dr. Mario}} is collected, he will say "Let's-a go", normally only said by {{SSB4|Mario}}. | ||
*If no input is given by human players, the game will progress forward by itself. The only exceptions to this are the Smash Tour Home Run Contest and Target Blast minigames, both will wait for human input before progressing. This trick allows one to get rewards and complete challenges from Smash Tour without having to actually play. The 'human player'-computer will collect Checkpoint Bonuses and fighters, chase the {{b|Metroid|creature}} and [[Nabbit]], and generally avoid other players. | **When {{SSB4|Kirby}} is collected, he will say "Hi" that resembles an unused version from ''Brawl'', and consequently its ''[[Smash 64]]'' and ''[[Melee]]'' versions. This variant is not used otherwise, however, the file exists in {{for3ds}}, alongside his unused voice clips for copying {{SSB4|Palutena}}'s [[Explosive Flame]] and [[Heavenly Light]]. | ||
*If no input is given by human players, the game will progress forward by itself. The only exceptions to this are the Smash Tour Home-Run Contest and Target Blast minigames, both will wait for human input before progressing. This trick allows one to get rewards and complete challenges from Smash Tour without having to actually play. The 'human player'-computer will collect Checkpoint Bonuses and fighters, chase the {{b|Metroid|creature}} and [[Nabbit]], and generally avoid other players. | |||
*In a Team Battle, it is possible to use the [[Latias & Latios]] item to make it a 3 VS 1 match. | *In a Team Battle, it is possible to use the [[Latias & Latios]] item to make it a 3 VS 1 match. | ||
*In a boss battle, the [[DK Barrel]] will be temporarily disabled. | *In a boss battle, the [[DK Barrel]] will be temporarily disabled. | ||
*When a match begins, the type of battle will be displayed at the top-left corner. This shows up in the pause screen and even in snapshots. This does not occur in the final match. | *When a match begins, the type of battle will be displayed at the top-left corner. This shows up in the pause screen and even in snapshots. This does not occur in the final match. | ||
*Fighters that are Blast KO'd during the Final Battle will, for some reason, never finish their KO sounds unless they are the final fighter the player has. | *Fighters that are Blast KO'd during the Final Battle will, for some reason, never finish their KO sounds unless they are the final fighter the player has. | ||
*The Ghosts item contains the game title ''Luigi's Mansion'' in their name despite there not being any other items named, "Ghosts." This is likely a leftover from their trophy, where they share the name with the Ghosts from ''PAC-MAN'' (along with ''Find Mii'' in the Nintendo 3DS version). | |||
{{SSB4-UMenus}} | {{SSB4-UMenus}} | ||
| Line 270: | Line 391: | ||
[[Category:Modes (SSB4-Wii U)]] | [[Category:Modes (SSB4-Wii U)]] | ||
[[Category:Multiplayer modes]] | |||
Latest revision as of 10:29, April 12, 2023

Smash Tour (ワールドスマッシュ, World Smash) is a game mode exclusive to Super Smash Bros. for Wii U.
Overview[edit]
Smash Tour plays as a board game, in which players use Mii characters to move around the board. There are three different boards - small, normal, and big - and every game can be set to last for 15 to 25 turns. The goal is to move around the board and collect powerups and fighters, who will face off in a final battle. If customizations are turned on, the characters may possess custom special moves, indicated by the number 1, 2, or 3 on the character's icon.
At the game's start, each player is given two random characters. At the beginning of each turn but the first, each player receives a random item, and may then choose to use any item they have. Then a spinner starts moving, and after stopping it, the player will be able to move by the number of spaces indicated, which ranges from 1 to 6 in normal conditions: it is possible to change direction at every crossroad.
By moving around the board, players can collect powerups, which raise their characters' stats; items, which possess various effects; and playable fighters, which will be put into use during battles: the characters are used in the order they were obtained. Each player may hold up to ten characters and four items.
Battles are initiated by landing on the same space as another player or landing on a battle space. At the beginning of a battle, a player may select an item to use, and will then face the others. There are several types of battles: only specific items may appear, the players are put in a specific state, or instead of a battle, a round of Home-Run Contest or Target Blast might play. The winner will receive a prize shown before the battle, which is always an item plus sometimes a character: in the case of a team battle, the item will be given to all the members of the winning team. If a player gets KO'd, they will lose their current fighter: the last character KO'd will be given to the player who defeated them. After the battle, any player who shares a space with the player who KO'd them will be launched away, possibly dropping some of their characters.
During gameplay, random events can occur: they range from non-playable characters roaming the board and giving bonuses of some kind to players who touch them, to alterations of the map, to boss battles.
When the turn counter runs out, the board phase of the game ends and the announcer will call out "GAME!". The players' stats are shown, and some further bonuses may be awarded if some special conditions are met:
- Distance Traveled: each player's Speed attribute increases based on the number of spaces crossed.
- Trophies Used: each player's Arms attribute increases based on the number of trophies used.
- Lucky 7: stats which include a 7 are increased.
- Launched Ace: the player(s) who got launched the most get one more character.
- Launching Ace: the player(s) who launched the most opponents get an increase in their highest stats.
- Booby Prize: the player(s) with the least characters get a bonus character, if they have no characters or every other player has at least two more characters.
The winner is then determined by a special timed stock battle that always takes place on the stage Battlefield. Every fighter that the player has collected counts as one stock; once a fighter is defeated, the player's next fighter enters the field until they have no fighters left, a concept that was carried over to Squad Strike. The winner is always decided by KO count: in other words, being the last player standing does not necessarily equate to victory. In the case of a tie, the winner is decided by a Sudden Death finale between the last fighters used.
After the game ends, several trophies, equipment items, Mii costumes, custom special moves, gold, and Crazy Orders passes may be received.
Space types[edit]
- Fighter Space: a collectible character may appear here.
- Checkpoint: touching it awards the correspondent symbol to the player, as well as a stat boost. Collecting all five symbols gives a player a checkpoint bonus, similar to the Fortune Street series of games.
- Stat Boost Space: a player's stats may be raised, lowered, or swapped with one another. The effects become stronger when approaching the game's end.
- Warp Space: contains a pipe which warps the player to another pipe with the same color in another space on the map.
- Battle Space: automatically starts a battle at the end of the turn. Only appears on the big map.
Additionally, powerups and items may appear on any empty normal space.
Possible Fighters[edit]
Every fighter aside from the Mii Fighters can appear on the board, and if custom fighters are turned on, there are preset alternate costumes for each of the custom movesets. Most of the costumes for Moveset 2 are the costumes on the Alternate fighter trophies. The same applies to the 3DS's versions of the Alternate fighter trophies' costumes for Moveset 3. The custom moves in these sets always match their number with the costume number, so moveset 1 is always 1111, moveset 2 is always 2222 and moveset 3 is always 3333.
| Fighter | Moveset 1 Costume | Moveset 2 Costume | Moveset 3 Costume |
|---|---|---|---|
| Mario |  |
 |

|
| Luigi |  |
 |

|
| Peach |  |
 |

|
| Bowser |  |
 |

|
| Yoshi |  |
 |

|
| Rosalina & Luma |  |
 |

|
| Bowser Jr. |  |
|
|
| Wario |  |
 |

|
| Donkey Kong |  |
 |

|
| Diddy Kong |  |
 |

|
| Mr. Game & Watch |  |
 |

|
| Little Mac |  |
 |

|
| Link |  |
 |

|
| Zelda |  |
 |

|
| Sheik |  |
 |

|
| Ganondorf |  |
 |

|
| Toon Link |  |
 |

|
| Samus |  |
 |

|
| Zero Suit Samus |  |
 |

|
| Pit |  |
 |

|
| Palutena |  |
 |

|
| Marth |  |
 |

|
| Ike |  |
 |

|
| Robin |  |
 |

|
| Duck Hunt |  |
 |

|
| Kirby |  |
 |

|
| King Dedede |  |
 |

|
| Meta Knight |  |
 |

|
| Fox |  |
 |

|
| Falco |  |
 |

|
| Pikachu |  |
 |

|
| Charizard |  |
 |

|
| Lucario |  |
 |

|
| Jigglypuff |  |
 |

|
| Greninja |  |
 |

|
| R.O.B. |  (JP) (JP)  (US) (US) |
 |

|
| Ness |  |
 |

|
| Captain Falcon |  |
 |

|
| Villager |  |
 |

|
| Olimar |  |
 |

|
| Wii Fit Trainer |  |
 |

|
| Shulk |  |
 |

|
| Dr. Mario |  |
 |

|
| Dark Pit |  |
 |

|
| Lucina |  |
 |

|
| Pac-Man |  |
 |

|
| Mega Man |  |
 |

|
| Sonic |  |
 |

|
| Mewtwo |  |
N/A | N/A |
| Lucas |  |
N/A | N/A |
| Roy |  |
N/A | N/A |
| Ryu |  |
N/A | N/A |
| Cloud |  |
N/A | N/A |
| Corrin |  |
N/A | N/A |
| Bayonetta |  |
N/A | N/A |
Tour items[edit]

Items take the form of trophies from the game. The following is a list of known items and their effects in Smash Tour. There are red, blue, and green items, with red items being used in battle, blue items being used on the game board, and green items being usable in both.
| Icon | Name | Type | Targets | Description | Series |
|---|---|---|---|---|---|
 |
Back Shield | Red | Self | Start battle with a Back Shield. | |
 |
Black Knight | Red | Self | On occasion, turns smash attacks into one-hit KOs. | |
 |
Bob-omb | Red | Self | Start battle with a Bob-omb. | |
 |
Boo | Red | Self | Start battle invisible. | |
 |
Bunny Hood | Red | Self | Start battle wearing a Bunny Hood. | |
 |
Daisy (Baseball) | Red | Self | Automatically catch thrown items. | |
 |
DK Barrel | Red | Self | Allows the user to have one of their characters as a CPU ally. | |
 |
Dixie Kong | Red | Self | Adds one to the user's number of midair jumps. | |
 |
Energy Tank | Red | Self | Heals the user once if their damage exceeds 100%. | |
 |
Franklin Badge | Red | Self | Start battle wearing a Franklin Badge. | |
 |
Hammer | Red | Self | Start battle with a Hammer. | |
 |
Home-Run Bat | Red | Self | Start battle with a Home-Run Bat. | |
 |
Kat & Ana | Red | Self | All collisions with walls and ceilings are automatically teched. | |
 |
Majora's Mask | Red | Self | Inflicts 50% damage to the user, but doubles their stats. | |
 |
Mecha-Fiora | Red | Self | Boosts the user's attack power the more they take damage. Stacks with Lucario's Aura. | |
 |
Metal Box | Red | Self | Start battle in metal form. | |
 |
Mr. Saturn | Red | Self | Makes it easier to break shields with attacks. | |
 |
Ore Club | Red | Self | Start battle with an Ore Club. | |
 |
Phosphora | Red | Self | Allows the user to land instantly by tapping down. | |
 |
Plasm Wraith | Red | Self | Heals the user when they block attacks with their shield. | |
 |
Rocket Belt | Red | Self | Start battle with a Rocket Belt. | |
 |
Sidestepper | Red | Self | Speeds up the user's sideways dodges. | |
 |
Steel Diver | Red | Self | Start battle with a Steel Diver. | |
 |
Super Mushroom | Red | Self | Start battle in giant form. | |
 |
Super Scope | Red | Self | Start battle with a Super Scope. | |
 |
X Bomb | Red | Self | Start battle with an X Bomb. | |
 |
Darkrai | Red | Opponent | Puts an opponent to sleep at the start of battle. | |
 |
Latias and Latios | Red | Opponent | Allows the user to choose an opponent to be their teammate in a battle. | |
 |
Mr. Resetti | Red | Opponent | Reduces a chosen opponent's stats to 0 for one battle. | |
 |
Poison Mushroom | Red | Opponent | Shrinks a foe at the start of battle. | |
 |
Wolfen | Red | Opponent | Inflicts 100% damage on a chosen opponent at the start of battle. | |
 |
Magnus | Red | Other | After battle, launches all players the user KO'd during the fight. | |
 |
Ultimate Chimera | Red | Other | Takes two fighters from the last opponent KO'd instead of just one. It will activate even if the user did not place first in the battle. | |
 |
Ashley | Blue | Self | Slows down the spinner. | |
 |
Doc Louis | Blue | Self | Increases the effect of collected stat boosts by 1.5x. | |
 |
Excitebike | Blue | Self | Doubles the result of the user's spin. | |
 |
Ghosts (Luigi's Mansion) | Blue | Self | Allows the user to walk through stationary opponents without triggering a battle. | |
 |
Great Fox | Blue | Self | Warps the player to a checkpoint that they have not yet visited. | |
 |
Riki | Blue | Self | Allows the user to collect items two spaces away. | |
 |
Snorlax | Blue | Self | Temporarily makes the user immune to being launched away on the map, be it from other items or being defeated. | |
 |
Super Star | Blue | Self | Makes the player invincible and twice as fast. | |
 |
Yellow Wollywog | Blue | Self | Nullifies traps that the user steps on. | |
 |
Boss Galaga | Blue | Opponents | Switches the other players around. | |
 |
Bus to the City | Blue | Opponents | Calls everyone to the user's space. | |
 |
Chain Chomp | Blue | Opponents | Launches away nearby opponents. | |
 |
Dillon | Blue | Opponents | Launches other players encountered. | |
 |
POW Block | Blue | Opponents | Makes all other players drop fighters. | |
 |
Tingle | Blue | All | Shuffles the fighters of all players. | |
 |
Isabelle | Blue | Board | Changes nearby stat boosts to maximum size. | |
 |
Tetra | Blue | Board | Places a trap that can steal fighters. | |
 |
Timmy & Tommy | Blue | Board | Transforms nearby items into different items. Fighters do not turn into other fighters, and instead will be replaced with items or stat boosts. | |
 |
Zinger | Blue | Board | Places a trap that can launch an opponent. | |
 |
Porky Minch | Green | Opponents | Steals a Tour Item used by another player. | |
 |
Proto Man | Green | Other | If a tour item specifically targets this item's user, it is reflected back to that item's user. | |
 |
Substitute Doll | Green | Other | If a tour item specifically targets this item's user, it is redirected to a random other player. Can also be used to exclude the user from the effect of an item that affects all players (like Boss Galaga or Tingle). |
Stat boosts[edit]
The following items can be found throughout the game board. Each item has its own use, and will help the player in some way during the subsequent fights. Additionally, every item can be found in different sizes, which alters how much of each stat will be boosted. There is a limit of 1000 points for each category.
| Icon | Name | Description |
|---|---|---|
 |
Speed (移動, Movement) | A green item resembling a boot. Known to boost dashing speed; may also boost walking and air speed. |
 |
Jump (ジャンプ, Jump) | A yellow item resembling a wing. Increases jumping height (includes midair jump height and wall jump height); also appears to increase falling speed. |
 |
Attack (通常ワザ, Normal Art) | An orange item resembling a boxing glove. Boosts power of all normal attacks. |
 |
Special (必殺ワザ, Sure-Killing Art) | A red item shaped like a starburst. Boosts power of all special moves. Additionally, some special moves may gain increased range or a shortened charge time. |
 |
Arms (投げ・アイテム, Throw/Item) | A purple item resembling a sledge-hammer. Increases strength of projectiles, item attacks, healing effects from items, and throws. Additionally, grabbing range is increased and the user is less likely to drop items when attacked. |
 |
Defense (防御, Defense) | A blue item resembling a generic shield. Makes it more difficult to launch characters; it is currently unknown whether this is an increase in weight or a decrease in knockback taken (which may also result in flinch resistance). Additionally, the shield becomes harder to break and the timing for a perfect shield becomes more lenient. |
Enemies[edit]
The following is a list of all known enemies on the board that involve random events and their effects, if known. Some events begin boss battles, granting stat boosts to the player who defeats it. If they fail to defeat this boss, it will reappear elsewhere on the map.
 Banzai Bill: Explodes upon the end of the current turn, dropping numerous stat boosts and launching any Miis caught in the blast.
 Flying Man: Aids the first player who bumps into him by launching one of their opponents.
 Iridescent Glint Beetle: Carries various treasures, which will be awarded to any player that walks into it. These include items and even fighters.
- Kamek: Uses his magic to change the position of the checkpoints.
 Koffing: Obscures the map, causing all players to be unable to see the board.
 Metal Face: Initiates a battle on Gaur Plain, where Metal Face appears earlier.
 Metroid: Steals stats from the first player to touch it, and grants the stats to whichever player bumps into it next.
- Nabbit: Collects all items it comes across as it moves along the map. Whoever catches it will receive all items Nabbit has stolen.
 Reaper: Forces an exchange of three fighters for a checkpoint bonus. Having two or less fighters will cause the Reaper to launch the player.
- Ridley: Initiates a battle on Pyrosphere, where Ridley appears earlier.
- Souflee: Grants a checkpoint bonus to players that walk into it.
 Tac: Carries stat boosts, which will be awarded to any player that walks into it.
 Yellow Devil: Initiates a battle on Wily Castle, where the Yellow Devil appears earlier.
List of battle types[edit]
Most of these matches may also be team battles. If so, they will have "Team" at the start of the match name.
| Match Type | Description |
|---|---|
| Smash | A regular match. Items can appear, with some exceptions such as the Special Flag. |
| 300% Smash | A match where players start with 300% damage, akin to Super Sudden Death. |
| Battering Smash | A match where only battering items appear. |
| Boss Galaga Smash | A match where only the Boss Galaga item appears. |
| Explosive Smash | A match where only explosive items appear. |
| Flower Smash | A match where all fighters suffer from a permanent flower effect. |
| Glorious Smash | A match where no items appear and the stage is an Ω form, as in For Glory. |
| High-Launch Smash | A match where the launch rate is set very high, resulting in greater knockback. |
| Home-Run Contest | A multiplayer round of Home-Run Contest, with each player taking turns to get the highest score. |
| Mega Smash | A match where all fighters are giant. |
| Mr. Saturn Smash | A match where only the Mr. Saturn item appears. |
| Pokémon Smash | A match where only the Poké Ball and Master Ball items appear. This type of match is always set on a Pokémon stage. |
| Shooter Smash | A match where only shooting items appear. |
| Target Blast | A multiplayer round of Target Blast, with each player taking turns to see who can get the highest score in a single round. |
| Transformation Smash | A match where only transformation items appear, such as the Metal Box. |
| Warp Star Smash | A match where only the Warp Star item appears. |
| Boss Battle | A match against Yellow Devil, Ridley, or Metal Face. The winner of the battle is either whoever deals the final blow or is the last fighter standing. The winner gains extra stat boosts as well, and this reward will be greater if they initiated the Boss Battle. |
Challenges[edit]
- Starting the final battle with 10 characters awards the Flying Man trophy.
- Getting three or more checkpoint bonuses awards the Bionis trophy.
- Defeating 12 or more fighters in a single game awards a Crazy Orders pass.
- Getting first place in 5 or more battles in a single game awards 2000G.
- Using 18 or more items in a single game awards the Riki trophy.
- Dealing the final blow to a boss awards the Ridley trophy.
- Recovering stolen stat boosts from a Metroid awards the Vs. Parasite Queen music.
- Playing all the three maps awards the Pac-Land stage.
- Bumping into an enemy awards the Nabbit trophy.
- Bumping into every other player in a single game awards the Mecha Suit Mii outfit.
Gallery[edit]
The small map.
A gameplay screenshot of the medium map.
The big map.
Settings and map selection.


Trivia[edit]
- Nabbit and Riki use the same black hole effect graphic.
- Music changes when a boss appears on the map.
- When Ridley appears, Vs. Ridley is used.
- When Metal Face appears, You Will Know Our Names is used.
- When the Yellow Devil appears, Mega Man 2 Medley is used.
- If in a battle, one player has at least one fighter and the others don't have any, the battle ends automatically as soon as it starts, being a single person match. This also happens if players use the Latias & Latios item to put all fighters on the same team.
- If a player reflects a Bus to the City trophy by using a Proto Man, all players are called to the Proto Man user's space.
- If Mew is summoned during any Smash Tour battle, it will drop absolutely nothing.
- Similar to the Wii Remote selection sounds in Brawl, collecting a fighter will have the players hear a phrase or sound specific to that character. For example, Wii Fit Trainer will say "Let's get fired up".
- Interestingly, if Dr. Mario is collected, he will say "Let's-a go", normally only said by Mario.
- When Kirby is collected, he will say "Hi" that resembles an unused version from Brawl, and consequently its Smash 64 and Melee versions. This variant is not used otherwise, however, the file exists in Super Smash Bros. for Nintendo 3DS, alongside his unused voice clips for copying Palutena's Explosive Flame and Heavenly Light.
- If no input is given by human players, the game will progress forward by itself. The only exceptions to this are the Smash Tour Home-Run Contest and Target Blast minigames, both will wait for human input before progressing. This trick allows one to get rewards and complete challenges from Smash Tour without having to actually play. The 'human player'-computer will collect Checkpoint Bonuses and fighters, chase the Metroid and Nabbit, and generally avoid other players.
- In a Team Battle, it is possible to use the Latias & Latios item to make it a 3 VS 1 match.
- In a boss battle, the DK Barrel will be temporarily disabled.
- When a match begins, the type of battle will be displayed at the top-left corner. This shows up in the pause screen and even in snapshots. This does not occur in the final match.
- Fighters that are Blast KO'd during the Final Battle will, for some reason, never finish their KO sounds unless they are the final fighter the player has.
- The Ghosts item contains the game title Luigi's Mansion in their name despite there not being any other items named, "Ghosts." This is likely a leftover from their trophy, where they share the name with the Ghosts from PAC-MAN (along with Find Mii in the Nintendo 3DS version).
| Super Smash Bros. for Wii U menu items | |
|---|---|
| Smash | Smash (Time · Stock · Coin Battle · Team Battle) · 8-Player Smash · Special Smash · Rules · Controls |
| Games & More | Classic · All-Star · Stadium (Target Blast · Home-Run Contest · Multi-Man Smash) · Training · Events · Special Orders (Master Orders · Crazy Orders) · Custom · Stage Builder · amiibo · Vault (Trophies · Trophy Rush · Album · Replays · Movies · Sounds · Records · Tips · Masterpieces) · Options (Controls · Sound · My Music · Internet Options) |
| Online | Spectator Mode · With Anyone (For Fun · For Glory) · With Friends · Online Events (Tourney · Conquest) · Share |
| Other | Challenge · Smash Tour · 3DS |
| Smash Tour | |
|---|---|
| Red items | Back Shield · Black Knight · Bob-omb · Boo · Bunny Hood · Daisy (Baseball) · Darkrai · Dixie Kong · DK Barrel · Energy Tank · Franklin Badge · Hammer · Home-Run Bat · Kat & Ana · Latias & Latios · Magnus · Majora's Mask · Mecha-Fiora · Metal Box · Mr. Resetti · Mr. Saturn · Ore Club · Phosphora · Plasm Wraith · Poison Mushroom · Rocket Belt · Sidestepper · Steel Diver · Super Mushroom · Super Scope · Ultimate Chimera · Wolfen · X Bomb |
| Blue items | Ashley · Boss Galaga · Bus to the City · Chain Chomp · Dillon · Doc Louis · Excitebike · Ghosts (Luigi's Mansion) · Great Fox · Isabelle · POW Block · Riki · Snorlax · Super Star · Tetra · Timmy & Tommy · Tingle · Yellow Wollywog · Zinger |
| Green items | Porky Minch · Proto Man · Substitute Doll |
| Random events | Banzai Bill · Flying Man · Iridescent Glint Beetle · Kamek · Koffing · Metal Face · Metroid · Nabbit · Reaper · Ridley · Souflee · Tac · Yellow Devil |