Lock: Difference between revisions
Serpent King (talk | contribs) (Undid edit by Baefeather: Um, not saying it is.) |
m (→Types of locks) |
||
| (101 intermediate revisions by 41 users not shown) | |||
| Line 1: | Line 1: | ||
{{ArticleIcons|ssbb=y|ssb4=y}} | {{ArticleIcons|ssbm=y|ssbb=y|ssb4=y|ssbu=y|unofficial=y}} | ||
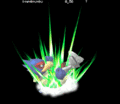
[[File:Brawl-JabLock-Sonic.gif|thumb|{{SSBB|Sonic}} performing a jab lock on {{SSBB|R.O.B.}} | [[File:Brawl-JabLock-Sonic.gif|thumb|{{SSBB|Sonic}} performing a [[neutral air]], [[footstool]] into a jab lock combo on {{SSBB|R.O.B.}}; then allowing a reset while simultaneously finishing with a [[forward smash]].]] | ||
[[File:jabreset.gif|thumb|{{SSBM|Mewtwo}} performing a [[down throw]] into jab reset then [[down smash]] on {{SSBM|Fox}}.]] | |||
:''"Lock" redirects here. For the Italian smasher, see [[Smasher:Lock]].'' | |||
A '''lock''' is a [[technique]] in ''[[Super Smash Bros. Brawl]]'', ''[[Super Smash Bros. 4]]'', and ''[[Super Smash Bros. Ultimate]]'' where a character can use low [[knockback]] attacks to [[combo]] an opponent on the [[floor]] that is "prone"; aka "lying down". An animation of the victim briefly bouncing off the ground signifies a lock. Some moves that lock are fast enough to be repeated, while others cannot be repeated fast enough to keep the opponent in the locked position, or have knockback scaling that causes the opponent to be launched at higher percents. Some moves will move a character across the stage farther than others, causing less damage buildup overall. | |||
A lock is | |||
The '''reset''' was first introduced in ''[[Super Smash Bros. Melee]]'', and was then incorporated into the locking mechanic as the only [[floor recovery|wake-up]] option that can be used afterwards, allowing for a [[punish]] as the opponent stands up. The character will stand up in an identical animation of a standard neutral get-up, with [[intangibility]] frames at the beginning. | |||
== | Trying to perform a lock in ''Melee'' merely results in a reset, which the opponent can avoid altogether with [[ASDI]]. In ''Brawl'', a reset can occur only after locking has ceased, which can result in [[zero-to-death combo]]s. In ''Smash 4'', it functions in the same way, but locking can now only be performed a maximum of three times before an automatic reset occurs<ref>https://twitter.com/EvenMatchup/status/509543588137402370</ref> (except in rare circumstances, see below). In ''Ultimate'', this has been reduced to two times before an automatic reset; additionally, the reset no longer forces the opponent to use a neutral get-up (effectively resulting in a [[tech-chase]]). This can be considered a blend of the former locking and reset mechanics, respectively. | ||
Starting a lock is often the | |||
[[Percent]]ages, [[weight]], and [[angle]]s are the most noteworthy properties in determining if a move will successfully lock or reset. Some moves only do so in very specific circumstances, while others almost always do. The listings below do not take any of these parameters into account, and only extremely character-specific or unwieldy locks are not to be listed. In every ''Smash'' game, including ''[[Smash 64]]'', an instant getup with a grounded [[flinch]] will occur in any low-knockback situation a lock or reset cannot. | |||
==How to perform== | |||
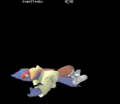
[[File:Lucas footstool combo.gif|thumb| {{SSB4|Lucas}} performing a lock combo on {{SSB4|Lucario}} with [[down air]] after an un[[tech]]able [[footstool]].]] | |||
Starting a lock or reset is often the most difficult part, as many skilled players will [[tech]] or [[DI]] away before hitting the ground, and will also get up as soon as possible to avoid it. Surprise or fast attacks causing a character to fall quickly on the ground can work, as well as taking advantage of various situations in which a tech cannot be performed. For example, in ''Brawl'' and ''SSB4'', [[Footstool Jump|footstooling]] an airborne opponent will prevent them from being able to tech in any way while in [[tumble]], though the upward momentum can cause the footstooler to be unable to follow up with a lock depending on their character. Learning to perform a [[shorthop]] footstool aides in this. For some characters, it is possible to fast fall an aerial with lock properties to cause a single bounce, then follow up with a jab lock or reset. | |||
==Types of locks== | ==Types of locks== | ||
===Jab lock=== | {{cleanup}} | ||
The most common type of lock is the jab lock, which can be performed by multiple characters. As the name states, it is done by hitting a fallen character with a [[jab]], stepping forward, and hitting them again. The locked player can be moved to the end of the stage, where the active player generally hits them with a charged smash attack as they stand up. Generally it is done with only the first hit of the jab, but some characters can do it with the second hit as well. If one attacks too soon after each bounce, or use a move without lock properties, the character will snap to a standing position. | ===[[Jab]] lock=== | ||
The most common type of lock is the '''jab lock''', which can be performed by multiple characters. As the name states, it is done by hitting a fallen character with a [[jab]], stepping forward, and hitting them again. The locked player can be moved to the end of the stage in ''Brawl'', where the active player generally hits them with a charged smash attack as they stand up. Generally, it is done with only the first hit of the jab, but some characters can do it with the second hit as well. If one attacks too soon after each bounce, or use a move without lock properties, the character will snap to a standing position. Some jabs will only lock with certain hitboxes. An example of this is with {{SSBB|Mario}}, where he cannot jab lock with the first hit of his jab if he hits them with the front of his fist, so he must be close to his opponent when he jab locks them. In ''SSB4'', the jab lock only works up to three times. In ''Ultimate'', a jab lock only works up to two times, although a change from previous games is that almost every character in the game is capable of jab locking except for characters with unique jabs such as {{SSBU|Ganondorf}} and {{SSBU|Roy}}. | |||
=== | ===[[Aerial]] move locks=== | ||
Another common move that can lock are aerials, especially the weak hits of [[sex kicks]]. Because of the minimal endlag of the type of kick, these are easily followed up with strong moves. | |||
=== | ===[[Projectile]] lock=== | ||
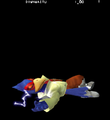
[[File:Laser Lock Falco Brawl.gif|thumb | [[File:Laser Lock Falco Brawl.gif|thumb|250px|{{SSBB|Falco}} performing a laser lock on {{SSBB|Snake}}.]] | ||
A commonly used lock is Falco's laser lock, which, unlike other locks, has enough range to hit and lock characters on level ground with Falco regardless of distance (assuming tournament legal maps). Larger stages like [[Bridge of Eldin]] can cause a character to move far enough away that Falco's lasers cannot reach them. There are many | A commonly used lock is Falco's laser lock, which, unlike other locks, has enough range to hit and lock characters on level ground with Falco regardless of distance (assuming tournament legal maps). Larger stages like [[Bridge of Eldin]] can cause a character to move far enough away that Falco's lasers cannot reach them. There are many follow up options that Falco can use, such as his [[BDACUS]]. The easiest and most effective way to set up a Laser Lock is to land a down throw or grounded down aerial and immediately [[buffer]] the first hit of Falco's jab. Falco cannot always follow up with a KO move because of distance, reducing the effectiveness of the laser lock to damage building only. It should also be noted that the laser lock only works at percentages equal to or exceeding 80% as Falco's moves will not cause a tumbling animation until said percentage. | ||
Not all characters can be laser locked, due to the height of their character model while lying down. For other characters, it is dependent on which way they fall, since the height of the hitbox can change if they fall on their face or on their back. | Not all characters can be laser locked, due to the height of their character model while lying down. For other characters, it is dependent on which way they fall, since the height of the hitbox can change if they fall on their face or on their back. | ||
| Line 26: | Line 33: | ||
Kirby using Falco's lasers will shoot them lower, allowing him to lock more characters than Falco can. | Kirby using Falco's lasers will shoot them lower, allowing him to lock more characters than Falco can. | ||
===Burial lock=== | In ''Ultimate'', Falco's lasers do not travel as far as they do in ''Brawl'', and he can only lock opponents twice with them before they reset due to the altered locking mechanics. | ||
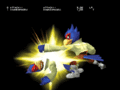
[[File:P-burial_lock.gif|thumb | |||
===[[Buried|Burial]] lock=== | |||
[[File:P-burial_lock.gif|thumb|250px|Two {{SSB4|Donkey Kong}}s performing an infinite lock on {{SSB4|Pac-Man}}]] | |||
Most moves with a burial [[effect]] are able to lock an opponent indefinitely past the three hit limit in ''Smash 4'' (one notable example being {{SSB4|Villager}}'s down smash), giving the possibility of 0-death combos in team battles. It is important to note, however, that a lock cannot be started using a burying move, as the opponent will reset before the lock is able to be continued. Burial moves cannot lock opponents in ''Brawl''. | |||
===[[Throw]] lock=== | |||
Many throws have a hitbox that collaterally damages nearby opponents. With proper positioning and timing, some of these throws are able to lock other opponents. | |||
===Other [[ground]]ed move locks=== | |||
Various [[special moves]], [[tilt]]s, and even weak parts of [[smash attack]]s can lock or reset opponents. | |||
==List of locking attacks== | |||
{{incomplete|lacks Melee moves and Ultimate that can reset and many moves that can lock in rare situations. Also looks bad and needs re-formatted.}} | |||
===In ''[[Brawl]]''=== | |||
{| class=wikitable width=75% | |||
! Character !! Move(s) !! Notes | |||
|- | |||
|rowspan=2|{{SSBB|Bowser}} || Down tilt || The first hit only works at extremely low percents. The second hit works for slightly longer. | |||
|- | |||
| Neutral aerial || | |||
|- | |||
|rowspan=3|{{SSBB|Charizard}} || Neutral attack || Only the front hitbox of the first hit. Works regardless of percent. | |||
|- | |||
| Neutral aerial || | |||
|- | |||
| Back aerial || Sourspot of the second hit. | |||
|- | |||
|rowspan=6|{{SSBB|Donkey Kong}} || Neutral attack || Only certain hitboxes of the first hit and does not work at higher percents | |||
|- | |||
| Forward tilt || | |||
|- | |||
| Down tilt || | |||
|- | |||
| Neutral aerial || | |||
|- | |||
| Back aerial || | |||
|- | |||
| [[Giant Punch]] || Requires to be uncharged to lock. | |||
|- | |||
| rowspan=4|{{SSBB|Diddy Kong}} || Neutral attack || Only locks at a certain part of the first hit's hitbox behind him making it extremely difficult to connect. Works regardless of percent. | |||
|- | |||
| Forward tilt || | |||
|- | |||
| Forward aerial || | |||
|- | |||
| [[Peanut Popgun]] || | |||
= | |- | ||
| rowspan=5|{{SSBB|Fox}} || Neutral aerial || | |||
|- | |||
| Forward tilt || | |||
|- | |||
| Forward smash || | |||
|- | |||
| Up smash || Late hit. | |||
|- | |||
| Back aerial || Sourspot only. | |||
|- | |||
|- | |||
|{{SSBB|Ganondorf}} || Neutral attack || Only the sweetspot, works at extremely low percents and it cannot lock smaller characters due to jab's high hitbox. | |||
|- | |||
|{{SSBB|Ice Climbers}} || [[Ice Shot]] || It is capable of locking infinitely if the Ice Climbers are desynched properly. | |||
|- | |||
|rowspan=7|{{SSBB|Jigglypuff}} || Neutral attack || Both hits can lock. Is not effective at very high damage. | |||
|- | |||
| Forward tilt || | |||
|- | |||
| Forward smash || | |||
|- | |||
| Down smash || | |||
|- | |||
| Neutral aerial || | |||
|- | |||
| Forward aerial || Late hit. | |||
|- | |||
| Back aerial || | |||
|- | |||
|{{SSBB|King Dedede}} || Neutral attack || Only the first hit locks. Works regardless of damage. | |||
= | |- | ||
|rowspan=6|{{SSBB|Kirby}} || Neutral attack || Does not work at very low percents or percents far beyond [[Sudden Death]] percents and only the first hit locks. | |||
|- | |||
| Down tilt || | |||
|- | |||
| Neutral aerial || | |||
|- | |||
| Forward tilt || | |||
|- | |||
| Back aerial || | |||
|- | |||
| [[Inhale]] || Any copy ability that can lock (except for {{SSBB|Link}} [[Hero's Bow]]). | |||
|- | |||
|- | |||
|{{SSBB|Link}} || Neutral attack || Only the first hit locks. Does not work at very high damage. | |||
|- | |||
|{{SSBB|Lucas}} || Down tilt || | |||
|- | |||
|{{SSBB|Luigi}} || Forward tilt || Angled down, can lock indefinitely | |||
|- | |||
|rowspan=6|{{SSBB|Mario}} || Neutral attack || Only the front hitbox of the first hit locks and all three hits can lock at low percents. The first and second hits lock regardless of percent. | |||
|- | |||
| Forward tilt || | |||
|- | |||
| Forward aerial || Only sourspot works. | |||
|- | |||
| Back aerial || | |||
|- | |||
| Neutral aerial || | |||
|- | |||
| [[Fireball]] || | |||
|- | |||
|{{SSBB|Marth}} || Neutral attack || Only a specific part of the hitbox and both hits can lock. Does not work at very high percents. | |||
|- | |||
|rowspan=4|{{SSBB|Meta Knight}} || Neutral attack || Works best against a wall. Only stops working at percents far above 300%. | |||
|- | |||
| Forward tilt || Certain hitboxes of the first hit. | |||
|- | |||
| Down tilt || | |||
|- | |||
| Neutral aerial || | |||
|- | |||
|rowspan=6|{{SSBB|Ness}} || Neutral attack || Only the first hit locks. Does not work at very high percents. | |||
|- | |||
| Forward tilt || | |||
|- | |||
| Neutral aerial || | |||
|- | |||
| Forward aerial || | |||
|- | |||
| Back aerial || | |||
|- | |||
| Down tilt || Locks against a vertical wall only. | |||
|- | |||
|{{SSBB|Olimar}} || Neutral attack || The second hit only works at very low percents. The first hit works regardless of percent. | |||
|- | |||
|rowspan=5|{{SSBB|Peach}} || Neutral attack || Only the second hit. | |||
|- | |||
| Dash attack || Only the first hit. | |||
|- | |||
| Neutral aerial || | |||
|- | |||
| Back aerial || | |||
|- | |||
| Up aerial || Certain hitboxes. | |||
|- | |||
|rowspan=7|{{SSBB|Pikachu}} || Neutral attack || Does not work at low percents. | |||
|- | |||
| Down tilt || | |||
|- | |||
| Neutral aerial || | |||
|- | |||
| Forward tilt || | |||
|- | |||
| Down aerial || | |||
|- | |||
| [[Thunder Jolt]] || | |||
|- | |||
| [[Quick Attack]] || Can be repeated with [[Quick Attack Cancel]], known as [[QAC lock]]. | |||
|- | |||
|rowspan=4|{{SSBB|R.O.B.}} || Neutral attack || Only the front hitbox of the first hit. Does not work at very high percents. | |||
|- | |||
| Forward tilt || | |||
|- | |||
| Forward aerial || | |||
|- | |||
| Down tilt || Effective against a vertical wall only. | |||
|- | |||
|{{SSBB|Samus}} || Neutral attack || The second hit only works at very low percents. The first hit stops working at higher percents. | |||
|- | |||
|rowspan=4|{{SSBB|Sheik}} || Back aerial || | |||
|- | |||
| Neutral aerial || | |||
|- | |||
|[[Needle Storm]] || | |||
|- | |||
| [[Chain]] || | |||
|- | |||
|{{SSBB|Snake}} || Neutral attack || Only certain hitboxes and the first and second hits can lock regardless of percent. | |||
|- | |||
|{{SSBB|Sonic}} || Neutral attack || Both the first and second hits can lock regardless of percent. | |||
|- | |||
|rowspan=5|{{SSBB|Squirtle}} || Neutral attack || Both the first and second hits can lock regardless of percent. | |||
|- | |||
| Forward tilt || | |||
|- | |||
| Forward smash || | |||
|- | |||
| Neutral aerial || | |||
|- | |||
| Back aerial || | |||
|- | |||
|- | |||
|rowspan=3|{{SSBB|Wolf}} || Down tilt || | |||
|- | |||
| Neutral aerial || | |||
|- | |||
| Back aerial || | |||
|- | |||
|rowspan=3|{{SSBB|Yoshi}} || neutral attack || Only the second hit can lock and it stops locking at higher percents. | |||
|- | |||
| Neutral aerial || | |||
|- | |||
| Forward aerial || Only the sourspot is capable of locking. | |||
|- | |||
|{{SSBB|Zelda}} || Neutral attack || The first two hits work regardless of percent but the third hit only works at lower percents. Only works on larger characters due to jab's high hitbox. | |||
|- | |||
|rowspan=5|{{SSBB|Zero Suit Samus}} || Dash attack || | |||
|- | |||
| Forward tilt || | |||
|- | |||
| Forward aerial || First hit. | |||
|- | |||
| Down aerial || Aerial hit. | |||
|- | |||
| [[Paralyser]] || | |||
|} | |||
===In ''[[SSB4]]''=== | |||
Jab Locks are still possible in ''SSB4''. However, in most cases, the opponent can only be hit three times before being freed. Moves that bury opponents are exceptions to this rule as most of them can lock infinitely. Moves that "lock" must hit the opponent within 25 frames of hitting the ground. | |||
{| class=wikitable width=75% | |||
! Character !! Move(s) !! Notes | |||
|- | |||
|rowspan=3|{{SSB4|Bayonetta}} || Down smash || First hit | |||
|- | |||
| Back aerial || | |||
|- | |||
| [[Bullet Climax]] || | |||
|- | |||
|rowspan=6|{{SSB4|Bowser}} || Down tilt || | |||
|- | |||
| Forward smash || Sourspot | |||
|- | |||
| Down aerial || | |||
|- | |||
| Up throw || | |||
|- | |||
| Down throw || | |||
|- | |||
| [[Whirling Fortress]] || Excluding the last hit | |||
|- | |||
|rowspan=7|{{SSB4|Bowser Jr.}} || Neutral attack || | |||
|- | |||
| Forward tilt || | |||
|- | |||
| Neutral aerial || Sourspot | |||
|- | |||
| Back aerial || Sourspot | |||
|- | |||
| Down aerial || Hits 2-6 | |||
|- | |||
| Forward throw || | |||
|- | |||
| Down throw || | |||
|- | |||
|rowspan=6|{{SSB4|Captain Falcon}} || Forward tilt || | |||
|- | |||
| Down smash || Second hit | |||
|- | |||
| Forward aerial || Sourspot | |||
|- | |||
| Back aerial || Sourspot | |||
|- | |||
| Down aerial || | |||
|- | |||
| [[Falcon Punch]] || | |||
|- | |||
|rowspan=4|{{SSB4|Charizard}} || Neutral attack || | |||
|- | |||
| Up smash || Back of the first hit | |||
|- | |||
| Neutral aerial || Sourspot | |||
|- | |||
| Down aerial || Sweetspot | |||
|- | |||
|rowspan=3|{{SSB4|Cloud}} || Forward tilt || | |||
|- | |||
| Back aerial || | |||
|- | |||
| [[Cross Slash]] || Top part | |||
|- | |||
|rowspan=2|{{SSB4|Corrin}} || Neutral attack || Rapid jab back hitbox | |||
|- | |||
| Pummel || | |||
|- | |||
|rowspan=6|{{SSB4|Dark Pit}} || Forward tilt || | |||
|- | |||
| Forward aerial || Last hit | |||
|- | |||
| Up aerial || Hits 1-4 | |||
|- | |||
| Down aerial || Meteor hitbox | |||
|- | |||
| Forward throw || | |||
|- | |||
| Up throw || | |||
|- | |||
|rowspan=4|{{SSB4|Diddy Kong}} || Forward tilt || | |||
|- | |||
| Forward aerial || | |||
|- | |||
| Back aerial || | |||
|- | |||
| Down aerial || | |||
|- | |||
|rowspan=9|{{SSB4|Donkey Kong}} || Neutral attack || | |||
|- | |||
| Forward tilt || | |||
|- | |||
| Down tilt || | |||
|- | |||
| Neutral aerial || Late hit | |||
|- | |||
| Back aerial || | |||
|- | |||
| [[Giant Punch]] || Up to five swings | |||
|- | |||
| [[Headbutt]] || | |||
|- | |||
| [[Spinning Kong]] || Grounded, hits 3-6 | |||
|- | |||
| [[Hand Slap]] || Aerial, second hit | |||
|- | |||
|rowspan=5|{{SSB4|Dr. Mario}} || Neutral attack || Hit 3 | |||
|- | |||
| Forward tilt || | |||
|- | |||
| Neutral aerial || | |||
|- | |||
| Forward aerial || | |||
|- | |||
| [[Megavitamins]] || | |||
|- | |||
|rowspan=4|{{SSB4|Duck Hunt}} || Neutral attack || Rapid jap sourspot | |||
|- | |||
| Forward tilt || | |||
|- | |||
| Neutral aerial || | |||
|- | |||
| Down aerial || First hit, sourspot | |||
|- | |||
|rowspan=9|{{SSB4|Falco}} || Forward tilt || | |||
|- | |||
| Up tilt || Tip of the back hitbox, first hit | |||
|- | |||
| Forward smash || Sourspot | |||
|- | |||
| Forward aerial || First three hits | |||
|- | |||
| Back aerial || | |||
|- | |||
| Down aerial || Sourspot | |||
|- | |||
| [[Blaster]] || | |||
|- | |||
| [[Fire Bird]] || | |||
|- | |||
| [[Reflector]] || | |||
|- | |||
| rowspan=4|{{SSB4|Fox}} || Forward tilt || | |||
|- | |||
| Forward smash || | |||
|- | |||
| Neutral aerial || | |||
|- | |||
| Down aerial || All but the last hit. | |||
|- | |||
|rowspan=5|{{SSB4|Ganondorf}} || Neutral attack || | |||
|- | |||
| Forward aerial || | |||
|- | |||
| Up aerial || Only sourspot. | |||
|- | |||
| Down aerial || | |||
|- | |||
| Neutral aerial || Second hit | |||
|- | |||
|rowspan=3|{{SSB4|Greninja}} || Forward tilt || | |||
|- | |||
| Back aerial || All but the last hit. | |||
|- | |||
| Down aerial || | |||
|- | |||
|rowspan=6|{{SSB4|Ike}} || Forward tilt || | |||
|- | |||
| Down aerial || | |||
|- | |||
| Forward throw || | |||
|- | |||
| Back throw || | |||
|- | |||
| Up throw || | |||
|- | |||
| Down throw || | |||
|- | |||
|rowspan=7|{{SSB4|Jigglypuff}} || Dash attack || | |||
|- | |||
| Forward tilt || | |||
|- | |||
| Forward smash || | |||
|- | |||
| Down smash || | |||
|- | |||
| Neutral aerial || Sweetspot only. | |||
|- | |||
| Forward aerial || | |||
|- | |||
| Down aerial || All but the last hit. | |||
|- | |||
|rowspan=8|{{SSB4|King Dedede}} || Neutral attack || | |||
|- | |||
| Forward tilt || Tip of the hammer, all but the last hit. | |||
|- | |||
| Forward aerial || | |||
|- | |||
| Down aerial || | |||
|- | |||
| Forward throw || | |||
|- | |||
| Back throw || | |||
|- | |||
| [[Gordo Toss]] || Without the Gordo. | |||
|- | |||
| [[Super Dedede Jump]] || | |||
|- | |||
|rowspan=7|{{SSB4|Kirby}} || Forward tilt || | |||
|- | |||
| Down tilt || | |||
|- | |||
| Back aerial || | |||
|- | |||
| Down aerial || Last hit | |||
|- | |||
| Down throw || | |||
|- | |||
| [[Inhale]] || Any copy ability that can lock (except for {{SSBB|Link}} [[Hero's Bow]]). | |||
|- | |||
| [[Stone]] || If aerial, must be sourspotted. | |||
|- | |||
|rowspan=4|{{SSB4|Link}} || Neutral attack || | |||
|- | |||
| Neutral aerial || | |||
|- | |||
| [[Hero's Bow]] || | |||
|- | |||
| [[Spin Attack]] || Grounded, only last hitbox. | |||
|- | |||
|{{SSB4|Little Mac}} || Down Aerial || | |||
|- | |||
|rowspan=3|{{SSB4|Lucario}} || Neutral aerial || | |||
|- | |||
| Back aerial || | |||
|- | |||
| [[Aura Sphere]] || | |||
|- | |||
|rowspan=7|{{SSB4|Lucas}} || Forward tilt || | |||
|- | |||
| Down tilt || Sourspot | |||
|- | |||
| Down smash || Excluding the first hit | |||
|- | |||
| Neutral aerial || Hits 1-4, only while rising through a platform | |||
|- | |||
| Forward aerial || Sourspot | |||
|- | |||
| Back aerial || | |||
|- | |||
| Down aerial || For hits 1-3, sourspot and only while rising through a platform. For hit 4, sweetspot. | |||
|- | |||
|rowspan=2|{{SSB4|Lucina}} || Down aerial || Meteor hitbox | |||
|- | |||
| [[Dolphin Slash]] || Sourspot | |||
|- | |||
|rowspan=8|{{SSB4|Luigi}} || Forward tilt || | |||
|- | |||
| Down tilt || | |||
|- | |||
| Forward aerial || | |||
|- | |||
| Back aerial || | |||
|- | |||
| Down aerial || | |||
|- | |||
| Back throw || | |||
|- | |||
| [[Fireball]] || | |||
|- | |||
| [[Green Missile]] || | |||
|- | |||
|rowspan=7|{{SSBB|Mario}} || Neutral attack || | |||
|- | |||
| Forward tilt || | |||
|- | |||
| Neutral aerial || | |||
|- | |||
| Forward aerial || | |||
|- | |||
| Back aerial || | |||
|- | |||
| Down aerial || Landing hit | |||
|- | |||
| [[Fireball]] || | |||
|- | |||
|rowspan=6|{{SSBB|Marth}} || Dash attack || Untippered | |||
|- | |||
| Forward Tilt || Untippered | |||
|- | |||
| Forward aerial || Untippered | |||
|- | |||
| Down aerial || Meteor hitbox | |||
|- | |||
| [[Shield Breaker]] || Sourspot | |||
|- | |||
| [[Dolphin Slash]] || | |||
|- | |||
|rowspan=8|{{SSB4|Mega Man}} || Neutral attack || | |||
|- | |||
| Forward tilt || | |||
|- | |||
| Forward smash || | |||
|- | |||
| Neutral aerial || Late hit | |||
|- | |||
| Forward aerial || Late hit | |||
|- | |||
| Back aerial || First hit | |||
|- | |||
| Down aerial || | |||
|- | |||
| [[Leaf Shield]] || | |||
|- | |||
|rowspan=4|{{SSB4|Mewtwo}} || Forward tilt || | |||
|- | |||
| Up smash || Directly beneath the opponent, excluding the final hit | |||
|- | |||
| Back aerial || | |||
|- | |||
| [[Shadow Ball]] || | |||
|- | |||
|rowspan=4|{{SSB4|Meta Knight}} || Down tilt || | |||
|- | |||
| Forward aerial || First two hits | |||
|- | |||
| Down throw || | |||
|- | |||
| [[Drill Rush]] || | |||
|- | |||
|rowspan=4|{{SSB4|Mii Brawler}} || Forward tilt || | |||
|- | |||
| Neutral aerial || | |||
|- | |||
| Back aerial || | |||
|- | |||
| [[Head-On Assault]] || | |||
|- | |||
|rowspan=7|{{SSB4|Mii Gunner}} || Forward tilt || | |||
|- | |||
| Up smash || Multi-hit from below | |||
|- | |||
| Back aerial || | |||
|- | |||
| Down aerial || Sourspot | |||
|- | |||
| Back throw || | |||
|- | |||
| [[Charge Blast]] || | |||
|- | |||
| [[Gunner Missile]] || | |||
|- | |||
|rowspan=4|{{SSB4|Mii Swordfighter}} || Forward tilt || | |||
|- | |||
| Back aerial || | |||
|- | |||
| Down aerial || Excluding last hit | |||
|- | |||
| Down throw || | |||
|- | |||
|rowspan=8|{{SSBB|Ness}} || Neutral attack || | |||
|- | |||
| Dash attack || First hit | |||
|- | |||
| Forward tilt || | |||
|- | |||
| Neutral aerial || | |||
|- | |||
| Back aerial || | |||
|- | |||
| Down aerial || | |||
|- | |||
| Down throw || | |||
|- | |||
| [[PK Thunder]] || Tail hitbox | |||
|- | |||
|rowspan=3|{{SSB4|Olimar}} || Neutral attack || | |||
|- | |||
| Neutral aerial || Top of the first hit | |||
|- | |||
| Forward aerial || | |||
|- | |||
|rowspan=9|{{SSB4|Pac-Man}} || Neutral attack || | |||
|- | |||
| Forward tilt || | |||
|- | |||
| Forward smash || Late hit | |||
|- | |||
| Neutral aerial || | |||
|- | |||
| Forward aerial || | |||
|- | |||
| Back aerial || | |||
|- | |||
| Pummel || | |||
|- | |||
| Down throw || | |||
|- | |||
| [[Bonus Fruit]] || Bell, dropped | |||
|- | |||
|rowspan=2|{{SSB4|Palutena}} || Back aerial || | |||
|- | |||
| [[Autoreticle]] || | |||
|- | |||
|rowspan=5|{{SSB4|Peach}} || Neutral attack || Second hit | |||
|- | |||
| Neutral aerial || | |||
|- | |||
| Back aerial || | |||
|- | |||
| Down throw || | |||
|- | |||
| [[Vegetable]] || [[Mr. Saturn]] | |||
|- | |||
|rowspan=8|{{SSB4|Pikachu}} || Neutral attack || | |||
|- | |||
| Forward tilt || | |||
|- | |||
| Down tilt || | |||
|- | |||
| Neutral aerial || Sweetspot | |||
|- | |||
| Forward aerial || Top hitbox | |||
|- | |||
| Down aerial || | |||
|- | |||
| [[Thunder Jolt]] || | |||
|- | |||
| [[Skull Bash]] || | |||
|- | |||
|rowspan=5|{{SSB4|Pit}} || Forward aerial || Last hit | |||
|- | |||
| Up aerial || Hits 1-4 | |||
|- | |||
| Down aerial || Meteor hitbox | |||
|- | |||
| Forward throw || | |||
|- | |||
| Up throw || | |||
|- | |||
|rowspan=6|{{SSB4|R.O.B.}} || Forward tilt || | |||
|- | |||
| Down tilt || | |||
|- | |||
| Forward aerial || | |||
|- | |||
| Up aerial || First 4 hits | |||
|- | |||
| Down aerial || Sourspot | |||
|- | |||
| [[Arm Rotor]] || | |||
|- | |||
|rowspan=4|{{SSB4|Robin}} || [[Levin Sword]] || Thrown | |||
|- | |||
| All tomes || | |||
|- | |||
| [[Thunder (Robin)|Thunder]] || First stage | |||
|- | |||
| [[Elwind]] || First hit, meteor hitbox | |||
|- | |||
|rowspan=4|{{SSB4|Rosalina & Luma}} || Forward tilt || No Luma | |||
|- | |||
| Neutral aerial || No Luma | |||
|- | |||
| Back aerial || Sourspot | |||
|- | |||
| Down aerial || No Luma | |||
|- | |||
|rowspan=4|{{SSB4|Roy}} || Forward tilt || Sourspot | |||
|- | |||
| Forward smash || Sourspot | |||
|- | |||
| Down smash || Sourspot | |||
|- | |||
| Back aerial || | |||
|- | |||
|rowspan=4|{{SSB4|Ryu}} || Neutral aerial || | |||
|- | |||
| Back aerial || | |||
|- | |||
| Pummel || | |||
|- | |||
| [[Hadoken]] || Standard or input | |||
|- | |||
|rowspan=10|{{SSB4|Samus}} || Neutral attack || | |||
|- | |||
| Forward tilt || | |||
|- | |||
| Up tilt || | |||
|- | |||
| Forward smash || Sourspot | |||
|- | |||
| Forward aerial || Top of the first hit | |||
|- | |||
| Up aerial || Tip of the first hit | |||
|- | |||
| Back aerial || Sourspot | |||
|- | |||
| Down aerial || | |||
|- | |||
| [[Homing Missile]] || | |||
|- | |||
| [[Bomb (Samus)|Bomb]] || | |||
|- | |||
|rowspan=6|{{SSB4|Sheik}} || Dash attack || Late | |||
|- | |||
| Up tilt || First hit | |||
|- | |||
| Neutral aerial || | |||
|- | |||
| Back aerial || | |||
|- | |||
| Down aerial || | |||
|- | |||
| [[Bouncing Fish]] || | |||
|- | |||
|rowspan=5|{{SSB4|Sonic}} || Neutral attack || | |||
|- | |||
| Dash attack || First three hits | |||
|- | |||
| Down tilt || | |||
|- | |||
| Forward aerial || Excluding the last hit | |||
|- | |||
| [[Spring Jump]] || Projectile | |||
|- | |||
|rowspan=9|{{SSB4|Shulk}} || Forward tilt || Sourspot if not in Buster | |||
|- | |||
| Forward aerial || Buster | |||
|- | |||
| Back aerial || Sourspot if not in Buster | |||
|- | |||
| Down aerial || Buster, second hit | |||
|- | |||
| Forward throw || | |||
|- | |||
| Back throw || | |||
|- | |||
| Up throw || | |||
|- | |||
| Down throw || | |||
|- | |||
| [[Back Slash]] || | |||
|- | |||
|rowspan=6|{{SSB4|Toon Link}} || Forward tilt || | |||
|- | |||
| Down tilt || | |||
|- | |||
| Neutral aerial || | |||
|- | |||
| Down aerial || | |||
|- | |||
| [[Hero's Bow]] || | |||
|- | |||
| [[Spin Attack]] || Grounded, excluding the last hit | |||
|- | |||
|rowspan=6|{{SSB4|Villager}} || Forward tilt || | |||
|- | |||
| Down smash || | |||
|- | |||
| Neutral aerial || | |||
|- | |||
| Forward aerial || Sourspot | |||
|- | |||
| Back aerial || Sourspot | |||
|- | |||
| Down aerial || 3 turnips | |||
|- | |||
|rowspan=6|{{SSB4|Wario}} || Dash attack || Late | |||
|- | |||
| Forward tilt || | |||
|- | |||
| Forward aerial || | |||
|- | |||
| Back aerial || | |||
|- | |||
| Down throw || | |||
|- | |||
| [[Wario Bike]] || Thrown | |||
|- | |||
|rowspan=5|{{SSB4|Wii Fit Trainer}} || Neutral attack || Hit 3 | |||
|- | |||
| Forward aerial || Meteor hitbox | |||
|- | |||
| Back aerial || | |||
|- | |||
| [[Header]] || Meteor hitbox | |||
|- | |||
| [[Super Hoop]] || | |||
|- | |||
|rowspan=3|{{SSB4|Yoshi}} || Neutral aerial || Sourspot | |||
|- | |||
| Forward aerial || | |||
|- | |||
| Down aerial || Excluding the last hit | |||
|- | |||
|rowspan=5|{{SSB4|Zelda}} || Neutral attack || First and third hit | |||
|- | |||
| Forward aerial || Sourspot | |||
|- | |||
| Back aerial || Sourspot | |||
|- | |||
| Down aerial || | |||
|- | |||
| [[Phantom Slash]] || Stages one and two | |||
|- | |||
|rowspan=3|{{SSB4|Zero Suit Samus}} || Forward tilt || | |||
|- | |||
| Down throw || | |||
|- | |||
| [[Paralyzer]] || | |||
|} | |||
==Videos== | ==Videos== | ||
*[https://www.youtube.com/watch?v=_ZJx5F0kTms Jab Lock Tutorial SSB4 (My Smash Corner)] | |||
*[https://www.youtube.com/watch?v=S7hhbvdH5go Every Character's Jablock Showcase] | |||
*[http://www.youtube.com/watch?v=wIP7QY0anuw The jab lock] | *[http://www.youtube.com/watch?v=wIP7QY0anuw The jab lock] | ||
*[http://www.youtube.com/watch?v=hwaa_Lt9sqQ Falco's laser lock] | *[http://www.youtube.com/watch?v=hwaa_Lt9sqQ Falco's laser lock] | ||
| Line 147: | Line 960: | ||
*[https://gfycat.com/EvergreenWatchfulAstarte Falcon punch lock in Smash 4 on Bowser] | *[https://gfycat.com/EvergreenWatchfulAstarte Falcon punch lock in Smash 4 on Bowser] | ||
== | ==Gallery== | ||
<gallery> | |||
File:DownBoundU_Falco.gif|Falco's first animation during which he can be jab reset. | |||
File:DownWaitU_Falco.png|Falco's second animation during which he can be jab reset. | |||
File:DownStandU_Falco.gif|Falco's neutral get-up animation that is forced in a jab reset. | |||
File:DownDamageU_Falco_jab_on_Falco_SDI_up_to_shine.gif|Using SDI and ASDI upwards to escape a jab reset. This looks notably similar to locking. | |||
</gallery> | |||
==References== | |||
{{reflist}} | |||
[[Category:Techniques (SSBM)]] | |||
[[Category:Techniques (SSBB)]] | [[Category:Techniques (SSBB)]] | ||
[[Category:Techniques (SSB4)]] | [[Category:Techniques (SSB4)]] | ||
[[Category:Advanced | [[Category:Techniques (SSBU)]] | ||
[[Category:Advanced techniques]] | |||
Latest revision as of 00:45, April 12, 2024


- "Lock" redirects here. For the Italian smasher, see Smasher:Lock.
A lock is a technique in Super Smash Bros. Brawl, Super Smash Bros. 4, and Super Smash Bros. Ultimate where a character can use low knockback attacks to combo an opponent on the floor that is "prone"; aka "lying down". An animation of the victim briefly bouncing off the ground signifies a lock. Some moves that lock are fast enough to be repeated, while others cannot be repeated fast enough to keep the opponent in the locked position, or have knockback scaling that causes the opponent to be launched at higher percents. Some moves will move a character across the stage farther than others, causing less damage buildup overall.
The reset was first introduced in Super Smash Bros. Melee, and was then incorporated into the locking mechanic as the only wake-up option that can be used afterwards, allowing for a punish as the opponent stands up. The character will stand up in an identical animation of a standard neutral get-up, with intangibility frames at the beginning.
Trying to perform a lock in Melee merely results in a reset, which the opponent can avoid altogether with ASDI. In Brawl, a reset can occur only after locking has ceased, which can result in zero-to-death combos. In Smash 4, it functions in the same way, but locking can now only be performed a maximum of three times before an automatic reset occurs[1] (except in rare circumstances, see below). In Ultimate, this has been reduced to two times before an automatic reset; additionally, the reset no longer forces the opponent to use a neutral get-up (effectively resulting in a tech-chase). This can be considered a blend of the former locking and reset mechanics, respectively.
Percentages, weight, and angles are the most noteworthy properties in determining if a move will successfully lock or reset. Some moves only do so in very specific circumstances, while others almost always do. The listings below do not take any of these parameters into account, and only extremely character-specific or unwieldy locks are not to be listed. In every Smash game, including Smash 64, an instant getup with a grounded flinch will occur in any low-knockback situation a lock or reset cannot.
How to perform[edit]

Starting a lock or reset is often the most difficult part, as many skilled players will tech or DI away before hitting the ground, and will also get up as soon as possible to avoid it. Surprise or fast attacks causing a character to fall quickly on the ground can work, as well as taking advantage of various situations in which a tech cannot be performed. For example, in Brawl and SSB4, footstooling an airborne opponent will prevent them from being able to tech in any way while in tumble, though the upward momentum can cause the footstooler to be unable to follow up with a lock depending on their character. Learning to perform a shorthop footstool aides in this. For some characters, it is possible to fast fall an aerial with lock properties to cause a single bounce, then follow up with a jab lock or reset.
Types of locks[edit]

Jab lock[edit]
The most common type of lock is the jab lock, which can be performed by multiple characters. As the name states, it is done by hitting a fallen character with a jab, stepping forward, and hitting them again. The locked player can be moved to the end of the stage in Brawl, where the active player generally hits them with a charged smash attack as they stand up. Generally, it is done with only the first hit of the jab, but some characters can do it with the second hit as well. If one attacks too soon after each bounce, or use a move without lock properties, the character will snap to a standing position. Some jabs will only lock with certain hitboxes. An example of this is with Mario, where he cannot jab lock with the first hit of his jab if he hits them with the front of his fist, so he must be close to his opponent when he jab locks them. In SSB4, the jab lock only works up to three times. In Ultimate, a jab lock only works up to two times, although a change from previous games is that almost every character in the game is capable of jab locking except for characters with unique jabs such as Ganondorf and Roy.
Aerial move locks[edit]
Another common move that can lock are aerials, especially the weak hits of sex kicks. Because of the minimal endlag of the type of kick, these are easily followed up with strong moves.
Projectile lock[edit]

A commonly used lock is Falco's laser lock, which, unlike other locks, has enough range to hit and lock characters on level ground with Falco regardless of distance (assuming tournament legal maps). Larger stages like Bridge of Eldin can cause a character to move far enough away that Falco's lasers cannot reach them. There are many follow up options that Falco can use, such as his BDACUS. The easiest and most effective way to set up a Laser Lock is to land a down throw or grounded down aerial and immediately buffer the first hit of Falco's jab. Falco cannot always follow up with a KO move because of distance, reducing the effectiveness of the laser lock to damage building only. It should also be noted that the laser lock only works at percentages equal to or exceeding 80% as Falco's moves will not cause a tumbling animation until said percentage.
Not all characters can be laser locked, due to the height of their character model while lying down. For other characters, it is dependent on which way they fall, since the height of the hitbox can change if they fall on their face or on their back.
Kirby using Falco's lasers will shoot them lower, allowing him to lock more characters than Falco can.
In Ultimate, Falco's lasers do not travel as far as they do in Brawl, and he can only lock opponents twice with them before they reset due to the altered locking mechanics.
Burial lock[edit]

Most moves with a burial effect are able to lock an opponent indefinitely past the three hit limit in Smash 4 (one notable example being Villager's down smash), giving the possibility of 0-death combos in team battles. It is important to note, however, that a lock cannot be started using a burying move, as the opponent will reset before the lock is able to be continued. Burial moves cannot lock opponents in Brawl.
Throw lock[edit]
Many throws have a hitbox that collaterally damages nearby opponents. With proper positioning and timing, some of these throws are able to lock other opponents.
Other grounded move locks[edit]
Various special moves, tilts, and even weak parts of smash attacks can lock or reset opponents.
List of locking attacks[edit]

In Brawl[edit]
| Character | Move(s) | Notes |
|---|---|---|
| Bowser | Down tilt | The first hit only works at extremely low percents. The second hit works for slightly longer. |
| Neutral aerial | ||
| Charizard | Neutral attack | Only the front hitbox of the first hit. Works regardless of percent. |
| Neutral aerial | ||
| Back aerial | Sourspot of the second hit. | |
| Donkey Kong | Neutral attack | Only certain hitboxes of the first hit and does not work at higher percents |
| Forward tilt | ||
| Down tilt | ||
| Neutral aerial | ||
| Back aerial | ||
| Giant Punch | Requires to be uncharged to lock. | |
| Diddy Kong | Neutral attack | Only locks at a certain part of the first hit's hitbox behind him making it extremely difficult to connect. Works regardless of percent. |
| Forward tilt | ||
| Forward aerial | ||
| Peanut Popgun | ||
| Fox | Neutral aerial | |
| Forward tilt | ||
| Forward smash | ||
| Up smash | Late hit. | |
| Back aerial | Sourspot only. | |
| Ganondorf | Neutral attack | Only the sweetspot, works at extremely low percents and it cannot lock smaller characters due to jab's high hitbox. |
| Ice Climbers | Ice Shot | It is capable of locking infinitely if the Ice Climbers are desynched properly. |
| Jigglypuff | Neutral attack | Both hits can lock. Is not effective at very high damage. |
| Forward tilt | ||
| Forward smash | ||
| Down smash | ||
| Neutral aerial | ||
| Forward aerial | Late hit. | |
| Back aerial | ||
| King Dedede | Neutral attack | Only the first hit locks. Works regardless of damage. |
| Kirby | Neutral attack | Does not work at very low percents or percents far beyond Sudden Death percents and only the first hit locks. |
| Down tilt | ||
| Neutral aerial | ||
| Forward tilt | ||
| Back aerial | ||
| Inhale | Any copy ability that can lock (except for Link Hero's Bow). | |
| Link | Neutral attack | Only the first hit locks. Does not work at very high damage. |
| Lucas | Down tilt | |
| Luigi | Forward tilt | Angled down, can lock indefinitely |
| Mario | Neutral attack | Only the front hitbox of the first hit locks and all three hits can lock at low percents. The first and second hits lock regardless of percent. |
| Forward tilt | ||
| Forward aerial | Only sourspot works. | |
| Back aerial | ||
| Neutral aerial | ||
| Fireball | ||
| Marth | Neutral attack | Only a specific part of the hitbox and both hits can lock. Does not work at very high percents. |
| Meta Knight | Neutral attack | Works best against a wall. Only stops working at percents far above 300%. |
| Forward tilt | Certain hitboxes of the first hit. | |
| Down tilt | ||
| Neutral aerial | ||
| Ness | Neutral attack | Only the first hit locks. Does not work at very high percents. |
| Forward tilt | ||
| Neutral aerial | ||
| Forward aerial | ||
| Back aerial | ||
| Down tilt | Locks against a vertical wall only. | |
| Olimar | Neutral attack | The second hit only works at very low percents. The first hit works regardless of percent. |
| Peach | Neutral attack | Only the second hit. |
| Dash attack | Only the first hit. | |
| Neutral aerial | ||
| Back aerial | ||
| Up aerial | Certain hitboxes. | |
| Pikachu | Neutral attack | Does not work at low percents. |
| Down tilt | ||
| Neutral aerial | ||
| Forward tilt | ||
| Down aerial | ||
| Thunder Jolt | ||
| Quick Attack | Can be repeated with Quick Attack Cancel, known as QAC lock. | |
| R.O.B. | Neutral attack | Only the front hitbox of the first hit. Does not work at very high percents. |
| Forward tilt | ||
| Forward aerial | ||
| Down tilt | Effective against a vertical wall only. | |
| Samus | Neutral attack | The second hit only works at very low percents. The first hit stops working at higher percents. |
| Sheik | Back aerial | |
| Neutral aerial | ||
| Needle Storm | ||
| Chain | ||
| Snake | Neutral attack | Only certain hitboxes and the first and second hits can lock regardless of percent. |
| Sonic | Neutral attack | Both the first and second hits can lock regardless of percent. |
| Squirtle | Neutral attack | Both the first and second hits can lock regardless of percent. |
| Forward tilt | ||
| Forward smash | ||
| Neutral aerial | ||
| Back aerial | ||
| Wolf | Down tilt | |
| Neutral aerial | ||
| Back aerial | ||
| Yoshi | neutral attack | Only the second hit can lock and it stops locking at higher percents. |
| Neutral aerial | ||
| Forward aerial | Only the sourspot is capable of locking. | |
| Zelda | Neutral attack | The first two hits work regardless of percent but the third hit only works at lower percents. Only works on larger characters due to jab's high hitbox. |
| Zero Suit Samus | Dash attack | |
| Forward tilt | ||
| Forward aerial | First hit. | |
| Down aerial | Aerial hit. | |
| Paralyser |
In SSB4[edit]
Jab Locks are still possible in SSB4. However, in most cases, the opponent can only be hit three times before being freed. Moves that bury opponents are exceptions to this rule as most of them can lock infinitely. Moves that "lock" must hit the opponent within 25 frames of hitting the ground.
| Character | Move(s) | Notes |
|---|---|---|
| Bayonetta | Down smash | First hit |
| Back aerial | ||
| Bullet Climax | ||
| Bowser | Down tilt | |
| Forward smash | Sourspot | |
| Down aerial | ||
| Up throw | ||
| Down throw | ||
| Whirling Fortress | Excluding the last hit | |
| Bowser Jr. | Neutral attack | |
| Forward tilt | ||
| Neutral aerial | Sourspot | |
| Back aerial | Sourspot | |
| Down aerial | Hits 2-6 | |
| Forward throw | ||
| Down throw | ||
| Captain Falcon | Forward tilt | |
| Down smash | Second hit | |
| Forward aerial | Sourspot | |
| Back aerial | Sourspot | |
| Down aerial | ||
| Falcon Punch | ||
| Charizard | Neutral attack | |
| Up smash | Back of the first hit | |
| Neutral aerial | Sourspot | |
| Down aerial | Sweetspot | |
| Cloud | Forward tilt | |
| Back aerial | ||
| Cross Slash | Top part | |
| Corrin | Neutral attack | Rapid jab back hitbox |
| Pummel | ||
| Dark Pit | Forward tilt | |
| Forward aerial | Last hit | |
| Up aerial | Hits 1-4 | |
| Down aerial | Meteor hitbox | |
| Forward throw | ||
| Up throw | ||
| Diddy Kong | Forward tilt | |
| Forward aerial | ||
| Back aerial | ||
| Down aerial | ||
| Donkey Kong | Neutral attack | |
| Forward tilt | ||
| Down tilt | ||
| Neutral aerial | Late hit | |
| Back aerial | ||
| Giant Punch | Up to five swings | |
| Headbutt | ||
| Spinning Kong | Grounded, hits 3-6 | |
| Hand Slap | Aerial, second hit | |
| Dr. Mario | Neutral attack | Hit 3 |
| Forward tilt | ||
| Neutral aerial | ||
| Forward aerial | ||
| Megavitamins | ||
| Duck Hunt | Neutral attack | Rapid jap sourspot |
| Forward tilt | ||
| Neutral aerial | ||
| Down aerial | First hit, sourspot | |
| Falco | Forward tilt | |
| Up tilt | Tip of the back hitbox, first hit | |
| Forward smash | Sourspot | |
| Forward aerial | First three hits | |
| Back aerial | ||
| Down aerial | Sourspot | |
| Blaster | ||
| Fire Bird | ||
| Reflector | ||
| Fox | Forward tilt | |
| Forward smash | ||
| Neutral aerial | ||
| Down aerial | All but the last hit. | |
| Ganondorf | Neutral attack | |
| Forward aerial | ||
| Up aerial | Only sourspot. | |
| Down aerial | ||
| Neutral aerial | Second hit | |
| Greninja | Forward tilt | |
| Back aerial | All but the last hit. | |
| Down aerial | ||
| Ike | Forward tilt | |
| Down aerial | ||
| Forward throw | ||
| Back throw | ||
| Up throw | ||
| Down throw | ||
| Jigglypuff | Dash attack | |
| Forward tilt | ||
| Forward smash | ||
| Down smash | ||
| Neutral aerial | Sweetspot only. | |
| Forward aerial | ||
| Down aerial | All but the last hit. | |
| King Dedede | Neutral attack | |
| Forward tilt | Tip of the hammer, all but the last hit. | |
| Forward aerial | ||
| Down aerial | ||
| Forward throw | ||
| Back throw | ||
| Gordo Toss | Without the Gordo. | |
| Super Dedede Jump | ||
| Kirby | Forward tilt | |
| Down tilt | ||
| Back aerial | ||
| Down aerial | Last hit | |
| Down throw | ||
| Inhale | Any copy ability that can lock (except for Link Hero's Bow). | |
| Stone | If aerial, must be sourspotted. | |
| Link | Neutral attack | |
| Neutral aerial | ||
| Hero's Bow | ||
| Spin Attack | Grounded, only last hitbox. | |
| Little Mac | Down Aerial | |
| Lucario | Neutral aerial | |
| Back aerial | ||
| Aura Sphere | ||
| Lucas | Forward tilt | |
| Down tilt | Sourspot | |
| Down smash | Excluding the first hit | |
| Neutral aerial | Hits 1-4, only while rising through a platform | |
| Forward aerial | Sourspot | |
| Back aerial | ||
| Down aerial | For hits 1-3, sourspot and only while rising through a platform. For hit 4, sweetspot. | |
| Lucina | Down aerial | Meteor hitbox |
| Dolphin Slash | Sourspot | |
| Luigi | Forward tilt | |
| Down tilt | ||
| Forward aerial | ||
| Back aerial | ||
| Down aerial | ||
| Back throw | ||
| Fireball | ||
| Green Missile | ||
| Mario | Neutral attack | |
| Forward tilt | ||
| Neutral aerial | ||
| Forward aerial | ||
| Back aerial | ||
| Down aerial | Landing hit | |
| Fireball | ||
| Marth | Dash attack | Untippered |
| Forward Tilt | Untippered | |
| Forward aerial | Untippered | |
| Down aerial | Meteor hitbox | |
| Shield Breaker | Sourspot | |
| Dolphin Slash | ||
| Mega Man | Neutral attack | |
| Forward tilt | ||
| Forward smash | ||
| Neutral aerial | Late hit | |
| Forward aerial | Late hit | |
| Back aerial | First hit | |
| Down aerial | ||
| Leaf Shield | ||
| Mewtwo | Forward tilt | |
| Up smash | Directly beneath the opponent, excluding the final hit | |
| Back aerial | ||
| Shadow Ball | ||
| Meta Knight | Down tilt | |
| Forward aerial | First two hits | |
| Down throw | ||
| Drill Rush | ||
| Mii Brawler | Forward tilt | |
| Neutral aerial | ||
| Back aerial | ||
| Head-On Assault | ||
| Mii Gunner | Forward tilt | |
| Up smash | Multi-hit from below | |
| Back aerial | ||
| Down aerial | Sourspot | |
| Back throw | ||
| Charge Blast | ||
| Gunner Missile | ||
| Mii Swordfighter | Forward tilt | |
| Back aerial | ||
| Down aerial | Excluding last hit | |
| Down throw | ||
| Ness | Neutral attack | |
| Dash attack | First hit | |
| Forward tilt | ||
| Neutral aerial | ||
| Back aerial | ||
| Down aerial | ||
| Down throw | ||
| PK Thunder | Tail hitbox | |
| Olimar | Neutral attack | |
| Neutral aerial | Top of the first hit | |
| Forward aerial | ||
| Pac-Man | Neutral attack | |
| Forward tilt | ||
| Forward smash | Late hit | |
| Neutral aerial | ||
| Forward aerial | ||
| Back aerial | ||
| Pummel | ||
| Down throw | ||
| Bonus Fruit | Bell, dropped | |
| Palutena | Back aerial | |
| Autoreticle | ||
| Peach | Neutral attack | Second hit |
| Neutral aerial | ||
| Back aerial | ||
| Down throw | ||
| Vegetable | Mr. Saturn | |
| Pikachu | Neutral attack | |
| Forward tilt | ||
| Down tilt | ||
| Neutral aerial | Sweetspot | |
| Forward aerial | Top hitbox | |
| Down aerial | ||
| Thunder Jolt | ||
| Skull Bash | ||
| Pit | Forward aerial | Last hit |
| Up aerial | Hits 1-4 | |
| Down aerial | Meteor hitbox | |
| Forward throw | ||
| Up throw | ||
| R.O.B. | Forward tilt | |
| Down tilt | ||
| Forward aerial | ||
| Up aerial | First 4 hits | |
| Down aerial | Sourspot | |
| Arm Rotor | ||
| Robin | Levin Sword | Thrown |
| All tomes | ||
| Thunder | First stage | |
| Elwind | First hit, meteor hitbox | |
| Rosalina & Luma | Forward tilt | No Luma |
| Neutral aerial | No Luma | |
| Back aerial | Sourspot | |
| Down aerial | No Luma | |
| Roy | Forward tilt | Sourspot |
| Forward smash | Sourspot | |
| Down smash | Sourspot | |
| Back aerial | ||
| Ryu | Neutral aerial | |
| Back aerial | ||
| Pummel | ||
| Hadoken | Standard or input | |
| Samus | Neutral attack | |
| Forward tilt | ||
| Up tilt | ||
| Forward smash | Sourspot | |
| Forward aerial | Top of the first hit | |
| Up aerial | Tip of the first hit | |
| Back aerial | Sourspot | |
| Down aerial | ||
| Homing Missile | ||
| Bomb | ||
| Sheik | Dash attack | Late |
| Up tilt | First hit | |
| Neutral aerial | ||
| Back aerial | ||
| Down aerial | ||
| Bouncing Fish | ||
| Sonic | Neutral attack | |
| Dash attack | First three hits | |
| Down tilt | ||
| Forward aerial | Excluding the last hit | |
| Spring Jump | Projectile | |
| Shulk | Forward tilt | Sourspot if not in Buster |
| Forward aerial | Buster | |
| Back aerial | Sourspot if not in Buster | |
| Down aerial | Buster, second hit | |
| Forward throw | ||
| Back throw | ||
| Up throw | ||
| Down throw | ||
| Back Slash | ||
| Toon Link | Forward tilt | |
| Down tilt | ||
| Neutral aerial | ||
| Down aerial | ||
| Hero's Bow | ||
| Spin Attack | Grounded, excluding the last hit | |
| Villager | Forward tilt | |
| Down smash | ||
| Neutral aerial | ||
| Forward aerial | Sourspot | |
| Back aerial | Sourspot | |
| Down aerial | 3 turnips | |
| Wario | Dash attack | Late |
| Forward tilt | ||
| Forward aerial | ||
| Back aerial | ||
| Down throw | ||
| Wario Bike | Thrown | |
| Wii Fit Trainer | Neutral attack | Hit 3 |
| Forward aerial | Meteor hitbox | |
| Back aerial | ||
| Header | Meteor hitbox | |
| Super Hoop | ||
| Yoshi | Neutral aerial | Sourspot |
| Forward aerial | ||
| Down aerial | Excluding the last hit | |
| Zelda | Neutral attack | First and third hit |
| Forward aerial | Sourspot | |
| Back aerial | Sourspot | |
| Down aerial | ||
| Phantom Slash | Stages one and two | |
| Zero Suit Samus | Forward tilt | |
| Down throw | ||
| Paralyzer |
Videos[edit]
- Jab Lock Tutorial SSB4 (My Smash Corner)
- Every Character's Jablock Showcase
- The jab lock
- Falco's laser lock
- Demonstration of several characters performing locks
- Peach's floating aerial locks
- Jiggylpuff's double jab lock, with footstool setup
- Marth's jab lock
- Lucas's down tilt lock
- Pikachu's QAC lock followed with a jab lock
- Pikachu Jab Lock set-ups in Smash 4, courtesy of ESAM
- Falcon punch lock in Smash 4 on Bowser
Gallery[edit]
Falco's first animation during which he can be jab reset.
Falco's second animation during which he can be jab reset.
Falco's neutral get-up animation that is forced in a jab reset.
Using SDI and ASDI upwards to escape a jab reset. This looks notably similar to locking.


