Up throw: Difference between revisions
m (Undid edit by 152.172.56.68: Pokémon are "it" to be in line with how the series does it) Tags: Undo Mobile edit Advanced mobile edit |
|||
| (46 intermediate revisions by 32 users not shown) | |||
| Line 1: | Line 1: | ||
{{ArticleIcons|melee=y|brawl=y|ssb4=y|ultimate=y}} | {{ArticleIcons|melee=y|brawl=y|ssb4=y|ultimate=y}} | ||
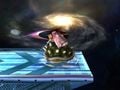
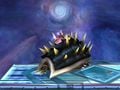
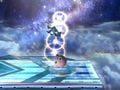
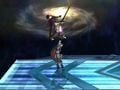
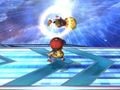
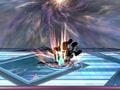
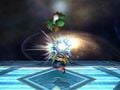
[[File:SSBU Up Throw ROB.gif|thumb|250px|{{SSBU|R.O.B.}} using his up throw against {{SSBU|Sonic}} in ''Ultimate''.]] | |||
[[File: | An '''up throw''' ({{ja|上投げ|Ue nage}}, ''Up/above/upper throw''; commonly abbreviated as '''u-throw''' or '''Uthrow''', and referred to as '''ThrowHi''' internally) is a [[throw]] performed by tilting the [[control stick]] up after [[grab]]bing an opponent. They were introduced in ''[[Super Smash Bros. Melee]]''; in the original ''[[Super Smash Bros.]]'', there were only [[forward throw]]s and [[back throw]]s. In the transition to ''Melee'', {{SSB|Kirby}} and {{SSB|Jigglypuff}}'s previous forward throws became their up throws, and they instead received new forward throws. | ||
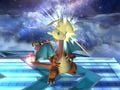
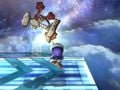
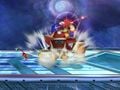
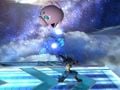
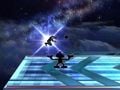
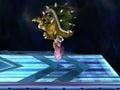
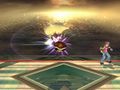
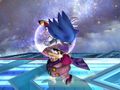
An '''up throw''' ({{ja|上投げ|Ue nage}}, ''Up/above/upper throw''; commonly abbreviated as ''' | [[File:UpThrow Ness Melee.png|thumb|150px|{{SSBM|Ness}} using his up throw against {{SSBM|Zelda}} in ''Melee''.]] | ||
Due to their predominantly vertical knockback and generally moderate ending lag, up throws tend to be useful for starting [[combo]]s and [[chain grab]]s, especially in ''Melee''. Some also deal high enough knockback to KO opponents reliably, with a notable example being {{SSBM|Mewtwo}}'s up throw. From ''[[Super Smash Bros. Brawl]]'' onward, the changes to vertical [[knockback]] and the addition of [[hitstun canceling]] have indirectly reduced their effectiveness; for a handful of characters, their up throw is their least useful throw, as it can neither start combos as effectively as their [[down throw]] (with some of them lacking any guaranteed followups), nor KO as reliably as their forward or back throw. However, some characters' up throws remain an important part of their kit, such as [[R.O.B.]]'s, {{SSB4|Bowser}}'s in ''Smash 4'', and [[Diddy Kong]]'s in ''Smash 4'' and ''Ultimate''. | |||
Up throws | ==List of up throws== | ||
Up throws with hitboxes consist of two or more hits on the grabbed opponent (the hitbox, then the throw), and can affect other opponents near the thrower. Additionally, some up throws may possess a '''collateral hitbox''', which affects nearby opponents but not the victim of the throw. | |||
{| class="wikitable" | |||
{|class="wikitable | |||
|- | |- | ||
! Character !! Description !! Hitbox | |||
|- | |- | ||
| | |[[Banjo]] & [[Kazooie]]||Banjo throws the opponent to Kazooie, who stabs the opponent upwards with her beak.||{{n|16}} | ||
|- | |- | ||
| | |[[Bayonetta]]||Launches the opponent with a crescent kick.||{{y|16}} | ||
|- | |- | ||
| | |[[Bowser]]||Grinds the opponent above himself with the spikes on his shell.||{{y|16}} | ||
|- | |- | ||
| | |[[Bowser Jr.]]||Heaves the opponent upward with the [[Koopa Clown Car]]'s claw.||{{n|16}} | ||
|- | |- | ||
| | |[[Byleth]]||Launches the opponent upwards with the Sword of the Creator.||{{y|16}} | ||
|- | |- | ||
| | |[[Captain Falcon]]||Uppercuts the opponent.||{{y|16}} | ||
|- | |- | ||
|{{SSBB| | |[[Charizard]]||{{GameIcon|SSBB}} Headbutts the opponent above itself.<br/>{{GameIcon|SSB4}}{{GameIcon|SSBU}} Flies with the opponent to the top of the stage offscreen, then dives back down and slams them onto the ground.||{{y|16}} | ||
|- | |- | ||
|{{ | |[[Chrom]]||Heaves the opponent upward with one arm.||{{n|16}} | ||
|- | |- | ||
|{{ | |[[Cloud]]||Performs a {{s|wikipedia|540 kick}}, hitting the opponent twice above himself before launching them.||{{y|16}} | ||
|- | |- | ||
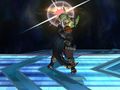
| | |[[Corrin]]||Turns into dragon form and raises on his hind legs to headbutt the opponent upward.||{{y|16}} | ||
|- | |- | ||
| | |[[Daisy]]||Performs a jump [[Wikipedia:Volleyball#Set|set]], a volleyball technique.||{{y|16}} | ||
|- | |- | ||
| | |[[Dark Pit]]||Performs a handstand and kicks the opponent upward with both legs.||{{y|16}} | ||
|- | |- | ||
| | |[[Dark Samus]]||Blasts the opponent above herself with electricity from her Arm Cannon.||{{y|16}} | ||
|- | |- | ||
| | |[[Diddy Kong]]||Performs a handstand and kicks the opponent upward with one leg.||{{y|16}} | ||
|- | |- | ||
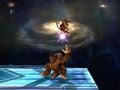
| | |[[Donkey Kong]]||Heaves the opponent upward with one arm.||{{n|16}} | ||
|- | |- | ||
| | |[[Dr. Mario]]||Heaves the opponent upward with both arms.||{{n|16}} | ||
|- | |- | ||
| | |[[Duck Hunt]]||The dog kicks the opponent upward with its hind legs.||{{n|16}} | ||
|- | |- | ||
|{{SSBB| | |[[Falco]]||{{GameIcon|SSBM}}{{GameIcon|SSBB}} Tosses the opponent upward and fires three rapid shots from his Blaster.<br/>{{GameIcon|SSB4}}{{GameIcon|SSBU}} Tosses the opponent upward and fires one shot from his Blaster.||{{y|16}} | ||
|- | |- | ||
| | |[[Fox]]||Tosses the opponent upward and fires three rapid shots from his Blaster.||{{y|16}} | ||
|- | |- | ||
|{{SSBB| | |[[Ganondorf]]||{{GameIcon|SSBM}} Uppercuts the opponent.<br/>{{GameIcon|SSBB}}{{GameIcon|SSB4}}{{GameIcon|SSBU}} Lifts the opponent above himself and strikes them with his free palm.||{{y|16}} | ||
|- | |- | ||
| | |[[Greninja]]||Heaves the opponent upward with one arm.||{{n|16}} | ||
|- | |- | ||
| | |[[Hero]]||Heaves the opponent upward with both arms.||{{n|16}} | ||
|- | |- | ||
| | |[[Ice Climbers]]||Bashes the opponent above themselves with the tip of the hammer.||{{y|16}} | ||
|- | |- | ||
| | |[[Ike]]||Plunges Ragnell on the ground and launches the opponent with a [[Wikipedia:Professional wrestling attacks#Double axe handle|double axe handle]] swing.||{{y|16}} | ||
|- | |- | ||
| | |[[Incineroar]]||Performs an {{s|wikipedia|Argentine backbreaker rack}}.||{{n|16}} | ||
|- | |- | ||
| | |[[Inkling]]||Turns into squid form and headbutts the opponent upward.||{{y|16}} | ||
|- | |- | ||
|{{ | |[[Isabelle]]||Tosses the opponent upward with her net.||{{n|16}} | ||
|- | |- | ||
|{{SSBB| | |[[Ivysaur]]||Bounces the opponent upward with the bud on its back.||{{GameIcon|SSBB}} {{n|16}}<br/>{{GameIcon|SSBU}} {{y|16}} | ||
|- | |- | ||
| | |[[Jigglypuff]]||Spins once and tosses the opponent upward with one arm. In ''SSB'', this was its forward throw.||{{n|16}} | ||
|- | |- | ||
| | |[[Joker]]||Tosses the opponent upward with a flourish of his arm.||{{n|16}} | ||
|- | |- | ||
| | |[[Kazuya]]||Tosses the opponent up with his right hand, turns into [[Devil Kazuya]], then fires a beam at the opponent. The beam behaves identically to the one in [[Devil Blaster]].||{{y|16}} <small>(collateral)</small> | ||
|- | |- | ||
| | |[[Ken]]||Kicks the opponent upward, then performs an axe kick with the raised leg.||{{y|16}} | ||
|} | |||
|- | |- | ||
| | |[[King Dedede]]||Performs a jump set, a volleyball technique.||{{y|16}} | ||
|- | |- | ||
| | |[[King K. Rool]]||Leaps high with the opponent, then falls back down and performs an Argentine backbreaker rack upon landing.||{{n|16}} | ||
|- | |- | ||
|{{ | |[[Kirby]]||Leaps with the opponent to the top of the stage offscreen, then falls back down and slams them onto the ground, creating an explosion. In ''SSB'', this was his forward throw.||{{GameIcon|SSBM}}{{GameIcon|SSBB}}{{GameIcon|SSB4}} {{n|16}}<br/>{{GameIcon|SSBU}} {{y|16}} <small>(collateral)</small> | ||
|- | |- | ||
| | |[[Link]]||Puts the opponent above himself and launches them with a crescent slash.||{{y|16}} | ||
|- | |- | ||
| | |[[Little Mac]]||Uppercuts the opponent.||{{y|16}} | ||
|- | |- | ||
| | |[[Lucario]]||Performs the pao choui, an uppercut-styled punch in Shaolin Kung Fu.||{{y|16}} | ||
|- | |- | ||
| | |[[Lucas]]||Twirls the opponent above himself with PSI, then tosses them upward.||{{n|16}} | ||
|- | |- | ||
|{{ | |[[Lucina]]||Heaves the opponent upward with one arm.||{{n|16}} | ||
|- | |- | ||
|{{ | |[[Luigi]]||{{GameIcon|SSBM}}{{GameIcon|SSBB}}{{GameIcon|SSB4}} Heaves the opponent upward with both arms.<br/>{{GameIcon|SSBU}} Swings the opponent upward with the Poltergust G-00.||{{GameIcon|SSBM}}{{GameIcon|SSBB}}{{GameIcon|SSB4}} {{n|16}}<br/>{{GameIcon|SSBU}} {{y|16}} <small>(collateral)</small> | ||
|- | |- | ||
| | |[[Mario]]||Heaves the opponent upward with both arms.||{{n|16}} | ||
|- | |- | ||
|{{ | |[[Marth]]||Heaves the opponent upward with one arm.||{{n|16}} | ||
|- | |- | ||
| | |[[Mega Man]]||Heaves the opponent upward with the Super Arm.||{{n|16}} | ||
|- | |- | ||
|{{ | |[[Meta Knight]]||Flies with the opponent to the top of the stage offscreen, then dives back down and slams them onto the ground.||{{GameIcon|SSBB}} {{n|16}}<br/>{{GameIcon|SSB4}}{{GameIcon|SSBU}} {{y|16}} <small>(collateral)</small> | ||
|- | |- | ||
| | |[[Mewtwo]]||Twirls the opponent around itself and up to the top of its head with its powers, then tosses them upward.||{{n|16}} | ||
|- | |- | ||
| | |[[Mii Brawler]]||Launches the opponent with a palm strike.||{{n|16}} | ||
|- | |- | ||
|{{SSB4| | |[[Mii Gunner]]||{{GameIcon|SSB4}} Tosses the opponent upward and fires one shot from the arm cannon.<br/>{{GameIcon|SSBU}} Tosses the opponent upward and fires two shots from the arm cannon.||{{y|16}} | ||
|- | |- | ||
| | |[[Mii Swordfighter]]||Puts the opponent above themselves and launches them with a crescent slash.||{{y|16}} | ||
|- | |- | ||
| | |[[Min Min]]||Kicks the opponent upward.||{{y|16}} | ||
|- | |- | ||
| | |[[Mr. Game & Watch]]||Juggles the opponent as a ball from front to back, then tosses them upward.||{{n|16}} | ||
|- | |- | ||
| | |[[Mythra]]||Telekinetically throws the opponent above herself.||{{n|16}} | ||
|- | |- | ||
| | |[[Ness]]||Points his index finger upward and twirls the opponent above himself with PSI, then tosses them upward.||{{y|16}} | ||
|- | |- | ||
|{{ | |[[Olimar]]||{{GameIcon|SSBB}}{{GameIcon|SSB4}} The Pikmin grabbing the opponent leaps a set distance upward with them, then falls back down and slams them onto the ground.<br/>{{GameIcon|SSBU}} The Pikmin grabbing the opponent headbutt them above Olimar.||{{GameIcon|SSBB}}{{GameIcon|SSB4}} {{n|16}}<br/>{{GameIcon|SSBU}} {{y|16}} | ||
|- | |- | ||
| | |[[Pac-Man]]||Heaves the opponent upward with one arm.||{{n|16}} | ||
|- | |- | ||
| | |[[Palutena]]||Telekinetically tosses the opponent upward.||{{n|16}} | ||
|- | |- | ||
| | |[[Peach]]||Performs a jump set, a volleyball technique.||{{y|16}} | ||
|- | |- | ||
| | |[[Pichu]]||Headbutts the opponent upward.||{{y|16}} | ||
|- | |- | ||
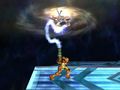
| | |[[Pikachu]]||Headbutts the opponent upward.||{{y|16}} | ||
|- | |- | ||
| | |[[Piranha Plant]]||Launches the opponent with a rising bite.||{{y|16}} <small>(collateral)</small> | ||
|- | |- | ||
| | |[[Pit]]||Performs a handstand and kicks the opponent upward with both legs.||{{y|16}} | ||
|- | |- | ||
| | |[[Pyra]]||Telekinetically throws the opponent above herself.||{{n|16}} | ||
|- | |- | ||
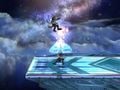
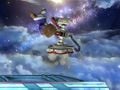
| | |[[R.O.B.]]||Rises a set distance upward with the opponent, then falls back down and slams them onto the ground.||{{n|16}} | ||
|- | |- | ||
| | |[[Richter]]||Puts the opponent above himself and whips them with the Vampire Killer.||{{y|16}} | ||
|- | |- | ||
| | |[[Ridley]]||Puts the opponent above himself and stabs them with his tail.||{{y|16}} | ||
|- | |- | ||
| | |[[Robin]]||Tosses the opponent upward using magic.||{{n|16}} | ||
|- | |- | ||
| | |[[Rosalina]] & [[Luma]]||Telekinetically tosses the opponent upward.||{{n|16}} | ||
|- | |- | ||
| | |[[Roy]]||Heaves the opponent upward with one arm.||{{n|16}} | ||
|- | |- | ||
| | |[[Ryu]]||Kicks the opponent upward, then performs an axe kick with the raised leg.||{{y|16}} | ||
|- | |- | ||
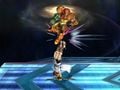
|{{ | |[[Samus]]||{{GameIcon|SSBM}}{{GameIcon|SSBB}}{{GameIcon|SSB4}} Twirls the opponent above herself with the Grapple Beam, hitting them multiple times, then tosses them upward.<br/>{{GameIcon|SSBU}} Blasts the opponent above herself with fire from her Arm Cannon.||{{y|16}} | ||
|- | |- | ||
| | |[[Sephiroth]]||Slashes the opponent upwards with the Masamune.||{{y|16}} | ||
|- | |- | ||
| | |[[Sheik]]||Performs a handstand and kicks the opponent upward with both legs.||{{y|16}} | ||
|- | |- | ||
| | |[[Shulk]]||Puts the opponent above himself and stabs them with the Monado.||{{y|16}} | ||
|- | |- | ||
| | |[[Simon]]||Puts the opponent above himself and whips them with the Vampire Killer.||{{y|16}} | ||
|- | |- | ||
|{{ | |[[Snake]]||Performs a suplex.||{{GameIcon|SSBB}} {{n|16}}<br/>{{GameIcon|SSBU}} {{y|16}} | ||
|- | |- | ||
| | |[[Sonic]]||Puts the opponent above himself and stabs them with his back quills.||{{y|16}} | ||
|- | |- | ||
| | |[[Sora]]||Tosses the opponent upward with his left hand.||{{n|16}} | ||
|- | |- | ||
|{{ | |[[Squirtle]]||{{GameIcon|SSBB}} Retreats into its shell and tackles the opponent upward.<br/>{{GameIcon|SSBU}} Headbutts the opponent upward.||{{y|16}} | ||
|- | |- | ||
| | |[[Steve]]||Places piston on the ground to launch the opponent upward.||{{y|16}} | ||
|- | |- | ||
|{{ | |[[Terry]]||Uppercuts the opponent.||{{n|16}} | ||
|- | |- | ||
| | |[[Toon Link]]||Puts the opponent above himself and launches them with a crescent slash.||{{y|16}} | ||
|- | |- | ||
| | |[[Villager]]||Tosses the opponent upward with his net.||{{n|16}} | ||
|- | |- | ||
| | |[[Wario]]||Jumps and punches the opponent upward with both fists.||{{y|16}} | ||
|- | |- | ||
| | |[[Wii Fit Trainer]]||Performs a jump set, a volleyball technique.||{{n|16}} | ||
|- | |- | ||
|{{ | |[[Wolf]]||{{GameIcon|SSBB}} Jumps and slashes the opponent upward from a horizontal somersault.<br/>{{GameIcon|SSBU}} Slashes the opponent upward.||{{y|16}} | ||
|- | |- | ||
| | |[[Yoshi]]||Spits the opponent upward.||{{n|16}} | ||
|- | |- | ||
| | |[[Young Link]]||Puts the opponent above himself and launches them with a crescent slash.||{{y|16}} | ||
|- | |- | ||
| | |[[Zelda]]||Tosses the opponent upward with magic.||{{n|16}} | ||
|- | |- | ||
| | |[[Zero Suit Samus]]||Launches the opponent with a backflip kick.||{{y|16}} | ||
|{{ | |||
|} | |} | ||
== | ==Notable up throws== | ||
*[[Fox]], [[Falco]], [[Mii Gunner]] and [[Kazuya]]'s up throws are the only ones to release [[projectile]]s, in the form of lasers that can be [[reflect]]ed and [[absorb]]ed. Fox fires three lasers that cause no knockback, much like those of [[Blaster (Fox)|his neutral special]]; likewise, Falco in ''Melee'' and ''Brawl'' fires three lasers that cause weak knockback. In ''Smash 4'' and ''Ultimate'', Falco instead fires a single laser that deals much more knockback, and can be used to combo into aerial attacks at various percentages. Mii Gunner's up throw behaves similarly to Falco's, firing one laser in ''Smash 4'' and two in ''Ultimate''. Kazuya also fires a single laser and deals mostly diagonal knockback. | |||
**{{SSBM|Fox}}'s up throw in ''Melee'' is also notable for its immense combo potential, leading into an [[up aerial]] even at high percentages, which is prominently used as a KO setup. In latter games, however, it has completely lost this potential due to receiving more ending lag, as well as the changes to vertical knockback. | |||
*[[Kirby]] and [[Meta Knight]]'s up throws, as well as [[Charizard]]'s from ''Smash 4'' onward, involve quickly dragging the opponent to the top [[blast line]] offscreen, then crashing down towards the spot where the throw was initiated. This behavior results in particular side effects: the user can land on [[platform]]s above them (except Kirby in ''Melee'') and execute the throw at a higher position, allowing them to KO the opponent earlier; additionally, if they take damage from another source while they are at the top blast line (such as from a [[Gooey Bomb]] stuck to them, or throwing [[Link]] holding a {{b|Bomb|Link}} that automatically detonates), both characters can get KO'd off the top blast line mid-throw. | |||
**[[R.O.B.]] and [[King K. Rool]]'s up throws likewise cause both the thrower and victim to leave the ground, and can be used to land on platforms above them, but they only rise a set distance upward instead of all the way to the blast line. | |||
*Unlike other throws with hitboxes, [[Ryu]] and [[Ken]]'s up throws produce their hitbox ''after'' the opponent is released; therefore, while it can affect both the victim and nearby opponents, it can never hit the former under normal circumstances. This hitbox also deals considerably more damage and knockback than the throw itself on the grabbed opponent. | |||
*[[Mewtwo]]'s up throw is the strongest in the series, especially in ''Melee'', where it can KO characters of average [[falling speed]] under 100%. In ''Smash 4'' and ''Ultimate'', it can KO most characters under 150% without [[rage]]. | |||
**[[Charizard]]'s up throw in ''Smash 4'' and ''Ultimate'' deals more knockback than Mewtwo's, KOing most characters under 140% from ground level, although due to its angle of 70°, [[DI]] has a much stronger effect on it, causing Mewtwo's to still be stronger overall. Nevertheless, it remains one of the strongest up throws in both games. | |||
**In ''Brawl'', with the absence of Mewtwo, the strongest up throw is instead {{SSBB|Olimar}}'s with purple Pikmin, KOing under 130%. | |||
*{{SSBM|Jigglypuff}}'s up throw in ''Melee'' is used to perform the [[space animal slayer]], a deadly low percent KO setup on Fox and Falco. In later games, it no longer possesses any guaranteed followups, except the [[Leaping Rest]] [[custom move|custom]] [[down special]] in ''Smash 4'' if equipped. | |||
*{{SSBM|Marth}} and {{SSBM|Roy}}'s up throws in ''Melee'' are useful for [[chain grab]]bing and starting combos on [[fast faller]]s at various percents, while they are also among the strongest up throws in the game, KOing characters of average falling speed under 180% and 160% respectively without DI. In later games, they can no longer be used for combos or chain grabs, but retain their utility as emergency KO moves at very high percents, a trait that also carries over to [[Lucina]] and [[Chrom]]. | |||
*{{SSB4|Bowser}}'s up throw in ''Smash 4'' is a defining part of his playstyle, possessing very low ending lag compared to others (11 [[frame]]s) that allows it to combo into aerial attacks at nearly any percentage, most notably a [[neutral aerial]] at low to mid percentages to rack up large amounts of damage, and an up aerial at high percentages as a KO setup. In ''Ultimate'', its combo potential has been significantly reduced to the point it can only lead into a forward or up aerial at low percentages, but as a partial tradeoff, it deals much more damage by itself. | |||
**[[Diddy Kong]]'s up throw in ''Smash 4'' and ''Ultimate'' is similar, possessing deceptively low ending lag (9 frames) that gives it immense combo potential, although it deals less damage and only has KO setups if initiated on a high enough platform. | |||
*{{SSB4|Sonic}}'s up throw in ''Smash 4'' can easily combo into any of his aerials from mid to high percentages if followed up with a [[Spring Jump]], which can also be used as a KO setup if initiated on a high platform. Aside from this, it can combo into an up aerial at low percentages. In ''Ultimate'', however, its [[ending lag]] has been increased, which in combination with the faster knockback physics drastically worsens its Spring Jump-based followups. | |||
*[[Kazuya]]’s up throw is his only throw that does not have the camera briefly shift to a unique angle in 1v1 matches. | |||
* | |||
==Gallery of up throws in ''Brawl''== | ==Gallery of up throws in ''Brawl''== | ||
<gallery> | <gallery> | ||
Bowser up throw Brawl.jpg|Bowser | |||
Captain Falcon up throw Brawl.jpg|Captain Falcon | |||
Charizard up throw Brawl.jpg|Charizard | |||
Diddy Kong up throw Brawl.jpg|Diddy Kong | |||
Donkey Kong up throw Brawl.jpg|Donkey Kong | |||
Falco up throw Brawl.jpg|Falco | |||
Fox up throw Brawl.jpg|Fox | |||
Ganondorf up throw Brawl.jpg|Ganondorf | |||
Giga Bowser up throw Brawl.jpg|Giga Bowser | |||
Ice Climbers up throw Brawl.jpg|Ice Climbers (Popo) | |||
Ike up throw Brawl.jpg|Ike | |||
Ivysaur up throw Brawl.jpg|Ivysaur | |||
Jigglypuff up throw Brawl.jpg|Jigglypuff | |||
King Dedede up throw Brawl.jpg|King Dedede | |||
Kirby up throw Brawl part 1.jpg|Kirby, part 1 | |||
Kirby up throw Brawl part 2.jpg|Kirby, part 2 | |||
Link up throw Brawl.jpg|Link | |||
Lucario up throw Brawl.jpg|Lucario | |||
Lucas up throw Brawl.jpg|Lucas | |||
Luigi up throw Brawl.jpg|Luigi | |||
Mario up throw Brawl.jpg|Mario | |||
Marth up throw Brawl.jpg|Marth | |||
Meta Knight up throw Brawl part 1.jpg|Meta Knight, part 1 | |||
Meta Knight up throw Brawl part 2.jpg|Meta Knight, part 2 | |||
Mr. Game & Watch up throw Brawl.jpg|Mr. Game & Watch | |||
Ness up throw Brawl.jpg|Ness | |||
Olimar up throw Brawl part 1.jpg|Olimar, part 1 | |||
Olimar up throw Brawl part 2.jpg|Olimar, part 2 | |||
Peach up throw Brawl.jpg|Peach | |||
Pikachu up throw Brawl.jpg|Pikachu | |||
Pit up throw Brawl.jpg|Pit | |||
R.O.B. up throw Brawl.jpg|R.O.B. | |||
Samus up throw Brawl.jpg|Samus | |||
Sheik up throw Brawl.png|Sheik | |||
Snake up throw Brawl.jpg|Snake | |||
Sonic up throw Brawl.jpg|Sonic | |||
Squirtle up throw Brawl.jpg|Squirtle | |||
Toon Link up throw Brawl.jpg|Toon Link | |||
Wario up throw Brawl.jpg|Wario | |||
Wario-Man up throw Brawl.jpg|Wario-Man | |||
Wolf up throw Brawl.jpg|Wolf | |||
Yoshi up throw Brawl.jpg|Yoshi | |||
Zelda up throw Brawl.jpg|Zelda | |||
Zero Suit Samus up throw Brawl.jpg|Zero Suit Samus | |||
</gallery> | </gallery> | ||
{{Attacks}} | {{Attacks}} | ||
[[Category:Game controls]] | [[Category:Game controls]] | ||
[[es:Lanzamiento hacia arriba]] | |||
Latest revision as of 08:18, March 4, 2024

An up throw (上投げ, Up/above/upper throw; commonly abbreviated as u-throw or Uthrow, and referred to as ThrowHi internally) is a throw performed by tilting the control stick up after grabbing an opponent. They were introduced in Super Smash Bros. Melee; in the original Super Smash Bros., there were only forward throws and back throws. In the transition to Melee, Kirby and Jigglypuff's previous forward throws became their up throws, and they instead received new forward throws.

Due to their predominantly vertical knockback and generally moderate ending lag, up throws tend to be useful for starting combos and chain grabs, especially in Melee. Some also deal high enough knockback to KO opponents reliably, with a notable example being Mewtwo's up throw. From Super Smash Bros. Brawl onward, the changes to vertical knockback and the addition of hitstun canceling have indirectly reduced their effectiveness; for a handful of characters, their up throw is their least useful throw, as it can neither start combos as effectively as their down throw (with some of them lacking any guaranteed followups), nor KO as reliably as their forward or back throw. However, some characters' up throws remain an important part of their kit, such as R.O.B.'s, Bowser's in Smash 4, and Diddy Kong's in Smash 4 and Ultimate.
List of up throws[edit]
Up throws with hitboxes consist of two or more hits on the grabbed opponent (the hitbox, then the throw), and can affect other opponents near the thrower. Additionally, some up throws may possess a collateral hitbox, which affects nearby opponents but not the victim of the throw.
| Character | Description | Hitbox |
|---|---|---|
| Banjo & Kazooie | Banjo throws the opponent to Kazooie, who stabs the opponent upwards with her beak. | |
| Bayonetta | Launches the opponent with a crescent kick. | |
| Bowser | Grinds the opponent above himself with the spikes on his shell. | |
| Bowser Jr. | Heaves the opponent upward with the Koopa Clown Car's claw. | |
| Byleth | Launches the opponent upwards with the Sword of the Creator. | |
| Captain Falcon | Uppercuts the opponent. | |
| Charizard | ||
| Chrom | Heaves the opponent upward with one arm. | |
| Cloud | Performs a 540 kick, hitting the opponent twice above himself before launching them. | |
| Corrin | Turns into dragon form and raises on his hind legs to headbutt the opponent upward. | |
| Daisy | Performs a jump set, a volleyball technique. | |
| Dark Pit | Performs a handstand and kicks the opponent upward with both legs. | |
| Dark Samus | Blasts the opponent above herself with electricity from her Arm Cannon. | |
| Diddy Kong | Performs a handstand and kicks the opponent upward with one leg. | |
| Donkey Kong | Heaves the opponent upward with one arm. | |
| Dr. Mario | Heaves the opponent upward with both arms. | |
| Duck Hunt | The dog kicks the opponent upward with its hind legs. | |
| Falco | ||
| Fox | Tosses the opponent upward and fires three rapid shots from his Blaster. | |
| Ganondorf | ||
| Greninja | Heaves the opponent upward with one arm. | |
| Hero | Heaves the opponent upward with both arms. | |
| Ice Climbers | Bashes the opponent above themselves with the tip of the hammer. | |
| Ike | Plunges Ragnell on the ground and launches the opponent with a double axe handle swing. | |
| Incineroar | Performs an Argentine backbreaker rack. | |
| Inkling | Turns into squid form and headbutts the opponent upward. | |
| Isabelle | Tosses the opponent upward with her net. | |
| Ivysaur | Bounces the opponent upward with the bud on its back. | |
| Jigglypuff | Spins once and tosses the opponent upward with one arm. In SSB, this was its forward throw. | |
| Joker | Tosses the opponent upward with a flourish of his arm. | |
| Kazuya | Tosses the opponent up with his right hand, turns into Devil Kazuya, then fires a beam at the opponent. The beam behaves identically to the one in Devil Blaster. | |
| Ken | Kicks the opponent upward, then performs an axe kick with the raised leg. | |
| King Dedede | Performs a jump set, a volleyball technique. | |
| King K. Rool | Leaps high with the opponent, then falls back down and performs an Argentine backbreaker rack upon landing. | |
| Kirby | Leaps with the opponent to the top of the stage offscreen, then falls back down and slams them onto the ground, creating an explosion. In SSB, this was his forward throw. | |
| Link | Puts the opponent above himself and launches them with a crescent slash. | |
| Little Mac | Uppercuts the opponent. | |
| Lucario | Performs the pao choui, an uppercut-styled punch in Shaolin Kung Fu. | |
| Lucas | Twirls the opponent above himself with PSI, then tosses them upward. | |
| Lucina | Heaves the opponent upward with one arm. | |
| Luigi | ||
| Mario | Heaves the opponent upward with both arms. | |
| Marth | Heaves the opponent upward with one arm. | |
| Mega Man | Heaves the opponent upward with the Super Arm. | |
| Meta Knight | Flies with the opponent to the top of the stage offscreen, then dives back down and slams them onto the ground. | |
| Mewtwo | Twirls the opponent around itself and up to the top of its head with its powers, then tosses them upward. | |
| Mii Brawler | Launches the opponent with a palm strike. | |
| Mii Gunner | ||
| Mii Swordfighter | Puts the opponent above themselves and launches them with a crescent slash. | |
| Min Min | Kicks the opponent upward. | |
| Mr. Game & Watch | Juggles the opponent as a ball from front to back, then tosses them upward. | |
| Mythra | Telekinetically throws the opponent above herself. | |
| Ness | Points his index finger upward and twirls the opponent above himself with PSI, then tosses them upward. | |
| Olimar | ||
| Pac-Man | Heaves the opponent upward with one arm. | |
| Palutena | Telekinetically tosses the opponent upward. | |
| Peach | Performs a jump set, a volleyball technique. | |
| Pichu | Headbutts the opponent upward. | |
| Pikachu | Headbutts the opponent upward. | |
| Piranha Plant | Launches the opponent with a rising bite. | |
| Pit | Performs a handstand and kicks the opponent upward with both legs. | |
| Pyra | Telekinetically throws the opponent above herself. | |
| R.O.B. | Rises a set distance upward with the opponent, then falls back down and slams them onto the ground. | |
| Richter | Puts the opponent above himself and whips them with the Vampire Killer. | |
| Ridley | Puts the opponent above himself and stabs them with his tail. | |
| Robin | Tosses the opponent upward using magic. | |
| Rosalina & Luma | Telekinetically tosses the opponent upward. | |
| Roy | Heaves the opponent upward with one arm. | |
| Ryu | Kicks the opponent upward, then performs an axe kick with the raised leg. | |
| Samus | ||
| Sephiroth | Slashes the opponent upwards with the Masamune. | |
| Sheik | Performs a handstand and kicks the opponent upward with both legs. | |
| Shulk | Puts the opponent above himself and stabs them with the Monado. | |
| Simon | Puts the opponent above himself and whips them with the Vampire Killer. | |
| Snake | Performs a suplex. | |
| Sonic | Puts the opponent above himself and stabs them with his back quills. | |
| Sora | Tosses the opponent upward with his left hand. | |
| Squirtle | ||
| Steve | Places piston on the ground to launch the opponent upward. | |
| Terry | Uppercuts the opponent. | |
| Toon Link | Puts the opponent above himself and launches them with a crescent slash. | |
| Villager | Tosses the opponent upward with his net. | |
| Wario | Jumps and punches the opponent upward with both fists. | |
| Wii Fit Trainer | Performs a jump set, a volleyball technique. | |
| Wolf | ||
| Yoshi | Spits the opponent upward. | |
| Young Link | Puts the opponent above himself and launches them with a crescent slash. | |
| Zelda | Tosses the opponent upward with magic. | |
| Zero Suit Samus | Launches the opponent with a backflip kick. |
Notable up throws[edit]
- Fox, Falco, Mii Gunner and Kazuya's up throws are the only ones to release projectiles, in the form of lasers that can be reflected and absorbed. Fox fires three lasers that cause no knockback, much like those of his neutral special; likewise, Falco in Melee and Brawl fires three lasers that cause weak knockback. In Smash 4 and Ultimate, Falco instead fires a single laser that deals much more knockback, and can be used to combo into aerial attacks at various percentages. Mii Gunner's up throw behaves similarly to Falco's, firing one laser in Smash 4 and two in Ultimate. Kazuya also fires a single laser and deals mostly diagonal knockback.
- Fox's up throw in Melee is also notable for its immense combo potential, leading into an up aerial even at high percentages, which is prominently used as a KO setup. In latter games, however, it has completely lost this potential due to receiving more ending lag, as well as the changes to vertical knockback.
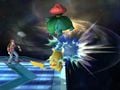
- Kirby and Meta Knight's up throws, as well as Charizard's from Smash 4 onward, involve quickly dragging the opponent to the top blast line offscreen, then crashing down towards the spot where the throw was initiated. This behavior results in particular side effects: the user can land on platforms above them (except Kirby in Melee) and execute the throw at a higher position, allowing them to KO the opponent earlier; additionally, if they take damage from another source while they are at the top blast line (such as from a Gooey Bomb stuck to them, or throwing Link holding a Bomb that automatically detonates), both characters can get KO'd off the top blast line mid-throw.
- R.O.B. and King K. Rool's up throws likewise cause both the thrower and victim to leave the ground, and can be used to land on platforms above them, but they only rise a set distance upward instead of all the way to the blast line.
- Unlike other throws with hitboxes, Ryu and Ken's up throws produce their hitbox after the opponent is released; therefore, while it can affect both the victim and nearby opponents, it can never hit the former under normal circumstances. This hitbox also deals considerably more damage and knockback than the throw itself on the grabbed opponent.
- Mewtwo's up throw is the strongest in the series, especially in Melee, where it can KO characters of average falling speed under 100%. In Smash 4 and Ultimate, it can KO most characters under 150% without rage.
- Charizard's up throw in Smash 4 and Ultimate deals more knockback than Mewtwo's, KOing most characters under 140% from ground level, although due to its angle of 70°, DI has a much stronger effect on it, causing Mewtwo's to still be stronger overall. Nevertheless, it remains one of the strongest up throws in both games.
- In Brawl, with the absence of Mewtwo, the strongest up throw is instead Olimar's with purple Pikmin, KOing under 130%.
- Jigglypuff's up throw in Melee is used to perform the space animal slayer, a deadly low percent KO setup on Fox and Falco. In later games, it no longer possesses any guaranteed followups, except the Leaping Rest custom down special in Smash 4 if equipped.
- Marth and Roy's up throws in Melee are useful for chain grabbing and starting combos on fast fallers at various percents, while they are also among the strongest up throws in the game, KOing characters of average falling speed under 180% and 160% respectively without DI. In later games, they can no longer be used for combos or chain grabs, but retain their utility as emergency KO moves at very high percents, a trait that also carries over to Lucina and Chrom.
- Bowser's up throw in Smash 4 is a defining part of his playstyle, possessing very low ending lag compared to others (11 frames) that allows it to combo into aerial attacks at nearly any percentage, most notably a neutral aerial at low to mid percentages to rack up large amounts of damage, and an up aerial at high percentages as a KO setup. In Ultimate, its combo potential has been significantly reduced to the point it can only lead into a forward or up aerial at low percentages, but as a partial tradeoff, it deals much more damage by itself.
- Diddy Kong's up throw in Smash 4 and Ultimate is similar, possessing deceptively low ending lag (9 frames) that gives it immense combo potential, although it deals less damage and only has KO setups if initiated on a high enough platform.
- Sonic's up throw in Smash 4 can easily combo into any of his aerials from mid to high percentages if followed up with a Spring Jump, which can also be used as a KO setup if initiated on a high platform. Aside from this, it can combo into an up aerial at low percentages. In Ultimate, however, its ending lag has been increased, which in combination with the faster knockback physics drastically worsens its Spring Jump-based followups.
- Kazuya’s up throw is his only throw that does not have the camera briefly shift to a unique angle in 1v1 matches.
Gallery of up throws in Brawl[edit]
Bowser
Captain Falcon
Charizard
Diddy Kong
Donkey Kong
Falco
Fox
Ganondorf
Giga Bowser
Ice Climbers (Popo)
Ike
Ivysaur
Jigglypuff
King Dedede
Kirby, part 1
Kirby, part 2

Link
Lucario
Lucas
Luigi
Mario
Marth
Meta Knight, part 1
Meta Knight, part 2
Mr. Game & Watch
Ness
Olimar, part 1
Olimar, part 2
Peach
Pikachu
Pit
R.O.B.
Samus

Sheik
Snake
Sonic
Squirtle
Toon Link
Wario
Wario-Man
Wolf
Yoshi
Zelda
Zero Suit Samus


| Attacks in the Super Smash Bros. series | |
|---|---|
| Standard ground attacks | Neutral attack · Dash attack |
| Tilt attacks | Forward tilt · Up tilt · Down tilt · Crouching attack |
| Smash attacks | Forward smash · Up smash · Down smash |
| Aerial attacks | Neutral aerial · Forward aerial · Back aerial · Up aerial · Down aerial · Grab aerial · Glide attack |
| Throws | Grab · Pummel · Forward throw · Back throw · Up throw · Down throw |
| Get-up attacks | Floor attack · Edge attack |
| Special moves | Neutral special move · Side special move · Up special move · Down special move · Command-input move · Final Smash |