Quark mine

A quark mine is a trap in Adventure Mode: The Subspace Emissary. Quark mines are round, black spheres with neon green markings and several spines protruding from its surface. They are similar to Jyks as they either remain stationary or move in a continuous and predictable pattern, but unlike Jyks, quark mines can be destroyed.
If a quark mine comes into contact with a player, a shield, a damaging hitbox, or a cube, it will detonate and create an unstable, electrical explosion. The explosion has a high KO ratio, even on lower difficulty levels. If a quark mine is approached, it makes a beeping sound and its green markings turn pink. Quark mines often appear in large groups, which makes them difficult obstacles to avoid. If a quark mine explodes, nearby ones may also be set off in a chain reaction if they are in close enough proximity. Quark mines are not affected by non-damaging attacks such as F.L.U.D.D. or Water Gun.

One group of quark mines in The Subspace Bomb Factory (Part II) operate differently from the others. If a character happens to approach a certain area (e.g. a platform), quark mines are quickly dispatched and attempt to ram themselves into the player.
Most quark mines are found on the Isle of the Ancients, in its Research Facility and Subspace Bomb Factory. Others can be found in The Wilds, on the Halberd, in certain areas of the Subspace stages, and throughout The Great Maze.
A specific quark mine in the Halberd reveals an orange cube if it detonates close enough to the cracked ceiling.
Properties[edit]
All quark mines have a hurtbox radius of 7.5, a detection (when it beeps and changes color) radius of 30.0, a hitbox radius of 20.0, and use the Sakurai angle. The mines detect players based on their root bone (located at the bottom of the model between the feet) instead of the closest hurtbox, meaning it may appear to detect a player earlier when approaching from above than from below and may not detect the player at all from below.
| Level | Portion | KBG | BKB | Damage | ||||||||||||||
|---|---|---|---|---|---|---|---|---|---|---|---|---|---|---|---|---|---|---|
| The Research Facility (Part I) | Exit room with movable columns. | 25 | 90 | 5 | 7 | 8 | 10 | 12 | 15 | 20 | 23 | 25 | 30 | 33 | 35 | 41 | 43 | 45 |
| The Wilds (Part I) | After the tunnel and columns. | 20 | 75 | 6 | 8 | 10 | 13 | 15 | 18 | 24 | 27 | 30 | 36 | 39 | 42 | 48 | 50 | 52 |
| Battleship Halberd Exterior | First room when entering the Halberd. | 20 | 75 | 8 | 10 | 13 | 15 | 18 | 24 | 27 | 30 | 36 | 39 | 42 | 48 | 50 | 52 | 55 |
| 4th room, long hallway after an ambush. | 25 | 90 | 8 | 10 | 13 | 15 | 18 | 24 | 27 | 30 | 36 | 39 | 42 | 48 | 50 | 52 | 55 | |
| The Subspace Bomb Factory (Part II) | 2nd falling section. | 29 | 90 | 8 | 10 | 13 | 15 | 18 | 24 | 27 | 30 | 36 | 39 | 42 | 48 | 50 | 52 | 55 |
| Subspace (Part I) | Room with Olimar and Fox trophies. | 25 | 200 | 12 | 14 | 17 | 19 | 22 | 28 | 31 | 34 | 40 | 43 | 46 | 52 | 54 | 56 | 59 |
| Subspace (Part II) | First area. | 20 | 75 | 8 | 10 | 13 | 15 | 18 | 24 | 27 | 30 | 36 | 39 | 42 | 48 | 50 | 52 | 55 |
| The Great Maze | The Ruined Zoo, chase recreation. | 20 | 75 | 8 | 10 | 13 | 15 | 18 | 24 | 27 | 30 | 36 | 39 | 42 | 48 | 50 | 52 | 55 |
| Outside the Ancient Ruins recreation. | 25 | 95 | 8 | 10 | 13 | 15 | 18 | 24 | 27 | 30 | 36 | 39 | 42 | 48 | 50 | 52 | 55 | |
| The Jungle recreation. | 15 | 70 | 8 | 10 | 13 | 15 | 18 | 24 | 27 | 30 | 36 | 39 | 42 | 48 | 50 | 52 | 55 | |
Gallery[edit]
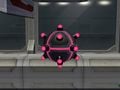
A quark mine. Note its pink hue, indicating a possible explosion soon after.
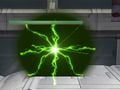
A quark mine explosion.

