Boss Battles: Difference between revisions
Tag: Mobile edit |
|||
| (248 intermediate revisions by more than 100 users not shown) | |||
| Line 1: | Line 1: | ||
'''Boss Battles | {{ArticleIcons|brawl=y}} | ||
'''Boss Battles''' is an [[unlockable]] [[Stadium]] mode introduced in ''[[Super Smash Bros. Brawl]]'' that is very similar to [[All-Star Mode]], except the player fights all the [[boss]]es rather than all the playable characters. Boss Battles is unlocked after the player completes both {{SSBB|Classic Mode}} & [[The Subspace Emissary]] for the first time, or in other words, has defeated each boss at least once (aside from {{SSBB|Crazy Hand}}). | |||
==Gameplay== | ==Gameplay== | ||
[[File:BossBattlesRest.png|thumb|The Rest Area.]] | |||
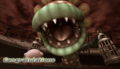
[[File:BossBattlesPiranha.png|thumb|A battle with Petey Piranha in Boss Battles. Note that the cages are empty, and the sky is blue, like in [[The Great Maze]].]] | |||
The goal of Boss Battles | The goal of Boss Battles is to defeat every boss in the game with a single [[stock]]. When a player begins Boss Battles, they are immediately dropped into combat against one of nine bosses (excluding [[Tabuu]]). Once a boss is defeated, the player is brought to the rest area. The rest area displays all defeated bosses as trophies, a screen that displays the face of next boss to be fought, and has limited recovery items. There are three [[Heart Container]]s, which recover the player's damage to 0% and don't reappear upon later visits to the rest area. This format continues until all bosses are defeated. | ||
When a player begins Boss Battles | |||
This format is the same as [[All-Star Mode]]. However, the | The bosses are fought in random order, except for Tabuu, who is always last. The player receives only 0.5x incoming damage, and reduced knockback, making bosses noticeably weaker, in addition to also being slower to compensate the fact that player has only one life and no [[continue]]s. Some boss attacks are altered in strength as well, either to make them weaker still, or to partially compensate for the resistances. | ||
This format is mostly the same as [[All-Star Mode]]. However, the mode must be retried from the beginning if a [[Game Over]] is earned instead of having any continues. The final three bosses before Tabuu move and attack at a faster rate (most noticeable with Rayquaza & Galleom), and boss HP gradually increases as the mode progresses. The player is treated to a picture of one of the bosses upon completing the mode; this picture varies depending on the [[difficulty]] level chosen, starting from [[Petey Piranha]] for Easy to Winged Tabuu for Intense. | |||
Boss Battles also includes a co-op mode, where both characters will have a single stock and there will be three extra Heart Containers for a total of six. Both players must remain alive; if either player loses their stock, the game ends. | |||
The battles in this mode include: | The battles in this mode include: | ||
*{{SSBB|Master Hand}} | |||
* | *{{SSBB|Crazy Hand}} | ||
* | |||
*[[Petey Piranha]] | *[[Petey Piranha]] | ||
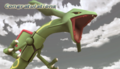
*[[Rayquaza]] | *[[Rayquaza]] | ||
| Line 21: | Line 27: | ||
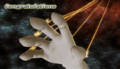
*[[Tabuu]] | *[[Tabuu]] | ||
== | ==Rewards== | ||
There are eight trophies obtained by completing [[Challenges]] and one [[unlockable character]] in ''[[Super Smash Bros. Brawl]]'' involving Boss Battles. None of these challenges can be broken by a [[Golden Hammer]], except in [[PAL]] versions of the game (which can break open all challenges). These trophies cannot be unlocked in [[Multiplayer|co-op play]]. If done in co-op mode, the high scores (similar to [[All-Star]]) are tracked into a unique reserved slot rather than being any attached to any character. | |||
[[ | |||
*Clearing Boss Battles with {{SSBB|Fox}} or {{SSBB|Falco}} will challenge the player to beat {{SSBB|Wolf}}, and beating him will unlock him. | |||
* | *Clearing Boss Battles with 10 characters unlocks the [[Subspace Gunship]] trophy | ||
*Clearing Boss Battles with 20 characters unlocks the [[Jyk]] trophy | |||
*Clearing Boss Battles with every character unlocks the Winged Tabuu trophy | |||
* | *Clearing Boss Battles on Easy difficulty unlocks the [[Subspace Bomb]] trophy | ||
* | *Clearing Boss Battles on Normal difficulty unlocks the [[Shadow Bug]]s trophy | ||
*Clearing Boss Battles on Hard difficulty unlocks the [[Dark Cannon]] trophy | |||
*Clearing Boss Battles on Very Hard difficulty unlocks the [[Porky Statue]] trophy | |||
*Clearing Boss Battles on Intense difficulty unlocks the [[Galleom|Galleom (Tank Form)]] trophy | |||
* | |||
* | |||
* | |||
* | |||
* | |||
* | |||
== | ==Changes from other modes== | ||
Several of the bosses are slightly altered from their appearances in other modes. | |||
*Bosses generally have around half the [[HP]] they do in the equivalent difficulty in the [[Subspace Emissary]] and [[Classic Mode]], with their attacks being noticeably nerfed in both damage and knockback as well. This may be to compensate for [[sticker]]s being unavailable. | |||
**Bosses are additionally slower than normal, unless they're one of the final three before Tabuu. | |||
**The maximum health can vary vastly depending on the difficulty. For example, Tabuu's HP is around 1/3 of their equivalent difficulty on Easy in the Subspace Emissary, but nearly 60% on Intense. However, in [[Multiplayer|co-op mode]] bosses' health is still increased by 66% as in the Subspace Emissary. | |||
*Crazy Hand is a boss on his own, rather than together with Master Hand. | |||
*Master Hand and Crazy Hand have Stamina Bars like other bosses, rather than the usual HP shown at the bottom. Both Hands also suffer a much more severe HP drop than the other bosses, resulting in them having much less HP than the other bosses despite having above average HP in Classic Mode. Their attacks are also much weaker, even on Intense difficulty, compared to the equivalent Classic Mode fight. | |||
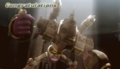
*Galleom will be fought randomly in one of his two stages. His death animation will depend on when the player fights him. If they fight him as one of the earlier bosses, he will kneel to the ground, defeated (like his animation at the end of [[The Wilds (Part I)|The Wilds I]]). If he is fought as one of the last three bosses before Tabuu, he will fall backwards to the ground (like his animation at the end of [[The Ruined Hall]] or when finished by a strong attack like [[Falcon Punch]]). | |||
**Additionally, while the attacks of bosses are normally slower in Boss Battles, Galleom's Uppercut attack is always faster in Boss Battles than it is on the equivalent difficulty in the Subspace Emissary. | |||
*There is no time limit when fighting [[Meta Ridley]]. | |||
*Almost all attacks lose their OHKO power and their [[damage]] is severely reduced (for example, Tabuu's Off Waves on Easy deal 22%-36% instead of 70%-78%). | |||
**Tabuu's Off Waves on Intense is the only move that still has OHKO potential. | |||
**Meta Ridley's Falcon Flyer Slam, Pull, and Smash are not weakened, however they are slower than in the Subspace Emissary. | |||
**Unlike in the Subspace Emissary, Tabuu's Off Waves are not [[nerfed]] in co-op mode. | |||
*Petey Piranha's cages are empty, as they are when he is faced in [[The Great Maze]]. Similarly, the sky is clear rather than covered in dark clouds. | |||
*The individual boss themes are replaced with an arrangement of Melee's menu music, called ''{{SSBBMusicLink|Super Smash Bros. Brawl|Boss Battle}}'', except for those of of Master Hand, Crazy Hand, and Tabuu. They use the music ''{{SSBBMusicLink|Super Smash Bros.|Final Destination (Melee)}}'', ''{{SSBBMusicLink|Super Smash Bros.|Giga Bowser (Melee)}}'', and ''{{SSBBMusicLink|Super Smash Bros. Brawl|Boss Battle Song 2}}'', respectively. | |||
*[[Item]]s don't appear and stickers can't be used. | |||
*The camera behaves as it does in normal Brawls rather than how it behaves in the Subspace Emissary. | |||
==Gallery== | |||
Below are the congratulations screens for completing Boss Battles. | |||
<gallery> | |||
Bossbattleseasy.png|Easy | |||
Bossbattlesnormal.png|Normal | |||
Bossbattleshard.png|Hard | |||
Bossbattlesveryhard.png|Very Hard | |||
Bossbattlesintense.png|Intense | |||
</gallery> | |||
== | |||
==Trivia== | ==Trivia== | ||
* | *The player can move while the [[Announcer]] is still saying "Ready?" and before he says "GO!". | ||
* | *Water effects from [[F.L.U.D.D.]] and [[Water Gun]] and [[push]] effects from [[PSI Magnet]] will make the color in the boss's health bar blink as it does when the boss takes [[damage]], even though these moves inflict none. | ||
*The Boss Battles is similar to The Arena from the [[Kirby (universe)|''Kirby'' series]]. | |||
* | *In ''[[Super Smash Bros. Ultimate]]'', the true [[Final stage (World of Light)|final stage]] of [[World of Light]] features a boss rush that pits the player against all the bosses (except for {{SSBU|Master Hand}} and {{SSBU|Crazy Hand}}), which can be fought in any order, before the true final boss. | ||
* | **{{SSBU|Sephiroth}}'s route has him fighting against all the bosses in the game (aside from [[Galeem]] and [[Dharkon]]) in a Boss Rush. | ||
** | |||
{{SSBBMenus}} | |||
[ | [[Category:Single-player modes]] | ||
[[Category: | [[Category:Co-op modes]] | ||
[[Category:SSBB | [[Category:Modes (SSBB)]] | ||
Latest revision as of 15:43, April 14, 2024
Boss Battles is an unlockable Stadium mode introduced in Super Smash Bros. Brawl that is very similar to All-Star Mode, except the player fights all the bosses rather than all the playable characters. Boss Battles is unlocked after the player completes both Classic Mode & The Subspace Emissary for the first time, or in other words, has defeated each boss at least once (aside from Crazy Hand).
Gameplay[edit]


The goal of Boss Battles is to defeat every boss in the game with a single stock. When a player begins Boss Battles, they are immediately dropped into combat against one of nine bosses (excluding Tabuu). Once a boss is defeated, the player is brought to the rest area. The rest area displays all defeated bosses as trophies, a screen that displays the face of next boss to be fought, and has limited recovery items. There are three Heart Containers, which recover the player's damage to 0% and don't reappear upon later visits to the rest area. This format continues until all bosses are defeated.
The bosses are fought in random order, except for Tabuu, who is always last. The player receives only 0.5x incoming damage, and reduced knockback, making bosses noticeably weaker, in addition to also being slower to compensate the fact that player has only one life and no continues. Some boss attacks are altered in strength as well, either to make them weaker still, or to partially compensate for the resistances.
This format is mostly the same as All-Star Mode. However, the mode must be retried from the beginning if a Game Over is earned instead of having any continues. The final three bosses before Tabuu move and attack at a faster rate (most noticeable with Rayquaza & Galleom), and boss HP gradually increases as the mode progresses. The player is treated to a picture of one of the bosses upon completing the mode; this picture varies depending on the difficulty level chosen, starting from Petey Piranha for Easy to Winged Tabuu for Intense.
Boss Battles also includes a co-op mode, where both characters will have a single stock and there will be three extra Heart Containers for a total of six. Both players must remain alive; if either player loses their stock, the game ends.
The battles in this mode include:
Rewards[edit]
There are eight trophies obtained by completing Challenges and one unlockable character in Super Smash Bros. Brawl involving Boss Battles. None of these challenges can be broken by a Golden Hammer, except in PAL versions of the game (which can break open all challenges). These trophies cannot be unlocked in co-op play. If done in co-op mode, the high scores (similar to All-Star) are tracked into a unique reserved slot rather than being any attached to any character.
- Clearing Boss Battles with Fox or Falco will challenge the player to beat Wolf, and beating him will unlock him.
- Clearing Boss Battles with 10 characters unlocks the Subspace Gunship trophy
- Clearing Boss Battles with 20 characters unlocks the Jyk trophy
- Clearing Boss Battles with every character unlocks the Winged Tabuu trophy
- Clearing Boss Battles on Easy difficulty unlocks the Subspace Bomb trophy
- Clearing Boss Battles on Normal difficulty unlocks the Shadow Bugs trophy
- Clearing Boss Battles on Hard difficulty unlocks the Dark Cannon trophy
- Clearing Boss Battles on Very Hard difficulty unlocks the Porky Statue trophy
- Clearing Boss Battles on Intense difficulty unlocks the Galleom (Tank Form) trophy
Changes from other modes[edit]
Several of the bosses are slightly altered from their appearances in other modes.
- Bosses generally have around half the HP they do in the equivalent difficulty in the Subspace Emissary and Classic Mode, with their attacks being noticeably nerfed in both damage and knockback as well. This may be to compensate for stickers being unavailable.
- Bosses are additionally slower than normal, unless they're one of the final three before Tabuu.
- The maximum health can vary vastly depending on the difficulty. For example, Tabuu's HP is around 1/3 of their equivalent difficulty on Easy in the Subspace Emissary, but nearly 60% on Intense. However, in co-op mode bosses' health is still increased by 66% as in the Subspace Emissary.
- Crazy Hand is a boss on his own, rather than together with Master Hand.
- Master Hand and Crazy Hand have Stamina Bars like other bosses, rather than the usual HP shown at the bottom. Both Hands also suffer a much more severe HP drop than the other bosses, resulting in them having much less HP than the other bosses despite having above average HP in Classic Mode. Their attacks are also much weaker, even on Intense difficulty, compared to the equivalent Classic Mode fight.
- Galleom will be fought randomly in one of his two stages. His death animation will depend on when the player fights him. If they fight him as one of the earlier bosses, he will kneel to the ground, defeated (like his animation at the end of The Wilds I). If he is fought as one of the last three bosses before Tabuu, he will fall backwards to the ground (like his animation at the end of The Ruined Hall or when finished by a strong attack like Falcon Punch).
- Additionally, while the attacks of bosses are normally slower in Boss Battles, Galleom's Uppercut attack is always faster in Boss Battles than it is on the equivalent difficulty in the Subspace Emissary.
- There is no time limit when fighting Meta Ridley.
- Almost all attacks lose their OHKO power and their damage is severely reduced (for example, Tabuu's Off Waves on Easy deal 22%-36% instead of 70%-78%).
- Tabuu's Off Waves on Intense is the only move that still has OHKO potential.
- Meta Ridley's Falcon Flyer Slam, Pull, and Smash are not weakened, however they are slower than in the Subspace Emissary.
- Unlike in the Subspace Emissary, Tabuu's Off Waves are not nerfed in co-op mode.
- Petey Piranha's cages are empty, as they are when he is faced in The Great Maze. Similarly, the sky is clear rather than covered in dark clouds.
- The individual boss themes are replaced with an arrangement of Melee's menu music, called Boss Battle, except for those of of Master Hand, Crazy Hand, and Tabuu. They use the music Final Destination (Melee), Giga Bowser (Melee), and Boss Battle Song 2, respectively.
- Items don't appear and stickers can't be used.
- The camera behaves as it does in normal Brawls rather than how it behaves in the Subspace Emissary.
Gallery[edit]
Below are the congratulations screens for completing Boss Battles.
Easy
Normal
Hard
Very Hard
Intense


Trivia[edit]
- The player can move while the Announcer is still saying "Ready?" and before he says "GO!".
- Water effects from F.L.U.D.D. and Water Gun and push effects from PSI Magnet will make the color in the boss's health bar blink as it does when the boss takes damage, even though these moves inflict none.
- The Boss Battles is similar to The Arena from the Kirby series.
- In Super Smash Bros. Ultimate, the true final stage of World of Light features a boss rush that pits the player against all the bosses (except for Master Hand and Crazy Hand), which can be fought in any order, before the true final boss.
| Super Smash Bros. Brawl menu items | |
|---|---|
| Group | Brawl (Time · Stock · Coin Battle · Team Battle) · Rules · Special Brawl · Rotation · Tourney · Names |
| Solo | Classic · All-Star · Adventure Mode: The Subspace Emissary · Events · Stadium (Target Smash!! · Home-Run Contest · Multi-Man Brawl · Boss Battles) · Training |
| Wi-Fi | Spectator Mode · With Anyone · With Friends |
| Vault | Trophies & Stickers (Trophy Gallery · Trophy Hoard · Coin Launcher · Sticker Album · Sticker Center) · Stage Builder · Album · Challenges · Replays · Masterpieces · Chronicle |
| Options | Screen · Deflicker · Rumble · Controls · Sound · My Music · Erase Data |
| Data | Movies · Records (Group Records · Brawl Records · Notices) · Sound Test |