SSBU Icon.png

Bayonetta (SSBU)/Up special: Difference between revisions

From SmashWiki, the Super Smash Bros. wiki
Jump to navigationJump to search
mNo edit summary
(Hitbox scripts for all kinds of Witch Twists are the same. There are just flags to change the first hit based on whether it starts on the ground or in the air, and the final hit based on whether it's the first or second use)
 
(2 intermediate revisions by 2 users not shown)
Line 1: Line 1:
{{ArticleIcons|ssbu=y}}
{{competitive expertise}}
 
{| class="wikitable" style="float:right; margin:4pt;"
|-
|-
Line 11: Line 11:
|}
|}
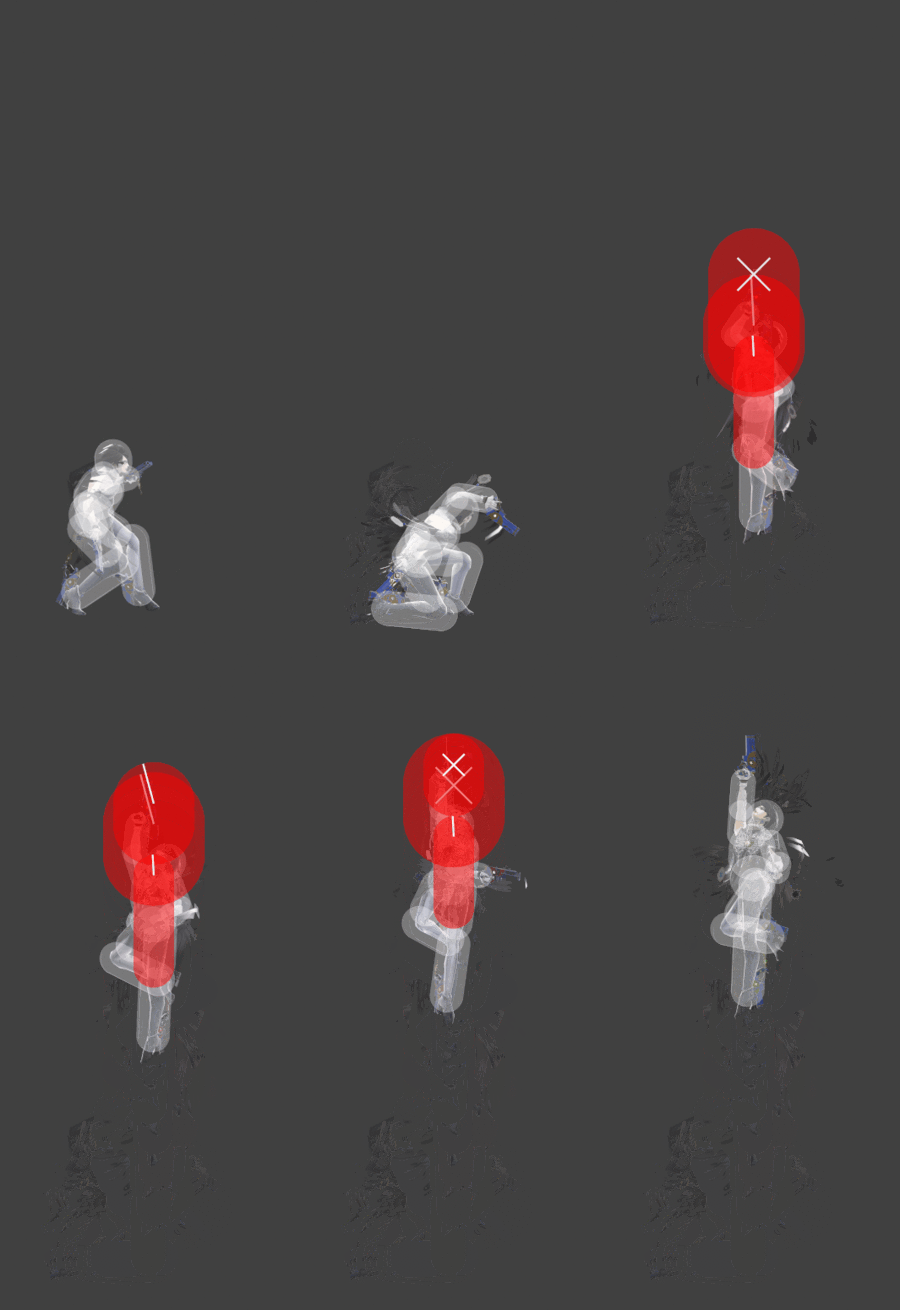
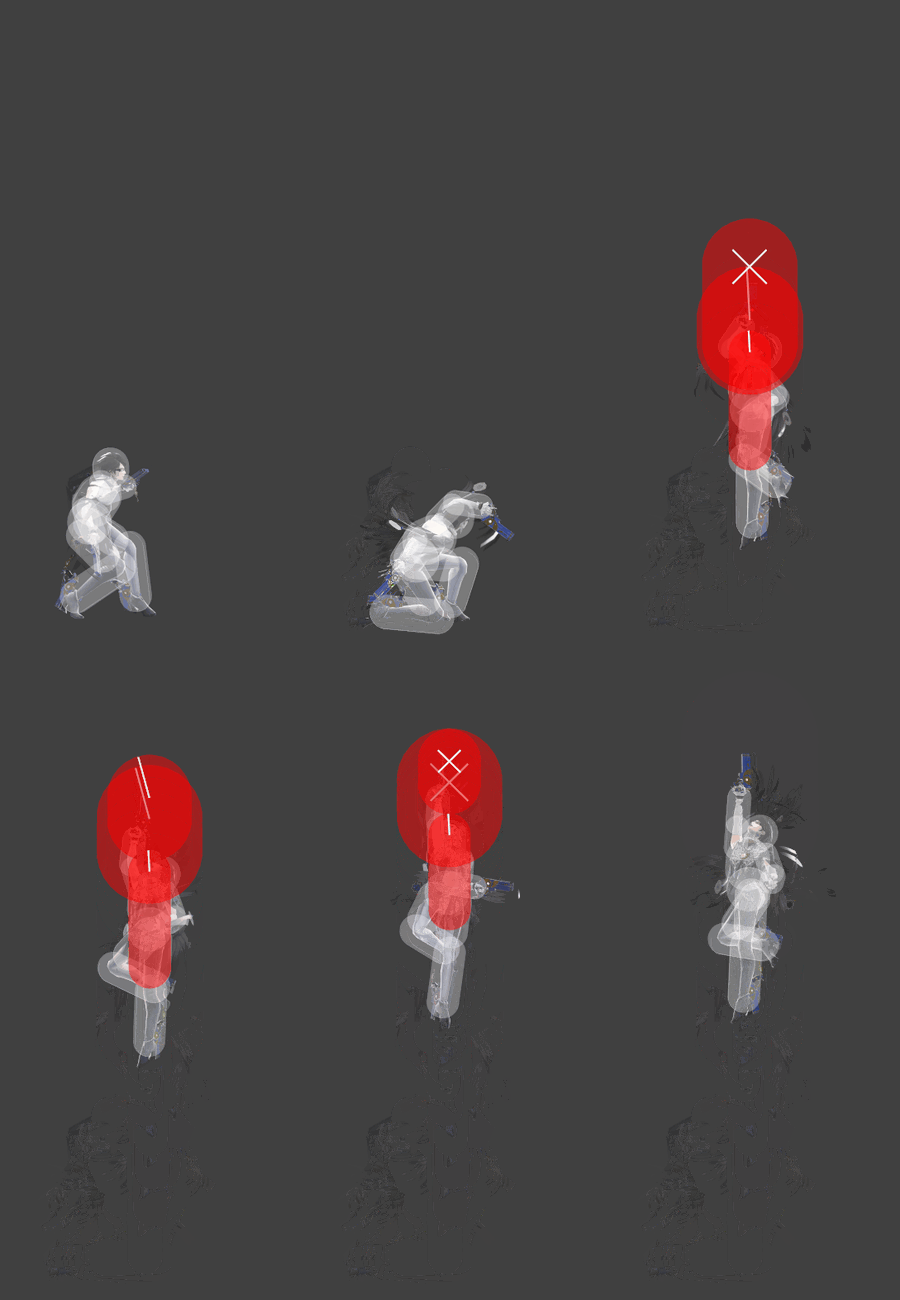
[[File:BayonettaWitchTwistBulletArtsSSBU.png|thumb|300px|Hitbox visualization showing the bullet arts of Bayonetta's up special, Witch Twist.]]
[[File:BayonettaWitchTwistBulletArtsSSBU.png|thumb|300px|Hitbox visualization showing the bullet arts of Bayonetta's up special, Witch Twist.]]
==Overview==
==Overview==
An ascending, corkscrew pistol-whip. Based on '''Witch Twist''' from ''Bayonetta'', as well as a variation from ''Bayonetta 2'' known as Witch Strike; the ability to hold guns is taken from the former, but lacks the dodging spinning kick at the start. It hits multiple times but covers minimal vertical distance and extremely minimal horizontal distance, similarly to [[Rising Uppercut]]. Despite this, Witch Twist is still a very useful [[recovery]] option, as she is allowed to use one Witch Twist after each jump, including after a double jump (allowing for a maximum of two Witch Twists before landing). Holding the button causes Bayonetta to additionally fire her guns from her hands and feet; hitting anyone directly above or below, to her sides, and slightly diagonally under her. It is overall her primary combo initiator and extender along with Witch Twist/After Burner Kick, as its low [[ending lag]] and multiple uses allow her to perform an impressive variety of aerial strings. Witch Twist is also essential for Bayonetta's ladder combos, as she can immediately perform another Witch Twist after the first one ends with precise timing, which can drag opponents close to the top [[blast line]]. Each Witch Twist's final hit has different [[knockback]] trajectories, with the first sending diagonally upwards and the second sending at a horizontal angle with low knockback; the latter allows Bayonetta to consistently combo into aerials (the most common being forward aerial).
The move deals a total of 7% damage (8.4% with the [[1v1 multiplier]]) if started on the ground, and 6% (7.2% in 1v1) if started in the air. With Bullet Arts, this can be increased to a total of 10% (12%) and 9% (10.8%), respectively. However, firing Bullet Arts deprives the move of its [[interruptibility]] frames, and is thus very rarely used, as it effectively prevents Bayonetta from starting or continuing combos into other attacks.
With precise timing (a 4 frame window), a double jump can be cancelled into Witch Twist, thereby saving her jump in a similar way to ''Smash 4''. This drastically improves her combo game and enables some particularly powerful ladder combos, as well as some much needed recovery mix-ups. This can be executed with both the first and second Witch Twists (as long as the double jump is unused) only to use the double jump right after, essentially giving her a maximum of three midair jumps, though only one would reach the top of its arch.
==Update History==
==Update History==
'''{{GameIcon|ssbu}} {{SSBU|3.1.0}}'''
Line 19: Line 25:
*{{buff|The move has a lower SDI multiplier (2× → 1.5×).}}
*{{buff|The window for Bayonetta to regain her double jump if the move is used after it has been increased (3 frames → 4).}}
==Hitboxes==
==Hitboxes==
===First Witch Twitst===
{{UltimateHitboxTableHeader}}
! {{rollover|Rehit rate|If not 0, hits again every X frames|y}}
{{HitboxTableTitle|Hit 1|25}}
{{HitboxTableTitle|Hit 1, grounded|25}}
{{UltimateHitboxTableRow
|id=0
|id=0
Line 68: Line 74:
}}
}}
|0
|0
{{HitboxTableTitle|Multihits (Earliest)|25}}
{{HitboxTableTitle|Hit 1, aerial|25}}
{{UltimateHitboxTableRow
|id=0
|damage=0.2%
|angle=93
|bk=0
|ks=100
|fkv=100
|r=5.0
|bn=top
|xpos=0.0
|ypos=21.0 to 19.0
|zpos=0.0
|ff=0.8
|sdi=1.5
|type=Hand
|effect=Rapid
|sfx=Kick
|slvl=M
}}
|3
{{UltimateHitboxTableRow
|id=1
|damage=0.2%
|angle=367
|bk=0
|ks=100
|fkv=80
|r=4.5
|bn=top
|xpos=0.0
|ypos=26.0 to 19.0
|zpos=0.0
|ff=0.8
|sdi=1.5
|type=Hand
|effect=Rapid
|sfx=Kick
|slvl=M
}}
|3
{{UltimateHitboxTableRow
|id=2
|damage=0.2%
|angle=93
|bk=0
|ks=100
|fkv=140
|r=2.0
|bn=top
|xpos=0.0
|ypos=18.0 to 8.0
|zpos=0.0
|ff=0.8
|sdi=1.5
|type=Hand
|effect=Rapid
|sfx=Kick
|slvl=M
}}
|3
{{HitboxTableTitle|Multihits (Early)|25}}
{{UltimateHitboxTableRow
|id=0
|damage=0.2%
|angle=93
|bk=0
|ks=100
|fkv=100
|r=5.0
|bn=top
|xpos=0.0
|ypos=21.0 to 19.0
|zpos=0.0
|ff=0.8
|sdi=1.5
|type=Hand
|effect=Rapid
|sfx=Kick
|slvl=M
}}
|3
{{UltimateHitboxTableRow
|id=1
|damage=0.2%
|angle=367
|bk=0
|ks=100
|fkv=80
|r=4.5
|bn=top
|xpos=0.0
|ypos=26.0 to 19.0
|zpos=0.0
|ff=0.8
|sdi=1.5
|type=Hand
|effect=Rapid
|sfx=Kick
|slvl=M
}}
|3
{{UltimateHitboxTableRow
|id=2
|damage=0.2%
|angle=93
|bk=0
|ks=100
|fkv=120
|r=2.0
|bn=top
|xpos=0.0
|ypos=18.0 to 9.0
|zpos=0.0
|ff=0.8
|sdi=1.5
|type=Hand
|effect=Rapid
|sfx=Kick
|slvl=M
}}
|3
{{HitboxTableTitle|Multihits (Mid)|25}}
{{UltimateHitboxTableRow
|id=0
|damage=0.2%
|angle=105
|bk=0
|ks=100
|fkv=75
|r=5.0
|bn=top
|xpos=0.0
|ypos=23.0 to 20.0
|zpos=0.0
|ff=0.8
|sdi=1.5
|type=Hand
|effect=Rapid
|sfx=Kick
|slvl=M
}}
|3
{{UltimateHitboxTableRow
|id=1
|damage=0.2%
|angle=105
|bk=0
|ks=100
|fkv=30
|r=4.0
|bn=top
|xpos=0.0
|ypos=25.0 to 23.0
|zpos=0.0
|ff=0.8
|sdi=1.5
|type=Hand
|effect=Rapid
|sfx=Kick
|slvl=M
}}
|3
{{UltimateHitboxTableRow
|id=2
|damage=0.2%
|angle=93
|bk=0
|ks=100
|fkv=120
|r=2.0
|bn=top
|xpos=0.0
|ypos=18.0 to 9.0
|zpos=0.0
|ff=0.8
|sdi=1.5
|type=Hand
|effect=Rapid
|sfx=Kick
|slvl=M
}}
|3
{{HitboxTableTitle|Multihits (Late)|25}}
{{UltimateHitboxTableRow
|id=0
|damage=0.2%
|angle=367
|bk=0
|ks=100
|fkv=75
|r=5.0
|bn=top
|xpos=0.0
|ypos=23.0 to 20.0
|zpos=0.0
|ff=0.8
|sdi=1.5
|type=Hand
|effect=Rapid
|sfx=Kick
|slvl=M
}}
|3
{{UltimateHitboxTableRow
|id=1
|damage=0.2%
|angle=367
|bk=0
|ks=100
|fkv=135
|r=3.0
|bn=top
|xpos=0.0
|ypos=25.0 to 23.0
|zpos=0.0
|ff=0.8
|sdi=1.5
|type=Hand
|effect=Rapid
|sfx=Kick
|slvl=M
}}
|3
{{UltimateHitboxTableRow
|id=2
|damage=0.2%
|angle=93
|bk=0
|ks=100
|fkv=120
|r=2.0
|bn=top
|xpos=0.0
|ypos=18.0 to 9.0
|zpos=0.0
|ff=0.8
|sdi=1.5
|type=Hand
|effect=Rapid
|sfx=Kick
|slvl=M
}}
|3
{{HitboxTableTitle|Multihits (Latest)|25}}
{{UltimateHitboxTableRow
|id=0
|damage=0.2%
|angle=367
|bk=0
|ks=100
|fkv=75
|r=5.0
|bn=top
|xpos=0.0
|ypos=23.0 to 20.0
|zpos=0.0
|ff=0.8
|sdi=1.5
|type=Hand
|effect=Rapid
|sfx=Kick
|slvl=M
}}
|3
{{UltimateHitboxTableRow
|id=1
|damage=0.2%
|angle=367
|bk=0
|ks=100
|fkv=135
|r=3.0
|bn=top
|xpos=0.0
|ypos=25.0 to 23.0
|zpos=0.0
|ff=0.8
|sdi=1.5
|type=Hand
|effect=Rapid
|sfx=Kick
|slvl=M
}}
|3
{{UltimateHitboxTableRow
|id=2
|damage=0.2%
|angle=93
|bk=0
|ks=100
|fkv=120
|r=2.0
|bn=top
|xpos=0.0
|ypos=18.0 to 11.0
|zpos=0.0
|ff=0.8
|sdi=1.5
|type=Hand
|effect=Rapid
|sfx=Kick
|slvl=M
}}
|3
{{HitboxTableTitle|Final hit|25}}
{{UltimateHitboxTableRow
|id=0
|damage=3.0%
|angle=32
|bk=45
|ks=80
|fkv=0
|r=6.5
|bn=top
|xpos=0.0
|ypos=26.5 to 19.0
|zpos=0.0
|ff=0.8
|sdi=1.5
|type=Hand
|effect=Normal
|sfx=Kick
|slvl=L
}}
|0
{{HitboxTableRowNote|All hitboxes use weight-independent knockback.|25}}
|}
===Second Witch Twist===
{{UltimateHitboxTableHeader}}
! {{rollover|Rehit rate|If not 0, hits again every X frames|y}}
{{HitboxTableTitle|Hit 1|25}}
{{UltimateHitboxTableRow
|id=0
|id=0
Line 749: Line 424:
}}
}}
|3
|3
{{HitboxTableTitle|Final hit|25}}
{{HitboxTableTitle|Final hit, first use|25}}
{{UltimateHitboxTableRow
|id=0
|damage=3.0%
|angle=32
|bk=45
|ks=80
|fkv=0
|r=6.5
|bn=top
|xpos=0.0
|ypos=26.5 to 19.0
|zpos=0.0
|ff=0.8
|sdi=1.5
|type=Hand
|effect=Normal
|sfx=Kick
|slvl=L
}}
|0
{{HitboxTableTitle|Final hit, second use|25}}
{{UltimateHitboxTableRow
|id=0
|id=0
Line 774: Line 470:


==Timing==
==Timing==
The move can grab ledges from the front starting on frame 27, and from behind starting on frame 33.
If Bullet Arts are used, the move loses its interruptibility frames, preventing Bayonetta from acting out of it until frame 45.
{|class="wikitable"
{|class="wikitable"
!Hit 1
!Hit 1
Line 796: Line 496:


{{FrameIconLegend|lag=y|hitbox=y|hitboxchange=y|interruptible=y}}
{{clr}}
 
==Parameters==
For landing lag data, see [[Bayonetta Recovery Frames]].
 
{|class="wikitable"
!Horizontal speed multiplier on startup
|0.8 (grounded)<br>0.5 (aerial)
|-
!Vertical speed multiplier on startup
|0.5
|-
!Gravity during the move
|0.03
|-
!Falling speed during the move
|0.4
|-
!Height multiplier
|1.2 (first)<br>1.1 (second)
|-
!Window after double jump to restore it
|4 frames (8.0.0 onward)<br>3 frames (before 8.0.0)
|}
 
{{MvSubNavBayonetta|g=SSBU}}
[[Category:Bayonetta (SSBU)]]
[[Category:Bayonetta (SSBU)]]
[[Category:Special moves (SSBU)]]
[[Category:Special moves (SSBU)]]
[[Category:Up special moves (SSBU)]]
[[Category:Up special moves (SSBU)]]

Latest revision as of 11:48, November 7, 2021

Bayonetta Up Special Hitbox Visualizations.
First Second
Hitbox visualization for Bayonetta's Witch Twist BayonettaWitchTwist2SSBU.gif
Hitbox visualization for Bayonetta's Witch Twist Bullet Arts
Hitbox visualization showing the bullet arts of Bayonetta's up special, Witch Twist.

Overview[edit]

An ascending, corkscrew pistol-whip. Based on Witch Twist from Bayonetta, as well as a variation from Bayonetta 2 known as Witch Strike; the ability to hold guns is taken from the former, but lacks the dodging spinning kick at the start. It hits multiple times but covers minimal vertical distance and extremely minimal horizontal distance, similarly to Rising Uppercut. Despite this, Witch Twist is still a very useful recovery option, as she is allowed to use one Witch Twist after each jump, including after a double jump (allowing for a maximum of two Witch Twists before landing). Holding the button causes Bayonetta to additionally fire her guns from her hands and feet; hitting anyone directly above or below, to her sides, and slightly diagonally under her. It is overall her primary combo initiator and extender along with Witch Twist/After Burner Kick, as its low ending lag and multiple uses allow her to perform an impressive variety of aerial strings. Witch Twist is also essential for Bayonetta's ladder combos, as she can immediately perform another Witch Twist after the first one ends with precise timing, which can drag opponents close to the top blast line. Each Witch Twist's final hit has different knockback trajectories, with the first sending diagonally upwards and the second sending at a horizontal angle with low knockback; the latter allows Bayonetta to consistently combo into aerials (the most common being forward aerial).

The move deals a total of 7% damage (8.4% with the 1v1 multiplier) if started on the ground, and 6% (7.2% in 1v1) if started in the air. With Bullet Arts, this can be increased to a total of 10% (12%) and 9% (10.8%), respectively. However, firing Bullet Arts deprives the move of its interruptibility frames, and is thus very rarely used, as it effectively prevents Bayonetta from starting or continuing combos into other attacks.

With precise timing (a 4 frame window), a double jump can be cancelled into Witch Twist, thereby saving her jump in a similar way to Smash 4. This drastically improves her combo game and enables some particularly powerful ladder combos, as well as some much needed recovery mix-ups. This can be executed with both the first and second Witch Twists (as long as the double jump is unused) only to use the double jump right after, essentially giving her a maximum of three midair jumps, though only one would reach the top of its arch.

Update History[edit]

Super Smash Bros. Ultimate 3.1.0

  • Buff Witch Twist has less landing lag when used twice (32 frames → 28).
  • Buff Witch Twist has an additional hitbox, making its hits connect more reliably.

Super Smash Bros. Ultimate 8.0.0

  • Buff The move has a lower SDI multiplier (2× → 1.5×).
  • Buff The window for Bayonetta to regain her double jump if the move is used after it has been increased (3 frames → 4).

Hitboxes[edit]

ID Part Rehit rate Damage SD Angle Angle type BK KS FKV Set weight Radius Bone Offset SDI× T% Clang Rebound Effect Type G A Sound Direct Hit bits Hit part Blockable Reflectable Absorbable Flinchless No GFX Heedless Rehit rate
Hit 1, grounded
0 0 0 3.0% 0 AngleIcon96.png Standard 0 100 120 HitboxTableIcon(False).png 2.5 top 0.0 4.5 to 9.5 0.5 0.8× 0.0× 0% HitboxTableIcon(NoClang).png HitboxTableIcon(NoRebound).png EffectIcon(Normal).png TypeIcon(Hand).png HitboxTableIcon(GroundedTrue).png HitboxTableIcon(AerialTrue).png L Kick SpecialsDirect.png All All HitboxTableIcon(Blockable).png HitboxTableIcon(Unreflectable).png HitboxTableIcon(Unabsorbable).png HitboxTableIcon(False).png HitboxTableIcon(False).png HitboxTableIcon(False).png 0
1 0 0 3.0% 0 AngleIcon103.png Standard 0 100 130 HitboxTableIcon(False).png 4.0 top 0.0 6.0 to 8.0 5.0 0.8× 0.0× 0% HitboxTableIcon(NoClang).png HitboxTableIcon(NoRebound).png EffectIcon(Normal).png TypeIcon(Hand).png HitboxTableIcon(GroundedTrue).png HitboxTableIcon(AerialTrue).png L Kick SpecialsDirect.png All All HitboxTableIcon(Blockable).png HitboxTableIcon(Unreflectable).png HitboxTableIcon(Unabsorbable).png HitboxTableIcon(False).png HitboxTableIcon(False).png HitboxTableIcon(False).png 0
Hit 1, aerial
0 0 0 2.0% 0 AngleIcon90.png Standard 0 100 140 HitboxTableIcon(False).png 3.0 top 0.0 4.0 to 11.0 1.0 0.8× 0.0× 0% HitboxTableIcon(NoClang).png HitboxTableIcon(NoRebound).png EffectIcon(Normal).png TypeIcon(Hand).png HitboxTableIcon(GroundedTrue).png HitboxTableIcon(AerialTrue).png L Kick SpecialsDirect.png All All HitboxTableIcon(Blockable).png HitboxTableIcon(Unreflectable).png HitboxTableIcon(Unabsorbable).png HitboxTableIcon(False).png HitboxTableIcon(False).png HitboxTableIcon(False).png 0
1 0 0 2.0% 0 AngleIcon100.png Standard 0 100 135 HitboxTableIcon(False).png 5.3 top 0.0 6.0 to 9.5 7.5 0.8× 0.0× 0% HitboxTableIcon(NoClang).png HitboxTableIcon(NoRebound).png EffectIcon(Normal).png TypeIcon(Hand).png HitboxTableIcon(GroundedTrue).png HitboxTableIcon(AerialTrue).png L Kick SpecialsDirect.png All All HitboxTableIcon(Blockable).png HitboxTableIcon(Unreflectable).png HitboxTableIcon(Unabsorbable).png HitboxTableIcon(False).png HitboxTableIcon(False).png HitboxTableIcon(False).png 0
Multihits (Earliest)
0 0 0 0.2% 0 AngleIcon93.png Standard 0 100 100 HitboxTableIcon(False).png 5.0 top 0.0 21.0 to 19.0 0.0 0.8× 1.5× 0% HitboxTableIcon(Clang).png HitboxTableIcon(Rebound).png EffectIcon(Rapid).png TypeIcon(Hand).png HitboxTableIcon(GroundedTrue).png HitboxTableIcon(AerialTrue).png M Kick SpecialsDirect.png All All HitboxTableIcon(Blockable).png HitboxTableIcon(Unreflectable).png HitboxTableIcon(Unabsorbable).png HitboxTableIcon(False).png HitboxTableIcon(False).png HitboxTableIcon(False).png 3
1 0 0 0.2% 0 Autolink angle (367) Standard 0 100 80 HitboxTableIcon(False).png 4.5 top 0.0 26.0 to 19.0 0.0 0.8× 1.5× 0% HitboxTableIcon(Clang).png HitboxTableIcon(Rebound).png EffectIcon(Rapid).png TypeIcon(Hand).png HitboxTableIcon(GroundedTrue).png HitboxTableIcon(AerialTrue).png M Kick SpecialsDirect.png All All HitboxTableIcon(Blockable).png HitboxTableIcon(Unreflectable).png HitboxTableIcon(Unabsorbable).png HitboxTableIcon(False).png HitboxTableIcon(False).png HitboxTableIcon(False).png 3
2 0 0 0.2% 0 AngleIcon93.png Standard 0 100 140 HitboxTableIcon(False).png 2.0 top 0.0 18.0 to 8.0 0.0 0.8× 1.5× 0% HitboxTableIcon(Clang).png HitboxTableIcon(Rebound).png EffectIcon(Rapid).png TypeIcon(Hand).png HitboxTableIcon(GroundedTrue).png HitboxTableIcon(AerialTrue).png M Kick SpecialsDirect.png All All HitboxTableIcon(Blockable).png HitboxTableIcon(Unreflectable).png HitboxTableIcon(Unabsorbable).png HitboxTableIcon(False).png HitboxTableIcon(False).png HitboxTableIcon(False).png 3
Multihits (Early)
0 0 0 0.2% 0 AngleIcon93.png Standard 0 100 100 HitboxTableIcon(False).png 5.0 top 0.0 21.0 to 19.0 0.0 0.8× 1.5× 0% HitboxTableIcon(Clang).png HitboxTableIcon(Rebound).png EffectIcon(Rapid).png TypeIcon(Hand).png HitboxTableIcon(GroundedTrue).png HitboxTableIcon(AerialTrue).png M Kick SpecialsDirect.png All All HitboxTableIcon(Blockable).png HitboxTableIcon(Unreflectable).png HitboxTableIcon(Unabsorbable).png HitboxTableIcon(False).png HitboxTableIcon(False).png HitboxTableIcon(False).png 3
1 0 0 0.2% 0 Autolink angle (367) Standard 0 100 80 HitboxTableIcon(False).png 4.5 top 0.0 26.0 to 19.0 0.0 0.8× 1.5× 0% HitboxTableIcon(Clang).png HitboxTableIcon(Rebound).png EffectIcon(Rapid).png TypeIcon(Hand).png HitboxTableIcon(GroundedTrue).png HitboxTableIcon(AerialTrue).png M Kick SpecialsDirect.png All All HitboxTableIcon(Blockable).png HitboxTableIcon(Unreflectable).png HitboxTableIcon(Unabsorbable).png HitboxTableIcon(False).png HitboxTableIcon(False).png HitboxTableIcon(False).png 3
2 0 0 0.2% 0 AngleIcon93.png Standard 0 100 120 HitboxTableIcon(False).png 2.0 top 0.0 18.0 to 9.0 0.0 0.8× 1.5× 0% HitboxTableIcon(Clang).png HitboxTableIcon(Rebound).png EffectIcon(Rapid).png TypeIcon(Hand).png HitboxTableIcon(GroundedTrue).png HitboxTableIcon(AerialTrue).png M Kick SpecialsDirect.png All All HitboxTableIcon(Blockable).png HitboxTableIcon(Unreflectable).png HitboxTableIcon(Unabsorbable).png HitboxTableIcon(False).png HitboxTableIcon(False).png HitboxTableIcon(False).png 3
Multihits (Mid)
0 0 0 0.2% 0 AngleIcon105.png Standard 0 100 75 HitboxTableIcon(False).png 5.0 top 0.0 23.0 to 20.0 0.0 0.8× 1.5× 0% HitboxTableIcon(Clang).png HitboxTableIcon(Rebound).png EffectIcon(Rapid).png TypeIcon(Hand).png HitboxTableIcon(GroundedTrue).png HitboxTableIcon(AerialTrue).png M Kick SpecialsDirect.png All All HitboxTableIcon(Blockable).png HitboxTableIcon(Unreflectable).png HitboxTableIcon(Unabsorbable).png HitboxTableIcon(False).png HitboxTableIcon(False).png HitboxTableIcon(False).png 3
1 0 0 0.2% 0 AngleIcon105.png Standard 0 100 30 HitboxTableIcon(False).png 4.0 top 0.0 25.0 to 23.0 0.0 0.8× 1.5× 0% HitboxTableIcon(Clang).png HitboxTableIcon(Rebound).png EffectIcon(Rapid).png TypeIcon(Hand).png HitboxTableIcon(GroundedTrue).png HitboxTableIcon(AerialTrue).png M Kick SpecialsDirect.png All All HitboxTableIcon(Blockable).png HitboxTableIcon(Unreflectable).png HitboxTableIcon(Unabsorbable).png HitboxTableIcon(False).png HitboxTableIcon(False).png HitboxTableIcon(False).png 3
2 0 0 0.2% 0 AngleIcon93.png Standard 0 100 120 HitboxTableIcon(False).png 2.0 top 0.0 18.0 to 9.0 0.0 0.8× 1.5× 0% HitboxTableIcon(Clang).png HitboxTableIcon(Rebound).png EffectIcon(Rapid).png TypeIcon(Hand).png HitboxTableIcon(GroundedTrue).png HitboxTableIcon(AerialTrue).png M Kick SpecialsDirect.png All All HitboxTableIcon(Blockable).png HitboxTableIcon(Unreflectable).png HitboxTableIcon(Unabsorbable).png HitboxTableIcon(False).png HitboxTableIcon(False).png HitboxTableIcon(False).png 3
Multihits (Late)
0 0 0 0.2% 0 Autolink angle (367) Standard 0 100 75 HitboxTableIcon(False).png 5.0 top 0.0 23.0 to 20.0 0.0 0.8× 1.5× 0% HitboxTableIcon(Clang).png HitboxTableIcon(Rebound).png EffectIcon(Rapid).png TypeIcon(Hand).png HitboxTableIcon(GroundedTrue).png HitboxTableIcon(AerialTrue).png M Kick SpecialsDirect.png All All HitboxTableIcon(Blockable).png HitboxTableIcon(Unreflectable).png HitboxTableIcon(Unabsorbable).png HitboxTableIcon(False).png HitboxTableIcon(False).png HitboxTableIcon(False).png 3
1 0 0 0.2% 0 Autolink angle (367) Standard 0 100 135 HitboxTableIcon(False).png 3.0 top 0.0 25.0 to 23.0 0.0 0.8× 1.5× 0% HitboxTableIcon(Clang).png HitboxTableIcon(Rebound).png EffectIcon(Rapid).png TypeIcon(Hand).png HitboxTableIcon(GroundedTrue).png HitboxTableIcon(AerialTrue).png M Kick SpecialsDirect.png All All HitboxTableIcon(Blockable).png HitboxTableIcon(Unreflectable).png HitboxTableIcon(Unabsorbable).png HitboxTableIcon(False).png HitboxTableIcon(False).png HitboxTableIcon(False).png 3
2 0 0 0.2% 0 AngleIcon93.png Standard 0 100 120 HitboxTableIcon(False).png 2.0 top 0.0 18.0 to 9.0 0.0 0.8× 1.5× 0% HitboxTableIcon(Clang).png HitboxTableIcon(Rebound).png EffectIcon(Rapid).png TypeIcon(Hand).png HitboxTableIcon(GroundedTrue).png HitboxTableIcon(AerialTrue).png M Kick SpecialsDirect.png All All HitboxTableIcon(Blockable).png HitboxTableIcon(Unreflectable).png HitboxTableIcon(Unabsorbable).png HitboxTableIcon(False).png HitboxTableIcon(False).png HitboxTableIcon(False).png 3
Multihits (Latest)
0 0 0 0.2% 0 Autolink angle (367) Standard 0 100 75 HitboxTableIcon(False).png 5.0 top 0.0 23.0 to 20.0 0.0 0.8× 1.5× 0% HitboxTableIcon(Clang).png HitboxTableIcon(Rebound).png EffectIcon(Rapid).png TypeIcon(Hand).png HitboxTableIcon(GroundedTrue).png HitboxTableIcon(AerialTrue).png M Kick SpecialsDirect.png All All HitboxTableIcon(Blockable).png HitboxTableIcon(Unreflectable).png HitboxTableIcon(Unabsorbable).png HitboxTableIcon(False).png HitboxTableIcon(False).png HitboxTableIcon(False).png 3
1 0 0 0.2% 0 Autolink angle (367) Standard 0 100 135 HitboxTableIcon(False).png 3.0 top 0.0 25.0 to 23.0 0.0 0.8× 1.5× 0% HitboxTableIcon(Clang).png HitboxTableIcon(Rebound).png EffectIcon(Rapid).png TypeIcon(Hand).png HitboxTableIcon(GroundedTrue).png HitboxTableIcon(AerialTrue).png M Kick SpecialsDirect.png All All HitboxTableIcon(Blockable).png HitboxTableIcon(Unreflectable).png HitboxTableIcon(Unabsorbable).png HitboxTableIcon(False).png HitboxTableIcon(False).png HitboxTableIcon(False).png 3
2 0 0 0.2% 0 AngleIcon93.png Standard 0 100 120 HitboxTableIcon(False).png 2.0 top 0.0 18.0 to 11.0 0.0 0.8× 1.5× 0% HitboxTableIcon(Clang).png HitboxTableIcon(Rebound).png EffectIcon(Rapid).png TypeIcon(Hand).png HitboxTableIcon(GroundedTrue).png HitboxTableIcon(AerialTrue).png M Kick SpecialsDirect.png All All HitboxTableIcon(Blockable).png HitboxTableIcon(Unreflectable).png HitboxTableIcon(Unabsorbable).png HitboxTableIcon(False).png HitboxTableIcon(False).png HitboxTableIcon(False).png 3
Final hit, first use
0 0 0 3.0% 0 AngleIcon32.png Standard 45 80 0 HitboxTableIcon(False).png 6.5 top 0.0 26.5 to 19.0 0.0 0.8× 1.5× 0% HitboxTableIcon(Clang).png HitboxTableIcon(Rebound).png EffectIcon(Normal).png TypeIcon(Hand).png HitboxTableIcon(GroundedTrue).png HitboxTableIcon(AerialTrue).png L Kick SpecialsDirect.png All All HitboxTableIcon(Blockable).png HitboxTableIcon(Unreflectable).png HitboxTableIcon(Unabsorbable).png HitboxTableIcon(False).png HitboxTableIcon(False).png HitboxTableIcon(False).png 0
Final hit, second use
0 0 0 3.0% 0 AngleIcon0.png Standard 30 50 0 HitboxTableIcon(False).png 6.5 top 0.0 26.5 to 19.0 0.0 0.8× 1.5× 0% HitboxTableIcon(Clang).png HitboxTableIcon(Rebound).png EffectIcon(Normal).png TypeIcon(Hand).png HitboxTableIcon(GroundedTrue).png HitboxTableIcon(AerialTrue).png L Kick SpecialsDirect.png All All HitboxTableIcon(Blockable).png HitboxTableIcon(Unreflectable).png HitboxTableIcon(Unabsorbable).png HitboxTableIcon(False).png HitboxTableIcon(False).png HitboxTableIcon(False).png 0
All hitboxes use weight-independent knockback.

Timing[edit]

The move can grab ledges from the front starting on frame 27, and from behind starting on frame 33.

If Bullet Arts are used, the move loses its interruptibility frames, preventing Bayonetta from acting out of it until frame 45.

Hit 1 6
Multihits (earliest, early, mid, late, latest) 11, 12-14, 15-19, 20-22, 23-25
Final hit 27-28
Interruptible 32
Animation length 44
FrameIcon(Lag).png FrameIcon(Lag).png FrameIcon(Lag).png FrameIcon(Lag).png FrameIcon(Lag).png FrameIcon(Hitbox).png FrameIcon(Lag).png FrameIcon(Lag).png FrameIcon(Lag).png FrameIcon(Lag).png FrameIcon(HitboxChangeS).png FrameIcon(HitboxChangeE).png FrameIcon(Hitbox).png FrameIcon(HitboxChangeS).png FrameIcon(HitboxChangeE).png FrameIcon(Hitbox).png FrameIcon(Hitbox).png FrameIcon(Hitbox).png FrameIcon(HitboxChangeS).png FrameIcon(HitboxChangeE).png FrameIcon(Hitbox).png FrameIcon(HitboxChangeS).png FrameIcon(HitboxChangeE).png FrameIcon(Hitbox).png FrameIcon(Hitbox).png FrameIcon(Lag).png FrameIcon(Hitbox).png FrameIcon(Hitbox).png FrameIcon(Lag).png FrameIcon(Lag).png FrameIcon(Lag).png FrameIcon(Interruptible).png FrameIcon(Interruptible).png FrameIcon(Interruptible).png FrameIcon(Interruptible).png FrameIcon(Interruptible).png FrameIcon(Interruptible).png FrameIcon(Interruptible).png FrameIcon(Interruptible).png FrameIcon(Interruptible).png FrameIcon(Interruptible).png FrameIcon(Interruptible).png FrameIcon(Interruptible).png FrameIcon(Interruptible).png
Legend (1 square = 1 frame)
FrameIcon(Lag).png
Lag time
FrameIcon(Hitbox).png
Hitbox
FrameIcon(HitboxChangeS).pngFrameIcon(HitboxChangeE).png
Hitbox change
FrameIcon(Interruptible).png
Interruptible

Parameters[edit]

For landing lag data, see Bayonetta Recovery Frames.

Horizontal speed multiplier on startup 0.8 (grounded)
0.5 (aerial)
Vertical speed multiplier on startup 0.5
Gravity during the move 0.03
Falling speed during the move 0.4
Height multiplier 1.2 (first)
1.1 (second)
Window after double jump to restore it 4 frames (8.0.0 onward)
3 frames (before 8.0.0)