SSBU Icon.png

King K. Rool (SSBU)/Down special

From SmashWiki, the Super Smash Bros. wiki
< King K. Rool (SSBU)
Revision as of 19:13, March 27, 2020 by EyeDonutz (talk | contribs) (fixed one of the gifs and some framestrips)
Jump to navigationJump to search
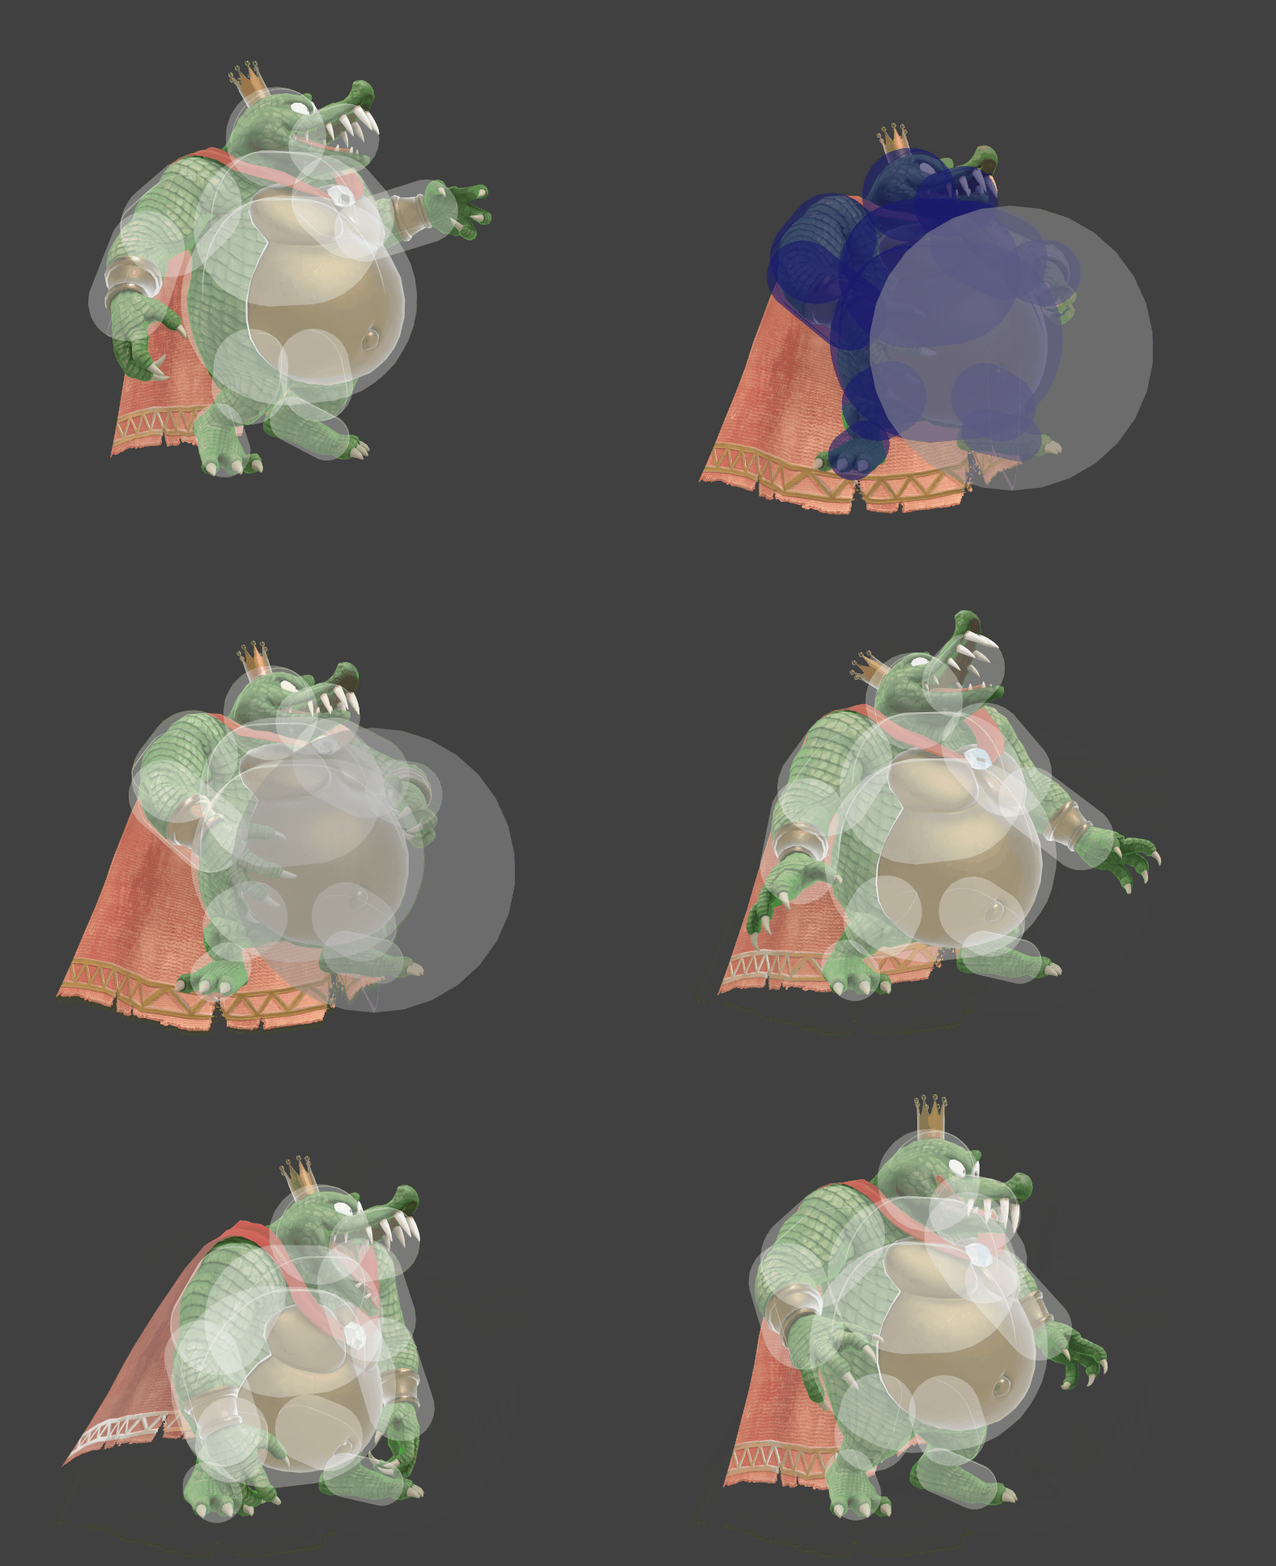
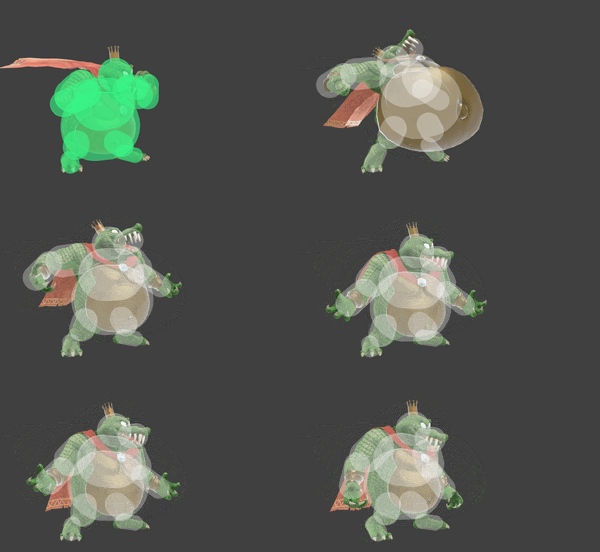
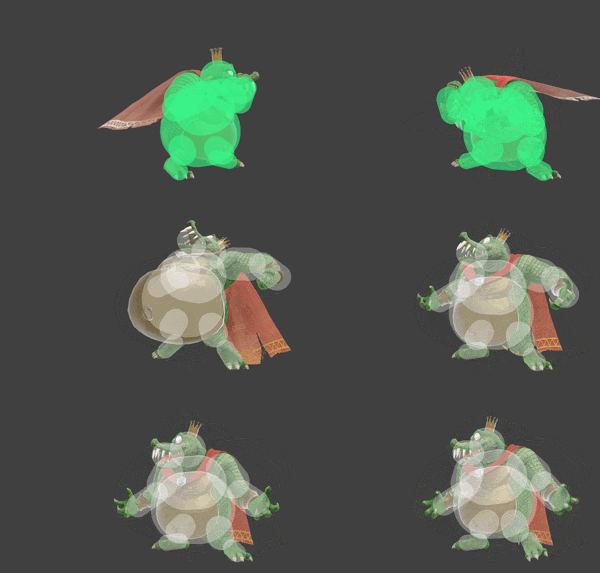
King K. Rool down special hitbox visualizations
Preparation KingKRoolDSpecialSSBU.gif
Counter KingKRoolDSpecialAttackSSBU.gif
Reverse KingKRoolDSpecialAttackTurnSSBU.gif

Overview

King K. Rool puffs out his armored belly before bouncing attacks off. Gut Check serves as both a counter and a reflector, giving K. Rool a degree of flexibility in how he can use the move. This allows him to stave off pressure in disadvantage, especially during ledgetrap situations. Gut Check is tied with Mii Brawler's Counter Throw for second most powerful counter in the game damage-wise, at 1.5× damage, with the highest damage being Joker's Tetrakarn.

Gut Check's purpose of being a counter allows it to function as a combo breaker or a method of resetting neutral. With intangibility on frame 4, this makes it K. Rool's fastest combo breaker other than air dodge. Most players will watch where a combo is going to decide whether to Gut Check or airdodge due to the incredible reward the counter has on hit in terms of damage. Gut Check has a minimum of 12% damage, or a maximum of 50%, which is a one-hit KO.

Gut Check has an enormous hitbox when the counter goes off, making it very difficult to avoid and remain safe on. In addition, the K. Rool player can have the counter turned around to either target other opponents in doubles, or hit the attacker's hurtbox extension through the counter. This can be done on reaction by the King K. Rool player. The searchbox also goes below the stage, making it relatively consistent for sniping recoveries below the ledge.

Gut Check can also be used for survivability, by virtue of its 0.5× horizontal air speed multiplier and 0.0025× vertical air speed multiplier[1]. While K. Rool will be KO'd around 5% earlier, with awareness of KO percentages, it is possible to aid in recovery through keeping both jump and air dodge as mixup options. It also takes K. Rool out of tumble.

Unlike many counters, Gut Check has an unnatural amount of intangibility frames. This allows the move to dodge grabs and sometimes reflect moves from behind (such as Thunder Jolt, Boomerangs and similar attacks). However, opponents usually maintain the most frame advantage due to Gut Check's failure lag. Most K. Rool players buffer neutral attack or spot dodge in these scenarios in attempt to score a punish, thanks to their decent frame data. In addition, King K. Rool gains full-body invincibility after using Gut Check, absorbing hitboxes rather than simply passing through them, significantly reducing the chance of him being hit post-Gut Check. It's also a very quick counterattack with a lingering hitbox, being active frame 2-5 if not reversed. The invincibility is also longer on the reverse Gut Check, meaning this can technically be used to absorb more attacks should the player want to do that.

However, Gut Check has some significant downsides. The main one being its heavy lag (a full second). While a successful attack is quick, the failure is not. As a result, a failed Gut Check can potentially be a stock. Gut Check also doesn't cover K. Rool completely. As a result, hitting K. Rool in the face causes it the attack to miss and K. Rool to take punishment. Many projectiles can completely bypass Gut Check through this, making it one of the worst counters in the game for the intended purpose. Reversing Gut Check, while the payoff is immense, is also very inconsistent even when reacting. This makes it difficult to determine risk/reward and potentially drops valuable damage and control of the game, despite the low endlag to the attack. The reward for a reverse Gut Check is also a bit low; despite the difficulty landing it as well as the hit frame being 2 frames slower, the power remains the same. Gut Check also has a noticeably weak sourspot on the gust of wind; while this deals the same damage, its KO power is noticeably low. It also has an angle of 45 unlike most having 361, making it easier to DI than most counters.

Update History

Super Smash Bros. Ultimate 3.0.0

  • Buff Gut Check has less ending lag (Fail/Succeed: FAF 68/48 → 63/43).

Super Smash Bros. Ultimate 6.0.0

  • Buff The counter detection hitbox has more range (size: 6u → 7.8u, Y offset: 8.6u → 7.4u, Z offset: 6u → 4.4u), now covering some area below his belly, the feet and just below the stage base.
  • Buff The counter hitbox and the counterattack's sweetspot have more range (size: 10u → 12u, Y offset: 11u → 12.5u, Z offset: 9u → 10.5u).
  • Buff A successful Gut Check has less ending lag (FAF 42 → 38).
  • Buff A successful reversed Gut Check has less ending lag (FAF 53 → 45).

Hitboxes

Both variants of a successful Gut Check have the same knockback and damage statistics.

ID Part Rehit rate Damage SD Angle Angle type BK KS FKV Set weight Radius Bone Offset SDI× T% Clang Rebound Effect Type G A Sound Direct Hit bits Hit part Blockable Reflectable Absorbable Flinchless No GFX Heedless
Success (Sweetspot)
0 0 0 0.0% 1 AngleIcon45.png Standard 90 56 0 HitboxTableIcon(False).png 12.0 top 0.0 12.5 10.5 1.2× 1.0× 0% HitboxTableIcon(NoClang).png HitboxTableIcon(NoRebound).png EffectIcon(Normal).png TypeIcon(Body).png HitboxTableIcon(GroundedTrue).png HitboxTableIcon(AerialTrue).png M Kick SpecialsDirect.png All All HitboxTableIcon(Blockable).png HitboxTableIcon(Unreflectable).png HitboxTableIcon(Unabsorbable).png HitboxTableIcon(False).png HitboxTableIcon(False).png HitboxTableIcon(False).png
Success (Sourspot)
1 0 0 0.0% 1 AngleIcon45.png Standard 80 50 0 HitboxTableIcon(False).png 12.0 top 0.0 13.0 18.0 1.1× 1.0× 0% HitboxTableIcon(NoClang).png HitboxTableIcon(NoRebound).png EffectIcon(Normal).png TypeIcon(Body).png HitboxTableIcon(GroundedTrue).png HitboxTableIcon(AerialTrue).png M Punch SpecialsDirect.png All All HitboxTableIcon(Blockable).png HitboxTableIcon(Unreflectable).png HitboxTableIcon(Unabsorbable).png HitboxTableIcon(False).png HitboxTableIcon(False).png HitboxTableIcon(False).png
Success (Reverse Sweetspot)
0 0 0 0.0% 1 AngleIcon45.png Standard 90 56 0 HitboxTableIcon(False).png 12.0 top 0.0 12.5 -10.5 1.2× 1.0× 0% HitboxTableIcon(NoClang).png HitboxTableIcon(NoRebound).png EffectIcon(Normal).png TypeIcon(Body).png HitboxTableIcon(GroundedTrue).png HitboxTableIcon(AerialTrue).png M Kick SpecialsDirect.png All All HitboxTableIcon(Blockable).png HitboxTableIcon(Unreflectable).png HitboxTableIcon(Unabsorbable).png HitboxTableIcon(False).png HitboxTableIcon(False).png HitboxTableIcon(False).png
Success (Reverse Sourspot)
1 0 0 0.0% 1 AngleIcon45.png Standard 80 50 0 HitboxTableIcon(False).png 12.0 top 0.0 13.0 -18.0 1.1× 1.0× 0% HitboxTableIcon(NoClang).png HitboxTableIcon(NoRebound).png EffectIcon(Normal).png TypeIcon(Body).png HitboxTableIcon(GroundedTrue).png HitboxTableIcon(AerialTrue).png M Punch SpecialsDirect.png All All HitboxTableIcon(Blockable).png HitboxTableIcon(Unreflectable).png HitboxTableIcon(Unabsorbable).png HitboxTableIcon(False).png HitboxTableIcon(False).png HitboxTableIcon(False).png

Timing

Counter

Intangibility 4-14
Counter 5-28
Interruptible 65
Animation length 71
Counter  FrameIcon(Lag).png FrameIcon(Lag).png FrameIcon(Lag).png FrameIcon(Lag).png FrameIcon(Defensive).png FrameIcon(Defensive).png FrameIcon(Defensive).png FrameIcon(Defensive).png FrameIcon(Defensive).png FrameIcon(Defensive).png FrameIcon(Defensive).png FrameIcon(Defensive).png FrameIcon(Defensive).png FrameIcon(Defensive).png FrameIcon(Defensive).png FrameIcon(Defensive).png FrameIcon(Defensive).png FrameIcon(Defensive).png FrameIcon(Defensive).png FrameIcon(Defensive).png FrameIcon(Defensive).png FrameIcon(Defensive).png FrameIcon(Defensive).png FrameIcon(Defensive).png FrameIcon(Defensive).png FrameIcon(Defensive).png FrameIcon(Defensive).png FrameIcon(Defensive).png FrameIcon(Defensive).png FrameIcon(Lag).png FrameIcon(Lag).png FrameIcon(Lag).png FrameIcon(Lag).png FrameIcon(Lag).png FrameIcon(Lag).png FrameIcon(Lag).png FrameIcon(Lag).png FrameIcon(Lag).png FrameIcon(Lag).png FrameIcon(Lag).png FrameIcon(Lag).png FrameIcon(Lag).png FrameIcon(Lag).png FrameIcon(Lag).png FrameIcon(Lag).png FrameIcon(Lag).png FrameIcon(Lag).png FrameIcon(Lag).png FrameIcon(Lag).png FrameIcon(Lag).png FrameIcon(Lag).png FrameIcon(Lag).png FrameIcon(Lag).png FrameIcon(Lag).png FrameIcon(Lag).png FrameIcon(Lag).png FrameIcon(Lag).png FrameIcon(Lag).png FrameIcon(Lag).png FrameIcon(Lag).png FrameIcon(Lag).png FrameIcon(Lag).png FrameIcon(Lag).png FrameIcon(Lag).png FrameIcon(Lag).png FrameIcon(Interruptible).png FrameIcon(Interruptible).png FrameIcon(Interruptible).png FrameIcon(Interruptible).png FrameIcon(Interruptible).png FrameIcon(Interruptible).png
Intangibility  FrameIcon(Vulnerable).png FrameIcon(Vulnerable).png FrameIcon(Vulnerable).png FrameIcon(Intangible).png FrameIcon(Intangible).png FrameIcon(Intangible).png FrameIcon(Intangible).png FrameIcon(Intangible).png FrameIcon(Intangible).png FrameIcon(Intangible).png FrameIcon(Intangible).png FrameIcon(Intangible).png FrameIcon(Intangible).png FrameIcon(Vulnerable).png FrameIcon(Vulnerable).png FrameIcon(Vulnerable).png FrameIcon(Vulnerable).png FrameIcon(Vulnerable).png FrameIcon(Vulnerable).png FrameIcon(Vulnerable).png FrameIcon(Vulnerable).png FrameIcon(Vulnerable).png FrameIcon(Vulnerable).png FrameIcon(Vulnerable).png FrameIcon(Vulnerable).png FrameIcon(Vulnerable).png FrameIcon(Vulnerable).png FrameIcon(Vulnerable).png FrameIcon(Vulnerable).png FrameIcon(Vulnerable).png FrameIcon(Vulnerable).png FrameIcon(Vulnerable).png FrameIcon(Vulnerable).png FrameIcon(Vulnerable).png FrameIcon(Vulnerable).png FrameIcon(Vulnerable).png FrameIcon(Vulnerable).png FrameIcon(Vulnerable).png FrameIcon(Vulnerable).png FrameIcon(Vulnerable).png FrameIcon(Vulnerable).png FrameIcon(Vulnerable).png FrameIcon(Vulnerable).png FrameIcon(Vulnerable).png FrameIcon(Vulnerable).png FrameIcon(Vulnerable).png FrameIcon(Vulnerable).png FrameIcon(Vulnerable).png FrameIcon(Vulnerable).png FrameIcon(Vulnerable).png FrameIcon(Vulnerable).png FrameIcon(Vulnerable).png FrameIcon(Vulnerable).png FrameIcon(Vulnerable).png FrameIcon(Vulnerable).png FrameIcon(Vulnerable).png FrameIcon(Vulnerable).png FrameIcon(Vulnerable).png FrameIcon(Vulnerable).png FrameIcon(Vulnerable).png FrameIcon(Vulnerable).png FrameIcon(Vulnerable).png FrameIcon(Vulnerable).png FrameIcon(Vulnerable).png FrameIcon(Vulnerable).png FrameIcon(Vulnerable).png FrameIcon(Vulnerable).png FrameIcon(Vulnerable).png FrameIcon(Vulnerable).png FrameIcon(Vulnerable).png FrameIcon(Vulnerable).png

Success

Invincibility 1-7
Hitboxes 2-5
Interruptible 38
Animation length 63
Hitboxes  FrameIcon(Lag).png FrameIcon(Hitbox).png FrameIcon(Hitbox).png FrameIcon(Hitbox).png FrameIcon(Hitbox).png FrameIcon(Lag).png FrameIcon(Lag).png FrameIcon(Lag).png FrameIcon(Lag).png FrameIcon(Lag).png FrameIcon(Lag).png FrameIcon(Lag).png FrameIcon(Lag).png FrameIcon(Lag).png FrameIcon(Lag).png FrameIcon(Lag).png FrameIcon(Lag).png FrameIcon(Lag).png FrameIcon(Lag).png FrameIcon(Lag).png FrameIcon(Lag).png FrameIcon(Lag).png FrameIcon(Lag).png FrameIcon(Lag).png FrameIcon(Lag).png FrameIcon(Lag).png FrameIcon(Lag).png FrameIcon(Lag).png FrameIcon(Lag).png FrameIcon(Lag).png FrameIcon(Lag).png FrameIcon(Lag).png FrameIcon(Lag).png FrameIcon(Lag).png FrameIcon(Lag).png FrameIcon(Lag).png FrameIcon(Lag).png FrameIcon(Lag).png FrameIcon(Interruptible).png FrameIcon(Interruptible).png FrameIcon(Interruptible).png FrameIcon(Interruptible).png FrameIcon(Interruptible).png FrameIcon(Interruptible).png FrameIcon(Interruptible).png FrameIcon(Interruptible).png FrameIcon(Interruptible).png FrameIcon(Interruptible).png FrameIcon(Interruptible).png FrameIcon(Interruptible).png FrameIcon(Interruptible).png FrameIcon(Interruptible).png FrameIcon(Interruptible).png FrameIcon(Interruptible).png FrameIcon(Interruptible).png FrameIcon(Interruptible).png FrameIcon(Interruptible).png FrameIcon(Interruptible).png FrameIcon(Interruptible).png FrameIcon(Interruptible).png FrameIcon(Interruptible).png FrameIcon(Interruptible).png FrameIcon(Interruptible).png
Invincibility  FrameIcon(Invincible).png FrameIcon(Invincible).png FrameIcon(Invincible).png FrameIcon(Invincible).png FrameIcon(Invincible).png FrameIcon(Invincible).png FrameIcon(Invincible).png FrameIcon(Vulnerable).png FrameIcon(Vulnerable).png FrameIcon(Vulnerable).png FrameIcon(Vulnerable).png FrameIcon(Vulnerable).png FrameIcon(Vulnerable).png FrameIcon(Vulnerable).png FrameIcon(Vulnerable).png FrameIcon(Vulnerable).png FrameIcon(Vulnerable).png FrameIcon(Vulnerable).png FrameIcon(Vulnerable).png FrameIcon(Vulnerable).png FrameIcon(Vulnerable).png FrameIcon(Vulnerable).png FrameIcon(Vulnerable).png FrameIcon(Vulnerable).png FrameIcon(Vulnerable).png FrameIcon(Vulnerable).png FrameIcon(Vulnerable).png FrameIcon(Vulnerable).png FrameIcon(Vulnerable).png FrameIcon(Vulnerable).png FrameIcon(Vulnerable).png FrameIcon(Vulnerable).png FrameIcon(Vulnerable).png FrameIcon(Vulnerable).png FrameIcon(Vulnerable).png FrameIcon(Vulnerable).png FrameIcon(Vulnerable).png FrameIcon(Vulnerable).png FrameIcon(Vulnerable).png FrameIcon(Vulnerable).png FrameIcon(Vulnerable).png FrameIcon(Vulnerable).png FrameIcon(Vulnerable).png FrameIcon(Vulnerable).png FrameIcon(Vulnerable).png FrameIcon(Vulnerable).png FrameIcon(Vulnerable).png FrameIcon(Vulnerable).png FrameIcon(Vulnerable).png FrameIcon(Vulnerable).png FrameIcon(Vulnerable).png FrameIcon(Vulnerable).png FrameIcon(Vulnerable).png FrameIcon(Vulnerable).png FrameIcon(Vulnerable).png FrameIcon(Vulnerable).png FrameIcon(Vulnerable).png FrameIcon(Vulnerable).png FrameIcon(Vulnerable).png FrameIcon(Vulnerable).png FrameIcon(Vulnerable).png FrameIcon(Vulnerable).png FrameIcon(Vulnerable).png

Success, Reverse

Invincibility 1-14
Hitboxes 9-12
Interruptible 45
Animation length 69
Hitboxes  FrameIcon(Lag).png FrameIcon(Lag).png FrameIcon(Lag).png FrameIcon(Lag).png FrameIcon(Lag).png FrameIcon(Lag).png FrameIcon(Lag).png FrameIcon(Lag).png FrameIcon(Hitbox).png FrameIcon(Hitbox).png FrameIcon(Hitbox).png FrameIcon(Hitbox).png FrameIcon(Lag).png FrameIcon(Lag).png FrameIcon(Lag).png FrameIcon(Lag).png FrameIcon(Lag).png FrameIcon(Lag).png FrameIcon(Lag).png FrameIcon(Lag).png FrameIcon(Lag).png FrameIcon(Lag).png FrameIcon(Lag).png FrameIcon(Lag).png FrameIcon(Lag).png FrameIcon(Lag).png FrameIcon(Lag).png FrameIcon(Lag).png FrameIcon(Lag).png FrameIcon(Lag).png FrameIcon(Lag).png FrameIcon(Lag).png FrameIcon(Lag).png FrameIcon(Lag).png FrameIcon(Lag).png FrameIcon(Lag).png FrameIcon(Lag).png FrameIcon(Lag).png FrameIcon(Lag).png FrameIcon(Lag).png FrameIcon(Lag).png FrameIcon(Lag).png FrameIcon(Lag).png FrameIcon(Lag).png FrameIcon(Lag).png FrameIcon(Lag).png FrameIcon(Lag).png FrameIcon(Lag).png FrameIcon(Lag).png FrameIcon(Lag).png FrameIcon(Lag).png FrameIcon(Lag).png FrameIcon(Lag).png FrameIcon(Lag).png FrameIcon(Lag).png FrameIcon(Lag).png FrameIcon(Lag).png FrameIcon(Lag).png FrameIcon(Lag).png FrameIcon(Lag).png FrameIcon(Lag).png FrameIcon(Lag).png FrameIcon(Lag).png FrameIcon(Lag).png FrameIcon(Lag).png FrameIcon(Lag).png FrameIcon(Lag).png FrameIcon(Lag).png FrameIcon(Lag).png FrameIcon(Lag).png FrameIcon(Lag).png
Invincibility  FrameIcon(Invincible).png FrameIcon(Invincible).png FrameIcon(Invincible).png FrameIcon(Invincible).png FrameIcon(Invincible).png FrameIcon(Invincible).png FrameIcon(Invincible).png FrameIcon(Invincible).png FrameIcon(Invincible).png FrameIcon(Invincible).png FrameIcon(Invincible).png FrameIcon(Invincible).png FrameIcon(Invincible).png FrameIcon(Invincible).png FrameIcon(Vulnerable).png FrameIcon(Vulnerable).png FrameIcon(Vulnerable).png FrameIcon(Vulnerable).png FrameIcon(Vulnerable).png FrameIcon(Vulnerable).png FrameIcon(Vulnerable).png FrameIcon(Vulnerable).png FrameIcon(Vulnerable).png FrameIcon(Vulnerable).png FrameIcon(Vulnerable).png FrameIcon(Vulnerable).png FrameIcon(Vulnerable).png FrameIcon(Vulnerable).png FrameIcon(Vulnerable).png FrameIcon(Vulnerable).png FrameIcon(Vulnerable).png FrameIcon(Vulnerable).png FrameIcon(Vulnerable).png FrameIcon(Vulnerable).png FrameIcon(Vulnerable).png FrameIcon(Vulnerable).png FrameIcon(Vulnerable).png FrameIcon(Vulnerable).png FrameIcon(Vulnerable).png FrameIcon(Vulnerable).png FrameIcon(Vulnerable).png FrameIcon(Vulnerable).png FrameIcon(Vulnerable).png FrameIcon(Vulnerable).png FrameIcon(Vulnerable).png FrameIcon(Vulnerable).png FrameIcon(Vulnerable).png FrameIcon(Vulnerable).png FrameIcon(Vulnerable).png FrameIcon(Vulnerable).png FrameIcon(Vulnerable).png FrameIcon(Vulnerable).png FrameIcon(Vulnerable).png FrameIcon(Vulnerable).png FrameIcon(Vulnerable).png FrameIcon(Vulnerable).png FrameIcon(Vulnerable).png FrameIcon(Vulnerable).png FrameIcon(Vulnerable).png FrameIcon(Vulnerable).png FrameIcon(Vulnerable).png FrameIcon(Vulnerable).png FrameIcon(Vulnerable).png FrameIcon(Vulnerable).png FrameIcon(Vulnerable).png FrameIcon(Vulnerable).png FrameIcon(Vulnerable).png FrameIcon(Vulnerable).png FrameIcon(Vulnerable).png FrameIcon(Vulnerable).png FrameIcon(Vulnerable).png
Legend (1 square = 1 frame)
FrameIcon(Lag).png
Lag time
FrameIcon(Hitbox).png
Hitbox
FrameIcon(Vulnerable).png
Vulnerable
FrameIcon(Invincible).png
Invincible
FrameIcon(Defensive).png
Counter
FrameIcon(Intangible).png
Intangible
FrameIcon(Interruptible).png
Interruptible