SSBU Icon.png

King K. Rool (SSBU)/Dash attack

From SmashWiki, the Super Smash Bros. wiki
Jump to navigationJump to search
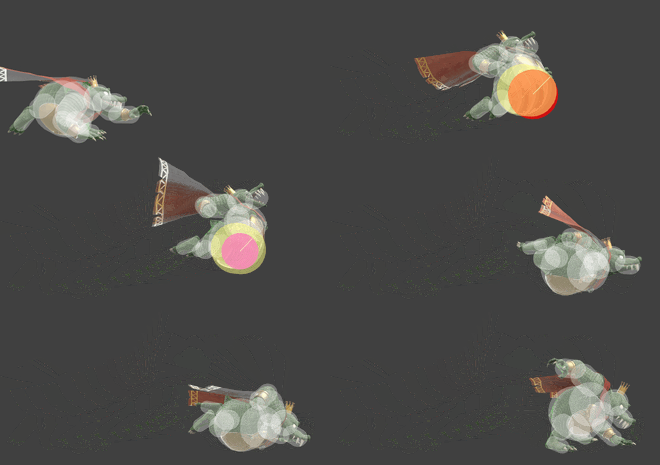
Hitbox visualization showing King K. Rool's dash attack.

Overview[edit]

A belly-first lunge based on his attack from Donkey Kong Land. It covers a good distance and has incredibly fast start-up for its power (comes out on frame 7), but has very high ending lag.

Dash attack has Belly Super Armor - the highest amount in K. Rool's kit - allowing it to tank opposing hits (especially projectiles). This makes it a formidable burst option in neutral. K. Rool players tend to use dash attack as a predictive tool to stuff habits, in a similar manner to Banjo & Kazooie's Wonderwing. This allows King K. Rool to force his way through projectiles as well, which prevents him from ever being truly locked down should he have the time to use the move. So long as his armor is at an acceptable amount of health, the option is there through Instant Dash Attack.

Dash attack is most useful as a combo ender, specifically out of moves like Blunderbuss's Kannonballs, Crownerang and forward throw. Crownerang is able to confirm the early hit at low percentages through Crown sliding. All of these make substantial use of the early hit's damage output. Forward throw into Instant Dash Attack is among the best bread and butter combos for K. Rool, being consistent on a large majority of the cast and landing him around 30% right out of the gate. It should be noted that this combo is completely absent of interaction up until tumble percentages, as ASDI and other options do not work against throws.[1] However once tumble begins, DI up+out tends to significantly hurt the % ranges.

Dash attack also crosses up shields consistently and has a shieldstun multiplier of 1.15x. This makes it a bit safer on shield than it would be at a glance, but remains more of a surprise option to exploit reaction time. This is because it remains -37 on shield on the early hit, which is more than enough time for the crossup to be punished. For it to be a reliable crossup, the King K. Rool player must space dash attack to cross up in a way that leaves it harder to punish, which isn't always something the king can afford to do in high-tension matches. As such, it is often relegated to a niche option for shock factor that doubles as a knowledge check. The ambiguity of the cross-up tends to make it harder to punish than one would expect, but against an experienced player, it just falls flat.

The long lasting hitbox on dash attack makes it a premier ledgetrap tool for King K. Rool, especially since it hits some characters at the ledge.[2] Due to its kill power and high general knockback, it makes it great on reaction and can end stocks solely through normal ledgetrapping. This is matchup-defining for the character, with it combined with forward aerial being one of his many unorthodox but effective ledgetraps. This was further buffed in 8.0.0 thanks to the early hitbox's duration being improved, allowing for more liberal spacing. Characters such as Ivysaur and Mr. Game & Watch have a lot of trouble dealing with this ledgetrap method, making it optimal in those situations.

Dash attack KOs Mario at around 100% at the edge of Final Destination with optimal DI (up and in, a trait common with 45 and 50 angle moves), making it a very good move to use out of down throw through Instant Dash Attack. This is considered the optimal way to use down throw "true" confirms by virtue of its incredible kill power, boosted in 8.0.0. Due to how fast dash attack is on startup, it can also be used as a bread and butter combo against worse mashers, or at around 75% in general to catch popout. This is among K. Rool's highest damage throw "combos", dealing more damage than a single unstaled up throw.

Dash attack, while extremely useful, has many severe drawbacks. It is a very risky approach due to the FAF of 61 and horrific shield safety, meaning it can and will backfire if used poorly. To make matters worse, the active frames for the armor come back to bite him when it has low HP, with it potentially breaking if abused too much. This is worsened by the lingering armor frames, with no hitbox to at least trade with, making a hit a net negative most of the time. Furthermore, dash attack deals much less damage later into the move, which can be unsafe on hit at lower percentages. However, it is much more difficult to punish on hit with any amount of percentage building thanks to the buffs received in 8.0.0.

Update History[edit]

Super Smash Bros. Ultimate 8.0.0

  • Buff The move has more knockback scaling (57 → 61 (clean), 48 → 55 (late)).
  • Buff The clean hit has a longer duration, with the late hit's duration reduced accordingly (frames 7-11 (clean)/12-25 (late) → 7-14/15-25).

Hitboxes[edit]

ID Part Rehit rate Damage SD Angle Angle type BK KS FKV Set weight Radius Bone Offset SDI× T% Clang Rebound Effect Type G A Sound Direct Hit bits Hit part Blockable Reflectable Absorbable Flinchless No GFX Heedless Shieldstun
Clean hit
0 0 0 15.0% 1.0 AngleIcon45.png Forward 80 61 0 HitboxTableIcon(False).png 7.0 hip 4.0 3.5 3.5 1.2× 1.0× 0% HitboxTableIcon(NoClang).png HitboxTableIcon(NoRebound).png EffectIcon(Normal).png TypeIcon(Body).png HitboxTableIcon(GroundedTrue).png HitboxTableIcon(AerialTrue).png L Kick SpecialsDirect.png All All HitboxTableIcon(Blockable).png HitboxTableIcon(Unreflectable).png HitboxTableIcon(Unabsorbable).png HitboxTableIcon(False).png HitboxTableIcon(False).png HitboxTableIcon(False).png 1.15×
Late hit
1 0 0 11.0% 1.0 AngleIcon45.png Forward 80 55 0 HitboxTableIcon(False).png 5.2 hip 4.0 3.5 3.5 1.1× 1.0× 0% HitboxTableIcon(NoClang).png HitboxTableIcon(NoRebound).png EffectIcon(Normal).png TypeIcon(Body).png HitboxTableIcon(GroundedTrue).png HitboxTableIcon(AerialTrue).png M Kick SpecialsDirect.png All All HitboxTableIcon(Blockable).png HitboxTableIcon(Unreflectable).png HitboxTableIcon(Unabsorbable).png HitboxTableIcon(False).png HitboxTableIcon(False).png HitboxTableIcon(False).png

Timing[edit]

The move disables jostling during frames 15-33.

Clean hit 7-14
Late hit 15-25
Belly Super Armor 7-28
Interruptible 61
Animation length 79
FrameIcon(Lag).png FrameIcon(Lag).png FrameIcon(Lag).png FrameIcon(Lag).png FrameIcon(Lag).png FrameIcon(Lag).png FrameIcon(Hitbox).png FrameIcon(Hitbox).png FrameIcon(Hitbox).png FrameIcon(Hitbox).png FrameIcon(Hitbox).png FrameIcon(Hitbox).png FrameIcon(Hitbox).png FrameIcon(HitboxChangeS).png FrameIcon(HitboxChangeE).png FrameIcon(Hitbox).png FrameIcon(Hitbox).png FrameIcon(Hitbox).png FrameIcon(Hitbox).png FrameIcon(Hitbox).png FrameIcon(Hitbox).png FrameIcon(Hitbox).png FrameIcon(Hitbox).png FrameIcon(Hitbox).png FrameIcon(Hitbox).png FrameIcon(Lag).png FrameIcon(Lag).png FrameIcon(Lag).png FrameIcon(Lag).png FrameIcon(Lag).png FrameIcon(Lag).png FrameIcon(Lag).png FrameIcon(Lag).png FrameIcon(Lag).png FrameIcon(Lag).png FrameIcon(Lag).png FrameIcon(Lag).png FrameIcon(Lag).png FrameIcon(Lag).png FrameIcon(Lag).png FrameIcon(Lag).png FrameIcon(Lag).png FrameIcon(Lag).png FrameIcon(Lag).png FrameIcon(Lag).png FrameIcon(Lag).png FrameIcon(Lag).png FrameIcon(Lag).png FrameIcon(Lag).png FrameIcon(Lag).png FrameIcon(Lag).png FrameIcon(Lag).png FrameIcon(Lag).png FrameIcon(Lag).png FrameIcon(Lag).png FrameIcon(Lag).png FrameIcon(Lag).png FrameIcon(Lag).png FrameIcon(Lag).png FrameIcon(Lag).png FrameIcon(Interruptible).png FrameIcon(Interruptible).png FrameIcon(Interruptible).png FrameIcon(Interruptible).png FrameIcon(Interruptible).png FrameIcon(Interruptible).png FrameIcon(Interruptible).png FrameIcon(Interruptible).png FrameIcon(Interruptible).png FrameIcon(Interruptible).png FrameIcon(Interruptible).png FrameIcon(Interruptible).png FrameIcon(Interruptible).png FrameIcon(Interruptible).png FrameIcon(Interruptible).png FrameIcon(Interruptible).png FrameIcon(Interruptible).png FrameIcon(Interruptible).png FrameIcon(Interruptible).png
FrameIcon(Vulnerable).png FrameIcon(Vulnerable).png FrameIcon(Vulnerable).png FrameIcon(Vulnerable).png FrameIcon(Vulnerable).png FrameIcon(Vulnerable).png FrameIcon(Armour).png FrameIcon(Armour).png FrameIcon(Armour).png FrameIcon(Armour).png FrameIcon(Armour).png FrameIcon(Armour).png FrameIcon(Armour).png FrameIcon(Armour).png FrameIcon(Armour).png FrameIcon(Armour).png FrameIcon(Armour).png FrameIcon(Armour).png FrameIcon(Armour).png FrameIcon(Armour).png FrameIcon(Armour).png FrameIcon(Armour).png FrameIcon(Armour).png FrameIcon(Armour).png FrameIcon(Armour).png FrameIcon(Armour).png FrameIcon(Armour).png FrameIcon(Armour).png FrameIcon(Vulnerable).png FrameIcon(Vulnerable).png FrameIcon(Vulnerable).png FrameIcon(Vulnerable).png FrameIcon(Vulnerable).png FrameIcon(Vulnerable).png FrameIcon(Vulnerable).png FrameIcon(Vulnerable).png FrameIcon(Vulnerable).png FrameIcon(Vulnerable).png FrameIcon(Vulnerable).png FrameIcon(Vulnerable).png FrameIcon(Vulnerable).png FrameIcon(Vulnerable).png FrameIcon(Vulnerable).png FrameIcon(Vulnerable).png FrameIcon(Vulnerable).png FrameIcon(Vulnerable).png FrameIcon(Vulnerable).png FrameIcon(Vulnerable).png FrameIcon(Vulnerable).png FrameIcon(Vulnerable).png FrameIcon(Vulnerable).png FrameIcon(Vulnerable).png FrameIcon(Vulnerable).png FrameIcon(Vulnerable).png FrameIcon(Vulnerable).png FrameIcon(Vulnerable).png FrameIcon(Vulnerable).png FrameIcon(Vulnerable).png FrameIcon(Vulnerable).png FrameIcon(Vulnerable).png FrameIcon(Vulnerable).png FrameIcon(Vulnerable).png FrameIcon(Vulnerable).png FrameIcon(Vulnerable).png FrameIcon(Vulnerable).png FrameIcon(Vulnerable).png FrameIcon(Vulnerable).png FrameIcon(Vulnerable).png FrameIcon(Vulnerable).png FrameIcon(Vulnerable).png FrameIcon(Vulnerable).png FrameIcon(Vulnerable).png FrameIcon(Vulnerable).png FrameIcon(Vulnerable).png FrameIcon(Vulnerable).png FrameIcon(Vulnerable).png FrameIcon(Vulnerable).png FrameIcon(Vulnerable).png FrameIcon(Vulnerable).png
Legend (1 square = 1 frame)
FrameIcon(Lag).png
Lag time
FrameIcon(Hitbox).png
Hitbox
FrameIcon(HitboxChangeS).pngFrameIcon(HitboxChangeE).png
Hitbox change
FrameIcon(Vulnerable).png
Vulnerable
FrameIcon(Armour).png
Armour
FrameIcon(Interruptible).png
Interruptible