Super Smash Bros. Ultimate

King K. Rool (SSBU)/Forward tilt

From SmashWiki, the Super Smash Bros. wiki
Jump to navigationJump to search
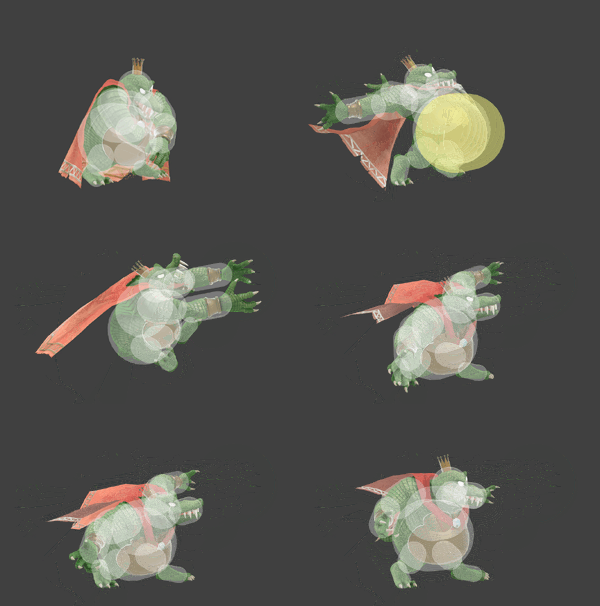
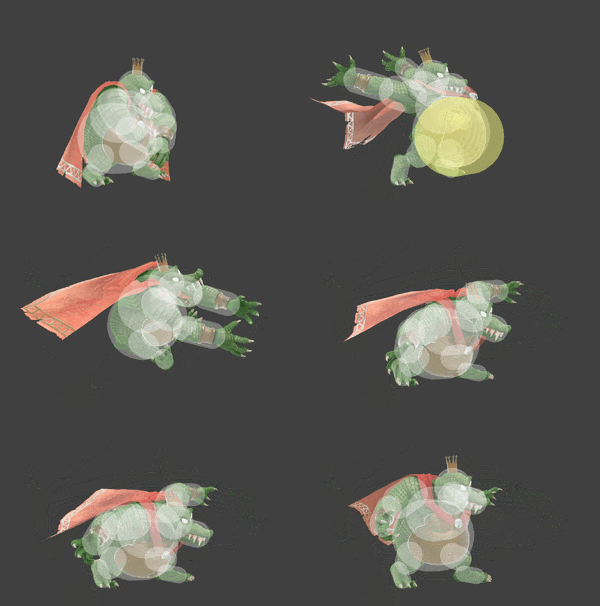
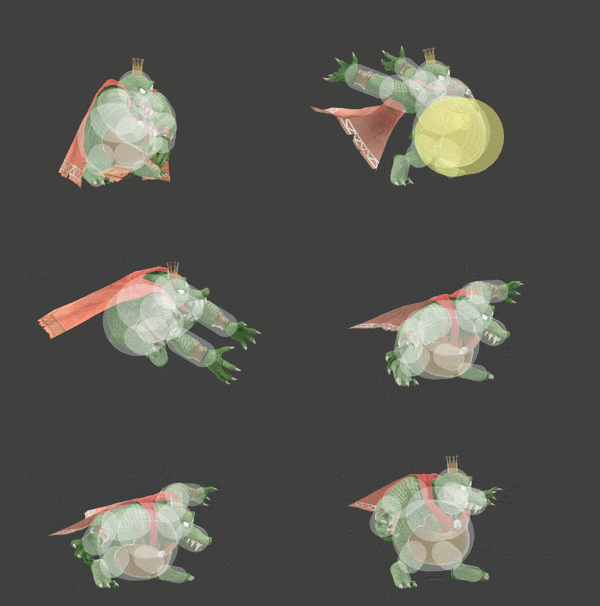
King K. Rool forward tilt hitbox visualizations
KingKRoolFTiltUpSSBU.gif
KingKRoolFtiltSSBU.gif
KingKRoolFTiltDownSSBU.gif

Overview[edit]

King K. Rool rears back and performs a lunging clap attack, similar to Donkey Kong's forward smash. The move gains Belly Super Armor when he rears back to clap, making it an effective approach option with pivot cancelling, though a bit unsafe. It has impressive power, KOing middleweights around 107% at the edge of Final Destination.

Forward tilt can be angled up and down from frames 1-10, making it a decent anti-air tool when angled up (outranging Lucina's forward aerial completely); when angled down, it is capable of hitting every character on the ledge, even 2-framing. To add to this versatility, the move has impressive range due to a large disjointed hitbox on K. Rool's hands. This makes it even more difficult to challenge and a premier defensive option in K. Rool's kit.

On shield, it is an unimpressive -19 and -18 with the sourspot and the sweetspot, respectively, but can be safe if spaced perfectly, making it a decent approach option against characters that have poor range on their out of shield options, such as Ken. It also makes a half-decent out of shield option, with the armor starting on frame 16 considering the 11 shield drop frames. This is useful against opponents less experienced with pressuring shield. This is also effective against frame traps involving deceptively unsafe moves, particularly from swordfighter characters.

Forward tilt can be used to end combos, usually after a forward air at lower percentages. It is inferior to dash attack in terms of damage, but is far more consistent. It is also the only consistent option out of a forward air without momentum at low %s, with dash attack tending to whiff or only get the late hit. Forward tilt is also the best option out of a basic jab lock should dash attack be unfavorable, or if the player is less adept at doing it. This is also a very strong kill confirm due to consistent sweetspots. When used alongside down aerial locks, this is among the most consistent, high damage basic lock combos in the game, dealing well over 35%.

Forward tilt is one of the easier moves to use out of down throw, being capable of sweetspotting opponents if angled correctly (although this varies by character). A resource for this can be found here. This is suboptimal compared to up tilt and dash attack, which are more consistent. An upward angled forward tilt will always sourspot a buried opponent; dash attack's clean hit KOs a bit earlier than forward tilt's sweetspot and is not susceptible to sourspotting. As such, if a player knows how to use instant dash attack, there is little reason to go for forward tilt outside of superior mash-out coverage when angled up.

Forward tilt's main flaw is its rather high startup and ending lag, making it relatively easy to punish, especially for faster opponents. K. Rool's head is also vulnerable during the attack, giving its protection a slight hole unless it is angled upwards.

The combination of its range, Belly Super Armor, KO potential and ability to angle it up or down makes it one of the best moves in King K. Rool's kit.

Update history[edit]

Super Smash Bros. Ultimate 3.0.0

  • Buff Forward tilt's hitboxes on K. Rool's gauntlets were expanded, giving them more range.
    • Buff This significantly improves forward tilt as a punish out of down throw, as down angled forward tilt now hits characters that it previously wouldn't, such as Jigglypuff and Mr. Game & Watch.

Hitboxes[edit]

ID Part Rehit rate Damage SD Angle Angle type BK KS FKV Set weight Radius Bone Offset SDI× T% Clang Rebound Effect Type G A Sound Direct Hit bits Hit part Blockable Reflectable Absorbable Flinchless No GFX Heedless
Angled forward
0 0 0 11.0% 0 Sakurai angle Forward 64 76 0 HitboxTableIcon(False).png 3.0 top 0.0 9.0 to 13.0 9.0 1.5× 1.0× 0% HitboxTableIcon(Clang).png HitboxTableIcon(Rebound).png Normal (effect) Hand (type) HitboxTableIcon(GroundedTrue).png HitboxTableIcon(AerialTrue).png L Punch SpecialsDirect.png All All HitboxTableIcon(Blockable).png HitboxTableIcon(Unreflectable).png HitboxTableIcon(Unabsorbable).png HitboxTableIcon(False).png HitboxTableIcon(False).png HitboxTableIcon(False).png
1 0 0 13.0% 0 Sakurai angle Forward 64 76 0 HitboxTableIcon(False).png 7.0 havel 0.0 0.0 0.0 1.5× 1.0× 0% HitboxTableIcon(Clang).png HitboxTableIcon(Rebound).png Normal (effect) Hand (type) HitboxTableIcon(GroundedTrue).png HitboxTableIcon(AerialTrue).png L Punch SpecialsDirect.png All All HitboxTableIcon(Blockable).png HitboxTableIcon(Unreflectable).png HitboxTableIcon(Unabsorbable).png HitboxTableIcon(False).png HitboxTableIcon(False).png HitboxTableIcon(False).png
Angled up or down
0 0 0 11.0% 0 Sakurai angle Forward 64 76 0 HitboxTableIcon(False).png 5.0 top 0.0 11.0 11.0 1.5× 1.0× 0% HitboxTableIcon(Clang).png HitboxTableIcon(Rebound).png Normal (effect) Hand (type) HitboxTableIcon(GroundedTrue).png HitboxTableIcon(AerialTrue).png L Punch SpecialsDirect.png All All HitboxTableIcon(Blockable).png HitboxTableIcon(Unreflectable).png HitboxTableIcon(Unabsorbable).png HitboxTableIcon(False).png HitboxTableIcon(False).png HitboxTableIcon(False).png
1 0 0 13.0% 0 Sakurai angle Forward 64 76 0 HitboxTableIcon(False).png 7.0 havel 0.0 0.0 0.0 1.5× 1.0× 0% HitboxTableIcon(Clang).png HitboxTableIcon(Rebound).png Normal (effect) Hand (type) HitboxTableIcon(GroundedTrue).png HitboxTableIcon(AerialTrue).png L Punch SpecialsDirect.png All All HitboxTableIcon(Blockable).png HitboxTableIcon(Unreflectable).png HitboxTableIcon(Unabsorbable).png HitboxTableIcon(False).png HitboxTableIcon(False).png HitboxTableIcon(False).png

Timing[edit]

Belly Super Armor 5-11
Hitboxes 12-13
Interruptible 43
Animation length 58
FrameIcon(Lag).png FrameIcon(Lag).png FrameIcon(Lag).png FrameIcon(Lag).png FrameIcon(Lag).png FrameIcon(Lag).png FrameIcon(Lag).png FrameIcon(Lag).png FrameIcon(Lag).png FrameIcon(Lag).png FrameIcon(Lag).png FrameIcon(Hitbox).png FrameIcon(Hitbox).png FrameIcon(Lag).png FrameIcon(Lag).png FrameIcon(Lag).png FrameIcon(Lag).png FrameIcon(Lag).png FrameIcon(Lag).png FrameIcon(Lag).png FrameIcon(Lag).png FrameIcon(Lag).png FrameIcon(Lag).png FrameIcon(Lag).png FrameIcon(Lag).png FrameIcon(Lag).png FrameIcon(Lag).png FrameIcon(Lag).png FrameIcon(Lag).png FrameIcon(Lag).png FrameIcon(Lag).png FrameIcon(Lag).png FrameIcon(Lag).png FrameIcon(Lag).png FrameIcon(Lag).png FrameIcon(Lag).png FrameIcon(Lag).png FrameIcon(Lag).png FrameIcon(Lag).png FrameIcon(Lag).png FrameIcon(Lag).png FrameIcon(Lag).png FrameIcon(Lag).png FrameIcon(Interruptible).png FrameIcon(Interruptible).png FrameIcon(Interruptible).png FrameIcon(Interruptible).png FrameIcon(Interruptible).png FrameIcon(Interruptible).png FrameIcon(Interruptible).png FrameIcon(Interruptible).png FrameIcon(Interruptible).png FrameIcon(Interruptible).png FrameIcon(Interruptible).png FrameIcon(Interruptible).png FrameIcon(Interruptible).png FrameIcon(Interruptible).png FrameIcon(Interruptible).png FrameIcon(Interruptible).png FrameIcon(Interruptible).png
FrameIcon(Vulnerable).png FrameIcon(Vulnerable).png FrameIcon(Vulnerable).png FrameIcon(Vulnerable).png FrameIcon(Armour).png FrameIcon(Armour).png FrameIcon(Armour).png FrameIcon(Armour).png FrameIcon(Armour).png FrameIcon(Armour).png FrameIcon(Armour).png FrameIcon(Vulnerable).png FrameIcon(Vulnerable).png FrameIcon(Vulnerable).png FrameIcon(Vulnerable).png FrameIcon(Vulnerable).png FrameIcon(Vulnerable).png FrameIcon(Vulnerable).png FrameIcon(Vulnerable).png FrameIcon(Vulnerable).png FrameIcon(Vulnerable).png FrameIcon(Vulnerable).png FrameIcon(Vulnerable).png FrameIcon(Vulnerable).png FrameIcon(Vulnerable).png FrameIcon(Vulnerable).png FrameIcon(Vulnerable).png FrameIcon(Vulnerable).png FrameIcon(Vulnerable).png FrameIcon(Vulnerable).png FrameIcon(Vulnerable).png FrameIcon(Vulnerable).png FrameIcon(Vulnerable).png FrameIcon(Vulnerable).png FrameIcon(Vulnerable).png FrameIcon(Vulnerable).png FrameIcon(Vulnerable).png FrameIcon(Vulnerable).png FrameIcon(Vulnerable).png FrameIcon(Vulnerable).png FrameIcon(Vulnerable).png FrameIcon(Vulnerable).png FrameIcon(Vulnerable).png FrameIcon(Vulnerable).png FrameIcon(Vulnerable).png FrameIcon(Vulnerable).png FrameIcon(Vulnerable).png FrameIcon(Vulnerable).png FrameIcon(Vulnerable).png FrameIcon(Vulnerable).png FrameIcon(Vulnerable).png FrameIcon(Vulnerable).png FrameIcon(Vulnerable).png FrameIcon(Vulnerable).png FrameIcon(Vulnerable).png FrameIcon(Vulnerable).png FrameIcon(Vulnerable).png FrameIcon(Vulnerable).png FrameIcon(Vulnerable).png FrameIcon(Vulnerable).png
Legend (1 square = 1 frame)
Lag
Lag time
Hitbox
Hitbox
FrameIcon(Vulnerable).png
Vulnerable
Armor
Armour
Interruptibility
Interruptible