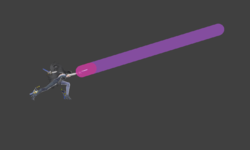
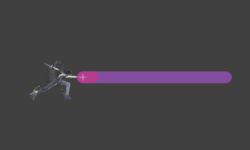
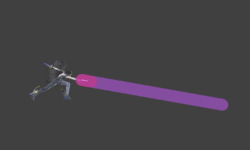
Bayonetta (SSBU)/Forward smash: Difference between revisions
| (3 intermediate revisions by 3 users not shown) | |||
| Line 1: | Line 1: | ||
{{ArticleIcons|ssbu=y}} | {{ArticleIcons|ssbu=y}} | ||
{|class="wikitable | |||
! | ==Hitbox visualizations== | ||
{|class="wikitable" | |||
!Angle!!Wicked Weaves!!Bullet Arts | |||
|- | |- | ||
!↗ | !↗ | ||
|[[File:BayonettaFSmashUpSSBU.gif| | |[[File:BayonettaFSmashUpSSBU.gif|250px]] || [[File:BayonettaFSmashUpBulletArtsSSBU.png|250px]] | ||
|- | |- | ||
!→ | !→ | ||
|[[File:BayonettaFSmashSSBU.gif| | |[[File:BayonettaFSmashSSBU.gif|250px]] || [[File:BayonettaFSmashBulletArtsSSBU.png|250px]] | ||
|- | |- | ||
!↘ | !↘ | ||
|[[File:BayonettaFSmashDownSSBU.gif| | |[[File:BayonettaFSmashDownSSBU.gif|250px]] || [[File:BayonettaFSmashDownBulletArtsSSBU.png|250px]] | ||
| | |||
|} | |} | ||
==Overview== | ==Overview== | ||
Uses Wicked Weaves to summon Madama Butterfly's arm, which is used to throw a punch. Based on the final hit of Bayonetta's Punch + Punch + Punch • Punch (PPP • P) combo while wielding Love is Blue. Can be angled. The [[Bullet Arts]] version of this move fires her gun depending on how the smash was angled: forward if unangled, slightly upward if angled up, and slightly downward if angled down. It has great power and horizontal [[range]], and Madama Butterfly's hitbox cannot be reversed. However, it has high [[ending lag]] and low [[priority]], making it fairly easy to cancel out. A blindspot will always be present directly in front of Bayonetta, regardless of angle, and its animation renders it unable to hit prone opponents (or those with very low crouches). | |||
==Update History== | |||
'''{{GameIcon|ssbu}} {{SSBU|8.0.0}}''' | |||
*{{buff|Forward smash has more base knockback (26 → 34/35) and a longer hitbox duration (frames 17-19 → 17-21).}} | |||
==Hitboxes== | ==Hitboxes== | ||
===Attack=== | |||
The move and its hitboxes have some unusual properties, which are shared with Bayonetta's other [[Bayonetta (SSBU)/Up smash|smash]] [[Bayonetta (SSBU)/Down smash|attacks]]: | |||
*The Wicked Weaves, while attached to Bayonetta and causing her to experience [[hitlag]] alongside opponents hit, are programmed as a separate object. This gives the hitboxes pseudo-[[projectile]] properties; for example, they do not have their damage affected by Bayonetta being [[giant]] or [[tiny]]. | |||
**Additionally, when [[shield]]ed, the 0.67× hitlag reduction only applies to the opponent, making it comparatively less safe than other attacks. | |||
*Compared to other [[smash attack]]s, it has a lower maximum charge damage multiplier, capping at 1.2× instead of 1.4×, and can only be held for up to 60 frames after reaching full charge instead of 120 frames. If hitting an opponent slowed down by [[Witch Time]], the multiplier is further reduced to 1.1×, with the damage increase per charge frame being halved. | |||
{{UltimateHitboxTableHeader}} | {{UltimateHitboxTableHeader}} | ||
{{HitboxTableTitle|Angled up| | {{HitboxTableTitle|Angled up|42}} | ||
{{UltimateHitboxTableRow | {{UltimateHitboxTableRow | ||
|id=0 | |id=0 | ||
|damage={{ChargedSmashDmgSSBU|14.0}} | |damage={{ChargedSmashDmgSSBU|14.0|1.2}} | ||
|sd=0 | |sd=0 | ||
|angle=361 | |angle=361 | ||
|af=3 | |||
|bk=34 | |bk=34 | ||
|ks=102 | |ks=102 | ||
| Line 50: | Line 51: | ||
|slvl=L | |slvl=L | ||
|a=f | |a=f | ||
|direct=f | |||
}} | }} | ||
{{UltimateHitboxTableRow | {{UltimateHitboxTableRow | ||
|id=1 | |id=1 | ||
|damage={{ChargedSmashDmgSSBU|14.0}} | |damage={{ChargedSmashDmgSSBU|14.0|1.2}} | ||
|sd=0 | |sd=0 | ||
|angle=361 | |angle=361 | ||
|af=3 | |||
|bk=34 | |bk=34 | ||
|ks=102 | |ks=102 | ||
| Line 72: | Line 75: | ||
|rebound=f | |rebound=f | ||
|g=f | |g=f | ||
|direct=f | |||
}} | }} | ||
{{UltimateHitboxTableRow | {{UltimateHitboxTableRow | ||
|id=2 | |id=2 | ||
|damage={{ChargedSmashDmgSSBU|16.0}} | |damage={{ChargedSmashDmgSSBU|16.0|1.2}} | ||
|sd=0 | |sd=0 | ||
|angle=361 | |angle=361 | ||
|af=3 | |||
|bk=35 | |bk=35 | ||
|ks=102 | |ks=102 | ||
| Line 92: | Line 97: | ||
|slvl=L | |slvl=L | ||
|a=f | |a=f | ||
|direct=f | |||
}} | }} | ||
{{UltimateHitboxTableRow | {{UltimateHitboxTableRow | ||
|id=3 | |id=3 | ||
|damage={{ChargedSmashDmgSSBU|16.0}} | |damage={{ChargedSmashDmgSSBU|16.0|1.2}} | ||
|sd=0 | |sd=0 | ||
|angle=361 | |angle=361 | ||
|af=3 | |||
|bk=35 | |bk=35 | ||
|ks=102 | |ks=102 | ||
| Line 114: | Line 121: | ||
|rebound=f | |rebound=f | ||
|g=f | |g=f | ||
|direct=f | |||
}} | }} | ||
{{HitboxTableTitle|Angled forward| | {{HitboxTableTitle|Angled forward|42}} | ||
{{UltimateHitboxTableRow | {{UltimateHitboxTableRow | ||
|id=0 | |id=0 | ||
|damage={{ChargedSmashDmgSSBU|14.0}} | |damage={{ChargedSmashDmgSSBU|14.0|1.2}} | ||
|sd=0 | |sd=0 | ||
|angle=361 | |angle=361 | ||
|af=3 | |||
|bk=34 | |bk=34 | ||
|ks=102 | |ks=102 | ||
| Line 135: | Line 144: | ||
|slvl=L | |slvl=L | ||
|a=f | |a=f | ||
|direct=f | |||
}} | }} | ||
{{UltimateHitboxTableRow | {{UltimateHitboxTableRow | ||
|id=1 | |id=1 | ||
|damage={{ChargedSmashDmgSSBU|14.0}} | |damage={{ChargedSmashDmgSSBU|14.0|1.2}} | ||
|sd=0 | |sd=0 | ||
|angle=361 | |angle=361 | ||
|af=3 | |||
|bk=34 | |bk=34 | ||
|ks=102 | |ks=102 | ||
| Line 157: | Line 168: | ||
|rebound=f | |rebound=f | ||
|g=f | |g=f | ||
|direct=f | |||
}} | }} | ||
{{UltimateHitboxTableRow | {{UltimateHitboxTableRow | ||
|id=2 | |id=2 | ||
|damage={{ChargedSmashDmgSSBU|16.0}} | |damage={{ChargedSmashDmgSSBU|16.0|1.2}} | ||
|sd=0 | |sd=0 | ||
|angle=361 | |angle=361 | ||
|af=3 | |||
|bk=35 | |bk=35 | ||
|ks=102 | |ks=102 | ||
| Line 177: | Line 190: | ||
|slvl=L | |slvl=L | ||
|a=f | |a=f | ||
|direct=f | |||
}} | }} | ||
{{UltimateHitboxTableRow | {{UltimateHitboxTableRow | ||
|id=3 | |id=3 | ||
|damage={{ChargedSmashDmgSSBU|16.0}} | |damage={{ChargedSmashDmgSSBU|16.0|1.2}} | ||
|sd=0 | |sd=0 | ||
|angle=361 | |angle=361 | ||
|af=3 | |||
|bk=35 | |bk=35 | ||
|ks=102 | |ks=102 | ||
| Line 199: | Line 214: | ||
|rebound=f | |rebound=f | ||
|g=f | |g=f | ||
|direct=f | |||
}} | }} | ||
{{HitboxTableTitle|Angled down| | {{HitboxTableTitle|Angled down|42}} | ||
{{UltimateHitboxTableRow | {{UltimateHitboxTableRow | ||
|id=0 | |id=0 | ||
|damage={{ChargedSmashDmgSSBU|14.0}} | |damage={{ChargedSmashDmgSSBU|14.0|1.2}} | ||
|sd=0 | |sd=0 | ||
|angle=361 | |angle=361 | ||
|af=3 | |||
|bk=34 | |bk=34 | ||
|ks=102 | |ks=102 | ||
| Line 220: | Line 237: | ||
|slvl=L | |slvl=L | ||
|a=f | |a=f | ||
|direct=f | |||
}} | }} | ||
{{UltimateHitboxTableRow | {{UltimateHitboxTableRow | ||
|id=1 | |id=1 | ||
|damage={{ChargedSmashDmgSSBU|14.0}} | |damage={{ChargedSmashDmgSSBU|14.0|1.2}} | ||
|sd=0 | |sd=0 | ||
|angle=361 | |angle=361 | ||
|af=3 | |||
|bk=34 | |bk=34 | ||
|ks=102 | |ks=102 | ||
| Line 242: | Line 261: | ||
|rebound=f | |rebound=f | ||
|g=f | |g=f | ||
|direct=f | |||
}} | }} | ||
{{UltimateHitboxTableRow | {{UltimateHitboxTableRow | ||
|id=2 | |id=2 | ||
|damage={{ChargedSmashDmgSSBU|16.0}} | |damage={{ChargedSmashDmgSSBU|16.0|1.2}} | ||
|sd=0 | |sd=0 | ||
|angle=361 | |angle=361 | ||
|af=3 | |||
|bk=35 | |bk=35 | ||
|ks=102 | |ks=102 | ||
| Line 262: | Line 283: | ||
|slvl=L | |slvl=L | ||
|a=f | |a=f | ||
|direct=f | |||
}} | }} | ||
{{UltimateHitboxTableRow | {{UltimateHitboxTableRow | ||
|id=3 | |id=3 | ||
|damage={{ChargedSmashDmgSSBU|16.0}} | |damage={{ChargedSmashDmgSSBU|16.0|1.2}} | ||
|sd=0 | |sd=0 | ||
|angle=361 | |angle=361 | ||
|af=3 | |||
|bk=35 | |bk=35 | ||
|ks=102 | |ks=102 | ||
| Line 284: | Line 307: | ||
|rebound=f | |rebound=f | ||
|g=f | |g=f | ||
|direct=f | |||
}} | |||
|} | |||
===Bullet Arts=== | |||
The bullet is shot from Bayonetta's right arm gun. | |||
{{UltimateHitboxTableHeader}} | |||
{{HitboxTableTitle|Angled up|42}} | |||
{{UltimateHitboxTableRow | |||
|id=0 | |||
|damage=0.5% | |||
|angle=17 | |||
|af=3 | |||
|bk=10 | |||
|ks=100 | |||
|fkv=0 | |||
|r=2.5 | |||
|bn=top | |||
|xpos=0.0 | |||
|ypos=12.0 to 13.2 | |||
|zpos=9.5 to 13.3 | |||
|ff=0.0 | |||
|sdi=0.0 | |||
|type=Typeless | |||
|effect=Normal | |||
|sfx=Bayonetta Hit 01 | |||
|slvl=S | |||
|clang=f | |||
|rebound=f | |||
|direct=f | |||
}} | |||
{{UltimateHitboxTableRow | |||
|id=1 | |||
|damage=0.5% | |||
|angle=17 | |||
|af=3 | |||
|bk=0 | |||
|ks=0 | |||
|fkv=0 | |||
|r=2.5 | |||
|bn=top | |||
|xpos=0.0 | |||
|ypos=12.0 to 29.5 | |||
|zpos=9.5 to 66.9 | |||
|ff=0.0 | |||
|sdi=0.0 | |||
|type=Typeless | |||
|effect=Normal | |||
|sfx=Bayonetta Hit 01 | |||
|slvl=S | |||
|clang=f | |||
|rebound=f | |||
|direct=f | |||
}} | |||
{{HitboxTableTitle|Angled forward|42}} | |||
{{UltimateHitboxTableRow | |||
|id=0 | |||
|damage=0.5% | |||
|angle=361 | |||
|af=3 | |||
|bk=10 | |||
|ks=100 | |||
|fkv=0 | |||
|r=2.5 | |||
|bn=top | |||
|xpos=0.0 | |||
|ypos=9.5 | |||
|zpos=10.0 to 14.0 | |||
|ff=0.0 | |||
|sdi=0.0 | |||
|type=Typeless | |||
|effect=Normal | |||
|sfx=Bayonetta Hit 01 | |||
|slvl=S | |||
|clang=f | |||
|rebound=f | |||
|direct=f | |||
}} | |||
{{UltimateHitboxTableRow | |||
|id=1 | |||
|damage=0.5% | |||
|angle=361 | |||
|af=3 | |||
|bk=0 | |||
|ks=0 | |||
|fkv=0 | |||
|r=2.5 | |||
|bn=top | |||
|xpos=0.0 | |||
|ypos=9.5 | |||
|zpos=10.0 to 70.0 | |||
|ff=0.0 | |||
|sdi=0.0 | |||
|type=Typeless | |||
|effect=Normal | |||
|sfx=Bayonetta Hit 01 | |||
|slvl=S | |||
|clang=f | |||
|rebound=f | |||
|direct=f | |||
}} | |||
{{HitboxTableTitle|Angled down|42}} | |||
{{UltimateHitboxTableRow | |||
|id=0 | |||
|damage=0.5% | |||
|angle=350 | |||
|af=3 | |||
|bk=10 | |||
|ks=100 | |||
|fkv=0 | |||
|r=2.5 | |||
|bn=top | |||
|xpos=0.0 | |||
|ypos=8.4 to 7.7 | |||
|zpos=9.5 to 13.4 | |||
|ff=0.0 | |||
|sdi=0.0 | |||
|type=Typeless | |||
|effect=Normal | |||
|sfx=Bayonetta Hit 01 | |||
|slvl=S | |||
|clang=f | |||
|rebound=f | |||
|direct=f | |||
}} | |||
{{UltimateHitboxTableRow | |||
|id=1 | |||
|damage=0.5% | |||
|angle=350 | |||
|af=3 | |||
|bk=0 | |||
|ks=0 | |||
|fkv=0 | |||
|r=2.5 | |||
|bn=top | |||
|xpos=0.0 | |||
|ypos=8.4 to -2.0 | |||
|zpos=9.5 to 68.6 | |||
|ff=0.0 | |||
|sdi=0.0 | |||
|type=Typeless | |||
|effect=Normal | |||
|sfx=Bayonetta Hit 01 | |||
|slvl=S | |||
|clang=f | |||
|rebound=f | |||
|direct=f | |||
}} | }} | ||
|} | |} | ||
==Timing== | ==Timing== | ||
===Attack=== | |||
{|class="wikitable" | {|class="wikitable" | ||
!Charges between | !Charges between | ||
| Line 293: | Line 464: | ||
|- | |- | ||
!Hitboxes | !Hitboxes | ||
|17- | |17-21 | ||
|- | |||
!Bullet Arts window | |||
|23 | |||
|- | |- | ||
!Interruptible | !Interruptible | ||
| Line 303: | Line 477: | ||
{{FrameStripStart}} | {{FrameStripStart}} | ||
{{FrameStrip|t=Lag|c=2|e=LagChargeS}}{{FrameStrip|t=Lag|c=14|s=LagChargeE}}{{FrameStrip|t=Hitbox|c= | {{FrameStrip|t=Lag|c=2|e=LagChargeS}}{{FrameStrip|t=Lag|c=14|s=LagChargeE}}{{FrameStrip|t=Hitbox|c=5}}{{FrameStrip|t=Lag|c=1|e=LagStateS}}{{FrameStrip|t=Lag|c=44|s=LagStateE}}{{FrameStrip|t=Interruptible|c=7}} | ||
{{FrameStripEnd}} | {{FrameStripEnd}} | ||
{{FrameIconLegend|lag=y|charge=y|hitbox=y|interruptible=y}} | |||
===Bullet Arts=== | |||
Up to 10 consecutive bullets can be fired by holding the button, with each one adding 7 frames to the move's duration. Otherwise, the Bullet Arts extension lasts 6 frames. | |||
{|class="wikitable" | |||
!Hitboxes | |||
|1 | |||
|- | |||
!Loop point | |||
|7-8 | |||
|- | |||
!Animation length | |||
|6 | |||
|} | |||
{{FrameStripStart}} | |||
{{FrameStrip|t=Hitbox|c=1}}{{FrameStrip|t=Lag|c=5}}{{FrameStrip|t=Blank|c=1|e=BlankLoopS}}{{FrameStrip|t=Blank|c=1|s=BlankLoopE}} | |||
{{FrameStripEnd}} | |||
{{FrameIconLegend|lag=y|charge=y|hitbox=y|loop=y|state=y|interruptible=y}} | |||
{{MvSubNavBayonetta|g=SSBU}} | {{MvSubNavBayonetta|g=SSBU}} | ||
[[Category:Bayonetta (SSBU)]] | [[Category:Bayonetta (SSBU)]] | ||
[[Category:Forward smashes (SSBU)]] | [[Category:Forward smashes (SSBU)]] | ||
Latest revision as of 01:21, August 3, 2022
Hitbox visualizations[edit]
| Angle | Wicked Weaves | Bullet Arts |
|---|---|---|
| ↗ |  |

|
| → |  |

|
| ↘ |  |

|
Overview[edit]
Uses Wicked Weaves to summon Madama Butterfly's arm, which is used to throw a punch. Based on the final hit of Bayonetta's Punch + Punch + Punch • Punch (PPP • P) combo while wielding Love is Blue. Can be angled. The Bullet Arts version of this move fires her gun depending on how the smash was angled: forward if unangled, slightly upward if angled up, and slightly downward if angled down. It has great power and horizontal range, and Madama Butterfly's hitbox cannot be reversed. However, it has high ending lag and low priority, making it fairly easy to cancel out. A blindspot will always be present directly in front of Bayonetta, regardless of angle, and its animation renders it unable to hit prone opponents (or those with very low crouches).
Update History[edit]
 Forward smash has more base knockback (26 → 34/35) and a longer hitbox duration (frames 17-19 → 17-21).
Hitboxes[edit]
Attack[edit]
The move and its hitboxes have some unusual properties, which are shared with Bayonetta's other smash attacks:
- The Wicked Weaves, while attached to Bayonetta and causing her to experience hitlag alongside opponents hit, are programmed as a separate object. This gives the hitboxes pseudo-projectile properties; for example, they do not have their damage affected by Bayonetta being giant or tiny.
- Additionally, when shielded, the 0.67× hitlag reduction only applies to the opponent, making it comparatively less safe than other attacks.
- Compared to other smash attacks, it has a lower maximum charge damage multiplier, capping at 1.2× instead of 1.4×, and can only be held for up to 60 frames after reaching full charge instead of 120 frames. If hitting an opponent slowed down by Witch Time, the multiplier is further reduced to 1.1×, with the damage increase per charge frame being halved.
Bullet Arts[edit]
The bullet is shot from Bayonetta's right arm gun.
Timing[edit]
Attack[edit]
| Charges between | 2-3 |
|---|---|
| Hitboxes | 17-21 |
| Bullet Arts window | 23 |
| Interruptible | 67 |
| Animation length | 73 |
Bullet Arts[edit]
Up to 10 consecutive bullets can be fired by holding the button, with each one adding 7 frames to the move's duration. Otherwise, the Bullet Arts extension lasts 6 frames.
| Hitboxes | 1 |
|---|---|
| Loop point | 7-8 |
| Animation length | 6 |
Lag time |
Charge interval |
Hitbox |
Loop point |
State change |
Interruptible |
|