SSBU Icon.png

Peach (SSBU)/Down special

From SmashWiki, the Super Smash Bros. wiki
< Peach (SSBU)
Revision as of 04:24, November 30, 2022 by Derekblue1 (talk | contribs) (Added overview and sections for the down specials.)
Jump to navigationJump to search
This article is about the hitbox visualization in Super Smash Bros. Ultimate. For the move itself, see Vegetable.
Hitbox visualization showing Peach's down special, Vegetable.
Competitive.png This article or section may require competitive expertise.
You can discuss this issue on the talk page or edit this page to improve it.

Overview

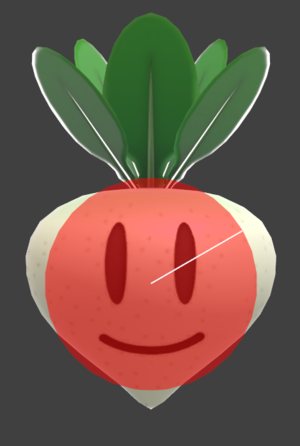
With Peach's down special, she plucks a Super Mario Bros. 2 Vegetable from the ground. She can then throw it as a projectile item. Its face determines how much damage it will do; the rarer the expression, the stronger the turnip. Along with turnips, Peach can rarely pull out Mr. Saturns and Bob-ombs.

Grin

Stare

Closed Eyes

Surprised

Happy

Wink

Dot-Eyes

Stitch-Face

Mr. Saturn

Bob-omb

The rarest item to pull from the down special, Peach can kill the opponent at low percentages. The Bob-omb will not hurt her if she throws it. However, the opponent has a reflection move, the Bob-omb will hurt Peach. To counter this, Peach has to mix her timing to bait her opponent into reflecting.

Peach can perform a combo with a Bob-omb by performing two down aerial while floating, then position herself to throw the Bob-omb onto the opponent. This can kill the opponent early at 0%.

Update History

Super Smash Bros. Ultimate 3.0.0

  • Nerf Vegetable deals less shield damage.

Super Smash Bros. Ultimate 3.1.0

  • Nerf Vegetable has more ending lag (FAF 37 → 40).

Hitboxes

Each turnip type has a unique base damage defined in their parameters. Per the item throw damage formula, the effective damage of each item is equal to the following:

  • Turnips: base damage - 0.5 + throw speed * 2.5
  • Bob-omb: 25 - 0.4 + throw speed * 3
  • Mr. Saturn: 5 - 0.4 + throw speed * 1.5

Turnip

ID Part Rehit rate Damage SD Angle Angle type BK KS FKV Set weight Radius Bone Offset SDI× T% Clang Rebound Effect Type G A Sound Direct Hit bits Hit part Blockable Reflectable Absorbable Flinchless No GFX Heedless
0 0 100 Variable -2.5 AngleIcon30.png Speed-based 25 45 0 HitboxTableIcon(False).png 2.1 top 0.0 -1.0 0.0 0.8× 1.0× 0% HitboxTableIcon(Clang).png HitboxTableIcon(Rebound).png EffectIcon(Normal).png TypeIcon(Typeless).png HitboxTableIcon(GroundedTrue).png HitboxTableIcon(AerialTrue).png M Shell SpecialsIndirect.png No stage All HitboxTableIcon(Blockable).png HitboxTableIcon(Reflectable).png HitboxTableIcon(Unabsorbable).png HitboxTableIcon(False).png HitboxTableIcon(False).png HitboxTableIcon(False).png

Bob-omb

ID Radius Bone Offset G A
Searchbox
0 3.0 top 0.0 0.0 0.0 HitboxTableIcon(GroundedTrue).png HitboxTableIcon(AerialTrue).png
ID Part Rehit rate Damage SD Angle Angle type BK KS FKV Set weight Radius Bone Offset SDI× T% Clang Rebound Effect Type G A Sound Direct Hit bits Hit part Blockable Reflectable Absorbable Flinchless No GFX Heedless
Explosion
0 0 0 25.0% 2.0 Sakurai angle Standard 30 90 0 HitboxTableIcon(False).png 12.0 top 0.0 0.0 0.0 0.5× 1.0× 0% HitboxTableIcon(NoClang).png HitboxTableIcon(NoRebound).png EffectIcon(Flame).png TypeIcon(Explosive).png HitboxTableIcon(GroundedFalse).png HitboxTableIcon(AerialTrue).png H Bomb SpecialsIndirect.png No stage All HitboxTableIcon(Blockable).png HitboxTableIcon(Reflectable).png HitboxTableIcon(Absorbable).png HitboxTableIcon(False).png HitboxTableIcon(False).png HitboxTableIcon(False).png
1 0 0 25.0% 2.0 Sakurai angle Standard 30 90 0 HitboxTableIcon(False).png 12.0 top 0.0 0.0 0.0 0.5× 1.0× 0% HitboxTableIcon(NoClang).png HitboxTableIcon(NoRebound).png EffectIcon(Flame).png TypeIcon(Explosive).png HitboxTableIcon(GroundedTrue).png HitboxTableIcon(AerialFalse).png H Bomb SpecialsIndirect.png No stage All HitboxTableIcon(Blockable).png HitboxTableIcon(Reflectable).png HitboxTableIcon(Absorbable).png HitboxTableIcon(False).png HitboxTableIcon(False).png HitboxTableIcon(False).png
Explosion when thrown
0 0 0 25.0% 2.0 Sakurai angle Speed-based 30 90 0 HitboxTableIcon(False).png 12.0 top 0.0 0.0 0.0 0.5× 1.0× 0% HitboxTableIcon(NoClang).png HitboxTableIcon(NoRebound).png EffectIcon(Flame).png TypeIcon(Explosive).png HitboxTableIcon(GroundedFalse).png HitboxTableIcon(AerialTrue).png H Bomb SpecialsIndirect.png No stage All HitboxTableIcon(Blockable).png HitboxTableIcon(Reflectable).png HitboxTableIcon(Absorbable).png HitboxTableIcon(False).png HitboxTableIcon(False).png HitboxTableIcon(False).png
1 0 0 25.0% 2.0 Sakurai angle Speed-based 30 90 0 HitboxTableIcon(False).png 12.0 top 0.0 0.0 0.0 0.5× 1.0× 0% HitboxTableIcon(NoClang).png HitboxTableIcon(NoRebound).png EffectIcon(Flame).png TypeIcon(Explosive).png HitboxTableIcon(GroundedTrue).png HitboxTableIcon(AerialFalse).png H Bomb SpecialsIndirect.png No stage All HitboxTableIcon(Blockable).png HitboxTableIcon(Reflectable).png HitboxTableIcon(Absorbable).png HitboxTableIcon(False).png HitboxTableIcon(False).png HitboxTableIcon(False).png

Mr. Saturn

ID Part Rehit rate Damage SD Angle Angle type BK KS FKV Set weight Radius Bone Offset SDI× T% Clang Rebound Effect Type G A Sound Direct Hit bits Hit part Blockable Reflectable Absorbable Flinchless No GFX Heedless
0 0 0 5.0% 45.0 Sakurai angle Speed-based 10 50 0 HitboxTableIcon(False).png 4.0 top 0.0 0.0 0.0 1.0× 1.0× 0% HitboxTableIcon(Clang).png HitboxTableIcon(NoRebound).png EffectIcon(Normal).png TypeIcon(Weapon).png HitboxTableIcon(GroundedFalse).png HitboxTableIcon(AerialTrue).png S Shell SpecialsIndirect.png No stage All HitboxTableIcon(Blockable).png HitboxTableIcon(Reflectable).png HitboxTableIcon(Unabsorbable).png HitboxTableIcon(False).png HitboxTableIcon(False).png HitboxTableIcon(False).png
1 0 0 5.0% 45.0 AngleIcon270.png Speed-based 10 50 0 HitboxTableIcon(False).png 4.0 top 0.0 0.0 0.0 1.0× 1.0× 0% HitboxTableIcon(Clang).png HitboxTableIcon(NoRebound).png EffectIcon(Normal).png TypeIcon(Weapon).png HitboxTableIcon(GroundedTrue).png HitboxTableIcon(AerialFalse).png S Shell SpecialsIndirect.png No stage All HitboxTableIcon(Blockable).png HitboxTableIcon(Reflectable).png HitboxTableIcon(Unabsorbable).png HitboxTableIcon(False).png HitboxTableIcon(False).png HitboxTableIcon(False).png

Timing

Pull

The move can only be used on the ground and if Peach is not already holding an item.

Turnip generated 1
Interruptible 40
Animation length 61
FrameIcon(LagPropE).png FrameIcon(Lag).png FrameIcon(Lag).png FrameIcon(Lag).png FrameIcon(Lag).png FrameIcon(Lag).png FrameIcon(Lag).png FrameIcon(Lag).png FrameIcon(Lag).png FrameIcon(Lag).png FrameIcon(Lag).png FrameIcon(Lag).png FrameIcon(Lag).png FrameIcon(Lag).png FrameIcon(Lag).png FrameIcon(Lag).png FrameIcon(Lag).png FrameIcon(Lag).png FrameIcon(Lag).png FrameIcon(Lag).png FrameIcon(Lag).png FrameIcon(Lag).png FrameIcon(Lag).png FrameIcon(Lag).png FrameIcon(Lag).png FrameIcon(Lag).png FrameIcon(Lag).png FrameIcon(Lag).png FrameIcon(Lag).png FrameIcon(Lag).png FrameIcon(Lag).png FrameIcon(Lag).png FrameIcon(Lag).png FrameIcon(Lag).png FrameIcon(Lag).png FrameIcon(Lag).png FrameIcon(Lag).png FrameIcon(Lag).png FrameIcon(Lag).png FrameIcon(Interruptible).png FrameIcon(Interruptible).png FrameIcon(Interruptible).png FrameIcon(Interruptible).png FrameIcon(Interruptible).png FrameIcon(Interruptible).png FrameIcon(Interruptible).png FrameIcon(Interruptible).png FrameIcon(Interruptible).png FrameIcon(Interruptible).png FrameIcon(Interruptible).png FrameIcon(Interruptible).png FrameIcon(Interruptible).png FrameIcon(Interruptible).png FrameIcon(Interruptible).png FrameIcon(Interruptible).png FrameIcon(Interruptible).png FrameIcon(Interruptible).png FrameIcon(Interruptible).png FrameIcon(Interruptible).png FrameIcon(Interruptible).png FrameIcon(Interruptible).png

Bob-omb explosion

The timings shown are for a Bob-omb exploding on impact with an opponent. During the first 4 frames, the Bob-omb stops the opponent in their last animation frame before it explodes.

Hitbox 5-6
FrameIcon(Lag).png FrameIcon(Lag).png FrameIcon(Lag).png FrameIcon(Lag).png FrameIcon(Hitbox).png FrameIcon(Hitbox).png
Legend (1 square = 1 frame)
FrameIcon(Lag).png
Lag time
FrameIcon(Hitbox).png
Hitbox
FrameIcon(BlankPropS).pngFrameIcon(BlankPropE).png
Prop event
FrameIcon(Interruptible).png
Interruptible

Parameters

Move

Active turnip limit 10
Chance of getting an item 1%
Relative odds of getting a Bob-omb 2 (0.4%)
Relative odds of getting a Mr. Saturn 3 (0.6%)

Item

These parameters only apply to turnips.

Lifetime 180 frames
Throw speed multiplier 0.805
Size multiplier 1.3
Base damage modifier for item throw damage -0.5
Multiplier to item throw speed for additional damage 2.5
Gravity 0.085
Falling speed 2.8
Friction 0.0025 (aerial)
0.03 (grounded)
Horizontal speed multiplier when bouncing off 0.2 (floor)
0.3 (wall)
0.5 (ceiling)
0.11 (target)
Vertical speed multiplier when bouncing off 0.55 (floor)
-0.1 (wall)
0.3 (ceiling)
0.11 (target)
Added vertical speed when bouncing off 1.3 (wall)
1.1 (target)
Minimum speed to bounce off terrain 0.2
Collision detection box half-lengths 3 (width)
2.5 (height)
Pickup detection box lengths 6 (width)
5 (height)
Effect when shielded Vanishes

Turnip differences

Parameter Turnip type
Grin Stare Closed eyes Surprised Happy Wink Dot-eyes Stitch-face
Base damage 5% 5% 5% 5% 5% 10% 16% 24%
Relative odds of appearing 35 6 5 3 3 4 1 1
Effective chance of appearing 60.35% 10.35% 8.62% 5.17% 5.17% 6.9% 1.72% 1.72%

Trivia

  • The move still contains code for pulling a Beam Sword, like it could in Melee and Brawl; however, its odds are set to 0 in the parameters, so it can never be pulled in-game. This was also the case in Smash 4.