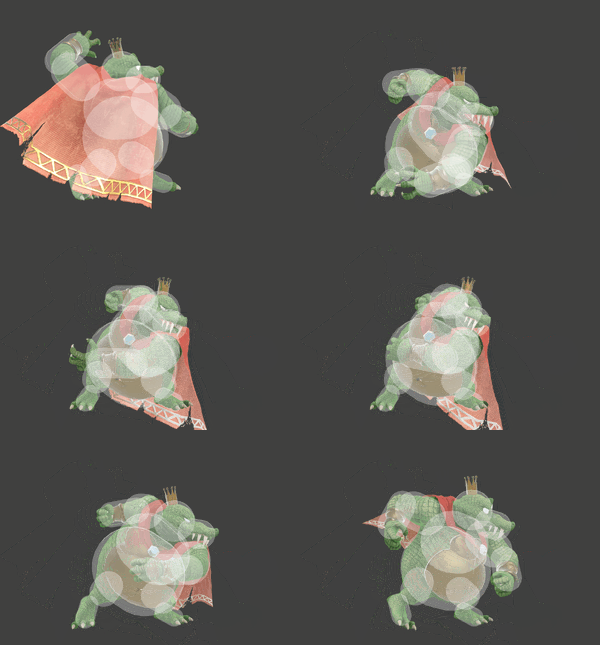
King K. Rool (SSBU)/Neutral attack/Hit 2: Difference between revisions
(→Overview: citation) |
No edit summary |
||
| (3 intermediate revisions by 3 users not shown) | |||
| Line 1: | Line 1: | ||
{{ArticleIcons|ssbu=y}} | {{ArticleIcons|ssbu=y}} | ||
[[File:KingKRoolJab2SSBU.gif|thumb| | [[File:KingKRoolJab2SSBU.gif|thumb|300px|Hitbox visualization showing King K. Rool's Hit 2 of neutral attack.]] | ||
==Overview== | ==Overview== | ||
King K. Rool does a quick claw swipe. Coming out Frame 3, this is King K. Rool's fastest move in general, although due to Hit 1's transition, it is technically Frame 9. Like Hit 1, this deals 4 extra frames of hitstun in addition to the usual amount. Due to the reasonably quick frame data and good active frames considering Hit 1, it's a niche option for baiting opponents trying to punish Hit 1 | King K. Rool does a quick claw swipe. Coming out Frame 3, this is King K. Rool's fastest move in general, although due to [[../Hit 1|Hit 1]]'s transition, it is technically Frame 9. Like Hit 1, this deals 4 extra frames of hitstun in addition to the usual amount. Due to the reasonably quick frame data and good active frames considering Hit 1, it's a niche option for baiting opponents trying to punish Hit 1. | ||
Hitting lower than Hit 1 means Hit 2 is better at [[lock]]ing<ref>https://docs.google.com/spreadsheets/d/1BU1v14JpuTQEWmhYLzJn5KEBnKRN6GoAvs6g4QUhiag/edit?usp=sharing</ref> or hitting buried opponents <ref>https://docs.google.com/spreadsheets/d/113W9WQAmUCBukC0gNI09o3giIjTVnG9rHbUyg-aV3l8/edit?usp=sharing</ref>than the prior. This is important in some matchups, although it takes time to set up and thus tends to lose to [[getup attack]]. Outside of this, the best use of Hit 2 is in niche spacing scenarios where | Jab 2 has slightly [[disjointed]] hitboxes for the same reason as [[../Hit 1|Hit 1]]: the lack of hand hurtboxes. This, in tandem with the previous hit, makes it effective for cancelling out weak projectiles like {{SSBU|Luigi}}'s [[Fireball]]s, but due to the low damage, it is matchup-specific. In the event the cancelling out occurs, K. Rool sustains minimal recoil lag, allowing for a quick punish. | ||
Hitting lower than Hit 1 means Hit 2 is better at [[lock]]ing<ref>https://docs.google.com/spreadsheets/d/1BU1v14JpuTQEWmhYLzJn5KEBnKRN6GoAvs6g4QUhiag/edit?usp=sharing</ref> or hitting buried opponents<ref>https://docs.google.com/spreadsheets/d/113W9WQAmUCBukC0gNI09o3giIjTVnG9rHbUyg-aV3l8/edit?usp=sharing</ref> than the prior; it also assists with projectiles that hit lower to the ground. This is important in some matchups, although it takes time to set up and thus tends to lose to [[getup attack]]. Outside of this, the best use of Hit 2 is in niche spacing scenarios where one needs more hitboxes, or is going into [[../Hit 3|Hit 3]]. | |||
==Hitboxes== | ==Hitboxes== | ||
| Line 14: | Line 16: | ||
|damage=2.5% | |damage=2.5% | ||
|angle=361 | |angle=361 | ||
|af=3 | |||
|bk=25 | |bk=25 | ||
|ks=30 | |ks=30 | ||
| Line 33: | Line 36: | ||
|damage=2.5% | |damage=2.5% | ||
|angle=361 | |angle=361 | ||
|af=3 | |||
|bk=25 | |bk=25 | ||
|ks=30 | |ks=30 | ||
| Line 52: | Line 56: | ||
|damage=2.5% | |damage=2.5% | ||
|angle=361 | |angle=361 | ||
|af=3 | |||
|bk=25 | |bk=25 | ||
|ks=30 | |ks=30 | ||
| Line 71: | Line 76: | ||
|damage=2.5% | |damage=2.5% | ||
|angle=180 | |angle=180 | ||
|af=3 | |||
|hitbits=Fighter only | |||
|bk=20 | |bk=20 | ||
|ks=15 | |ks=15 | ||
| Line 90: | Line 97: | ||
|damage=2.5% | |damage=2.5% | ||
|angle=361 | |angle=361 | ||
|af=3 | |||
|bk=20 | |bk=20 | ||
|ks=15 | |ks=15 | ||
| Line 112: | Line 120: | ||
|3-4 | |3-4 | ||
|- | |- | ||
! | !Continuability window | ||
|9 | |9-31 | ||
|- | |- | ||
!Interruptible | !Interruptible | ||
| Line 124: | Line 132: | ||
{{FrameStripStart}} | {{FrameStripStart}} | ||
{{FrameStrip|t=Lag|c=2}}{{FrameStrip|t=Hitbox|c=2}}{{FrameStrip|t=Lag|c=4|e=LagContinuableS}}{{FrameStrip|t=Lag|c=19|s=LagContinuableE}}{{FrameStrip|t=Interruptible|c=24}} | {{FrameStrip|t=Lag|c=2}}{{FrameStrip|t=Hitbox|c=2}}{{FrameStrip|t=Lag|c=4|e=LagContinuableS}}{{FrameStrip|t=Lag|c=19|s=LagContinuableE}}{{FrameStrip|t=Interruptible|c=24}} | ||
|- | |||
{{FrameStrip|t=Blank|c=8}}{{FrameStrip|t=Continuable|c=23}}{{FrameStrip|t=Blank|c=20}} | |||
{{FrameStripEnd}} | {{FrameStripEnd}} | ||
{{FrameIconLegend|lag=y|hitbox=y|earliestcontinuable=y|interruptible=y}} | {{FrameIconLegend|lag=y|hitbox=y|earliestcontinuable=y|continuable=y|interruptible=y}} | ||
{{MvSubNavKingKRool|g=SSBU}} | {{MvSubNavKingKRool|g=SSBU}} | ||
Latest revision as of 16:35, August 5, 2022
Overview[edit]
King K. Rool does a quick claw swipe. Coming out Frame 3, this is King K. Rool's fastest move in general, although due to Hit 1's transition, it is technically Frame 9. Like Hit 1, this deals 4 extra frames of hitstun in addition to the usual amount. Due to the reasonably quick frame data and good active frames considering Hit 1, it's a niche option for baiting opponents trying to punish Hit 1.
Jab 2 has slightly disjointed hitboxes for the same reason as Hit 1: the lack of hand hurtboxes. This, in tandem with the previous hit, makes it effective for cancelling out weak projectiles like Luigi's Fireballs, but due to the low damage, it is matchup-specific. In the event the cancelling out occurs, K. Rool sustains minimal recoil lag, allowing for a quick punish.
Hitting lower than Hit 1 means Hit 2 is better at locking[1] or hitting buried opponents[2] than the prior; it also assists with projectiles that hit lower to the ground. This is important in some matchups, although it takes time to set up and thus tends to lose to getup attack. Outside of this, the best use of Hit 2 is in niche spacing scenarios where one needs more hitboxes, or is going into Hit 3.
Hitboxes[edit]
Timing[edit]
| Hitboxes | 3-4 |
|---|---|
| Continuability window | 9-31 |
| Interruptible | 28 |
| Animation length | 51 |
Lag time |
Hitbox |
Continuable |
Earliest continuable point |
Interruptible |
|
