Bayonetta (SSBU)/Up tilt: Difference between revisions
Raul Retana (talk | contribs) m (Added update history) |
No edit summary |
||
| Line 4: | Line 4: | ||
==Overview== | ==Overview== | ||
Bayonetta performs an upwards pistol whip. | Bayonetta performs an upwards pistol whip. Coming out on frame 7, it is a great anti-air that doubles as a combo starter, capable of leading into up aerial, neutral aerial, and Witch Twist at low to mid percents and even into itself against heavyweights at low percents. It can also hit below platforms and shield-pressure opponents from above, potentially starting a combo. | ||
However at higher percents it loses all its combo potential, serving then exclusively as an anti-air, and its knockback growth is too low to score a KO until unreasonably high percents. It is also noteworthy that, at high percents and/or depending on positioning and hurtbox shifting, the first hit may fail to connect to the second hit against grounded opponents. | However at higher percents it loses all its combo potential, serving then exclusively as an anti-air, and its knockback growth is too low to score a KO until unreasonably high percents. It is also noteworthy that, at high percents and/or depending on positioning and hurtbox shifting, the first hit may fail to connect to the second hit against grounded opponents. | ||
==Update History== | ==Update History== | ||
'''{{GameIcon|ssbu}} {{SSBU|3.1.0}}''' | '''{{GameIcon|ssbu}} {{SSBU|3.1.0}}''' | ||
| Line 14: | Line 15: | ||
*{{buff|The first hit uses set knockback (100/90 base/10 scaling → 145/100 set/100 scaling), and launches grounded opponents at an angle more towards Bayonetta (123° → 125°), allowing it to connect more reliably into the second hit.}} | *{{buff|The first hit uses set knockback (100/90 base/10 scaling → 145/100 set/100 scaling), and launches grounded opponents at an angle more towards Bayonetta (123° → 125°), allowing it to connect more reliably into the second hit.}} | ||
*{{buff|The second hit has an additional hitbox that is placed lower (Y offset: 25.5u → 20u) and extends farther horizontally compared to the existing one (Z offset: -1u—1u → -3u—3u), increasing its range.}} | *{{buff|The second hit has an additional hitbox that is placed lower (Y offset: 25.5u → 20u) and extends farther horizontally compared to the existing one (Z offset: -1u—1u → -3u—3u), increasing its range.}} | ||
==Hitboxes== | ==Hitboxes== | ||
===Attack=== | |||
{{UltimateHitboxTableHeader}} | {{UltimateHitboxTableHeader}} | ||
{{HitboxTableTitle|Early hit 1|42}} | {{HitboxTableTitle|Early hit 1|42}} | ||
| Line 21: | Line 24: | ||
|damage=1.5% | |damage=1.5% | ||
|angle=125 | |angle=125 | ||
|af=3 | |||
|bk=0 | |bk=0 | ||
|ks=100 | |ks=100 | ||
|fkv=145 | |fkv=145 | ||
|setweight=t | |||
|r=5.0 | |r=5.0 | ||
|bn=top | |bn=top | ||
| Line 41: | Line 46: | ||
|damage=1.5% | |damage=1.5% | ||
|angle=123 | |angle=123 | ||
|af=3 | |||
|bk=0 | |bk=0 | ||
|ks=100 | |ks=100 | ||
|fkv=100 | |fkv=100 | ||
|setweight=t | |||
|r=5.0 | |r=5.0 | ||
|bn=top | |bn=top | ||
| Line 57: | Line 64: | ||
|g=f | |g=f | ||
}} | }} | ||
{{HitboxTableTitle|Late hit 1|42}} | {{HitboxTableTitle|Late hit 1|42}} | ||
{{UltimateHitboxTableRow | {{UltimateHitboxTableRow | ||
| Line 63: | Line 69: | ||
|damage=2.0% | |damage=2.0% | ||
|angle=128 | |angle=128 | ||
|af=3 | |||
|bk=65 | |bk=65 | ||
|ks=27 | |ks=27 | ||
| Line 85: | Line 92: | ||
|damage=6.0% | |damage=6.0% | ||
|angle=93 | |angle=93 | ||
|af=3 | |||
|bk=55 | |bk=55 | ||
|ks=60 | |ks=60 | ||
| Line 104: | Line 112: | ||
|damage=6.0% | |damage=6.0% | ||
|angle=93 | |angle=93 | ||
|af=3 | |||
|bk=55 | |bk=55 | ||
|ks=60 | |ks=60 | ||
| Line 117: | Line 126: | ||
|sfx=Punch | |sfx=Punch | ||
|slvl=L | |slvl=L | ||
}} | |||
|} | |||
===Bullet Arts=== | |||
The bullet is shot from Bayonetta's right arm gun. | |||
{{UltimateHitboxTableHeader}} | |||
{{UltimateHitboxTableRow | |||
|id=0 | |||
|damage=0.5% | |||
|angle=90 | |||
|af=3 | |||
|bk=10 | |||
|ks=100 | |||
|fkv=0 | |||
|r=2.5 | |||
|bn=top | |||
|xpos=0.0 | |||
|ypos=22.0 to 26.0 | |||
|zpos=-2.0 | |||
|ff=0.0 | |||
|sdi=0.0 | |||
|type=Typeless | |||
|effect=Normal | |||
|sfx=Bayonetta Hit 01 | |||
|slvl=S | |||
|clang=f | |||
|rebound=f | |||
|direct=f | |||
}} | |||
{{UltimateHitboxTableRow | |||
|id=1 | |||
|damage=0.5% | |||
|angle=90 | |||
|af=3 | |||
|bk=0 | |||
|ks=0 | |||
|fkv=0 | |||
|r=2.5 | |||
|bn=top | |||
|xpos=0.0 | |||
|ypos=22.0 to 82.0 | |||
|zpos=-2.0 | |||
|ff=0.0 | |||
|sdi=0.0 | |||
|type=Typeless | |||
|effect=Normal | |||
|sfx=Bayonetta Hit 01 | |||
|slvl=S | |||
|clang=f | |||
|rebound=f | |||
|direct=f | |||
}} | }} | ||
|} | |} | ||
==Timing== | ==Timing== | ||
===Attack=== | |||
{|class="wikitable" | {|class="wikitable" | ||
!Hit 1 (early, late) | !Hit 1 (early, late) | ||
| Line 127: | Line 188: | ||
!Hit 2 | !Hit 2 | ||
|13-15 | |13-15 | ||
|- | |||
!Bullet Arts window | |||
|16 | |||
|- | |- | ||
!Interruptible | !Interruptible | ||
| Line 136: | Line 200: | ||
{{FrameStripStart}} | {{FrameStripStart}} | ||
{{FrameStrip|t=Lag|c=6}}{{FrameStrip|t=Hitbox|c=3|e=HitboxChangeS}}{{FrameStrip|t=Hitbox|c=3|s=HitboxChangeE|e=HitboxChangeS}}{{FrameStrip|t=Hitbox|c=3|s=HitboxChangeE}}{{FrameStrip|t=Lag|c=14}}{{FrameStrip|t=Interruptible|c=20}} | {{FrameStrip|t=Lag|c=6}}{{FrameStrip|t=Hitbox|c=3|e=HitboxChangeS}}{{FrameStrip|t=Hitbox|c=3|s=HitboxChangeE|e=HitboxChangeS}}{{FrameStrip|t=Hitbox|c=3|s=HitboxChangeE|e=HitboxStateS}}{{FrameStrip|t=Lag|c=14|s=LagStateE}}{{FrameStrip|t=Interruptible|c=20}} | ||
{{FrameStripEnd}} | {{FrameStripEnd}} | ||
{{FrameIconLegend|lag=y|hitbox=y|hitboxchange=y|interruptible=y}} | ===Bullet Arts=== | ||
Up to 10 consecutive bullets can be fired by holding the button, with each one adding 7 frames to the move's duration. Otherwise, the Bullet Arts extension lasts 11 frames. | |||
{|class="wikitable" | |||
!Hitboxes | |||
|1 | |||
|- | |||
!Loop point | |||
|7-8 | |||
|- | |||
!Animation length | |||
|11 | |||
|} | |||
{{FrameStripStart}} | |||
{{FrameStrip|t=Hitbox|c=1}}{{FrameStrip|t=Lag|c=6|e=LagLoopS}}{{FrameStrip|t=Lag|c=4|s=LagLoopE}} | |||
{{FrameStripEnd}} | |||
{{FrameIconLegend|lag=y|hitbox=y|hitboxchange=y|loop=y|state=y|interruptible=y}} | |||
{{MvSubNavBayonetta|g=SSBU}} | {{MvSubNavBayonetta|g=SSBU}} | ||
[[Category:Bayonetta (SSBU)]] | [[Category:Bayonetta (SSBU)]] | ||
[[Category:Up tilts (SSBU)]] | [[Category:Up tilts (SSBU)]] | ||
Latest revision as of 23:07, August 2, 2022
Overview[edit]
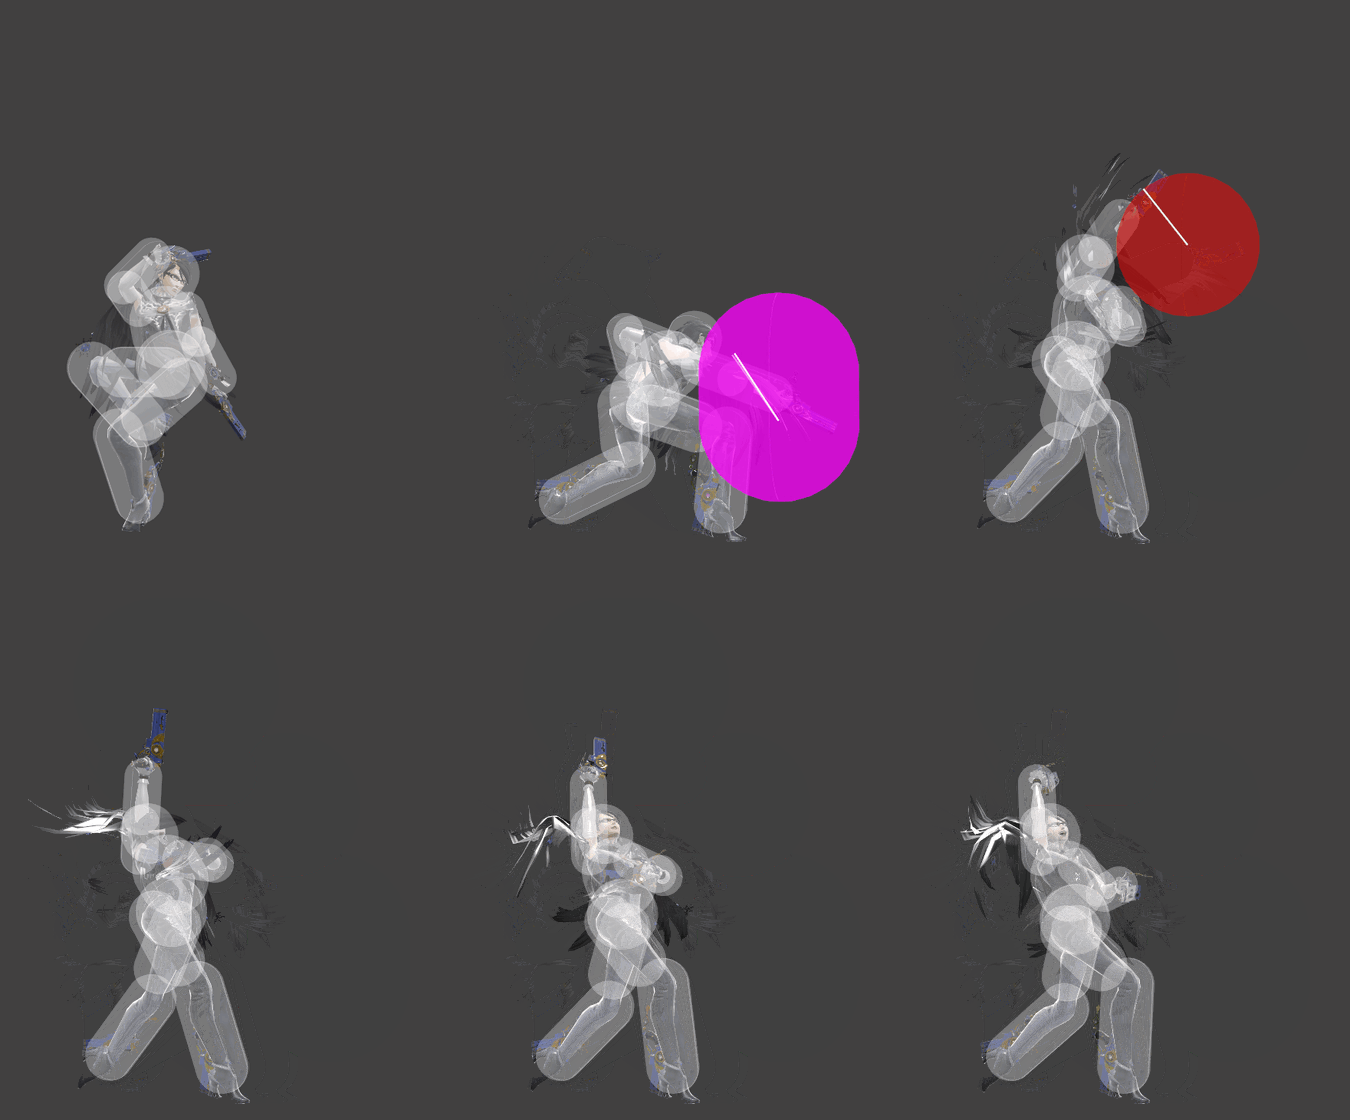
Bayonetta performs an upwards pistol whip. Coming out on frame 7, it is a great anti-air that doubles as a combo starter, capable of leading into up aerial, neutral aerial, and Witch Twist at low to mid percents and even into itself against heavyweights at low percents. It can also hit below platforms and shield-pressure opponents from above, potentially starting a combo.
However at higher percents it loses all its combo potential, serving then exclusively as an anti-air, and its knockback growth is too low to score a KO until unreasonably high percents. It is also noteworthy that, at high percents and/or depending on positioning and hurtbox shifting, the first hit may fail to connect to the second hit against grounded opponents.
Update History[edit]
 Up tilt's hits connect more reliably.
 The move has less startup (frame 9 → 7), and the second hit has a longer duration (frame 15 → frames 13-15). The move's interruptibility has been compensated as well (FAF 32 → 30), reducing its ending lag.
 The first hit uses set knockback (100/90 base/10 scaling → 145/100 set/100 scaling), and launches grounded opponents at an angle more towards Bayonetta (123° → 125°), allowing it to connect more reliably into the second hit.
 The second hit has an additional hitbox that is placed lower (Y offset: 25.5u → 20u) and extends farther horizontally compared to the existing one (Z offset: -1u—1u → -3u—3u), increasing its range.
Hitboxes[edit]
Attack[edit]
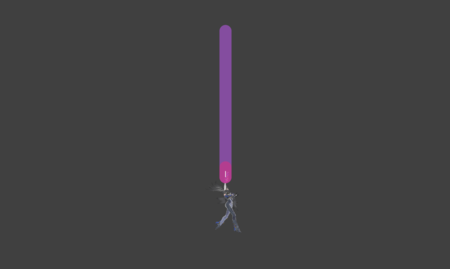
Bullet Arts[edit]
The bullet is shot from Bayonetta's right arm gun.
Timing[edit]
Attack[edit]
| Hit 1 (early, late) | 7-9, 10-12 |
|---|---|
| Hit 2 | 13-15 |
| Bullet Arts window | 16 |
| Interruptible | 30 |
| Animation length | 49 |
Bullet Arts[edit]
Up to 10 consecutive bullets can be fired by holding the button, with each one adding 7 frames to the move's duration. Otherwise, the Bullet Arts extension lasts 11 frames.
| Hitboxes | 1 |
|---|---|
| Loop point | 7-8 |
| Animation length | 11 |
Lag time |
Hitbox |
Hitbox change |
Loop point |
State change |
Interruptible |
|

