SSBU Icon.png

Kirby (SSBU)/Down aerial: Difference between revisions

From SmashWiki, the Super Smash Bros. wiki
Jump to navigationJump to search
(Who the hell made these images so damn big? I also don't think that whole "controversy" section is relevant here, petty twitter drama doesn't belong on these moveset pages. Also I think the writeup here is highly suspect, with it just glossing over its advantages, but I'm not gonna touch that for now.)
Line 1: Line 1:
{{ArticleIcons|ssbu=y}}
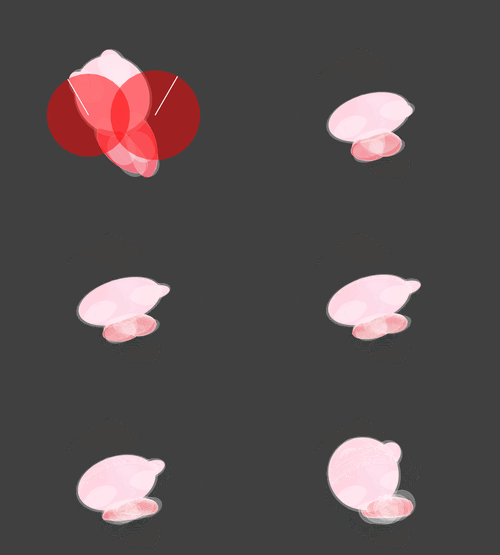
[[File:KirbyDAirSSBU.gif|thumb|500px|Hitbox visualization showing Kirby's down aerial.]]
[[File:KirbyDAirSSBU.gif|thumb|250px|Hitbox visualization showing Kirby's down aerial.]]
[[File:KirbyDAirLandingSSBU.gif|thumb|500px|Hitbox visualization showing Kirby's down aerial, when landing.]]
[[File:KirbyDAirLandingSSBU.gif|thumb|250px|Hitbox visualization showing Kirby's down aerial, when landing.]]
 
==Overview==
==Overview==
A corkscrew dropkick. It has the slowest startup of Kirby's entire moveset on frame 18, but it has low ending lag. It consists of multiple hits, with the final hit being able to meteor smash. It has a landing hitbox on Kirby's sides that launches at a 60 degrees angle, which makes it a useful combo starter. It also has a large initial autocancel window. In spite of its low ending lag and ability to meteor smash in the final hit, it is very unsafe on shield (being -12) and the final hit being unable to kill characters such as {{SSBU|Jigglypuff}} near the ledge offstage at 155%. Other aerials such as his neutral air or forward air possess faster frame data, stronger knockback, wider combo opportunities, and more versatility in general. In short, while serviceable against characters with bad recoveries and for starting combos, other aerials outclass down aerial in most aspects.
A corkscrew dropkick. It has the slowest startup of Kirby's entire moveset on frame 18, but it has low ending lag. It consists of multiple hits, with the final hit being able to meteor smash. It has a landing hitbox on Kirby's sides that launches at a 60 degrees angle, which makes it a useful combo starter. It also has a large initial autocancel window. In spite of its low ending lag and ability to meteor smash in the final hit, it is unsafe on shield (being -12) and the final hit being unable to KO characters such as {{SSBU|Jigglypuff}} near the ledge offstage at 155%. Other aerials such as his neutral air or forward air possess faster frame data, stronger knockback, wider combo opportunities, and more versatility in general. In short, while serviceable against characters with bad recoveries and for starting combos, other aerials outclass down aerial in most aspects.
 
This move has sparked up notorious controversy from {{Sm|PJiggles}}’s video on Worst Moves in Smash Ultimate, particularly on [[Twitter]]. Many players, such as {{Sm|Dark Wizzy}}, believe that the move is decent but not worse than [[Hammer]]. Dair “supporters” argue on how it is used in tournament footage, such as {{Sm|JeJaJeJa}} using it in edgeguard situations. However, due to the move’s inconsistency from mentioned above, other players, such as {{Sm|Ice_killer305}}, cite Hammer’s better consistency and much more reward when used at once, despite being more niche. Players that disagree with dair being a good move cite on the move’s inconsistency when played to its strengths: the move can often take more than 100% to genuinely KO a character for edgeguarding, whereas Donkey Kong’s dair can kill as early 20% because of its good knockback. Similarly, when a dair is above mid-percents, it no longer possesses the ability to properly combo a character.


==Hitboxes==
==Hitboxes==

Revision as of 14:36, February 21, 2021

Hitbox visualization showing Kirby's down aerial.
Hitbox visualization showing Kirby's down aerial, when landing.

Overview

A corkscrew dropkick. It has the slowest startup of Kirby's entire moveset on frame 18, but it has low ending lag. It consists of multiple hits, with the final hit being able to meteor smash. It has a landing hitbox on Kirby's sides that launches at a 60 degrees angle, which makes it a useful combo starter. It also has a large initial autocancel window. In spite of its low ending lag and ability to meteor smash in the final hit, it is unsafe on shield (being -12) and the final hit being unable to KO characters such as Jigglypuff near the ledge offstage at 155%. Other aerials such as his neutral air or forward air possess faster frame data, stronger knockback, wider combo opportunities, and more versatility in general. In short, while serviceable against characters with bad recoveries and for starting combos, other aerials outclass down aerial in most aspects.

Hitboxes

ID Part Rehit rate Damage SD Angle Angle type BK KS FKV Set weight Radius Bone Offset SDI× T% Clang Rebound Effect Type G A Sound Direct Hit bits Hit part Blockable Reflectable Absorbable Flinchless No GFX Heedless
Hits 1-5
0 0 0 1.3% 0 Autolink angle (367) Standard 20 100 0 HitboxTableIcon(False).png 6.0 top 0.0 -2.4 to 2.3 3.0 to 0.5 0.8× 1.2× 0% HitboxTableIcon(Clang).png HitboxTableIcon(Rebound).png EffectIcon(Rapid).png TypeIcon(Foot).png HitboxTableIcon(GroundedTrue).png HitboxTableIcon(AerialTrue).png M Kick SpecialsDirect.png All All HitboxTableIcon(Blockable).png HitboxTableIcon(Unreflectable).png HitboxTableIcon(Unabsorbable).png HitboxTableIcon(False).png HitboxTableIcon(False).png HitboxTableIcon(False).png
Hit 6
0 0 0 2.0% 0 AngleIcon270.png Standard 20 110 0 HitboxTableIcon(False).png 5.6 top 0.0 -2.5 to 0.0 2.4 to 1.2 1.0× 1.0× 0% HitboxTableIcon(Clang).png HitboxTableIcon(Rebound).png EffectIcon(Normal).png TypeIcon(Foot).png HitboxTableIcon(GroundedTrue).png HitboxTableIcon(AerialTrue).png M Kick SpecialsDirect.png All All HitboxTableIcon(Blockable).png HitboxTableIcon(Unreflectable).png HitboxTableIcon(Unabsorbable).png HitboxTableIcon(False).png HitboxTableIcon(False).png HitboxTableIcon(False).png
Landing
0 0 0 2.0% 0 AngleIcon60.png Standard 0 100 40 HitboxTableIcon(False).png 5.4 top 0.0 3.2 4.0 1.0× 1.0× 0% HitboxTableIcon(Clang).png HitboxTableIcon(Rebound).png EffectIcon(Normal).png TypeIcon(Foot).png HitboxTableIcon(GroundedTrue).png HitboxTableIcon(AerialTrue).png L Kick SpecialsDirect.png All All HitboxTableIcon(Blockable).png HitboxTableIcon(Unreflectable).png HitboxTableIcon(Unabsorbable).png HitboxTableIcon(False).png HitboxTableIcon(False).png HitboxTableIcon(False).png
1 0 0 2.0% 0 AngleIcon60.png Standard 0 100 40 HitboxTableIcon(False).png 5.0 top 0.0 3.2 -4.0 1.0× 1.0× 0% HitboxTableIcon(Clang).png HitboxTableIcon(Rebound).png EffectIcon(Normal).png TypeIcon(Foot).png HitboxTableIcon(GroundedTrue).png HitboxTableIcon(AerialTrue).png L Kick SpecialsDirect.png All All HitboxTableIcon(Blockable).png HitboxTableIcon(Unreflectable).png HitboxTableIcon(Unabsorbable).png HitboxTableIcon(False).png HitboxTableIcon(False).png HitboxTableIcon(False).png

Timing

Attack

Initial autocancel 1-17
Hits 1-5 18-19, 21-22, 24-25, 27-28, 30-31
Hit 6 34
Ending autocancel 48-
Interruptible 55
Animation length 59
FrameIcon(Lag).png FrameIcon(Lag).png FrameIcon(Lag).png FrameIcon(Lag).png FrameIcon(Lag).png FrameIcon(Lag).png FrameIcon(Lag).png FrameIcon(Lag).png FrameIcon(Lag).png FrameIcon(Lag).png FrameIcon(Lag).png FrameIcon(Lag).png FrameIcon(Lag).png FrameIcon(Lag).png FrameIcon(Lag).png FrameIcon(Lag).png FrameIcon(Lag).png FrameIcon(Hitbox).png FrameIcon(Hitbox).png FrameIcon(Lag).png FrameIcon(Hitbox).png FrameIcon(Hitbox).png FrameIcon(Lag).png FrameIcon(Hitbox).png FrameIcon(Hitbox).png FrameIcon(Lag).png FrameIcon(Hitbox).png FrameIcon(Hitbox).png FrameIcon(Lag).png FrameIcon(Hitbox).png FrameIcon(Hitbox).png FrameIcon(Lag).png FrameIcon(Lag).png FrameIcon(Hitbox).png FrameIcon(Lag).png FrameIcon(Lag).png FrameIcon(Lag).png FrameIcon(Lag).png FrameIcon(Lag).png FrameIcon(Lag).png FrameIcon(Lag).png FrameIcon(Lag).png FrameIcon(Lag).png FrameIcon(Lag).png FrameIcon(Lag).png FrameIcon(Lag).png FrameIcon(Lag).png FrameIcon(Lag).png FrameIcon(Lag).png FrameIcon(Lag).png FrameIcon(Lag).png FrameIcon(Lag).png FrameIcon(Lag).png FrameIcon(Lag).png FrameIcon(Interruptible).png FrameIcon(Interruptible).png FrameIcon(Interruptible).png FrameIcon(Interruptible).png FrameIcon(Interruptible).png
FrameIcon(Autocancel).png FrameIcon(Autocancel).png FrameIcon(Autocancel).png FrameIcon(Autocancel).png FrameIcon(Autocancel).png FrameIcon(Autocancel).png FrameIcon(Autocancel).png FrameIcon(Autocancel).png FrameIcon(Autocancel).png FrameIcon(Autocancel).png FrameIcon(Autocancel).png FrameIcon(Autocancel).png FrameIcon(Autocancel).png FrameIcon(Autocancel).png FrameIcon(Autocancel).png FrameIcon(Autocancel).png FrameIcon(Autocancel).png FrameIcon(Blank).png FrameIcon(Blank).png FrameIcon(Blank).png FrameIcon(Blank).png FrameIcon(Blank).png FrameIcon(Blank).png FrameIcon(Blank).png FrameIcon(Blank).png FrameIcon(Blank).png FrameIcon(Blank).png FrameIcon(Blank).png FrameIcon(Blank).png FrameIcon(Blank).png FrameIcon(Blank).png FrameIcon(Blank).png FrameIcon(Blank).png FrameIcon(Blank).png FrameIcon(Blank).png FrameIcon(Blank).png FrameIcon(Blank).png FrameIcon(Blank).png FrameIcon(Blank).png FrameIcon(Blank).png FrameIcon(Blank).png FrameIcon(Blank).png FrameIcon(Blank).png FrameIcon(Blank).png FrameIcon(Blank).png FrameIcon(Blank).png FrameIcon(Blank).png FrameIcon(Autocancel).png FrameIcon(Autocancel).png FrameIcon(Autocancel).png FrameIcon(Autocancel).png FrameIcon(Autocancel).png FrameIcon(Autocancel).png FrameIcon(Autocancel).png FrameIcon(Autocancel).png FrameIcon(Autocancel).png FrameIcon(Autocancel).png FrameIcon(Autocancel).png FrameIcon(Autocancel).png

Landing lag

Hitboxes 1-3
Interruptible 17
Animation length 35
FrameIcon(Hitbox).png FrameIcon(Hitbox).png FrameIcon(Hitbox).png FrameIcon(Lag).png FrameIcon(Lag).png FrameIcon(Lag).png FrameIcon(Lag).png FrameIcon(Lag).png FrameIcon(Lag).png FrameIcon(Lag).png FrameIcon(Lag).png FrameIcon(Lag).png FrameIcon(Lag).png FrameIcon(Lag).png FrameIcon(Lag).png FrameIcon(Lag).png FrameIcon(Interruptible).png FrameIcon(Interruptible).png FrameIcon(Interruptible).png FrameIcon(Interruptible).png FrameIcon(Interruptible).png FrameIcon(Interruptible).png FrameIcon(Interruptible).png FrameIcon(Interruptible).png FrameIcon(Interruptible).png FrameIcon(Interruptible).png FrameIcon(Interruptible).png FrameIcon(Interruptible).png FrameIcon(Interruptible).png FrameIcon(Interruptible).png FrameIcon(Interruptible).png FrameIcon(Interruptible).png FrameIcon(Interruptible).png FrameIcon(Interruptible).png FrameIcon(Interruptible).png
Legend (1 square = 1 frame)
FrameIcon(Lag).png
Lag time
FrameIcon(Hitbox).png
Hitbox
FrameIcon(Autocancel).png
Autocancel
FrameIcon(Interruptible).png
Interruptible