Olimar (SSBU)/Forward smash: Difference between revisions
From SmashWiki, the Super Smash Bros. wiki
Jump to navigationJump to search
Raul Retana (talk | contribs) mNo edit summary |
|||
| (6 intermediate revisions by 2 users not shown) | |||
| Line 9: | Line 9: | ||
==Update History== | ==Update History== | ||
'''{{GameIcon|ssbu}} {{SSBU|2.0.0}}''' | '''{{GameIcon|ssbu}} {{SSBU|2.0.0}}''' | ||
*{{ | *{{newbug|Created a glitch where smash attacks would not have their damage outputs scale when charged.}} | ||
'''{{GameIcon|ssbu}} {{SSBU|3.0.0}}''' | '''{{GameIcon|ssbu}} {{SSBU|3.0.0}}''' | ||
*{{nerf|Forward smash deals less shield damage.}} | *{{nerf|Forward smash deals less shield damage.}} | ||
| Line 17: | Line 17: | ||
*{{nerf|Forward smash has more ending lag (FAF 40 → 43).}} | *{{nerf|Forward smash has more ending lag (FAF 40 → 43).}} | ||
'''{{GameIcon|ssbu}} {{SSBU|4.0.0}}''' | '''{{GameIcon|ssbu}} {{SSBU|4.0.0}}''' | ||
*{{buff|Forward smash's | *{{buff|Forward smash's range has been increased when using Purple Pikmin, reverting to its pre-3.1.0 behavior.}} | ||
'''{{GameIcon|ssbu}} {{SSBU|12.0.0}}''' | |||
*{{buff|Forward Smash's clean hit has a longer duration (11-12 → 11-13). The mid hit was made shorter to compensate.}} | |||
==Hitboxes== | ==Hitboxes== | ||
Compared to other [[smash attack]]s, Olimar's forward smash has a lower maximum charge damage multiplier, capping at 1.2× instead of 1.4×, and can only be held for up to 60 frames after reaching full charge instead of 120 frames. | |||
{{UltimateHitboxTableHeader}} | {{UltimateHitboxTableHeader}} | ||
{{HitboxTableTitle|Clean Red Pikmin| | {{HitboxTableTitle|Clean Red Pikmin|42}} | ||
{{UltimateHitboxTableRow | {{UltimateHitboxTableRow | ||
|id=0 | |id=0 | ||
|damage={{ChargedSmashDmgSSBU|20. | |damage={{ChargedSmashDmgSSBU|20.3|1.2}} | ||
|sd=-10.0 | |sd=-10.0 | ||
|angle=361 | |angle=361 | ||
|af=1 | |||
|bk=33 | |bk=33 | ||
|ks=75 | |ks=75 | ||
| Line 40: | Line 45: | ||
|slvl=L | |slvl=L | ||
|direct=f | |direct=f | ||
|reflectable=t | |||
}} | }} | ||
{{HitboxTableTitle| | {{HitboxTableTitle|Mid Red Pikmin|42}} | ||
{{UltimateHitboxTableRow | {{UltimateHitboxTableRow | ||
|id=0 | |id=0 | ||
|damage={{ChargedSmashDmgSSBU|14.0}} | |damage={{ChargedSmashDmgSSBU|14.0|1.2}} | ||
|sd=-7.0 | |sd=-7.0 | ||
|angle=361 | |angle=361 | ||
|af=1 | |||
|bk=33 | |bk=33 | ||
|ks=75 | |ks=75 | ||
| Line 61: | Line 68: | ||
|slvl=M | |slvl=M | ||
|direct=f | |direct=f | ||
|reflectable=t | |||
}} | }} | ||
{{HitboxTableTitle| | {{HitboxTableTitle|Late Red Pikmin|42}} | ||
{{UltimateHitboxTableRow | {{UltimateHitboxTableRow | ||
|id=0 | |id=0 | ||
|damage={{ChargedSmashDmgSSBU|8.4}} | |damage={{ChargedSmashDmgSSBU|8.4|1.2}} | ||
|sd=-4.2 | |sd=-4.2 | ||
|angle=361 | |angle=361 | ||
|af=1 | |||
|bk=33 | |bk=33 | ||
|ks=75 | |ks=75 | ||
| Line 82: | Line 91: | ||
|slvl=S | |slvl=S | ||
|direct=f | |direct=f | ||
|reflectable=t | |||
}} | }} | ||
{{HitboxTableTitle|Clean Yellow Pikmin| | {{HitboxTableTitle|Clean Yellow Pikmin|42}} | ||
{{UltimateHitboxTableRow | {{UltimateHitboxTableRow | ||
|id=0 | |id=0 | ||
|damage={{ChargedSmashDmgSSBU|14.5}} | |damage={{ChargedSmashDmgSSBU|14.5|1.2}} | ||
|sd=-7.2 | |sd=-7.2 | ||
|angle=361 | |angle=361 | ||
|af=1 | |||
|bk=33 | |bk=33 | ||
|ks=94 | |ks=94 | ||
| Line 103: | Line 114: | ||
|slvl=L | |slvl=L | ||
|direct=f | |direct=f | ||
|reflectable=t | |||
}} | }} | ||
{{HitboxTableTitle| | {{HitboxTableTitle|Mid Yellow Pikmin|42}} | ||
{{UltimateHitboxTableRow | {{UltimateHitboxTableRow | ||
|id=0 | |id=0 | ||
|damage={{ChargedSmashDmgSSBU|10.0}} | |damage={{ChargedSmashDmgSSBU|10.0|1.2}} | ||
|sd=-5.0 | |sd=-5.0 | ||
|angle=361 | |angle=361 | ||
|af=1 | |||
|bk=33 | |bk=33 | ||
|ks=94 | |ks=94 | ||
| Line 124: | Line 137: | ||
|slvl=M | |slvl=M | ||
|direct=f | |direct=f | ||
|reflectable=t | |||
}} | }} | ||
{{HitboxTableTitle| | {{HitboxTableTitle|Late Yellow Pikmin|42}} | ||
{{UltimateHitboxTableRow | {{UltimateHitboxTableRow | ||
|id=0 | |id=0 | ||
|damage={{ChargedSmashDmgSSBU|6.0}} | |damage={{ChargedSmashDmgSSBU|6.0|1.2}} | ||
|sd=-3.0 | |sd=-3.0 | ||
|angle=361 | |angle=361 | ||
|af=1 | |||
|bk=33 | |bk=33 | ||
|ks=94 | |ks=94 | ||
| Line 145: | Line 160: | ||
|slvl=S | |slvl=S | ||
|direct=f | |direct=f | ||
|reflectable=t | |||
}} | }} | ||
{{HitboxTableTitle|Clean Blue Pikmin| | {{HitboxTableTitle|Clean Blue Pikmin|42}} | ||
{{UltimateHitboxTableRow | {{UltimateHitboxTableRow | ||
|id=0 | |id=0 | ||
|damage={{ChargedSmashDmgSSBU|14.5}} | |damage={{ChargedSmashDmgSSBU|14.5|1.2}} | ||
|sd=-7.2 | |sd=-7.2 | ||
|angle=361 | |angle=361 | ||
|af=1 | |||
|bk=33 | |bk=33 | ||
|ks=94 | |ks=94 | ||
| Line 166: | Line 183: | ||
|slvl=L | |slvl=L | ||
|direct=f | |direct=f | ||
|reflectable=t | |||
}} | }} | ||
{{HitboxTableTitle| | {{HitboxTableTitle|Mid Blue Pikmin|42}} | ||
{{UltimateHitboxTableRow | {{UltimateHitboxTableRow | ||
|id=0 | |id=0 | ||
|damage={{ChargedSmashDmgSSBU|10.0}} | |damage={{ChargedSmashDmgSSBU|10.0|1.2}} | ||
|sd=-5.0 | |sd=-5.0 | ||
|angle=361 | |angle=361 | ||
|af=1 | |||
|bk=33 | |bk=33 | ||
|ks=94 | |ks=94 | ||
| Line 187: | Line 206: | ||
|slvl=M | |slvl=M | ||
|direct=f | |direct=f | ||
|reflectable=t | |||
}} | }} | ||
{{HitboxTableTitle| | {{HitboxTableTitle|Late Blue Pikmin|42}} | ||
{{UltimateHitboxTableRow | {{UltimateHitboxTableRow | ||
|id=0 | |id=0 | ||
|damage={{ChargedSmashDmgSSBU|6.0}} | |damage={{ChargedSmashDmgSSBU|6.0|1.2}} | ||
|sd=-3.0 | |sd=-3.0 | ||
|angle=361 | |angle=361 | ||
|af=1 | |||
|bk=33 | |bk=33 | ||
|ks=94 | |ks=94 | ||
| Line 208: | Line 229: | ||
|slvl=S | |slvl=S | ||
|direct=f | |direct=f | ||
|reflectable=t | |||
}} | }} | ||
{{HitboxTableTitle|Clean White Pikmin| | {{HitboxTableTitle|Clean White Pikmin|42}} | ||
{{UltimateHitboxTableRow | {{UltimateHitboxTableRow | ||
|id=0 | |id=0 | ||
|damage={{ChargedSmashDmgSSBU|11.6}} | |damage={{ChargedSmashDmgSSBU|11.6|1.2}} | ||
|sd=-5.3 | |sd=-5.3 | ||
|angle=361 | |angle=361 | ||
|af=1 | |||
|bk=33 | |bk=33 | ||
|ks=94 | |ks=94 | ||
| Line 229: | Line 252: | ||
|slvl=L | |slvl=L | ||
|direct=f | |direct=f | ||
|reflectable=t | |||
}} | }} | ||
{{HitboxTableTitle| | {{HitboxTableTitle|Mid White Pikmin|42}} | ||
{{UltimateHitboxTableRow | {{UltimateHitboxTableRow | ||
|id=0 | |id=0 | ||
|damage={{ChargedSmashDmgSSBU|8.0}} | |damage={{ChargedSmashDmgSSBU|8.0|1.2}} | ||
|sd=-4.0 | |sd=-4.0 | ||
|angle=361 | |angle=361 | ||
|af=1 | |||
|bk=33 | |bk=33 | ||
|ks=94 | |ks=94 | ||
| Line 250: | Line 275: | ||
|slvl=M | |slvl=M | ||
|direct=f | |direct=f | ||
|reflectable=t | |||
}} | }} | ||
{{HitboxTableTitle| | {{HitboxTableTitle|Late White Pikmin|42}} | ||
{{UltimateHitboxTableRow | {{UltimateHitboxTableRow | ||
|id=0 | |id=0 | ||
|damage={{ChargedSmashDmgSSBU|4.8}} | |damage={{ChargedSmashDmgSSBU|4.8|1.2}} | ||
|sd=-2.4 | |sd=-2.4 | ||
|angle=361 | |angle=361 | ||
|af=1 | |||
|bk=33 | |bk=33 | ||
|ks=94 | |ks=94 | ||
| Line 271: | Line 298: | ||
|slvl=S | |slvl=S | ||
|direct=f | |direct=f | ||
|reflectable=t | |||
}} | }} | ||
{{HitboxTableTitle|Clean Purple Pikmin| | {{HitboxTableTitle|Clean Purple Pikmin|42}} | ||
{{UltimateHitboxTableRow | {{UltimateHitboxTableRow | ||
|id=0 | |id=0 | ||
|damage={{ChargedSmashDmgSSBU|23. | |damage={{ChargedSmashDmgSSBU|23.2|1.2}} | ||
|sd=-11.6 | |sd=-11.6 | ||
|angle=361 | |angle=361 | ||
|af=1 | |||
|bk=33 | |bk=33 | ||
|ks=75 | |ks=75 | ||
| Line 292: | Line 321: | ||
|slvl=L | |slvl=L | ||
|direct=f | |direct=f | ||
|reflectable=t | |||
}} | }} | ||
{{HitboxTableTitle| | {{HitboxTableTitle|Mid Purple Pikmin|42}} | ||
{{UltimateHitboxTableRow | {{UltimateHitboxTableRow | ||
|id=0 | |id=0 | ||
|damage={{ChargedSmashDmgSSBU|16.0}} | |damage={{ChargedSmashDmgSSBU|16.0|1.2}} | ||
|sd=-8.0 | |sd=-8.0 | ||
|angle=361 | |angle=361 | ||
|af=1 | |||
|bk=33 | |bk=33 | ||
|ks=75 | |ks=75 | ||
| Line 313: | Line 344: | ||
|slvl=L | |slvl=L | ||
|direct=f | |direct=f | ||
|reflectable=t | |||
}} | }} | ||
{{HitboxTableTitle| | {{HitboxTableTitle|Late Purple Pikmin|42}} | ||
{{UltimateHitboxTableRow | {{UltimateHitboxTableRow | ||
|id=0 | |id=0 | ||
|damage={{ChargedSmashDmgSSBU|9.6}} | |damage={{ChargedSmashDmgSSBU|9.6|1.2}} | ||
|sd=-4.8 | |sd=-4.8 | ||
|angle=361 | |angle=361 | ||
|af=1 | |||
|bk=33 | |bk=33 | ||
|ks=75 | |ks=75 | ||
| Line 334: | Line 367: | ||
|slvl=M | |slvl=M | ||
|direct=f | |direct=f | ||
|reflectable=t | |||
}} | }} | ||
|} | |} | ||
==Timing== | ==Timing== | ||
{|class="wikitable" | {|class="wikitable" | ||
| Line 342: | Line 377: | ||
|- | |- | ||
!Red, Yellow, Blue and White Pikmin | !Red, Yellow, Blue and White Pikmin | ||
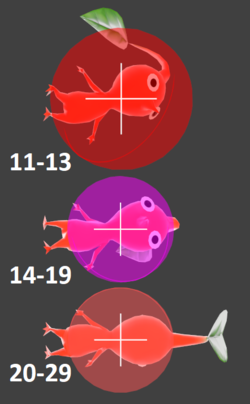
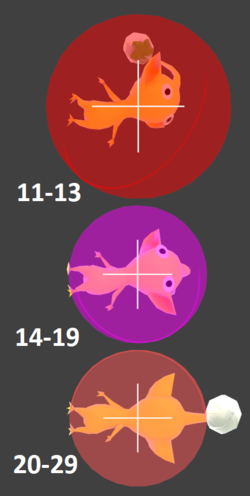
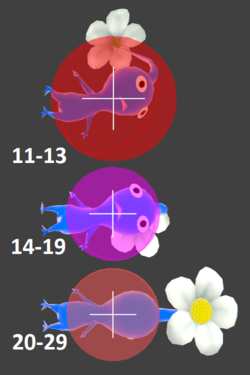
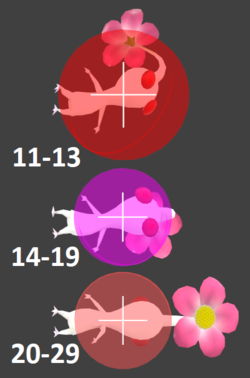
|11- | |11-13, 14-19, 20-29 | ||
|- | |- | ||
!Purple Pikmin | !Purple Pikmin | ||
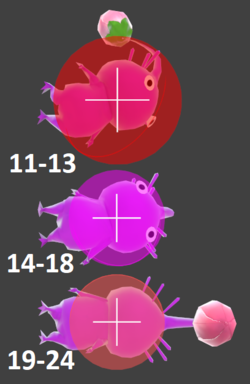
|11- | |11-13, 14-18, 19-24 | ||
|- | |- | ||
!Interruptible | !Interruptible | ||
| | |43 | ||
|- | |- | ||
!Animation length | !Animation length | ||
| Line 355: | Line 390: | ||
{{FrameStripStart}} | {{FrameStripStart}} | ||
!Non-Purple {{FrameStrip|t=Blank|c=10}}{{FrameStrip|t=Hitbox|c=3|e=HitboxChangeS}}{{FrameStrip|t=Hitbox|c=6|s=HitboxChangeE|e=HitboxChangeS}}{{FrameStrip|t=Hitbox|c=10|s=HitboxChangeE}}{{FrameStrip|t=Blank|c=14}} | |||
|- | |- | ||
!Purple {{FrameStrip|t=Blank|c=10}}{{FrameStrip|t=Hitbox|c=3|e=HitboxChangeS}}{{FrameStrip|t=Hitbox|c=5|s=HitboxChangeE|e=HitboxChangeS}}{{FrameStrip|t=Hitbox|c=6|s=HitboxChangeE}}{{FrameStrip|t=Blank|c=19}} | |||
|- | |- | ||
!Olimar {{FrameStrip|t=Lag|c=6|e=LagChargeS}}{{FrameStrip|t=Lag|c=4|s=LagChargeE|e=LagPropS}}{{FrameStrip|t=Lag|c=32|s=LagPropE}}{{FrameStrip|t=Interruptible|c=1}} | |||
{{FrameStripEnd}} | {{FrameStripEnd}} | ||
{{FrameIconLegend|lag=y|hitbox=y|hitboxchange=y|charge=y|interruptible=y}} | {{FrameIconLegend|lag=y|hitbox=y|hitboxchange=y|charge=y|prop=y|interruptible=y}} | ||
==Pikmin parameters== | |||
Purple Pikmin have altered physics compared to other types: on frame 11 (when thrown), they have their horizontal speed reduced by 0.9 and their vertical speed increased by 0.4, then on frame 16, their horizontal speed is set to 0.5 and their vertical speed is removed. This causes them to cover a considerably shorter distance. | |||
{|class="wikitable" | |||
!Initial horizontal speed | |||
|3.2 | |||
|- | |||
!Friction | |||
|0.18 | |||
|- | |||
!Minimum horizontal speed | |||
|0.5 | |||
|- | |||
!Maximum horizontal speed | |||
|3 | |||
|- | |||
!Initial vertical speed | |||
|0.7 | |||
|- | |||
!Gravity | |||
|0.06 | |||
|- | |||
!Rotation speed | |||
|{{rollover|22.9183°|0.4 in radians|y}} | |||
|} | |||
{{MvSubNavOlimar|g=SSBU}} | {{MvSubNavOlimar|g=SSBU}} | ||
[[Category:Olimar (SSBU)]] | [[Category:Olimar (SSBU)]] | ||
[[Category:Forward smashes (SSBU)]] | [[Category:Forward smashes (SSBU)]] | ||
Latest revision as of 20:56, August 1, 2022
Overview[edit]
Update History[edit]
Created a glitch where smash attacks would not have their damage outputs scale when charged.
 Forward smash deals less shield damage.
 Olimar's smash attacks now properly have their damage scale when charged.
 Forward smash's clean hit has a shorter duration, with the mid and late hits having a longer duration instead (frames 11-14 (clean)/15-20 (mid)/21-29 (late) → 11-12/13-19/20-29).
 Forward smash has more ending lag (FAF 40 → 43).
 Forward smash's range has been increased when using Purple Pikmin, reverting to its pre-3.1.0 behavior.
 Forward Smash's clean hit has a longer duration (11-12 → 11-13). The mid hit was made shorter to compensate.
Hitboxes[edit]
Compared to other smash attacks, Olimar's forward smash has a lower maximum charge damage multiplier, capping at 1.2× instead of 1.4×, and can only be held for up to 60 frames after reaching full charge instead of 120 frames.
Timing[edit]
| Charges between | 6-7 |
|---|---|
| Red, Yellow, Blue and White Pikmin | 11-13, 14-19, 20-29 |
| Purple Pikmin | 11-13, 14-18, 19-24 |
| Interruptible | 43 |
| Animation length | 43 |
| Non-Purple | |||||||||||||||||||||||||||||||||||||||||||
|---|---|---|---|---|---|---|---|---|---|---|---|---|---|---|---|---|---|---|---|---|---|---|---|---|---|---|---|---|---|---|---|---|---|---|---|---|---|---|---|---|---|---|---|
| Purple | |||||||||||||||||||||||||||||||||||||||||||
| Olimar |
Lag time |
Charge interval |
Hitbox |
Hitbox change |
Prop event |
Interruptible |
Pikmin parameters[edit]
Purple Pikmin have altered physics compared to other types: on frame 11 (when thrown), they have their horizontal speed reduced by 0.9 and their vertical speed increased by 0.4, then on frame 16, their horizontal speed is set to 0.5 and their vertical speed is removed. This causes them to cover a considerably shorter distance.
| Initial horizontal speed | 3.2 |
|---|---|
| Friction | 0.18 |
| Minimum horizontal speed | 0.5 |
| Maximum horizontal speed | 3 |
| Initial vertical speed | 0.7 |
| Gravity | 0.06 |
| Rotation speed | 22.9183° |
|
