SSBU Icon.png

Peach (SSBU)/Neutral attack/Hit 1: Difference between revisions

From SmashWiki, the Super Smash Bros. wiki
Jump to navigationJump to search
(New Page: {{ArticleIcons|ssbu=y}} thumb|400px|Hitbox visualization showing Peach's first jab. {{competitive expertise}} ==Overview== ==Hitboxes== {{UltimateHitboxTableH...)
 
(Added overview of the move.)
Line 3: Line 3:
{{competitive expertise}}
==Overview==
==Overview==
Peach slaps inwards with the <span class="explain" title="left arm if facing right, vice versa">leading arm</span>. The first hit of neutral attack deals 2.0% damage.
While pressuring the opponent's shield, neutral attack's first hit can be used to attack the opponent before they act [[out of shield]] along with the second hit. However this option can be countered if the opponent continues shield.
The first hit of neutral attack is one of Peach's fastest out of shield options. It can be used after performing a [[perfect shield]].
At low percentages, neutral aerial can combo into neutral attack. The move can set up [[jab reset]]s.
==Hitboxes==
==Hitboxes==
{{UltimateHitboxTableHeader}}

Revision as of 12:29, April 12, 2020

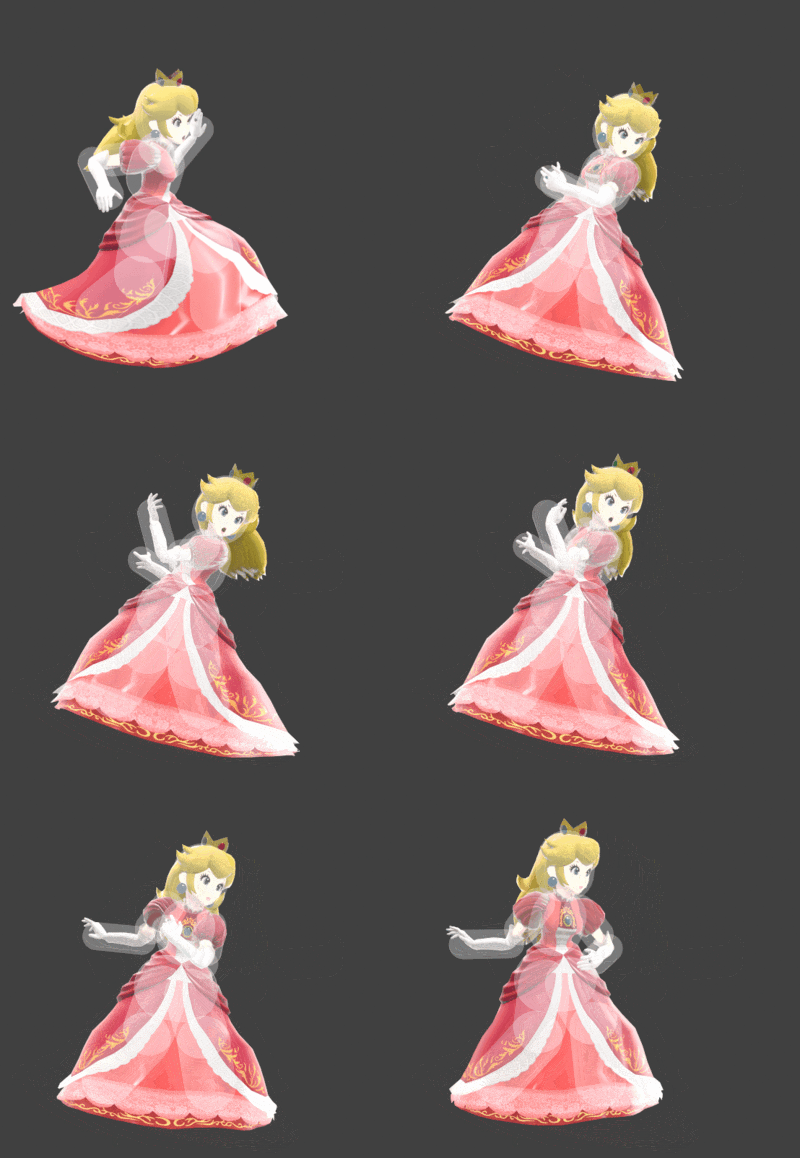
Hitbox visualization showing Peach's first jab.
Competitive.png This article or section may require competitive expertise.
You can discuss this issue on the talk page or edit this page to improve it.

Overview

Peach slaps inwards with the leading arm. The first hit of neutral attack deals 2.0% damage.

While pressuring the opponent's shield, neutral attack's first hit can be used to attack the opponent before they act out of shield along with the second hit. However this option can be countered if the opponent continues shield.

The first hit of neutral attack is one of Peach's fastest out of shield options. It can be used after performing a perfect shield.

At low percentages, neutral aerial can combo into neutral attack. The move can set up jab resets.

Hitboxes

ID Part Rehit rate Damage SD Angle Angle type BK KS FKV Set weight Radius Bone Offset SDI× T% Clang Rebound Effect Type G A Sound Direct Hit bits Hit part Blockable Reflectable Absorbable Flinchless No GFX Heedless
0 0 0 2.0% 0 Sakurai angle Standard 30 25 0 HitboxTableIcon(False).png 2.0 top 0.0 9.0 5.0 1.2× 1.0× 0% HitboxTableIcon(Clang).png HitboxTableIcon(Rebound).png EffectIcon(Normal).png TypeIcon(Hand).png HitboxTableIcon(GroundedTrue).png HitboxTableIcon(AerialTrue).png S Slap SpecialsDirect.png All All HitboxTableIcon(Blockable).png HitboxTableIcon(Unreflectable).png HitboxTableIcon(Unabsorbable).png HitboxTableIcon(False).png HitboxTableIcon(False).png HitboxTableIcon(False).png
1 0 0 2.0% 0 AngleIcon180.png Standard 20 15 0 HitboxTableIcon(False).png 2.0 top 0.0 9.0 8.0 1.2× 1.0× 0% HitboxTableIcon(Clang).png HitboxTableIcon(Rebound).png EffectIcon(Normal).png TypeIcon(Hand).png HitboxTableIcon(GroundedTrue).png HitboxTableIcon(AerialTrue).png S Slap SpecialsDirect.png All All HitboxTableIcon(Blockable).png HitboxTableIcon(Unreflectable).png HitboxTableIcon(Unabsorbable).png HitboxTableIcon(False).png HitboxTableIcon(False).png HitboxTableIcon(False).png
2 0 0 2.0% 0 AngleIcon180.png Standard 20 15 0 HitboxTableIcon(False).png 2.4 top 0.0 9.0 10.5 1.2× 1.0× 0% HitboxTableIcon(Clang).png HitboxTableIcon(Rebound).png EffectIcon(Normal).png TypeIcon(Hand).png HitboxTableIcon(GroundedTrue).png HitboxTableIcon(AerialTrue).png S Slap SpecialsDirect.png All All HitboxTableIcon(Blockable).png HitboxTableIcon(Unreflectable).png HitboxTableIcon(Unabsorbable).png HitboxTableIcon(False).png HitboxTableIcon(False).png HitboxTableIcon(False).png
3 0 0 2.0% 0 Sakurai angle Standard 30 25 0 HitboxTableIcon(False).png 2.0 top 0.0 9.0 8.0 1.2× 1.0× 0% HitboxTableIcon(Clang).png HitboxTableIcon(Rebound).png EffectIcon(Normal).png TypeIcon(Hand).png HitboxTableIcon(GroundedTrue).png HitboxTableIcon(AerialTrue).png S Slap SpecialsDirect.png All All HitboxTableIcon(Blockable).png HitboxTableIcon(Unreflectable).png HitboxTableIcon(Unabsorbable).png HitboxTableIcon(False).png HitboxTableIcon(False).png HitboxTableIcon(False).png
4 0 0 2.0% 0 Sakurai angle Standard 20 15 0 HitboxTableIcon(False).png 2.4 top 0.0 9.0 10.5 1.2× 1.0× 0% HitboxTableIcon(Clang).png HitboxTableIcon(Rebound).png EffectIcon(Normal).png TypeIcon(Hand).png HitboxTableIcon(GroundedTrue).png HitboxTableIcon(AerialTrue).png S Slap SpecialsDirect.png All All HitboxTableIcon(Blockable).png HitboxTableIcon(Unreflectable).png HitboxTableIcon(Unabsorbable).png HitboxTableIcon(False).png HitboxTableIcon(False).png HitboxTableIcon(False).png

Timing

Hitboxes 2
Earliest continuable 7
Interruptible 28
Animation length 37
FrameIcon(Lag).png FrameIcon(Hitbox).png FrameIcon(Lag).png FrameIcon(Lag).png FrameIcon(Lag).png FrameIcon(LagContinuableS).png FrameIcon(LagContinuableE).png FrameIcon(Lag).png FrameIcon(Lag).png FrameIcon(Lag).png FrameIcon(Lag).png FrameIcon(Lag).png FrameIcon(Lag).png FrameIcon(Lag).png FrameIcon(Lag).png FrameIcon(Lag).png FrameIcon(Lag).png FrameIcon(Lag).png FrameIcon(Lag).png FrameIcon(Lag).png FrameIcon(Lag).png FrameIcon(Lag).png FrameIcon(Lag).png FrameIcon(Lag).png FrameIcon(Lag).png FrameIcon(Lag).png FrameIcon(Interruptible).png FrameIcon(Interruptible).png FrameIcon(Interruptible).png FrameIcon(Interruptible).png FrameIcon(Interruptible).png FrameIcon(Interruptible).png FrameIcon(Interruptible).png FrameIcon(Interruptible).png FrameIcon(Interruptible).png FrameIcon(Interruptible).png
Legend (1 square = 1 frame)
FrameIcon(Lag).png
Lag time
FrameIcon(Hitbox).png
Hitbox
FrameIcon(BlankContinuableS).pngFrameIcon(BlankContinuableE).png
Earliest continuable point
FrameIcon(Interruptible).png
Interruptible