Ganondorf (SSB4)/Dash attack: Difference between revisions
From SmashWiki, the Super Smash Bros. wiki
Jump to navigationJump to search
(New Page: ==Overview== Ganondorf preforms a should tackle that has decent startup, gives him a quick speed boost, and has great power, with the sweetspot K.Oing at 140%. It also grants him brief...) |
m (Text replacement - "== ([^=])" to "== $1") |
||
| (15 intermediate revisions by 8 users not shown) | |||
| Line 1: | Line 1: | ||
{{ArticleIcons|ssb4=y}} | |||
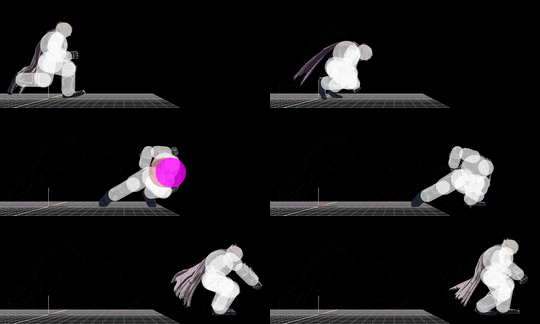
[[File:GanondorfDashAttack.gif|thumb|270px|Hitbox visualization showing Ganondorf's dash attack.]] | |||
==Overview== | ==Overview== | ||
Ganondorf | Ganondorf performs a shoulder tackle. The attack has decent start-up, grants him a quick speed boost and its sweetspot has respectable power, which KOs at 140%. The sourspot is incredibly weak and thus has virtually no KO potential; however, when coupled with its angle, it has good combo potential at varying percents, with his up aerial noticeably comboing the entire cast at 70%-90%. | ||
Update 1.1.5 buffed dash attack by decreasing its ending lag, which makes it slightly safer and even improves its sourspot's combo potential. | |||
==Update | ==Update history== | ||
*{{buff| | {{GameIcon|ssb4}} [[1.1.5]] | ||
*{{buff|Ending lag decreased|41 frames|38.}} | |||
==Hitboxes== | |||
{{SSB4HitboxTableHeader}} | |||
{{HitboxTableTitle|Clean hit|42}} | |||
{{SSB4HitboxTableRow | |||
|id=0 | |||
|part=0 | |||
|damage=14% | |||
|angle=70 | |||
|bk=50 | |||
|ks=80 | |||
|fkv=0 | |||
|r=7.0 | |||
|bn=0 | |||
|xpos=0.0 | |||
|ypos=9.0 | |||
|zpos=7.0 | |||
|type=Body | |||
|sdi=1.0 | |||
|trip=0 | |||
|sfx=Punch | |||
|slvl=L | |||
}} | |||
{{HitboxTableTitle|Late hit|42}} | |||
{{SSB4HitboxTableRow | |||
|id=0 | |||
|part=0 | |||
|damage=10% | |||
|angle=80 | |||
|bk=45 | |||
|ks=60 | |||
|fkv=0 | |||
|r=4.0 | |||
|bn=0 | |||
|xpos=0.0 | |||
|ypos=9.0 | |||
|zpos=7.0 | |||
|type=Body | |||
|sdi=1.0 | |||
|trip=0 | |||
|sfx=Punch | |||
|slvl=M | |||
}} | |||
|} | |||
==Timing== | |||
{|class="wikitable" | |||
!Clean hit | |||
|10-12 | |||
|- | |||
!Late hit | |||
|13-19 | |||
|- | |||
!Interruptible | |||
|38 | |||
|- | |||
!Animation length | |||
|44 | |||
|} | |||
{{FrameStripStart}} | |||
{{FrameStrip|t=Lag|c=9}}{{FrameStrip|t=Hitbox|c=3|e=HitboxChangeS}}{{FrameStrip|t=Hitbox|c=7|s=HitboxChangeE}}{{FrameStrip|t=Lag|c=18}}{{FrameStrip|t=Interruptible|c=7}} | |||
{{FrameStripEnd}} | |||
{{FrameIconLegend|lag=y|hitbox=y|hitboxchange=y|interruptible=y}} | |||
{{MvSubNavGanondorf|g=SSB4}} | {{MvSubNavGanondorf|g=SSB4}} | ||
[[Category:Ganondorf (SSB4)]] | [[Category:Ganondorf (SSB4)]] | ||
[[Category:Dash attacks (SSB4)]] | [[Category:Dash attacks (SSB4)]] | ||
Latest revision as of 22:08, April 12, 2022
Overview[edit]
Ganondorf performs a shoulder tackle. The attack has decent start-up, grants him a quick speed boost and its sweetspot has respectable power, which KOs at 140%. The sourspot is incredibly weak and thus has virtually no KO potential; however, when coupled with its angle, it has good combo potential at varying percents, with his up aerial noticeably comboing the entire cast at 70%-90%.
Update 1.1.5 buffed dash attack by decreasing its ending lag, which makes it slightly safer and even improves its sourspot's combo potential.
Update history[edit]
 Ending lag decreased: 41 frames → 38.
Hitboxes[edit]
Timing[edit]
| Clean hit | 10-12 |
|---|---|
| Late hit | 13-19 |
| Interruptible | 38 |
| Animation length | 44 |
Lag time |
Hitbox |
Hitbox change |
Interruptible |
|
