Super Smash Bros. 4

Ganondorf (SSB4)/Forward throw

From SmashWiki, the Super Smash Bros. wiki
Jump to navigationJump to search
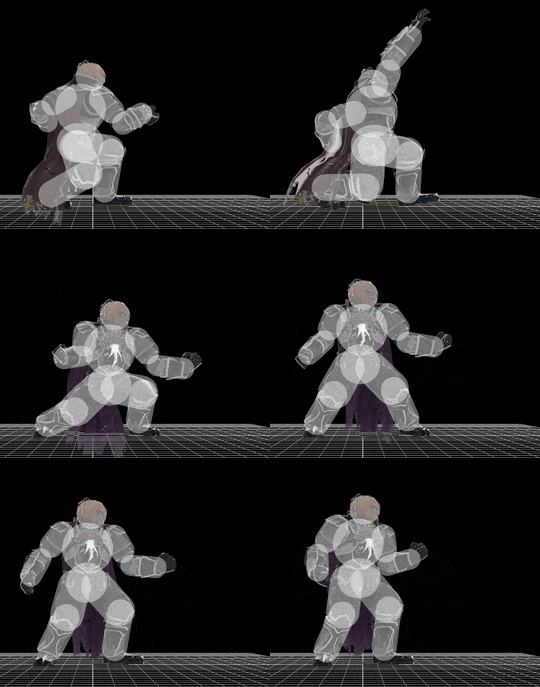
Hitbox visualization showing Ganondorf's forward throw.

Overview[edit]

Competitive.png This article or section may require competitive expertise.
You can discuss this issue on the talk page or edit this page to improve it.

Ganondorf punches the opponent forward dealing very high damage and sometimes is a good edgeguard setup. It has low KO power, struggling to KO under 200% from the middle of the stage.

Update history[edit]

Super Smash Bros. 4 1.0.6

Throw and Hitbox Data[edit]

Hitboxes[edit]

ID Part Damage SD Angle BK KS FKV Radius Bone Offset SDIx T% Clang Rebound Type Effect G A Sound Direct
0 0 5% 0 AngleIcon80.png 30 100 0 5.0 16 4.8 0.0 0.0 0.0x 1.5x 0% HitboxTableIcon(NoClang).png HitboxTableIcon(Rebound).png Hand (type) Normal (effect) HitboxTableIcon(GroundedTrue).png HitboxTableIcon(AerialTrue).png L Punch SpecialsDirect.png
1 0 5% 0 AngleIcon80.png 30 100 0 2.4 15 2.0 0.0 0.0 0.0x 1.5x 0% HitboxTableIcon(NoClang).png HitboxTableIcon(Rebound).png Hand (type) Normal (effect) HitboxTableIcon(GroundedTrue).png HitboxTableIcon(AerialTrue).png L Punch SpecialsDirect.png
2 0 5% 0 AngleIcon80.png 30 100 0 2.4 15 -0.8 0.0 0.0 0.0x 1.5x 0% HitboxTableIcon(NoClang).png HitboxTableIcon(Rebound).png Hand (type) Normal (effect) HitboxTableIcon(GroundedTrue).png HitboxTableIcon(AerialTrue).png L Punch SpecialsDirect.png

Throw[edit]

ID Damage Angle BK KS FKV Bone FFx Type Effect Sound
0 8% AngleIcon43.png Forwards 60 65 0 0 None Throwing (type) Normal (effect) S None
1 3% Sakurai angle Forwards 60 100 0 0 None Throwing (type) Normal (effect) S None

Timing[edit]

Invincibility 1-18
Hitbox 11-12
Throw Release 13
Animation length 39
Interruptible 40
FrameIcon(Lag).png FrameIcon(Lag).png FrameIcon(Lag).png FrameIcon(Lag).png FrameIcon(Lag).png FrameIcon(Lag).png FrameIcon(Lag).png FrameIcon(Lag).png FrameIcon(Lag).png FrameIcon(Lag).png FrameIcon(Hitbox).png FrameIcon(HitboxThrowS).png FrameIcon(LagThrowE).png FrameIcon(Lag).png FrameIcon(Lag).png FrameIcon(Lag).png FrameIcon(Lag).png FrameIcon(Lag).png FrameIcon(Lag).png FrameIcon(Lag).png FrameIcon(Lag).png FrameIcon(Lag).png FrameIcon(Lag).png FrameIcon(Lag).png FrameIcon(Lag).png FrameIcon(Lag).png FrameIcon(Lag).png FrameIcon(Lag).png FrameIcon(Lag).png FrameIcon(Lag).png FrameIcon(Lag).png FrameIcon(Lag).png FrameIcon(Lag).png FrameIcon(Lag).png FrameIcon(Lag).png FrameIcon(Lag).png FrameIcon(Lag).png FrameIcon(Lag).png FrameIcon(Lag).png
FrameIcon(Invincible).png FrameIcon(Invincible).png FrameIcon(Invincible).png FrameIcon(Invincible).png FrameIcon(Invincible).png FrameIcon(Invincible).png FrameIcon(Invincible).png FrameIcon(Invincible).png FrameIcon(Invincible).png FrameIcon(Invincible).png FrameIcon(Invincible).png FrameIcon(Invincible).png FrameIcon(Invincible).png FrameIcon(Invincible).png FrameIcon(Invincible).png FrameIcon(Invincible).png FrameIcon(Invincible).png FrameIcon(Invincible).png FrameIcon(Vulnerable).png FrameIcon(Vulnerable).png FrameIcon(Vulnerable).png FrameIcon(Vulnerable).png FrameIcon(Vulnerable).png FrameIcon(Vulnerable).png FrameIcon(Vulnerable).png FrameIcon(Vulnerable).png FrameIcon(Vulnerable).png FrameIcon(Vulnerable).png FrameIcon(Vulnerable).png FrameIcon(Vulnerable).png FrameIcon(Vulnerable).png FrameIcon(Vulnerable).png FrameIcon(Vulnerable).png FrameIcon(Vulnerable).png FrameIcon(Vulnerable).png FrameIcon(Vulnerable).png FrameIcon(Vulnerable).png FrameIcon(Vulnerable).png FrameIcon(Vulnerable).png
Legend (1 square = 1 frame)
Lag
Lag time
Hitbox
Hitbox
FrameIcon(Vulnerable).png
Vulnerable
Invincibility
Invincible
ThrowThrow
Throw point