SSB4 Icon.png

Bowser (SSB4)/Down aerial: Difference between revisions

From SmashWiki, the Super Smash Bros. wiki
Jump to navigationJump to search
No edit summary
m (This seems to be the sole link to Drill that doesn't intend to link to the item.)
 
(3 intermediate revisions by 2 users not shown)
Line 3: Line 3:
[[File:BowserDAirLanding.gif|thumb|270px|Hitbox visualization showing Bowser's down aerial on landing.]]
[[File:BowserDAirLanding.gif|thumb|270px|Hitbox visualization showing Bowser's down aerial on landing.]]
==Overview==
==Overview==
Bowser retracts into his shell, turns upside down, and propels himself downward. While the move mostly retains its animation from previous games, it has been largely overhauled in regard to its function; rather than a [[drill]] aerial, it is a [[stall-then-fall]] that [[meteor smash]]es opponents hit during the first 8 hit frames, out of the total of 33. However, the late hit also boasts extravagant power nonetheless, KOing middleweights reliably under 115% without [[rage]] and being the strongest non-meteor down aerial, along with {{SSB4|Ganondorf}}'s down aerial, in terms of knockback. In both cases, the move deals 16% damage, and produces a [[quake]] hitbox upon landing that deals an additional 2% with very weak [[semi-spike]] knockback, although this hitbox only affects opponents on the ground. The move possesses a large hitbox, enabling its meteor smashing hitbox to effectively edgeguard opponents when near the edge.
Bowser retracts into his shell, turns upside down, and propels himself downward. While the move mostly retains its animation from previous games, it has been largely overhauled in regard to its function; rather than a drill aerial, it is a [[stall-then-fall]] that [[meteor smash]]es opponents hit during the first 8 hit frames, out of the total of 33. However, the late hit also boasts extravagant power nonetheless, KOing middleweights reliably under 115% without [[rage]] and being the strongest non-meteor down aerial, along with {{SSB4|Ganondorf}}'s down aerial, in terms of knockback. In both cases, the move deals 16% damage, and produces a hitbox upon landing that deals an additional 2% with very weak [[semi-spike]] knockback, although this hitbox only affects opponents on the ground. The move possesses a large hitbox, enabling its meteor smashing hitbox to effectively edgeguard opponents when near the edge.


However, Bowser's down aerial suffers from the typical problems of stall-then-falls: due to its very long duration (77 frames before it can be interrupted), it is a guaranteed [[self-destruct]] offstage unless Bowser uses it high enough from the ground, and even said circumvention can leave him vulnerable afterwards if the move misses. Another glaring weakness is its extremely high landing lag at 40 frames; it is tied with his {{mvsub|Bowser|SSB4|back aerial}} and {{SSB4|Pikachu}}'s {{mvsub|Pikachu|SSB4|down aerial}} as the aerial attack with the highest landing lag in the game, which nearly guarantees the opponent will be able to punish it should they [[shield]] the move or simply avoid it altogether. Overall, Bowser's down aerial is a very high risk edgeguarding tool, and usually only sees use when near the edge at a position where Bowser can land onstage while still meteor smashing the opponent into the bottom [[blast line]].


==Hitboxes==
==Hitboxes==
{{SSB4HitboxTableHeader}}
{{HitboxTableTitle|Clean hit|42}}
Line 107: Line 106:
|-
|-
!Animation length
!Animation length
|80
|79
|}
|}


{{FrameStripStart}}
{{FrameStripStart}}
|Hitboxes {{FrameStrip|t=Lag|c=16}}{{FrameStrip|t=Hitbox|c=8|e=HitboxChangeS}}{{FrameStrip|t=Hitbox|c=25|s=HitboxChangeE}}{{FrameStrip|t=Lag|c=28}}{{FrameStrip|t=Interruptible|c=3}}
|Hitboxes {{FrameStrip|t=Lag|c=16}}{{FrameStrip|t=Hitbox|c=8|e=HitboxChangeS}}{{FrameStrip|t=Hitbox|c=25|s=HitboxChangeE}}{{FrameStrip|t=Lag|c=28}}{{FrameStrip|t=Interruptible|c=2}}
|-
|-
|Limbs {{FrameStrip|t=Vulnerable|c=13}}{{FrameStrip|t=Intangible|c=47}}{{FrameStrip|t=Vulnerable|c=20}}
|Limbs {{FrameStrip|t=Vulnerable|c=13}}{{FrameStrip|t=Intangible|c=47}}{{FrameStrip|t=Vulnerable|c=19}}
|-
|-
|Autocancel {{FrameStrip|t=Autocancel|c=13}}{{FrameStrip|t=Blank|c=56}}{{FrameStrip|t=Autocancel|c=11}}
|Autocancel {{FrameStrip|t=Autocancel|c=13}}{{FrameStrip|t=Blank|c=56}}{{FrameStrip|t=Autocancel|c=10}}
{{FrameStripEnd}}
{{FrameStripEnd}}


Latest revision as of 07:37, May 26, 2022

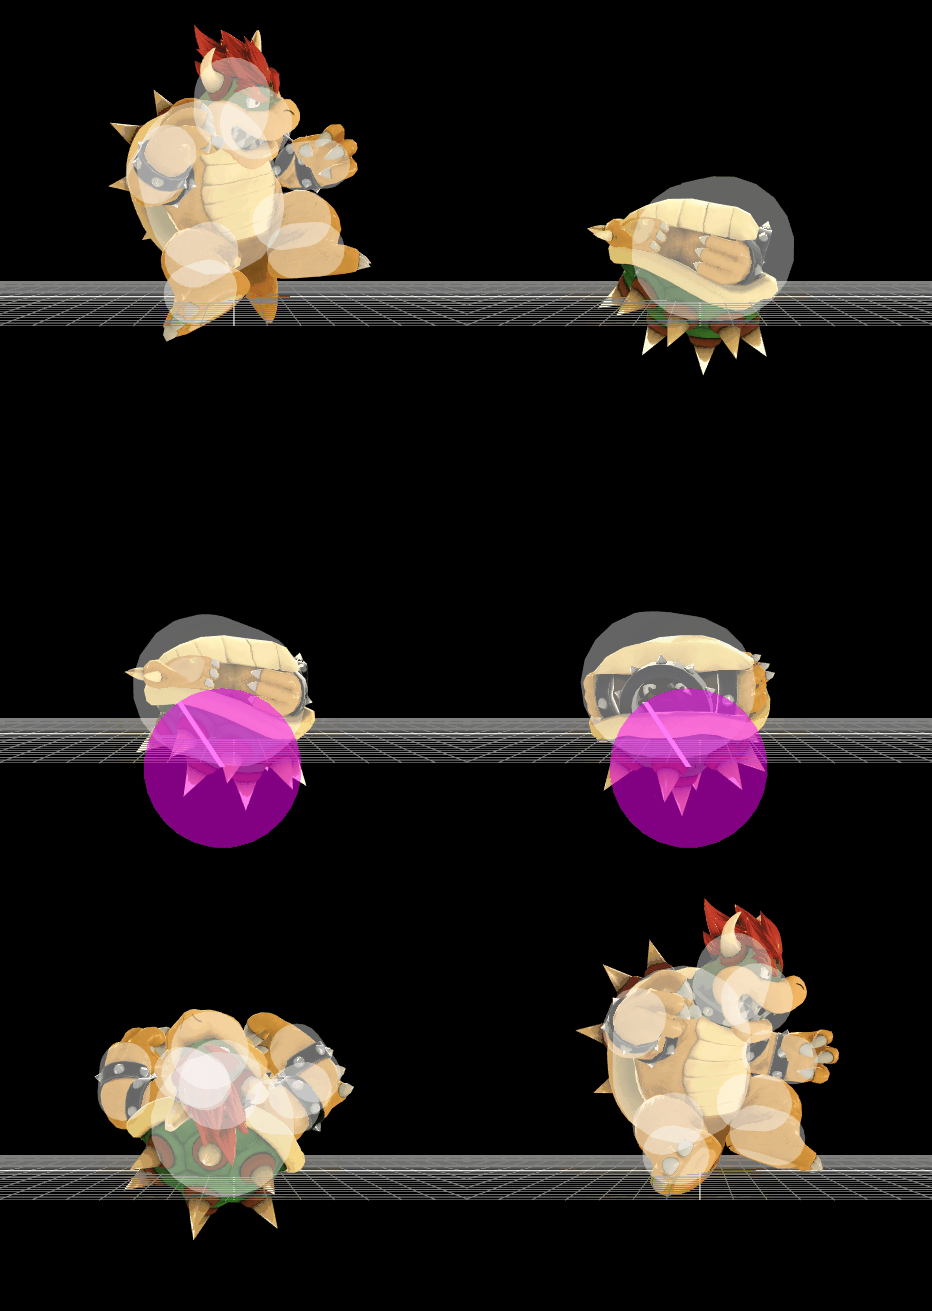
Hitbox visualization showing Bowser's down aerial.
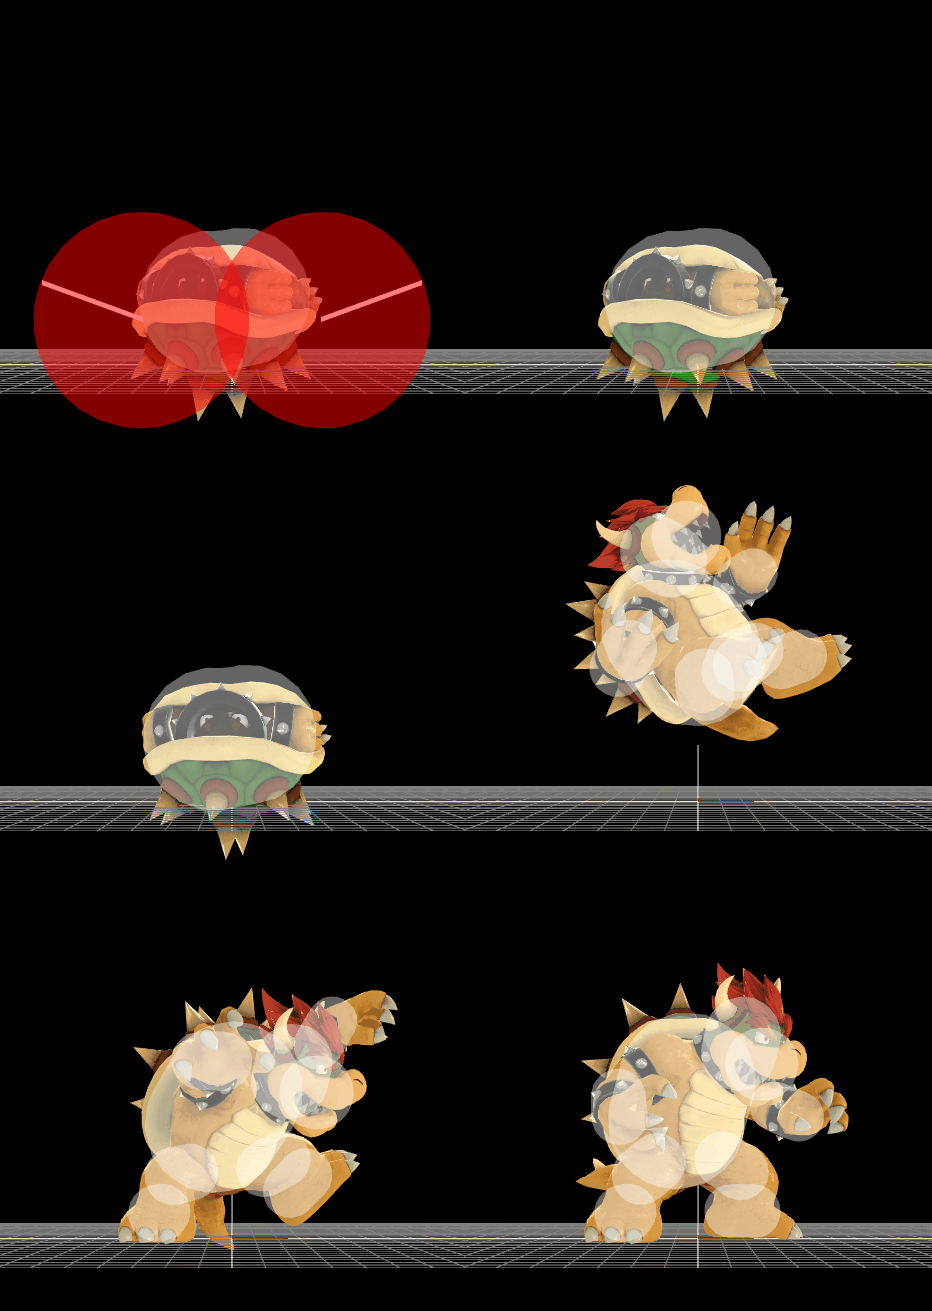
Hitbox visualization showing Bowser's down aerial on landing.

Overview[edit]

Bowser retracts into his shell, turns upside down, and propels himself downward. While the move mostly retains its animation from previous games, it has been largely overhauled in regard to its function; rather than a drill aerial, it is a stall-then-fall that meteor smashes opponents hit during the first 8 hit frames, out of the total of 33. However, the late hit also boasts extravagant power nonetheless, KOing middleweights reliably under 115% without rage and being the strongest non-meteor down aerial, along with Ganondorf's down aerial, in terms of knockback. In both cases, the move deals 16% damage, and produces a hitbox upon landing that deals an additional 2% with very weak semi-spike knockback, although this hitbox only affects opponents on the ground. The move possesses a large hitbox, enabling its meteor smashing hitbox to effectively edgeguard opponents when near the edge.

However, Bowser's down aerial suffers from the typical problems of stall-then-falls: due to its very long duration (77 frames before it can be interrupted), it is a guaranteed self-destruct offstage unless Bowser uses it high enough from the ground, and even said circumvention can leave him vulnerable afterwards if the move misses. Another glaring weakness is its extremely high landing lag at 40 frames; it is tied with his back aerial and Pikachu's down aerial as the aerial attack with the highest landing lag in the game, which nearly guarantees the opponent will be able to punish it should they shield the move or simply avoid it altogether. Overall, Bowser's down aerial is a very high risk edgeguarding tool, and usually only sees use when near the edge at a position where Bowser can land onstage while still meteor smashing the opponent into the bottom blast line.

Hitboxes[edit]

ID Part Damage SD Angle BK KS FKV Radius Bone Offset SDIx T% Clang Rebound Type Effect G A Sound Direct
Clean hit
0 0 16% 0 AngleIcon275.png 30 100 0 7.0 0 0.0 -3.0 -1.0 1.0x 1.0x 0% HitboxTableIcon(Clang).png HitboxTableIcon(Rebound).png TypeIcon(Spin).png EffectIcon(Stab).png HitboxTableIcon(GroundedTrue).png HitboxTableIcon(AerialTrue).png L Kick SpecialsDirect.png
Late hit
0 0 16% 0 AngleIcon56.png 30 100 0 7.0 0 0.0 -3.0 -1.0 1.0x 1.0x 0% HitboxTableIcon(Clang).png HitboxTableIcon(Rebound).png TypeIcon(Spin).png EffectIcon(Stab).png HitboxTableIcon(GroundedTrue).png HitboxTableIcon(AerialTrue).png L Kick SpecialsDirect.png
Landing
0 0 2% 0 AngleIcon20.png 60 30 0 9.6 0 0.0 4.0 -8.0 1.0x 1.0x 0% HitboxTableIcon(NoClang).png HitboxTableIcon(NoRebound).png TypeIcon(Spin).png EffectIcon(Slash).png HitboxTableIcon(GroundedTrue).png HitboxTableIcon(AerialFalse).png L Slash SpecialsDirect.png
1 0 2% 0 AngleIcon20.png 60 30 0 9.6 0 0.0 4.0 8.0 1.0x 1.0x 0% HitboxTableIcon(NoClang).png HitboxTableIcon(NoRebound).png TypeIcon(Spin).png EffectIcon(Slash).png HitboxTableIcon(GroundedTrue).png HitboxTableIcon(AerialFalse).png L Slash SpecialsDirect.png

Timing[edit]

Attack[edit]

Initial autocancel 1-13
Limbs intangibility 14-60
Clean hit 17-24
Late hit 25-49
Ending autocancel 70-
Interruptible 78
Animation length 79
Hitboxes  FrameIcon(Lag).png FrameIcon(Lag).png FrameIcon(Lag).png FrameIcon(Lag).png FrameIcon(Lag).png FrameIcon(Lag).png FrameIcon(Lag).png FrameIcon(Lag).png FrameIcon(Lag).png FrameIcon(Lag).png FrameIcon(Lag).png FrameIcon(Lag).png FrameIcon(Lag).png FrameIcon(Lag).png FrameIcon(Lag).png FrameIcon(Lag).png FrameIcon(Hitbox).png FrameIcon(Hitbox).png FrameIcon(Hitbox).png FrameIcon(Hitbox).png FrameIcon(Hitbox).png FrameIcon(Hitbox).png FrameIcon(Hitbox).png FrameIcon(HitboxChangeS).png FrameIcon(HitboxChangeE).png FrameIcon(Hitbox).png FrameIcon(Hitbox).png FrameIcon(Hitbox).png FrameIcon(Hitbox).png FrameIcon(Hitbox).png FrameIcon(Hitbox).png FrameIcon(Hitbox).png FrameIcon(Hitbox).png FrameIcon(Hitbox).png FrameIcon(Hitbox).png FrameIcon(Hitbox).png FrameIcon(Hitbox).png FrameIcon(Hitbox).png FrameIcon(Hitbox).png FrameIcon(Hitbox).png FrameIcon(Hitbox).png FrameIcon(Hitbox).png FrameIcon(Hitbox).png FrameIcon(Hitbox).png FrameIcon(Hitbox).png FrameIcon(Hitbox).png FrameIcon(Hitbox).png FrameIcon(Hitbox).png FrameIcon(Hitbox).png FrameIcon(Lag).png FrameIcon(Lag).png FrameIcon(Lag).png FrameIcon(Lag).png FrameIcon(Lag).png FrameIcon(Lag).png FrameIcon(Lag).png FrameIcon(Lag).png FrameIcon(Lag).png FrameIcon(Lag).png FrameIcon(Lag).png FrameIcon(Lag).png FrameIcon(Lag).png FrameIcon(Lag).png FrameIcon(Lag).png FrameIcon(Lag).png FrameIcon(Lag).png FrameIcon(Lag).png FrameIcon(Lag).png FrameIcon(Lag).png FrameIcon(Lag).png FrameIcon(Lag).png FrameIcon(Lag).png FrameIcon(Lag).png FrameIcon(Lag).png FrameIcon(Lag).png FrameIcon(Lag).png FrameIcon(Lag).png FrameIcon(Interruptible).png FrameIcon(Interruptible).png
Limbs  FrameIcon(Vulnerable).png FrameIcon(Vulnerable).png FrameIcon(Vulnerable).png FrameIcon(Vulnerable).png FrameIcon(Vulnerable).png FrameIcon(Vulnerable).png FrameIcon(Vulnerable).png FrameIcon(Vulnerable).png FrameIcon(Vulnerable).png FrameIcon(Vulnerable).png FrameIcon(Vulnerable).png FrameIcon(Vulnerable).png FrameIcon(Vulnerable).png FrameIcon(Intangible).png FrameIcon(Intangible).png FrameIcon(Intangible).png FrameIcon(Intangible).png FrameIcon(Intangible).png FrameIcon(Intangible).png FrameIcon(Intangible).png FrameIcon(Intangible).png FrameIcon(Intangible).png FrameIcon(Intangible).png FrameIcon(Intangible).png FrameIcon(Intangible).png FrameIcon(Intangible).png FrameIcon(Intangible).png FrameIcon(Intangible).png FrameIcon(Intangible).png FrameIcon(Intangible).png FrameIcon(Intangible).png FrameIcon(Intangible).png FrameIcon(Intangible).png FrameIcon(Intangible).png FrameIcon(Intangible).png FrameIcon(Intangible).png FrameIcon(Intangible).png FrameIcon(Intangible).png FrameIcon(Intangible).png FrameIcon(Intangible).png FrameIcon(Intangible).png FrameIcon(Intangible).png FrameIcon(Intangible).png FrameIcon(Intangible).png FrameIcon(Intangible).png FrameIcon(Intangible).png FrameIcon(Intangible).png FrameIcon(Intangible).png FrameIcon(Intangible).png FrameIcon(Intangible).png FrameIcon(Intangible).png FrameIcon(Intangible).png FrameIcon(Intangible).png FrameIcon(Intangible).png FrameIcon(Intangible).png FrameIcon(Intangible).png FrameIcon(Intangible).png FrameIcon(Intangible).png FrameIcon(Intangible).png FrameIcon(Intangible).png FrameIcon(Vulnerable).png FrameIcon(Vulnerable).png FrameIcon(Vulnerable).png FrameIcon(Vulnerable).png FrameIcon(Vulnerable).png FrameIcon(Vulnerable).png FrameIcon(Vulnerable).png FrameIcon(Vulnerable).png FrameIcon(Vulnerable).png FrameIcon(Vulnerable).png FrameIcon(Vulnerable).png FrameIcon(Vulnerable).png FrameIcon(Vulnerable).png FrameIcon(Vulnerable).png FrameIcon(Vulnerable).png FrameIcon(Vulnerable).png FrameIcon(Vulnerable).png FrameIcon(Vulnerable).png FrameIcon(Vulnerable).png
Autocancel  FrameIcon(Autocancel).png FrameIcon(Autocancel).png FrameIcon(Autocancel).png FrameIcon(Autocancel).png FrameIcon(Autocancel).png FrameIcon(Autocancel).png FrameIcon(Autocancel).png FrameIcon(Autocancel).png FrameIcon(Autocancel).png FrameIcon(Autocancel).png FrameIcon(Autocancel).png FrameIcon(Autocancel).png FrameIcon(Autocancel).png FrameIcon(Blank).png FrameIcon(Blank).png FrameIcon(Blank).png FrameIcon(Blank).png FrameIcon(Blank).png FrameIcon(Blank).png FrameIcon(Blank).png FrameIcon(Blank).png FrameIcon(Blank).png FrameIcon(Blank).png FrameIcon(Blank).png FrameIcon(Blank).png FrameIcon(Blank).png FrameIcon(Blank).png FrameIcon(Blank).png FrameIcon(Blank).png FrameIcon(Blank).png FrameIcon(Blank).png FrameIcon(Blank).png FrameIcon(Blank).png FrameIcon(Blank).png FrameIcon(Blank).png FrameIcon(Blank).png FrameIcon(Blank).png FrameIcon(Blank).png FrameIcon(Blank).png FrameIcon(Blank).png FrameIcon(Blank).png FrameIcon(Blank).png FrameIcon(Blank).png FrameIcon(Blank).png FrameIcon(Blank).png FrameIcon(Blank).png FrameIcon(Blank).png FrameIcon(Blank).png FrameIcon(Blank).png FrameIcon(Blank).png FrameIcon(Blank).png FrameIcon(Blank).png FrameIcon(Blank).png FrameIcon(Blank).png FrameIcon(Blank).png FrameIcon(Blank).png FrameIcon(Blank).png FrameIcon(Blank).png FrameIcon(Blank).png FrameIcon(Blank).png FrameIcon(Blank).png FrameIcon(Blank).png FrameIcon(Blank).png FrameIcon(Blank).png FrameIcon(Blank).png FrameIcon(Blank).png FrameIcon(Blank).png FrameIcon(Blank).png FrameIcon(Blank).png FrameIcon(Autocancel).png FrameIcon(Autocancel).png FrameIcon(Autocancel).png FrameIcon(Autocancel).png FrameIcon(Autocancel).png FrameIcon(Autocancel).png FrameIcon(Autocancel).png FrameIcon(Autocancel).png FrameIcon(Autocancel).png FrameIcon(Autocancel).png

Landing lag[edit]

Limbs intangibility 1-15
Hitboxes 1-3
Animation length 40
Hitboxes  FrameIcon(Hitbox).png FrameIcon(Hitbox).png FrameIcon(Hitbox).png FrameIcon(Lag).png FrameIcon(Lag).png FrameIcon(Lag).png FrameIcon(Lag).png FrameIcon(Lag).png FrameIcon(Lag).png FrameIcon(Lag).png FrameIcon(Lag).png FrameIcon(Lag).png FrameIcon(Lag).png FrameIcon(Lag).png FrameIcon(Lag).png FrameIcon(Lag).png FrameIcon(Lag).png FrameIcon(Lag).png FrameIcon(Lag).png FrameIcon(Lag).png FrameIcon(Lag).png FrameIcon(Lag).png FrameIcon(Lag).png FrameIcon(Lag).png FrameIcon(Lag).png FrameIcon(Lag).png FrameIcon(Lag).png FrameIcon(Lag).png FrameIcon(Lag).png FrameIcon(Lag).png FrameIcon(Lag).png FrameIcon(Lag).png FrameIcon(Lag).png FrameIcon(Lag).png FrameIcon(Lag).png FrameIcon(Lag).png FrameIcon(Lag).png FrameIcon(Lag).png FrameIcon(Lag).png FrameIcon(Lag).png
Limbs  FrameIcon(Intangible).png FrameIcon(Intangible).png FrameIcon(Intangible).png FrameIcon(Intangible).png FrameIcon(Intangible).png FrameIcon(Intangible).png FrameIcon(Intangible).png FrameIcon(Intangible).png FrameIcon(Intangible).png FrameIcon(Intangible).png FrameIcon(Intangible).png FrameIcon(Intangible).png FrameIcon(Intangible).png FrameIcon(Intangible).png FrameIcon(Intangible).png FrameIcon(Vulnerable).png FrameIcon(Vulnerable).png FrameIcon(Vulnerable).png FrameIcon(Vulnerable).png FrameIcon(Vulnerable).png FrameIcon(Vulnerable).png FrameIcon(Vulnerable).png FrameIcon(Vulnerable).png FrameIcon(Vulnerable).png FrameIcon(Vulnerable).png FrameIcon(Vulnerable).png FrameIcon(Vulnerable).png FrameIcon(Vulnerable).png FrameIcon(Vulnerable).png FrameIcon(Vulnerable).png FrameIcon(Vulnerable).png FrameIcon(Vulnerable).png FrameIcon(Vulnerable).png FrameIcon(Vulnerable).png FrameIcon(Vulnerable).png FrameIcon(Vulnerable).png FrameIcon(Vulnerable).png FrameIcon(Vulnerable).png FrameIcon(Vulnerable).png FrameIcon(Vulnerable).png
Legend (1 square = 1 frame)
FrameIcon(Lag).png
Lag time
FrameIcon(Hitbox).png
Hitbox
FrameIcon(Vulnerable).png
Vulnerable
FrameIcon(Autocancel).png
Autocancel
FrameIcon(Intangible).png
Intangible
FrameIcon(Interruptible).png
Interruptible