Blast line: Difference between revisions
Luigifan18 (talk | contribs) m (→Super Smash Bros. 4: Grammar check) |
BowserJrFire (talk | contribs) No edit summary Tag: Mobile edit |
||
| (58 intermediate revisions by 36 users not shown) | |||
| Line 1: | Line 1: | ||
{{ArticleIcons|series=y|unofficial=yes}} | {{ArticleIcons|series=y|unofficial=yes}} | ||
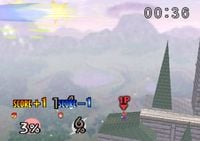
[[File:Blast line.png||300px|thumb|When a character passes the blast line, a colorful "blast" (hence the name) occurs.]] | [[File:Blast line.png||300px|thumb|When a character passes the blast line, a colorful "blast" (hence the name) occurs.]] | ||
A '''blast line''' is an invisible boundary on a [[stage]] that a [[character]] cannot cross without getting [[KO]]'d, and causing an opponent to go beyond them are the standard means of KOing opponents | A '''blast line''', also called a '''blast zone''', is an invisible boundary on a [[stage]] that a [[character]] cannot cross without getting [[KO]]'d, and causing an opponent to go beyond them are the standard means of KOing opponents in standard [[Versus Mode]] battles. Blast lines are usually placed beyond the borders of the screen in which the stage is shown. | ||
There are four blast lines, usually referred to as "bottom"/"lower", "left", "right", and "upper"/"ceiling" (alternatively, "north"/"south"/"east"/"west"). ''[[Super Smash Bros. Brawl]]'' | There are four blast lines, usually referred to as "bottom"/"lower", "left", "right", and "upper"/"ceiling" (alternatively, "north"/"south"/"east"/"west"). From ''[[Super Smash Bros. Brawl]]'' onward, a diagonal-pointing explosion is displayed if a character is KO'd in a corner, but this is only to improve the explosion's visibility. | ||
==Overview== | ==Overview== | ||
Most stages have left and right blast lines which are far away from the edges of the stage's platforms, and so cannot readily be walked into. Some stages, however, have what are known as '''walk-offs''', where a stage's platform doesn't stop at a ledge and instead goes all the way to the left and/or right blast line, which allows players to "walk off" the stage's boundaries and be KO'd (both versions of [[Mushroom Kingdom]] and [[Onett]] are prominent examples). The | Most stages have left and right blast lines which are far away from the edges of the stage's platforms, and so cannot readily be walked into. Some stages, however, have what are known as '''walk-offs''', where a stage's platform doesn't stop at a ledge and instead goes all the way to the left and/or right blast line, which allows players to "walk off" the stage's boundaries and be KO'd (both versions of [[Mushroom Kingdom]] and [[Onett]] are prominent examples). The exceptions are [[Balloon Fight]] and [[Mario Bros.]] (in ''Ultimate''), where walking off the side of the stage wraps the player around to the other side. However, fighters are KO'd as usual on either stage if they are [[knockback|launched]] into the blast line. There is additionally a lower blast line which is triggered by falling below the bottom of the screen, which is what KOs characters that fail to [[recover]] after being knocked off the stage. Some stages have full floors and walls that prevent access to certain blast lines, but they still exist, should a character be glitched through the stage. | ||
The upper blast line is different from the others in that characters can freely pass it without being KO'd in most situations; characters can freely jump and attack above the blast line (the cause of the [[Luigi ladder]]). Characters are only KO'd off the top if they are standing on platforms that leave the stage or they are being propelled upwards by [[knockback]] | The upper blast line is different from the others in that characters can freely pass it without being KO'd in most situations; characters can freely jump and attack above the blast line (the cause of the [[Luigi ladder]]). Characters are only KO'd off the top if they are standing on platforms that leave the stage or they are being propelled upwards by [[knockback]] (including from [[windbox]]es), a broken [[shield]], a thrown {{b|Screw Attack|item}}, or the [[Wario Waft]]. These characteristics do not apply in the original ''[[Super Smash Bros.]]''; the top blast line in said game will KO characters regardless of how they pass it. | ||
Characters KO'd via the upper blast line are either [[star KO]]'d or [[screen KO]]'d. There are a few exceptions to this, however. In most battles in [[1P Mode]] where the player fights a large team of opponents, the opponents are KO'd off the upper blast line as if it were any other blast line, instead of being star or screen KO'd. In ''Brawl'', there's a glitch that causes characters who are KO'd over the upper blast line during the usage of a [[tether recovery]] to be KO'd with a glitched colored blast. Additionally in ''Brawl'', if a character is KO'd at the upper blast line while near the left or right blast line, they are KO'd as normal instead of star/screen KO'd. | Characters KO'd via the upper blast line are either [[star KO]]'d or [[screen KO]]'d. There are a few exceptions to this, however. In most battles in [[1P Mode]] where the player fights a large team of opponents, the opponents are KO'd off the upper blast line as if it were any other blast line, instead of being star or screen KO'd. In ''Brawl'', there's a glitch that causes characters who are KO'd over the upper blast line during the usage of a [[tether recovery]] to be KO'd with a glitched colored blast. Additionally in ''Brawl'', if a character is KO'd at the upper blast line while near the left or right blast line, they are KO'd as normal instead of star/screen KO'd. | ||
The game's camera refuses to pan or zoom enough during gameplay to actually "see" the blast lines (although the lines themselves are invisible, as can be evidenced when the camera is rotated while pausing). When a character is between a blast line and the camera's view (or above the upper blast line without dying), they will appear in a bubble and slowly take damage. This is known as [[ | The game's camera refuses to pan or zoom enough during gameplay to actually "see" the blast lines (although the lines themselves are invisible, as can be evidenced when the camera is rotated while pausing). When a character is between a blast line and the camera's view (or above the upper blast line without dying), they will appear in a bubble and slowly take damage. This is known as [[Magnifying-Glass Damage]]. | ||
Items and projectiles that cross the blast lines are removed from play (except for, again, the upper blast line). | Items and projectiles that cross the blast lines are removed from play (except for, again, the upper blast line). The [[Soccer Ball]] in ''SSB4'' and beyond is an exception, warping back onto the stage if it crosses a blast line. Also a [[Smash Ball]] can freely cross blast lines until it leaves gameplay either by disappearing or being used. | ||
==In the games== | ==In the games== | ||
===''[[Super Smash Bros.]]''=== | ===''[[Super Smash Bros.]]''=== | ||
In the first game, blast zones are fairly big, which makes characters with good recoveries, like {{SSB|Pikachu}}, live longer on most stages. Despite this, the absence of air dodging and the high hitstun, coupled with the fact there are few characters that boast long, safe recoveries, | In the first game, blast zones are fairly big, which makes characters with good recoveries, like {{SSB|Pikachu}}, live longer on most stages. Despite this, the absence of air dodging and wall teching, and the high hitstun, coupled with the fact there are few characters that boast long, safe recoveries, make [[edgeguarding]] an easy task compared to other ''Smash'' titles. | ||
===''[[Super Smash Bros. Melee]]''=== | ===''[[Super Smash Bros. Melee]]''=== | ||
While the first game previously featured big blast lines, ''Melee'' features | While the first game previously featured big blast lines, for the most part ''Melee'' features smaller ones, though there are some exceptions, like {{SSB|Dream Land}}. Combined with the faster falling speeds, this makes edgeguarding technically easier than in the previous game, despite the significantly lower [[hitstun]] and the introduction of [[Air dodge|air dodging]]. | ||
===''[[Super Smash Bros. Brawl]]''=== | ===''[[Super Smash Bros. Brawl]]''=== | ||
''Brawl''{{'}}s blast lines seem to retain the same size as ''Melee''{{'}}s blast lines. However, changes to air dodging as well as the introduction of hitstun and [[momentum cancelling]] have made edgeguarding a harder task in the game. | ''Brawl''{{'}}s blast lines seem to retain the same size as ''Melee''{{'}}s blast lines. However, changes to air dodging as well as the introduction of hitstun and [[momentum cancelling]] have made edgeguarding a harder task in the game. | ||
In [[The Subspace Emissary]]'s side-scrolling stages, the upper blast line is stripped of its unique properties; characters don't need to be in knockback to be KO'd by it and don't fall into the background or foreground. On the other hand, the blast lines are otherwise disabled if the character is not in | With the addition of [[Assist Trophies]], the stage's blast lines will be moved if [[Devil]] is summoned. | ||
In [[The Subspace Emissary]]'s side-scrolling stages, the upper blast line is stripped of its unique properties; characters don't need to be in knockback to be KO'd by it and don't fall into the background or foreground. On the other hand, the blast lines are otherwise disabled if the character is not in hitstun; the camera will follow Player 1 and keep them away from the blast lines, while Player 2 will do a [[Space Jump]] instead of being KO'd. If a hit is momentum cancelled or otherwise interrupted, the character is still vulnerable to the blast lines for the full duration of the hitstun. | |||
===''[[Super Smash Bros. 4]]''=== | ===''[[Super Smash Bros. 4]]''=== | ||
In {{for3ds}}, blast lines have become much larger; specifically, most are about 2/3 of the distance of [[Final Destination]]. These allow for even lighter characters to live up to 200% [[damage]] on smaller stages such as [[Battlefield]]. However, it also forces several characters to grab the ledge when recovering instead of just landing on the stage. When combined with the removal of [[edge-hogging]], this allows for many more | In {{for3ds}}, blast lines have become much larger; specifically, most are about 2/3 of the distance of [[Final Destination]]. These allow for even lighter characters to live up to 200% [[damage]] on smaller stages such as [[Battlefield]]. However, it also forces several characters to grab the ledge when recovering instead of just landing on the stage. When combined with the removal of [[edge-hogging]], this allows for many more edgeguarding techniques along with the addition of the edge trump mechanic. Certain returning stages, such as [[Corneria]], have their usual smaller blast lines to match their respective original games. | ||
By contrast, {{forwiiu}} used to feature the smallest blast lines in the whole series (with only a select few having big blast lines, like [[PAC-LAND]]), being significantly smaller than in the ''3DS'' version and being in fact smaller than in ''Melee'' and ''Brawl''. This makes edgeguarding easier than in the ''3DS'' version, though not as easy as in ''Melee'' or ''64'', where edge-hogging is possible. | By contrast, {{forwiiu}} used to feature the smallest blast lines in the whole series (with only a select few having big blast lines, like [[PAC-LAND]]), being significantly smaller than in the ''3DS'' version and being in fact smaller than in ''Melee'' and ''Brawl''. This makes edgeguarding easier than in the ''3DS'' version, though not as easy as in ''Melee'' or ''64'', where edge-hogging is possible. | ||
| Line 38: | Line 38: | ||
===''[[Super Smash Bros. Ultimate]]''=== | ===''[[Super Smash Bros. Ultimate]]''=== | ||
In a first for the series, blast lines are visually represented in a small graphic (called the [[radar]] in-game), similar to how they are delineated in ''Melee'''s debug mode, that appears at the side of the screen whenever a player approaches the camera boundary. Color-coded dots in the graphic indicate the player's position in the zone between the camera's boundary and the blast lines. This graphic can be made smaller or turned off entirely in the options. | |||
An additional, lower "meteor blast line" now exists on all stages. This blast line sits between the camera's lower limit and the regular blast line and affects fighters with a speed greater than 3.<ref>[https://twitter.com/Ruben_dal/status/1221151119172345858 Ruben's tweet about the meteor blast zone]</ref> This allows players to go for riskier attacks (such as [[fast-fall]] down-airs) or to ensure a [[meteor smash]] KOs an opponent before they get to act again. | |||
The game also beats {{forwiiu}}'s smallest blast lines with the [[Squid Sisters|Squid Sisters Assist Trophy]], as the camera zooming in on them will also bring the blast lines closer, regardless of the stage. [[Sudden Death]] will bring the blast lines to the center of the stage in a similar manner; this is likely intended to discourage camping and stalling in Sudden Death matches. | |||
==Gallery== | ==Gallery== | ||
<gallery widths=200px heights=200px> | <gallery widths=200px heights=200px> | ||
File:SSB64Blastline.jpg|The left blast line in ''[[Super Smash Bros.]]'' at [[Hyrule Castle]]. | File:SSB64Blastline.jpg|The left blast line in ''[[Super Smash Bros.]]'' at [[Hyrule Castle]]. | ||
BTLFD-BLAST-SSBM.png|''Melee''{{'}}s {{SSBM|Battlefield}} showing the four blast lines (yellow). | BTLFD-BLAST-SSBM.png|''Melee''{{'}}s {{SSBM|Battlefield}} showing the four blast lines (yellow). | ||
BlastLine.jpg|If the camera is modded to go beyond stage borders, a more realistic blast can be seen. | BlastLine.jpg|If the camera in ''Melee'' is modded to go beyond stage borders, a more realistic blast can be seen. | ||
Kirbycide frame data.gif|In this animation, taken in debug mode, Bowser is KO'd when the bottom edge of his hurtbox touches the bottom blast line. | Kirbycide frame data.gif|In this animation, taken in ''Melee'''s [[Debug menu (SSBM)|debug mode]], Bowser is KO'd when the bottom edge of his hurtbox touches the bottom blast line. | ||
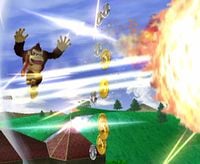
BlastLineStar.jpg|The top end of the trail of clouds shows the top blast line for the underground section of [[Mushroomy Kingdom]]. | BlastLineStar.jpg|The top end of the trail of clouds shows the top blast line for the underground section of [[Mushroomy Kingdom]]. | ||
SSB3DSGame!.jpg|The upper blast line in {{for3ds}} at [[Rainbow Road]]. | SSB3DSGame!.jpg|The upper blast line in {{for3ds}} at [[Rainbow Road]]. | ||
SmashWiiUGame!.jpg|The lower blast line in {{forwiiu}} at [[Kalos Pokémon League]]. | |||
SmashUltimateAnnouncerGAME!.jpg|The left blast line in ''[[Super Smash Bros. Ultimate]]'' at [[Moray Towers]].</gallery> | |||
==Trivia== | ==Trivia== | ||
[[File:MushroomKingdomBlastLine.png|thumb | [[File:MushroomKingdomBlastLine.png|thumb|The blast lines on the ''Melee'' version of Mushroom Kingdom.]] | ||
*On the {{SSB|Mushroom Kingdom}} stage of ''[[Super Smash Bros.]]'' and the {{SSBM|Mushroom Kingdom}} stage of ''[[Super Smash Bros. Melee]]'', the camera can be panned far enough to see black signs with a red circle and the word "Danger" off to the side. The sign itself is behind the blast line. | *On the {{SSB|Mushroom Kingdom}} stage of ''[[Super Smash Bros.]]'' (as well as its ''[[Super Smash Bros. Ultimate]]'' remake) and the {{SSBM|Mushroom Kingdom}} stage of ''[[Super Smash Bros. Melee]]'', the camera can be panned far enough to see black signs with a red circle and the word "Danger" off to the side. The sign itself is behind the blast line. | ||
*[[Sandbag]], {{SSBM|Master Hand}}, and {{SSBM|Crazy Hand}} are the only characters that can cross blast lines in ''Melee''. If they cover a great enough distance in either direction, the game will even freeze, as it is too far off the center of the stage for the game to handle. | *[[Sandbag]], {{SSBM|Master Hand}}, and {{SSBM|Crazy Hand}} are the only characters that can cross blast lines in ''Melee''. If they cover a great enough distance in either direction, the game will even freeze, as it is too far off the center of the stage for the game to handle. | ||
* | *In the original ''Super Smash Bros.'', KOing a character through the upper blast line will always result in a [[Star KO]] or [[Screen KO]], including characters in horde battles. | ||
*In ''Super Smash Bros. Brawl'' onwards, after a boss is defeated the blast lines are temporarily disabled until the screen fades to white. This is to prevent players from losing if they happen to defeat a boss offstage. | |||
==References== | |||
{{Reflist}} | |||
[[Category:Gameplay]] | [[Category:Gameplay]] | ||
Latest revision as of 12:29, April 11, 2024

A blast line, also called a blast zone, is an invisible boundary on a stage that a character cannot cross without getting KO'd, and causing an opponent to go beyond them are the standard means of KOing opponents in standard Versus Mode battles. Blast lines are usually placed beyond the borders of the screen in which the stage is shown.
There are four blast lines, usually referred to as "bottom"/"lower", "left", "right", and "upper"/"ceiling" (alternatively, "north"/"south"/"east"/"west"). From Super Smash Bros. Brawl onward, a diagonal-pointing explosion is displayed if a character is KO'd in a corner, but this is only to improve the explosion's visibility.
Overview[edit]
Most stages have left and right blast lines which are far away from the edges of the stage's platforms, and so cannot readily be walked into. Some stages, however, have what are known as walk-offs, where a stage's platform doesn't stop at a ledge and instead goes all the way to the left and/or right blast line, which allows players to "walk off" the stage's boundaries and be KO'd (both versions of Mushroom Kingdom and Onett are prominent examples). The exceptions are Balloon Fight and Mario Bros. (in Ultimate), where walking off the side of the stage wraps the player around to the other side. However, fighters are KO'd as usual on either stage if they are launched into the blast line. There is additionally a lower blast line which is triggered by falling below the bottom of the screen, which is what KOs characters that fail to recover after being knocked off the stage. Some stages have full floors and walls that prevent access to certain blast lines, but they still exist, should a character be glitched through the stage.
The upper blast line is different from the others in that characters can freely pass it without being KO'd in most situations; characters can freely jump and attack above the blast line (the cause of the Luigi ladder). Characters are only KO'd off the top if they are standing on platforms that leave the stage or they are being propelled upwards by knockback (including from windboxes), a broken shield, a thrown Screw Attack, or the Wario Waft. These characteristics do not apply in the original Super Smash Bros.; the top blast line in said game will KO characters regardless of how they pass it.
Characters KO'd via the upper blast line are either star KO'd or screen KO'd. There are a few exceptions to this, however. In most battles in 1P Mode where the player fights a large team of opponents, the opponents are KO'd off the upper blast line as if it were any other blast line, instead of being star or screen KO'd. In Brawl, there's a glitch that causes characters who are KO'd over the upper blast line during the usage of a tether recovery to be KO'd with a glitched colored blast. Additionally in Brawl, if a character is KO'd at the upper blast line while near the left or right blast line, they are KO'd as normal instead of star/screen KO'd.
The game's camera refuses to pan or zoom enough during gameplay to actually "see" the blast lines (although the lines themselves are invisible, as can be evidenced when the camera is rotated while pausing). When a character is between a blast line and the camera's view (or above the upper blast line without dying), they will appear in a bubble and slowly take damage. This is known as Magnifying-Glass Damage.
Items and projectiles that cross the blast lines are removed from play (except for, again, the upper blast line). The Soccer Ball in SSB4 and beyond is an exception, warping back onto the stage if it crosses a blast line. Also a Smash Ball can freely cross blast lines until it leaves gameplay either by disappearing or being used.
In the games[edit]
Super Smash Bros.[edit]
In the first game, blast zones are fairly big, which makes characters with good recoveries, like Pikachu, live longer on most stages. Despite this, the absence of air dodging and wall teching, and the high hitstun, coupled with the fact there are few characters that boast long, safe recoveries, make edgeguarding an easy task compared to other Smash titles.
Super Smash Bros. Melee[edit]
While the first game previously featured big blast lines, for the most part Melee features smaller ones, though there are some exceptions, like Dream Land. Combined with the faster falling speeds, this makes edgeguarding technically easier than in the previous game, despite the significantly lower hitstun and the introduction of air dodging.
Super Smash Bros. Brawl[edit]
Brawl's blast lines seem to retain the same size as Melee's blast lines. However, changes to air dodging as well as the introduction of hitstun and momentum cancelling have made edgeguarding a harder task in the game.
With the addition of Assist Trophies, the stage's blast lines will be moved if Devil is summoned.
In The Subspace Emissary's side-scrolling stages, the upper blast line is stripped of its unique properties; characters don't need to be in knockback to be KO'd by it and don't fall into the background or foreground. On the other hand, the blast lines are otherwise disabled if the character is not in hitstun; the camera will follow Player 1 and keep them away from the blast lines, while Player 2 will do a Space Jump instead of being KO'd. If a hit is momentum cancelled or otherwise interrupted, the character is still vulnerable to the blast lines for the full duration of the hitstun.
Super Smash Bros. 4[edit]
In Super Smash Bros. for Nintendo 3DS, blast lines have become much larger; specifically, most are about 2/3 of the distance of Final Destination. These allow for even lighter characters to live up to 200% damage on smaller stages such as Battlefield. However, it also forces several characters to grab the ledge when recovering instead of just landing on the stage. When combined with the removal of edge-hogging, this allows for many more edgeguarding techniques along with the addition of the edge trump mechanic. Certain returning stages, such as Corneria, have their usual smaller blast lines to match their respective original games.
By contrast, Super Smash Bros. for Wii U used to feature the smallest blast lines in the whole series (with only a select few having big blast lines, like PAC-LAND), being significantly smaller than in the 3DS version and being in fact smaller than in Melee and Brawl. This makes edgeguarding easier than in the 3DS version, though not as easy as in Melee or 64, where edge-hogging is possible.
In addition, in both versions, Screen and Star KOs no longer happen in the last few seconds of a match (save for an unknown glitch which causes Star KOs and Screen KOs to still happen). They also might not always occur when a character is KO'd across the upper blast line.
Super Smash Bros. Ultimate[edit]
In a first for the series, blast lines are visually represented in a small graphic (called the radar in-game), similar to how they are delineated in Melee's debug mode, that appears at the side of the screen whenever a player approaches the camera boundary. Color-coded dots in the graphic indicate the player's position in the zone between the camera's boundary and the blast lines. This graphic can be made smaller or turned off entirely in the options.
An additional, lower "meteor blast line" now exists on all stages. This blast line sits between the camera's lower limit and the regular blast line and affects fighters with a speed greater than 3.[1] This allows players to go for riskier attacks (such as fast-fall down-airs) or to ensure a meteor smash KOs an opponent before they get to act again.
The game also beats Super Smash Bros. for Wii U's smallest blast lines with the Squid Sisters Assist Trophy, as the camera zooming in on them will also bring the blast lines closer, regardless of the stage. Sudden Death will bring the blast lines to the center of the stage in a similar manner; this is likely intended to discourage camping and stalling in Sudden Death matches.
Gallery[edit]
The left blast line in Super Smash Bros. at Hyrule Castle.
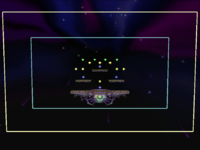
Melee's Battlefield showing the four blast lines (yellow).
If the camera in Melee is modded to go beyond stage borders, a more realistic blast can be seen.
In this animation, taken in Melee's debug mode, Bowser is KO'd when the bottom edge of his hurtbox touches the bottom blast line.
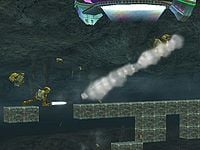
The top end of the trail of clouds shows the top blast line for the underground section of Mushroomy Kingdom.
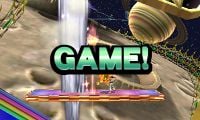
The upper blast line in Super Smash Bros. for Nintendo 3DS at Rainbow Road.
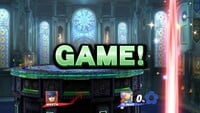
The lower blast line in Super Smash Bros. for Wii U at Kalos Pokémon League.
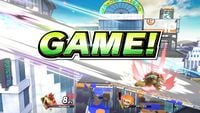
The left blast line in Super Smash Bros. Ultimate at Moray Towers.


Trivia[edit]

- On the Mushroom Kingdom stage of Super Smash Bros. (as well as its Super Smash Bros. Ultimate remake) and the Mushroom Kingdom stage of Super Smash Bros. Melee, the camera can be panned far enough to see black signs with a red circle and the word "Danger" off to the side. The sign itself is behind the blast line.
- Sandbag, Master Hand, and Crazy Hand are the only characters that can cross blast lines in Melee. If they cover a great enough distance in either direction, the game will even freeze, as it is too far off the center of the stage for the game to handle.
- In the original Super Smash Bros., KOing a character through the upper blast line will always result in a Star KO or Screen KO, including characters in horde battles.
- In Super Smash Bros. Brawl onwards, after a boss is defeated the blast lines are temporarily disabled until the screen fades to white. This is to prevent players from losing if they happen to defeat a boss offstage.