SSBU Icon.png

Wii Fit Trainer (SSBU)/Down tilt

From SmashWiki, the Super Smash Bros. wiki
Jump to navigationJump to search
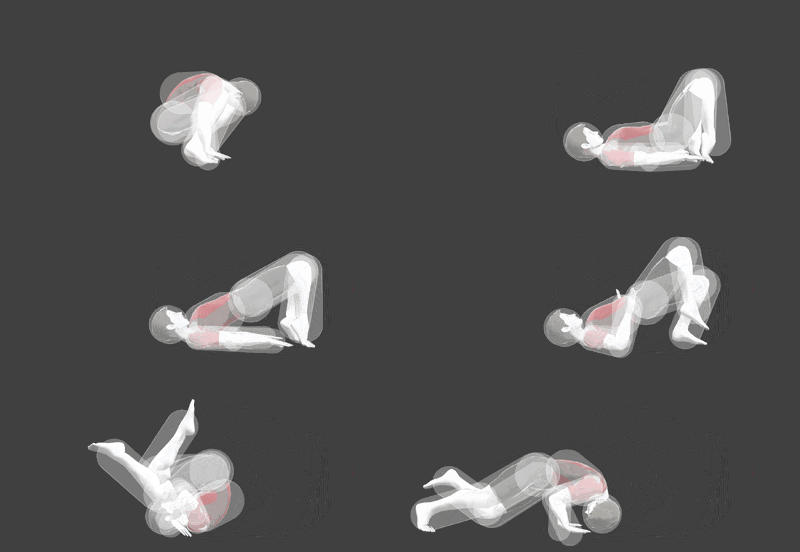
Hitbox visualization of Wii Fit Trainer's Down tilt.
Hitbox visualization showing Wii Fit Trainer's down tilt.

Overview[edit]

Wii Fit Trainer performs the bridge pose, striking low to the ground with her knees. This move has been historically understated in comparison to Wii Fit Trainer's other tilt attacks, but has steadily become a stronger tool over the course of Smash 4 and Ultimate. The most straightforward strength of the move is its heavy damage, dealing as much as 21.2% with the help of the 1v1 multiplier and Deep Breathing. In Update 8.0.0, down tilt was given kill power to match its ludicrous damage output thanks to a 15° launch angle change that consequently allows the move to kill almost as early as Wii Fit Trainer's forward tilt, one of her most potent kill moves. Aside from these two strengths, down tilt also has multiple niche uses and perks. Although the move has a disadvantage of 17 frames on shield, down tilt puts a large space between Wii Fit Trainer and her opponent such that many characters are not able to punish the attack thanks a combination of its heavy shield damage, pushback, and semi pseudo-crawl properties. This can sometimes even bait the opponent into whiffing a shield grab, in which case Wii Fit Trainer has a variety of punish options, such as a jab or even a raw forward smash. Although it does not hit every character, down tilt is also one of Wii Fit Trainer's few two-frame options, which can now lead to kills below 100% in Update 8.0.0. Finally, down tilt has the added bonus of being an effective low profile, increasing its general safety in a great deal of matchups. Overall, down tilt is a solid move that helps cover the area low to the ground (where many of Wii Fit Trainer's other attacks miss), and with its added kill power it doesn't have any real weaknesses aside from its slightly laggy nature.

Update History[edit]

Super Smash Bros. Ultimate 8.0.0

  • Buff It launches at a lower angle (55° → 40°). This drastically improves its utility overall, as it now has KO potential and can set up edgeguards.

Hitboxes[edit]

ID Part Rehit rate Damage SD Angle Angle type BK KS FKV Set weight Radius Bone Offset SDI× T% Clang Rebound Effect Type G A Sound Direct Hit bits Hit part Blockable Reflectable Absorbable Flinchless No GFX Heedless
0 0 0 13.5% 0 AngleIcon40.png Forward 30 80 0 HitboxTableIcon(False).png 4.0 top 0.0 3.0 to 4.8 4.5 1.0× 1.0× 40% HitboxTableIcon(Clang).png HitboxTableIcon(Rebound).png EffectIcon(Normal).png TypeIcon(Foot).png HitboxTableIcon(GroundedTrue).png HitboxTableIcon(AerialTrue).png L Kick SpecialsDirect.png All All HitboxTableIcon(Blockable).png HitboxTableIcon(Unreflectable).png HitboxTableIcon(Unabsorbable).png HitboxTableIcon(False).png HitboxTableIcon(False).png HitboxTableIcon(False).png
1 0 0 12.0% 0 AngleIcon40.png Forward 30 80 0 HitboxTableIcon(False).png 2.8 top 0.0 3.0 -1.0 1.0× 1.0× 40% HitboxTableIcon(Clang).png HitboxTableIcon(Rebound).png EffectIcon(Normal).png TypeIcon(Foot).png HitboxTableIcon(GroundedTrue).png HitboxTableIcon(AerialTrue).png L Kick SpecialsDirect.png All All HitboxTableIcon(Blockable).png HitboxTableIcon(Unreflectable).png HitboxTableIcon(Unabsorbable).png HitboxTableIcon(False).png HitboxTableIcon(False).png HitboxTableIcon(False).png

Timing[edit]

The move disables jostling during frames 8-12.

Hitbox 9-12
Interruptible 39
Animation length 54
FrameIcon(Lag).png FrameIcon(Lag).png FrameIcon(Lag).png FrameIcon(Lag).png FrameIcon(Lag).png FrameIcon(Lag).png FrameIcon(Lag).png FrameIcon(Lag).png FrameIcon(Hitbox).png FrameIcon(Hitbox).png FrameIcon(Hitbox).png FrameIcon(Hitbox).png FrameIcon(Lag).png FrameIcon(Lag).png FrameIcon(Lag).png FrameIcon(Lag).png FrameIcon(Lag).png FrameIcon(Lag).png FrameIcon(Lag).png FrameIcon(Lag).png FrameIcon(Lag).png FrameIcon(Lag).png FrameIcon(Lag).png FrameIcon(Lag).png FrameIcon(Lag).png FrameIcon(Lag).png FrameIcon(Lag).png FrameIcon(Lag).png FrameIcon(Lag).png FrameIcon(Lag).png FrameIcon(Lag).png FrameIcon(Lag).png FrameIcon(Lag).png FrameIcon(Lag).png FrameIcon(Lag).png FrameIcon(Lag).png FrameIcon(Lag).png FrameIcon(Lag).png FrameIcon(Interruptible).png FrameIcon(Interruptible).png FrameIcon(Interruptible).png FrameIcon(Interruptible).png FrameIcon(Interruptible).png FrameIcon(Interruptible).png FrameIcon(Interruptible).png FrameIcon(Interruptible).png FrameIcon(Interruptible).png FrameIcon(Interruptible).png FrameIcon(Interruptible).png FrameIcon(Interruptible).png FrameIcon(Interruptible).png FrameIcon(Interruptible).png FrameIcon(Interruptible).png FrameIcon(Interruptible).png
Legend (1 square = 1 frame)
FrameIcon(Lag).png
Lag time
FrameIcon(Hitbox).png
Hitbox
FrameIcon(Interruptible).png
Interruptible

Trivia[edit]

  • The move has a 40% trip chance that can only happen on slants due to the launch angle.