SSBM Icon.png

Ganondorf (SSBM)/Forward aerial: Difference between revisions

From SmashWiki, the Super Smash Bros. wiki
Jump to navigationJump to search
Tag: Mobile edit
Tag: Disambiguation links
Line 2: Line 2:
==Overview==
==Overview==
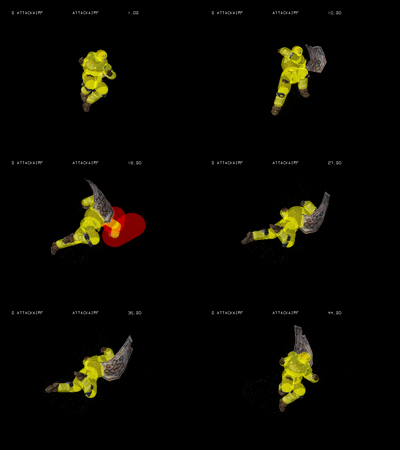
[[File:Ganondorf Forward Aerial Hitbox Melee.gif|thumb|Hitbox duration of Ganondorf's forward aerial.]]
[[File:Ganondorf Forward Aerial Hitbox Melee.gif|thumb|Hitbox duration of Ganondorf's forward aerial.]]
Ganondorf's forward aerial, often nicknamed the '''Skull Crusher''' or '''The Punch''', involves him punching in a downwards motion in front of himself. The move has many positive traits, namely its power, good [[range]], and lack of a [[sourspot]]. The fact that it hits above Ganondorf means it can easily cover various [[tech]] options from opponents on platforms above him, as well as being a good kill move, especially on stages with close [[blast line]]s, such as [[Yoshi's Story]]. Also, if the move is spaced properly, it's very hard to punish out of shield (due to its high shieldstun by virtue of its damage output) if used while falling. The Punch's speed is on par with the {{mvsub|Captain Falcon|SSBM|forward aerial|alt=Knee Smash}}, though it has lower power and longer [[landing lag]], albeit much larger range.  
Ganondorf's forward aerial, often nicknamed the '''Skull Crusher''' or '''The Punch''', involves him punching in a downwards motion in front of himself. The move has many positive traits which make it a widely used move in Ganondorf's [[metagame]], namely its power, good [[range]], and lack of a [[sourspot]]. The fact that it hits above Ganondorf means it can easily cover various [[tech]] options from opponents on platforms above him, as well as being a very good kill move, being able to kill [[space animals]] at below 80% if used near the edge of most competitive stages. Also, if the move is spaced properly, it's very hard to punish out of shield (due to its high [[shieldstun]] and [[Shield#Shield pushback|shield pushback]] by virtue of its damage output) if used while falling. Compared to the [[Captain Falcon (SSBM)/Forward aerial|Knee Smash]], The Punch is weaker and [[lag]]gier, which is made up for by its significantly longer range.  


However, every move has its drawbacks, and The Punch is outclassed by {{mvsub|Ganondorf|SSBM|back aerial}} in many areas, being slower, [[lag]]gier, having less knockback and, most importantly, not being able to [[autocancel]] in a [[short hop]], which makes it only work as a falling aerial, giving oponents more time to react.
However, every move has its drawbacks, and The Punch is outclassed by {{mvsub|Ganondorf|SSBM|back aerial}} in many areas, being slower, laggier, having less knockback and, most importantly, not being able to [[autocancel]] in a [[short hop]], which makes it only work as a falling aerial, giving oponents more time to react and potentially whiff punish the attack.


Overall, The Punch is a widely used move in Ganondorf's [[metagame]] for its variety of good traits, however, it should not be overused, as it might not always be the most rewarding option for every situation and Ganondorf can be [[punish]]ed hard if the attack fails to connect.
Overall, The Punch is considered a staple of Ganondorf's moveset for its variety of good traits, however, it should not be overused, as it might not always be the most rewarding option for every situation and Ganondorf can be [[punish]]ed hard if the attack fails to connect.


==Hitboxes==
==Hitboxes==

Revision as of 06:18, June 16, 2023

Overview

Hitbox duration of Ganondorf's forward aerial in Melee.
Hitbox duration of Ganondorf's forward aerial.

Ganondorf's forward aerial, often nicknamed the Skull Crusher or The Punch, involves him punching in a downwards motion in front of himself. The move has many positive traits which make it a widely used move in Ganondorf's metagame, namely its power, good range, and lack of a sourspot. The fact that it hits above Ganondorf means it can easily cover various tech options from opponents on platforms above him, as well as being a very good kill move, being able to kill space animals at below 80% if used near the edge of most competitive stages. Also, if the move is spaced properly, it's very hard to punish out of shield (due to its high shieldstun and shield pushback by virtue of its damage output) if used while falling. Compared to the Knee Smash, The Punch is weaker and laggier, which is made up for by its significantly longer range.

However, every move has its drawbacks, and The Punch is outclassed by back aerial in many areas, being slower, laggier, having less knockback and, most importantly, not being able to autocancel in a short hop, which makes it only work as a falling aerial, giving oponents more time to react and potentially whiff punish the attack.

Overall, The Punch is considered a staple of Ganondorf's moveset for its variety of good traits, however, it should not be overused, as it might not always be the most rewarding option for every situation and Ganondorf can be punished hard if the attack fails to connect.

Hitboxes

NTSC

ID Part Damage SD Angle BK KS FKV Radius Bone Offset Clang Rebound Effect G A Sound
0 0 17% 0 Sakurai angle 60 80 0 3.1248 66 -0.7812 0.0 0.0 HitboxTableIcon(Clang).png HitboxTableIcon(Rebound).png EffectIcon(Normal).png HitboxTableIcon(GroundedTrue).png HitboxTableIcon(AerialTrue).png L Burn
1 0 17% 0 Sakurai angle 60 80 0 3.906 66 1.953 0.0 0.0 HitboxTableIcon(Clang).png HitboxTableIcon(Rebound).png EffectIcon(Normal).png HitboxTableIcon(GroundedTrue).png HitboxTableIcon(AerialTrue).png L Burn
2 0 17% 0 Sakurai angle 60 80 0 5.0778 67 4.6872 0.0 0.0 HitboxTableIcon(Clang).png HitboxTableIcon(Rebound).png EffectIcon(Normal).png HitboxTableIcon(GroundedTrue).png HitboxTableIcon(AerialTrue).png L Burn

PAL

ID Part Damage SD Angle BK KS FKV Radius Bone Offset Clang Rebound Effect G A Sound
0 0 17% 0 Sakurai angle 40 80 0 2.7342 66 -0.7812 0.0 0.0 HitboxTableIcon(Clang).png HitboxTableIcon(Rebound).png EffectIcon(Normal).png HitboxTableIcon(GroundedTrue).png HitboxTableIcon(AerialTrue).png L Burn
1 0 17% 0 Sakurai angle 40 80 0 3.5154 66 1.953 0.0 0.0 HitboxTableIcon(Clang).png HitboxTableIcon(Rebound).png EffectIcon(Normal).png HitboxTableIcon(GroundedTrue).png HitboxTableIcon(AerialTrue).png L Burn
2 0 17% 0 Sakurai angle 40 80 0 4.2966 67 4.6872 0.0 0.0 HitboxTableIcon(Clang).png HitboxTableIcon(Rebound).png EffectIcon(Normal).png HitboxTableIcon(GroundedTrue).png HitboxTableIcon(AerialTrue).png L Burn

Summary:

  • Nerf Base knockback (60 → 40)
  • Nerf Hitbox sizes (3.125u/3.91u/5.08u → 2.734u/3.52u/4.3u)

Timing

Attack

Initial autocancel 1-6
Hitboxes 14-19
Ending autocancel 34-
Interruptible 35
Animation length 44
FrameIcon(Lag).png FrameIcon(Lag).png FrameIcon(Lag).png FrameIcon(Lag).png FrameIcon(Lag).png FrameIcon(Lag).png FrameIcon(Lag).png FrameIcon(Lag).png FrameIcon(Lag).png FrameIcon(Lag).png FrameIcon(Lag).png FrameIcon(Lag).png FrameIcon(Lag).png FrameIcon(Hitbox).png FrameIcon(Hitbox).png FrameIcon(Hitbox).png FrameIcon(Hitbox).png FrameIcon(Hitbox).png FrameIcon(Hitbox).png FrameIcon(Lag).png FrameIcon(Lag).png FrameIcon(Lag).png FrameIcon(Lag).png FrameIcon(Lag).png FrameIcon(Lag).png FrameIcon(Lag).png FrameIcon(Lag).png FrameIcon(Lag).png FrameIcon(Lag).png FrameIcon(Lag).png FrameIcon(Lag).png FrameIcon(Lag).png FrameIcon(Lag).png FrameIcon(Lag).png FrameIcon(Interruptible).png FrameIcon(Interruptible).png FrameIcon(Interruptible).png FrameIcon(Interruptible).png FrameIcon(Interruptible).png FrameIcon(Interruptible).png FrameIcon(Interruptible).png FrameIcon(Interruptible).png FrameIcon(Interruptible).png FrameIcon(Interruptible).png
FrameIcon(Autocancel).png FrameIcon(Autocancel).png FrameIcon(Autocancel).png FrameIcon(Autocancel).png FrameIcon(Autocancel).png FrameIcon(Autocancel).png FrameIcon(Blank).png FrameIcon(Blank).png FrameIcon(Blank).png FrameIcon(Blank).png FrameIcon(Blank).png FrameIcon(Blank).png FrameIcon(Blank).png FrameIcon(Blank).png FrameIcon(Blank).png FrameIcon(Blank).png FrameIcon(Blank).png FrameIcon(Blank).png FrameIcon(Blank).png FrameIcon(Blank).png FrameIcon(Blank).png FrameIcon(Blank).png FrameIcon(Blank).png FrameIcon(Blank).png FrameIcon(Blank).png FrameIcon(Blank).png FrameIcon(Blank).png FrameIcon(Blank).png FrameIcon(Blank).png FrameIcon(Blank).png FrameIcon(Blank).png FrameIcon(Blank).png FrameIcon(Blank).png FrameIcon(Autocancel).png FrameIcon(Autocancel).png FrameIcon(Autocancel).png FrameIcon(Autocancel).png FrameIcon(Autocancel).png FrameIcon(Autocancel).png FrameIcon(Autocancel).png FrameIcon(Autocancel).png FrameIcon(Autocancel).png FrameIcon(Autocancel).png FrameIcon(Autocancel).png

Landing lag

Animation length 25
L-cancelled animation length 12
Normal  FrameIcon(Lag).png FrameIcon(Lag).png FrameIcon(Lag).png FrameIcon(Lag).png FrameIcon(Lag).png FrameIcon(Lag).png FrameIcon(Lag).png FrameIcon(Lag).png FrameIcon(Lag).png FrameIcon(Lag).png FrameIcon(Lag).png FrameIcon(Lag).png FrameIcon(Lag).png FrameIcon(Lag).png FrameIcon(Lag).png FrameIcon(Lag).png FrameIcon(Lag).png FrameIcon(Lag).png FrameIcon(Lag).png FrameIcon(Lag).png FrameIcon(Lag).png FrameIcon(Lag).png FrameIcon(Lag).png FrameIcon(Lag).png FrameIcon(Lag).png
L-cancelled  FrameIcon(Lag).png FrameIcon(Lag).png FrameIcon(Lag).png FrameIcon(Lag).png FrameIcon(Lag).png FrameIcon(Lag).png FrameIcon(Lag).png FrameIcon(Lag).png FrameIcon(Lag).png FrameIcon(Lag).png FrameIcon(Lag).png FrameIcon(Lag).png FrameIcon(Blank).png FrameIcon(Blank).png FrameIcon(Blank).png FrameIcon(Blank).png FrameIcon(Blank).png FrameIcon(Blank).png FrameIcon(Blank).png FrameIcon(Blank).png FrameIcon(Blank).png FrameIcon(Blank).png FrameIcon(Blank).png FrameIcon(Blank).png FrameIcon(Blank).png
Legend (1 square = 1 frame)
FrameIcon(Lag).png
Lag time
FrameIcon(Hitbox).png
Hitbox
FrameIcon(Autocancel).png
Autocancel
FrameIcon(Interruptible).png
Interruptible