Super Smash Bros. Melee

Ganondorf (SSBM)/Forward tilt

From SmashWiki, the Super Smash Bros. wiki
Jump to navigationJump to search
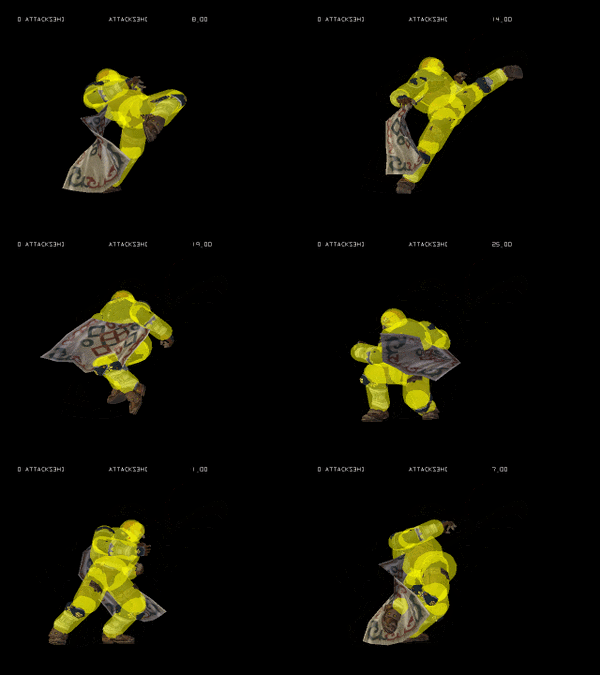
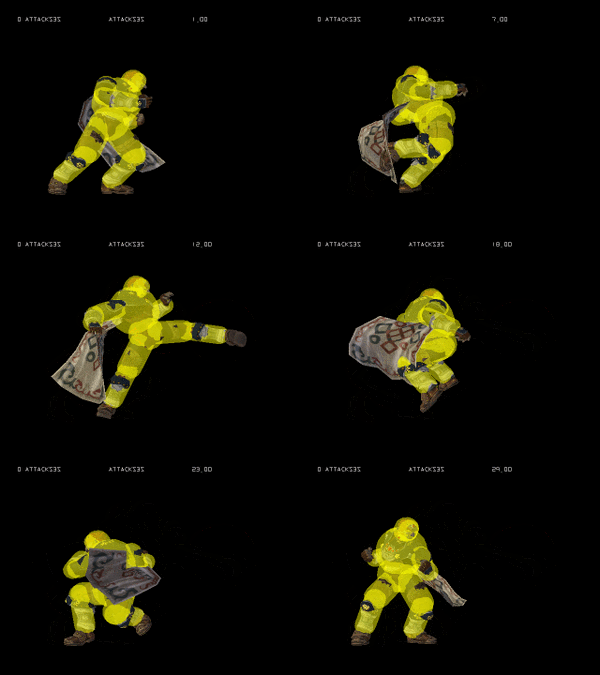
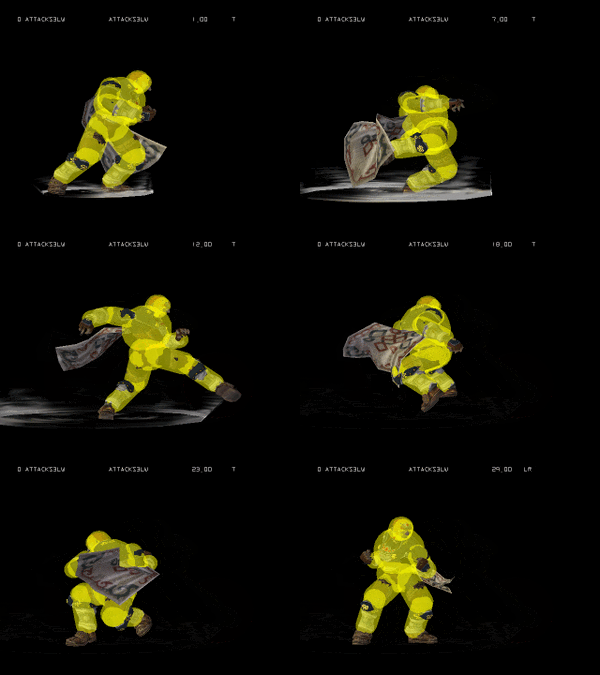
Ganondorf's forward tilt hitbox visualizations.
GanondorfFTiltUpSSBM.gif
GanondorfFTiltSSBM.gif
GanondorfFTiltDownSSBM.gif

Overview[edit]

Ganondorf does a roundhouse kick. It has the same frame data as Captain Falcon's forward tilt, but it is much stronger and has longer range. This and the short animation length it has make it arguably the best forward tilt in Melee other than Sheik's because it has a very good risk-reward ratio for a forward tilt.

If used as a standard poke in the neutral, the move is one of the longest-ranged forward tilts in the game and if spaced correctly it will connect with the foot sweetspot. From a distance, it can be used to predict a run-in from the opponent, and if the move doesn't connect, the low amount of endlag makes it very safe on whiff. For that reason, Ganondorf players often use this move from far away, as there's no big downside to using it. If it connects with the sweetspot, it has about as much kill power as his weaker aerials and is Ganondorf's best grounded kill move, providing a blend of strength and usability. It can also be used out of his throws when there isn't enough time to jump and then use an aerial.

Like every other forward tilt of its kind, it can be angled up or down. The up-angled version is Ganondorf's fastest and safest anti-air, and the down-angled version can hit characters crouching and also recoveries aimed at the ledge, often with lethal consequences if it hits, and missing the move will still sometimes let the Ganondorf player safely roll away from the ledge.

Overall, Ganondorf's forward tilt is a dependable and potentially very rewarding poke in neutral, as well as one more of his arsenal of great moves in advantage.

Hitboxes[edit]

ID Part Damage SD Angle BK KS FKV Radius Bone Offset Clang Rebound Effect G A Sound
Angled up
0 0 14% 0 Sakurai angle 20 100 0 5.0778 13 5.0778 0.0 0.0 HitboxTableIcon(Clang).png HitboxTableIcon(Rebound).png Normal (effect) HitboxTableIcon(GroundedTrue).png HitboxTableIcon(AerialTrue).png L Kick
1 0 13% 0 Sakurai angle 20 100 0 3.5154 12 1.953 0.0 0.0 HitboxTableIcon(Clang).png HitboxTableIcon(Rebound).png Normal (effect) HitboxTableIcon(GroundedTrue).png HitboxTableIcon(AerialTrue).png L Kick
2 0 12% 0 Sakurai angle 20 100 0 3.5154 4 0.0 0.0 0.0 HitboxTableIcon(Clang).png HitboxTableIcon(Rebound).png Normal (effect) HitboxTableIcon(GroundedTrue).png HitboxTableIcon(AerialTrue).png L Kick
Angled mid up
0 0 14% 0 Sakurai angle 20 100 0 5.0778 13 0.0 0.0 5.0778 HitboxTableIcon(Clang).png HitboxTableIcon(Rebound).png Normal (effect) HitboxTableIcon(GroundedTrue).png HitboxTableIcon(AerialTrue).png L Kick
1 0 13% 0 Sakurai angle 20 100 0 3.5154 12 0.0 0.0 1.953 HitboxTableIcon(Clang).png HitboxTableIcon(Rebound).png Normal (effect) HitboxTableIcon(GroundedTrue).png HitboxTableIcon(AerialTrue).png L Kick
2 0 12% 0 Sakurai angle 20 100 0 3.5154 4 0.0 0.0 0.0 HitboxTableIcon(Clang).png HitboxTableIcon(Rebound).png Normal (effect) HitboxTableIcon(GroundedTrue).png HitboxTableIcon(AerialTrue).png L Kick
Angled forward
0 0 13% 0 Sakurai angle 20 100 0 5.0778 13 5.0778 0.0 0.0 HitboxTableIcon(Clang).png HitboxTableIcon(Rebound).png Normal (effect) HitboxTableIcon(GroundedTrue).png HitboxTableIcon(AerialTrue).png L Kick
1 0 12% 0 Sakurai angle 20 100 0 3.5154 12 1.953 0.0 0.0 HitboxTableIcon(Clang).png HitboxTableIcon(Rebound).png Normal (effect) HitboxTableIcon(GroundedTrue).png HitboxTableIcon(AerialTrue).png L Kick
2 0 11% 0 Sakurai angle 20 100 0 3.5154 4 0.0 0.0 0.0 HitboxTableIcon(Clang).png HitboxTableIcon(Rebound).png Normal (effect) HitboxTableIcon(GroundedTrue).png HitboxTableIcon(AerialTrue).png L Kick
Angled mid down
0 0 12% 0 Sakurai angle 20 100 0 5.0778 13 0.0 0.0 5.0778 HitboxTableIcon(Clang).png HitboxTableIcon(Rebound).png Normal (effect) HitboxTableIcon(GroundedTrue).png HitboxTableIcon(AerialTrue).png L Kick
1 0 11% 0 Sakurai angle 20 100 0 3.5154 12 0.0 0.0 1.953 HitboxTableIcon(Clang).png HitboxTableIcon(Rebound).png Normal (effect) HitboxTableIcon(GroundedTrue).png HitboxTableIcon(AerialTrue).png L Kick
2 0 10% 0 Sakurai angle 20 100 0 3.5154 4 0.0 0.0 0.0 HitboxTableIcon(Clang).png HitboxTableIcon(Rebound).png Normal (effect) HitboxTableIcon(GroundedTrue).png HitboxTableIcon(AerialTrue).png L Kick
Angled down
0 0 12% 0 Sakurai angle 20 100 0 5.0778 13 5.0778 0.0 0.0 HitboxTableIcon(Clang).png HitboxTableIcon(Rebound).png Normal (effect) HitboxTableIcon(GroundedTrue).png HitboxTableIcon(AerialTrue).png L Kick
1 0 11% 0 Sakurai angle 20 100 0 3.5154 12 1.953 0.0 0.0 HitboxTableIcon(Clang).png HitboxTableIcon(Rebound).png Normal (effect) HitboxTableIcon(GroundedTrue).png HitboxTableIcon(AerialTrue).png L Kick
2 0 10% 0 Sakurai angle 20 100 0 3.5154 4 0.0 0.0 0.0 HitboxTableIcon(Clang).png HitboxTableIcon(Rebound).png Normal (effect) HitboxTableIcon(GroundedTrue).png HitboxTableIcon(AerialTrue).png L Kick

Timing[edit]

Hitboxes 9-11
Animation length 29
FrameIcon(Lag).png FrameIcon(Lag).png FrameIcon(Lag).png FrameIcon(Lag).png FrameIcon(Lag).png FrameIcon(Lag).png FrameIcon(Lag).png FrameIcon(Lag).png FrameIcon(Hitbox).png FrameIcon(Hitbox).png FrameIcon(Hitbox).png FrameIcon(Lag).png FrameIcon(Lag).png FrameIcon(Lag).png FrameIcon(Lag).png FrameIcon(Lag).png FrameIcon(Lag).png FrameIcon(Lag).png FrameIcon(Lag).png FrameIcon(Lag).png FrameIcon(Lag).png FrameIcon(Lag).png FrameIcon(Lag).png FrameIcon(Lag).png FrameIcon(Lag).png FrameIcon(Lag).png FrameIcon(Lag).png FrameIcon(Lag).png FrameIcon(Lag).png
Legend (1 square = 1 frame)
Lag
Lag time
Hitbox
Hitbox