Captain Falcon (SSB)/Forward aerial: Difference between revisions
MHStarCraft (talk | contribs) No edit summary |
SuperSqank (talk | contribs) m (→Hitboxes) |
||
| (12 intermediate revisions by 4 users not shown) | |||
| Line 2: | Line 2: | ||
==Overview== | ==Overview== | ||
[[File:Captain Falcon Forward Aerial Hitboxes Smash 64.gif|thumb| | [[File:Captain Falcon Forward Aerial Hitboxes Smash 64.gif|thumb|Hitbox duration of Captain Falcon's forward aerial.]] | ||
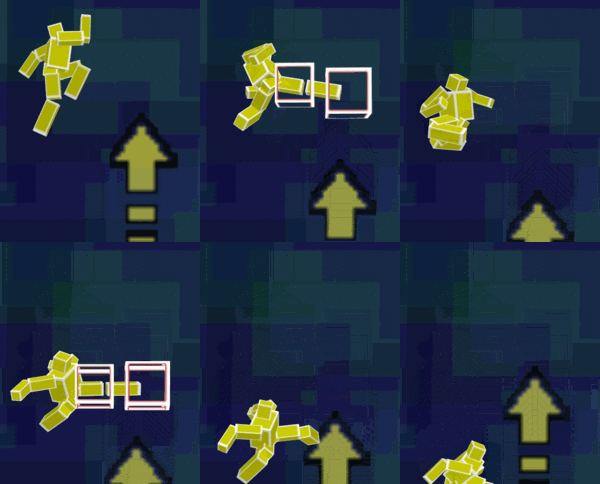
Captain Falcon does two kicks in the direction he's facing, | Captain Falcon does two kicks in the direction he's facing, dealing 10% [[damage]] on the first kick and 12% damage on the second kick, for a total of 22% damage if they both connect. This move would become Captain Falcon's neutral aerial in later games. This move is very useful for [[spacing]], and in matchups such as the Captain Falcon ditto, it is one of the primary moves that can easily lead into a grab, which leads into KO combos from almost any percentage. The [[shield stun]] of the move also allows it to setup grabs even if the opponents [[shield]]s against it. This move is a particularly useful option in [[combo]]s. On [[fastfaller]]s, the move is usable after a {{mvsub|Captain Falcon|SSB|forward throw}} at low percentages, and it can setup moves such as a regrab, an {{mvsub|Captain Falcon|SSB|up smash}}, or if the opponent lands on a [[soft platform]], a forward aerial used after dropping through the platform. On [[floaty|floatier]] characters, the move can also chain into itself, which can end with a {{mvsub|Captain Falcon|SSB|neutral aerial}}. The move is one of Captain Falcon's weakest in terms of [[knockback]], giving it many situational uses in combos even at high percentages. | ||
==Hitboxes== | |||
{{SSB64HitboxTableHeader}} | |||
{{HitboxTableTitle|Hit 1|19}} | |||
{{SSB64HitboxTableRow | |||
|id=0 | |||
|damage=10% | |||
|angle=361 | |||
|bk=5 | |||
|ks=80 | |||
|fkv=0 | |||
|r=105 | |||
|bn=26 | |||
|xpos=-60 | |||
|effect=Normal | |||
|slvl=L | |||
|sfx=Kick | |||
}} | |||
{{SSB64HitboxTableRow | |||
|id=1 | |||
|damage=10% | |||
|angle=361 | |||
|bk=5 | |||
|ks=80 | |||
|fkv=0 | |||
|r=120 | |||
|bn=26 | |||
|xpos=220 | |||
|effect=Normal | |||
|slvl=L | |||
|sfx=Kick | |||
}} | |||
{{HitboxTableTitle|Hit 2|19}} | |||
{{SSB64HitboxTableRow | |||
|id=0 | |||
|damage=12% | |||
|angle=361 | |||
|bk=20 | |||
|ks=80 | |||
|fkv=0 | |||
|r=105 | |||
|bn=21 | |||
|xpos=-60 | |||
|effect=Normal | |||
|slvl=L | |||
|sfx=Kick | |||
}} | |||
{{SSB64HitboxTableRow | |||
|id=1 | |||
|damage=12% | |||
|angle=361 | |||
|bk=20 | |||
|ks=80 | |||
|fkv=0 | |||
|r=120 | |||
|bn=21 | |||
|xpos=220 | |||
|effect=Normal | |||
|slvl=L | |||
|sfx=Kick | |||
}} | |||
|} | |||
==Timing== | |||
{|class="wikitable" | |||
!Initial autocancel | |||
|1-6 | |||
|- | |||
!Hit 1 | |||
|7-12 | |||
|- | |||
!Hit 2 | |||
|21-28 | |||
|- | |||
!Ending autocancel | |||
|29- | |||
|- | |||
!Animation length | |||
|44 | |||
|} | |||
{{FrameStripStart}} | |||
{{FrameStrip|t=Lag|c=6}}{{FrameStrip|t=Hitbox|c=6}}{{FrameStrip|t=Lag|c=8}}{{FrameStrip|t=Hitbox|c=8}}{{FrameStrip|t=Lag|c=16}} | |||
|- | |||
{{FrameStrip|t=Autocancel|c=6}}{{FrameStrip|t=Blank|c=22}}{{FrameStrip|t=Autocancel|c=16}} | |||
{{FrameStripEnd}} | |||
===Landing lag=== | |||
{|class="wikitable" | |||
|- | |||
!Animation length | |||
|30 | |||
|- | |||
!L-cancelled animation length | |||
|4 | |||
|} | |||
{{FrameStripStart}} | |||
|'''Normal''' {{FrameStrip|t=Lag|c=30}} | |||
|- | |||
|'''L-cancelled''' {{FrameStrip|t=Lag|c=4}}{{FrameStrip|t=Blank|c=26}} | |||
{{FrameStripEnd}} | |||
{{FrameIconLegend|lag=y|hitbox=y|autocancel=y}} | |||
{{MvSubNavCaptainFalcon|g=SSB}} | |||
[[Category:Captain Falcon (SSB)]] | [[Category:Captain Falcon (SSB)]] | ||
[[Category:Forward aerials]] | [[Category:Forward aerials (SSB)]] | ||
[[Category:Normal attacks (SSB)]] | |||
[[Category:Aerial attacks (SSB)]] | |||
Latest revision as of 13:02, August 22, 2020
Overview[edit]
Captain Falcon does two kicks in the direction he's facing, dealing 10% damage on the first kick and 12% damage on the second kick, for a total of 22% damage if they both connect. This move would become Captain Falcon's neutral aerial in later games. This move is very useful for spacing, and in matchups such as the Captain Falcon ditto, it is one of the primary moves that can easily lead into a grab, which leads into KO combos from almost any percentage. The shield stun of the move also allows it to setup grabs even if the opponents shields against it. This move is a particularly useful option in combos. On fastfallers, the move is usable after a forward throw at low percentages, and it can setup moves such as a regrab, an up smash, or if the opponent lands on a soft platform, a forward aerial used after dropping through the platform. On floatier characters, the move can also chain into itself, which can end with a neutral aerial. The move is one of Captain Falcon's weakest in terms of knockback, giving it many situational uses in combos even at high percentages.
Hitboxes[edit]
Timing[edit]
| Initial autocancel | 1-6 |
|---|---|
| Hit 1 | 7-12 |
| Hit 2 | 21-28 |
| Ending autocancel | 29- |
| Animation length | 44 |
Landing lag[edit]
| Animation length | 30 |
|---|---|
| L-cancelled animation length | 4 |
| Normal | ||||||||||||||||||||||||||||||
| L-cancelled |
Lag time |
Hitbox |
Autocancel |
|
