SSBU Icon.png

Bowser (SSBU)/Up tilt: Difference between revisions

From SmashWiki, the Super Smash Bros. wiki
Jump to navigationJump to search
(Added description.)
Tag: Mobile edit
No edit summary
 
(3 intermediate revisions by 3 users not shown)
Line 3: Line 3:


==Overview==
==Overview==
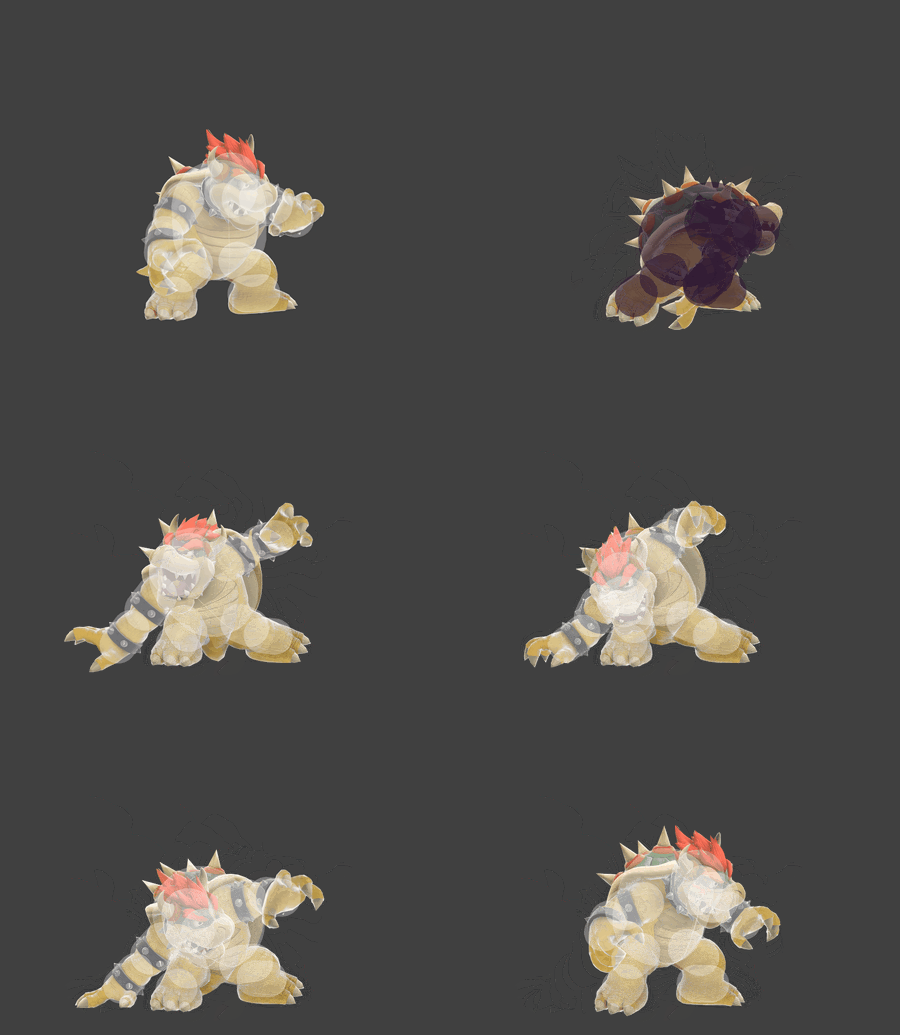
A 180-degree overhead arcing claw swipe. It comes with a wide range and average [[ending lag]], allowing it to [[combo]] into itself at low percents. At slightly higher percents, it can combo into [[Bowser (SSBU)/Neutral aerial|neutral air]] and [[Bowser (SSBU)/Back aerial|back air]]. The attack will almost always send the opponent directly above Bowser. It also boasts a respectable amount of kill power, being one of the strongest [[Up tilt|up tilts]] in the game and [[KO|KOing]] at around 120%. Has damage based [[armor]] (frames 8-10) and makes Bowser's arm [[intangible]] (frames 11-16). However, it has noticeable startup lag, coming out on frame 11.
A 180-degree overhead arcing claw swipe. It comes with a wide range and average [[ending lag]], allowing it to [[combo]] into itself at low percents. At slightly higher percents, it can combo into [[Bowser (SSBU)/Neutral aerial|neutral air]], [[Bowser (SSBU)/Back aerial|back air]], and [[Bowser (SSBU)/Side special|Flying Slam]] if it hits near the end of the move's duration. The attack will almost always send the opponent directly above Bowser, making for strong juggle situations. It also boasts a respectable amount of kill power, being one of the strongest [[up tilt]]s in the game and [[KO]]ing at around 120%. Thanks to its incredible range, up tilt is an excellent anti-air tool which, combined with the aforementioned KO potential, makes it difficult for airborne fighters to play around. Has 4% damage based [[armor]] (frames 8-10) and makes Bowser's arm [[intangible]] (frames 11-16). However, it has noticeable startup lag, coming out on frame 11.
 
==Hitboxes==
==Hitboxes==
{{UltimateHitboxTableHeader}}
Line 16: Line 17:
|bn=armr
|bn=armr
|xpos=6.9
|xpos=6.9
|ypos=0.0
|zpos=-1.2
|zpos=-1.2
|ff=1.0
|type=Hand
|type=Hand
|effect=Slash
|effect=Slash
Line 33: Line 32:
|r=5.0
|r=5.0
|bn=armr
|bn=armr
|xpos=0.0
|ypos=0.0
|zpos=0.0
|ff=1.0
|type=Hand
|type=Hand
|effect=Slash
|effect=Slash
Line 44: Line 39:
|}
|}
==Timing==
==Timing==
The damage-based armor has a threshold of 4%.
{|class="wikitable"
{|class="wikitable"
!Heavy armor
!Damage-based armor
|8-10
|8-10
|-
|-
!Arm intangible
!Lower arm intangible
|11-16
|11-16
|-
|-
Line 62: Line 58:


{{FrameStripStart}}
{{FrameStripStart}}
|'''Hitboxes''' {{FrameStrip|t=Lag|c=10}}{{FrameStrip|t=Hitbox|c=6}}{{FrameStrip|t=Lag|c=24}}{{FrameStrip|t=Interruptible|c=14}}
!Hitboxes {{FrameStrip|t=Lag|c=10}}{{FrameStrip|t=Hitbox|c=6}}{{FrameStrip|t=Lag|c=24}}{{FrameStrip|t=Interruptible|c=14}}
|-
|-
|'''Body''' {{FrameStrip|t=Vulnerable|c=7}}{{FrameStrip|t=Armour|c=3}}{{FrameStrip|t=Vulnerable|c=44}}
!Body {{FrameStrip|t=Vulnerable|c=7}}{{FrameStrip|t=Armour|c=3}}{{FrameStrip|t=Vulnerable|c=44}}
|-
|-
|'''Arm''' {{FrameStrip|t=Vulnerable|c=7}}{{FrameStrip|t=Armour|c=3}}{{FrameStrip|t=Intangible|c=6}}{{FrameStrip|t=Vulnerable|c=38}}
!Lower arm {{FrameStrip|t=Vulnerable|c=7}}{{FrameStrip|t=Armour|c=3}}{{FrameStrip|t=Intangible|c=6}}{{FrameStrip|t=Vulnerable|c=38}}
{{FrameStripEnd}}
{{FrameStripEnd}}


Latest revision as of 15:38, June 16, 2022

Hitbox visualization showing Bowser's up tilt.

Overview[edit]

A 180-degree overhead arcing claw swipe. It comes with a wide range and average ending lag, allowing it to combo into itself at low percents. At slightly higher percents, it can combo into neutral air, back air, and Flying Slam if it hits near the end of the move's duration. The attack will almost always send the opponent directly above Bowser, making for strong juggle situations. It also boasts a respectable amount of kill power, being one of the strongest up tilts in the game and KOing at around 120%. Thanks to its incredible range, up tilt is an excellent anti-air tool which, combined with the aforementioned KO potential, makes it difficult for airborne fighters to play around. Has 4% damage based armor (frames 8-10) and makes Bowser's arm intangible (frames 11-16). However, it has noticeable startup lag, coming out on frame 11.

Hitboxes[edit]

ID Part Rehit rate Damage SD Angle Angle type BK KS FKV Set weight Radius Bone Offset SDI× T% Clang Rebound Effect Type G A Sound Direct Hit bits Hit part Blockable Reflectable Absorbable Flinchless No GFX Heedless
0 0 0 11.0% 0 AngleIcon100.png Standard 55 97 0 HitboxTableIcon(False).png 5.5 armr 6.9 0.0 -1.2 1.0× 1.0× 0% HitboxTableIcon(Clang).png HitboxTableIcon(Rebound).png EffectIcon(Slash).png TypeIcon(Hand).png HitboxTableIcon(GroundedTrue).png HitboxTableIcon(AerialTrue).png M Slash SpecialsDirect.png All All HitboxTableIcon(Blockable).png HitboxTableIcon(Unreflectable).png HitboxTableIcon(Unabsorbable).png HitboxTableIcon(False).png HitboxTableIcon(False).png HitboxTableIcon(False).png
1 0 0 11.0% 0 AngleIcon100.png Standard 55 97 0 HitboxTableIcon(False).png 5.0 armr 0.0 0.0 0.0 1.0× 1.0× 0% HitboxTableIcon(Clang).png HitboxTableIcon(Rebound).png EffectIcon(Slash).png TypeIcon(Hand).png HitboxTableIcon(GroundedTrue).png HitboxTableIcon(AerialTrue).png M Slash SpecialsDirect.png All All HitboxTableIcon(Blockable).png HitboxTableIcon(Unreflectable).png HitboxTableIcon(Unabsorbable).png HitboxTableIcon(False).png HitboxTableIcon(False).png HitboxTableIcon(False).png

Timing[edit]

The damage-based armor has a threshold of 4%.

Damage-based armor 8-10
Lower arm intangible 11-16
Hitboxes 11-16
Interruptible 41
Animation length 54
Hitboxes  FrameIcon(Lag).png FrameIcon(Lag).png FrameIcon(Lag).png FrameIcon(Lag).png FrameIcon(Lag).png FrameIcon(Lag).png FrameIcon(Lag).png FrameIcon(Lag).png FrameIcon(Lag).png FrameIcon(Lag).png FrameIcon(Hitbox).png FrameIcon(Hitbox).png FrameIcon(Hitbox).png FrameIcon(Hitbox).png FrameIcon(Hitbox).png FrameIcon(Hitbox).png FrameIcon(Lag).png FrameIcon(Lag).png FrameIcon(Lag).png FrameIcon(Lag).png FrameIcon(Lag).png FrameIcon(Lag).png FrameIcon(Lag).png FrameIcon(Lag).png FrameIcon(Lag).png FrameIcon(Lag).png FrameIcon(Lag).png FrameIcon(Lag).png FrameIcon(Lag).png FrameIcon(Lag).png FrameIcon(Lag).png FrameIcon(Lag).png FrameIcon(Lag).png FrameIcon(Lag).png FrameIcon(Lag).png FrameIcon(Lag).png FrameIcon(Lag).png FrameIcon(Lag).png FrameIcon(Lag).png FrameIcon(Lag).png FrameIcon(Interruptible).png FrameIcon(Interruptible).png FrameIcon(Interruptible).png FrameIcon(Interruptible).png FrameIcon(Interruptible).png FrameIcon(Interruptible).png FrameIcon(Interruptible).png FrameIcon(Interruptible).png FrameIcon(Interruptible).png FrameIcon(Interruptible).png FrameIcon(Interruptible).png FrameIcon(Interruptible).png FrameIcon(Interruptible).png FrameIcon(Interruptible).png
Body  FrameIcon(Vulnerable).png FrameIcon(Vulnerable).png FrameIcon(Vulnerable).png FrameIcon(Vulnerable).png FrameIcon(Vulnerable).png FrameIcon(Vulnerable).png FrameIcon(Vulnerable).png FrameIcon(Armour).png FrameIcon(Armour).png FrameIcon(Armour).png FrameIcon(Vulnerable).png FrameIcon(Vulnerable).png FrameIcon(Vulnerable).png FrameIcon(Vulnerable).png FrameIcon(Vulnerable).png FrameIcon(Vulnerable).png FrameIcon(Vulnerable).png FrameIcon(Vulnerable).png FrameIcon(Vulnerable).png FrameIcon(Vulnerable).png FrameIcon(Vulnerable).png FrameIcon(Vulnerable).png FrameIcon(Vulnerable).png FrameIcon(Vulnerable).png FrameIcon(Vulnerable).png FrameIcon(Vulnerable).png FrameIcon(Vulnerable).png FrameIcon(Vulnerable).png FrameIcon(Vulnerable).png FrameIcon(Vulnerable).png FrameIcon(Vulnerable).png FrameIcon(Vulnerable).png FrameIcon(Vulnerable).png FrameIcon(Vulnerable).png FrameIcon(Vulnerable).png FrameIcon(Vulnerable).png FrameIcon(Vulnerable).png FrameIcon(Vulnerable).png FrameIcon(Vulnerable).png FrameIcon(Vulnerable).png FrameIcon(Vulnerable).png FrameIcon(Vulnerable).png FrameIcon(Vulnerable).png FrameIcon(Vulnerable).png FrameIcon(Vulnerable).png FrameIcon(Vulnerable).png FrameIcon(Vulnerable).png FrameIcon(Vulnerable).png FrameIcon(Vulnerable).png FrameIcon(Vulnerable).png FrameIcon(Vulnerable).png FrameIcon(Vulnerable).png FrameIcon(Vulnerable).png FrameIcon(Vulnerable).png
Lower arm  FrameIcon(Vulnerable).png FrameIcon(Vulnerable).png FrameIcon(Vulnerable).png FrameIcon(Vulnerable).png FrameIcon(Vulnerable).png FrameIcon(Vulnerable).png FrameIcon(Vulnerable).png FrameIcon(Armour).png FrameIcon(Armour).png FrameIcon(Armour).png FrameIcon(Intangible).png FrameIcon(Intangible).png FrameIcon(Intangible).png FrameIcon(Intangible).png FrameIcon(Intangible).png FrameIcon(Intangible).png FrameIcon(Vulnerable).png FrameIcon(Vulnerable).png FrameIcon(Vulnerable).png FrameIcon(Vulnerable).png FrameIcon(Vulnerable).png FrameIcon(Vulnerable).png FrameIcon(Vulnerable).png FrameIcon(Vulnerable).png FrameIcon(Vulnerable).png FrameIcon(Vulnerable).png FrameIcon(Vulnerable).png FrameIcon(Vulnerable).png FrameIcon(Vulnerable).png FrameIcon(Vulnerable).png FrameIcon(Vulnerable).png FrameIcon(Vulnerable).png FrameIcon(Vulnerable).png FrameIcon(Vulnerable).png FrameIcon(Vulnerable).png FrameIcon(Vulnerable).png FrameIcon(Vulnerable).png FrameIcon(Vulnerable).png FrameIcon(Vulnerable).png FrameIcon(Vulnerable).png FrameIcon(Vulnerable).png FrameIcon(Vulnerable).png FrameIcon(Vulnerable).png FrameIcon(Vulnerable).png FrameIcon(Vulnerable).png FrameIcon(Vulnerable).png FrameIcon(Vulnerable).png FrameIcon(Vulnerable).png FrameIcon(Vulnerable).png FrameIcon(Vulnerable).png FrameIcon(Vulnerable).png FrameIcon(Vulnerable).png FrameIcon(Vulnerable).png FrameIcon(Vulnerable).png
Legend (1 square = 1 frame)
FrameIcon(Lag).png
Lag time
FrameIcon(Hitbox).png
Hitbox
FrameIcon(Vulnerable).png
Vulnerable
FrameIcon(Intangible).png
Intangible
FrameIcon(Armour).png
Armour
FrameIcon(Interruptible).png
Interruptible