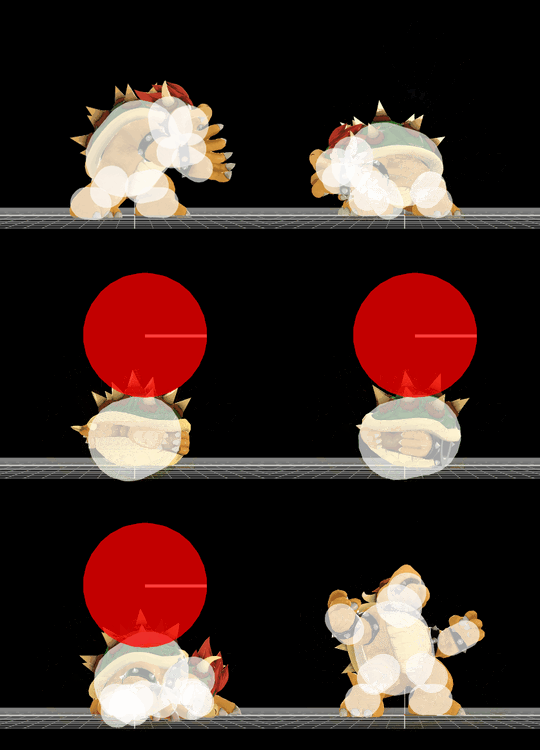
Bowser (SSB4)/Up throw: Difference between revisions
(Undid edit by 85.150.133.56: ) Tag: Undo |
SuperSqank (talk | contribs) No edit summary |
||
| Line 11: | Line 11: | ||
==Update history== | ==Update history== | ||
'''{{GameIcon|ssb4}} [[1.1.3]]''' | '''{{GameIcon|ssb4}} [[1.1.3]]''' | ||
*{{buff|The move | *{{buff|Ending lag (FAF 69 → 64).}} | ||
*{{nerf|Hits 1-7 damage | **The move becomes [[interruptible]] later into the animation (frame 69 → 75) however, the move now has a frame duration speed of 0.5 from frame 53 onward (effectively doubling the animation speed from frame 53 onward), negating this change and reducing the move's ending lag. | ||
*{{buff|Hits 1-7 hitlag | *{{nerf|Hits 1-7 damage (1% → 0.5%).}} | ||
*{{buff|Throw angle | *{{buff|Hits 1-7 hitlag (1.0x → 0.5x).}} | ||
*{{buff|Knockback: 0 base | *{{buff|Throw angle (70° → 82°).}} | ||
*{{buff|Knockback: (0 (base), 100 (scaling) → 80/200 (hit 8); 90/80 → 25/155 (throw)).}} | |||
'''{{GameIcon|ssb4}} [[1.1.4]]''' | '''{{GameIcon|ssb4}} [[1.1.4]]''' | ||
*{{nerf|Throw knockback scaling | *{{nerf|Throw knockback scaling (155 → 180).}} | ||
== | ==Throw and Hitbox Data== | ||
=== | ===Hitboxes=== | ||
{{SSB4HitboxTableHeader|special=y}} | {{SSB4HitboxTableHeader|special=y}} | ||
{{HitboxTableTitle|Hits 1-7|42}} | {{HitboxTableTitle|Hits 1-7|42}} | ||
| Line 112: | Line 113: | ||
===Throw=== | ===Throw=== | ||
{ | {{SSB4ThrowTableHeader}} | ||
{{SSB4ThrowTableRow | |||
| | |id=0 | ||
| | |damage=2% | ||
| | |af=3 | ||
|angle=82 | |||
|bk=25 | |||
|ks=180 | |||
|fkv=0 | |||
|bn=0 | |||
|noff=false | |||
|trip=0 | |||
|type=Throwing | |||
|effect=Normal | |||
|slvl=S | |||
|sfx=None | |||
}} | |||
{{SSB4ThrowTableRow | |||
|id=1 | |||
|damage=3% | |||
|af=3 | |||
|angle=361 | |||
|bk=40 | |||
|ks=100 | |||
|fkv=0 | |||
|bn=0 | |||
|noff=false | |||
|trip=0 | |||
|type=Throwing | |||
|effect=Normal | |||
|slvl=S | |||
|sfx=None | |||
}} | |||
|} | |} | ||
==Timing== | ==Timing== | ||
{|class="wikitable" | {|class="wikitable" | ||
!Invincible | !Invincible | ||
|1- | |1-18 | ||
|- | |- | ||
!Hits 1-7 | !Hits 1-7 | ||
| Line 136: | Line 164: | ||
!Interruptible | !Interruptible | ||
|64 | |64 | ||
|- | |||
!Animation length | |||
|68 | |||
|} | |} | ||
{{FrameStripStart}} | {{FrameStripStart}} | ||
{{FrameStrip|t=Lag|c=20}}{{FrameStrip|t=Hitbox|c=31}}{{FrameStrip|t=Lag|c=1|e=LagThrowS}}{{FrameStrip|t=Lag|c=11|s=LagThrowE}}{{FrameStrip|t=Interruptible|c= | {{FrameStrip|t=Lag|c=20}}{{FrameStrip|t=Hitbox|c=31}}{{FrameStrip|t=Lag|c=1|e=LagThrowS}}{{FrameStrip|t=Lag|c=11|s=LagThrowE}}{{FrameStrip|t=Interruptible|c=5}} | ||
|- | |- | ||
{{FrameStrip|t=Invincible|c= | {{FrameStrip|t=Invincible|c=18}}{{FrameStrip|t=Vulnerable|c=50}} | ||
{{FrameStripEnd}} | {{FrameStripEnd}} | ||
{{FrameIconLegend|lag=y|vulnerable=y|invincible=y|throw=y}} | {{FrameIconLegend|lag=y|vulnerable=y|invincible=y|throw=y}} | ||
Revision as of 13:16, August 3, 2020
Overview
Bowser throws the opponent on top of his shell, spinning to grind them, launching the opponent afterwards. After 1.1.3 was released, the buffs to the throw made it a great combo starter, being able to combo into up tilt or up smash at low percents, neutral or forward aerials at mid percents. and most notably up aerial at higher percents. The throw's knockback is low enough to where there is a large percent window for up aerial to connect and kill, and DI barely affects the throw at all, and rage allows the kill confirm to come around even earlier, especially thanks to his super heavyweight status allowing him to consistently get high levels of rage. Alternatively, at the ledge, up throw into back aerial can kill, although at very specific percent with good timing and bad DI.
It also has minor use in doubles, where the collateral hitbox's low angle and high knockback can put opponents at a very bad position, sometimes not even being able to recover at all.
Overall, combined with Bowser's greatly ranged grab, the move is extremely useful, being a central part of Bowser's gameplay and combo game due to the strengths of both his grab and up throw.
Update history
 Ending lag (FAF 69 → 64).
- The move becomes interruptible later into the animation (frame 69 → 75) however, the move now has a frame duration speed of 0.5 from frame 53 onward (effectively doubling the animation speed from frame 53 onward), negating this change and reducing the move's ending lag.
 Hits 1-7 damage (1% → 0.5%).
 Hits 1-7 hitlag (1.0x → 0.5x).
 Throw angle (70° → 82°).
 Knockback: (0 (base), 100 (scaling) → 80/200 (hit 8); 90/80 → 25/155 (throw)).
 Throw knockback scaling (155 → 180).
Throw and Hitbox Data
Hitboxes
Throw
| ID | Damage | Angle | BK | KS | FKV | Bone | FFx | Type | Effect | Sound | |
|---|---|---|---|---|---|---|---|---|---|---|---|
| 0 | 2% | Forwards | 25 | 180 | 0 | 0 | 1.0x | ||||
| 1 | 3% | Forwards | 40 | 100 | 0 | 0 | 1.0x | ||||
Timing
| Invincible | 1-18 |
|---|---|
| Hits 1-7 | 21-24, 25-28, 29-32, 33-36, 37-40, 41-44, 45-48 |
| Hits 8 | 49-51 |
| Throw | 53 |
| Interruptible | 64 |
| Animation length | 68 |
Lag time |
Vulnerable |
Invincible |
Throw point |
|
