Mario (SSB4)/Up aerial
Overview[edit]
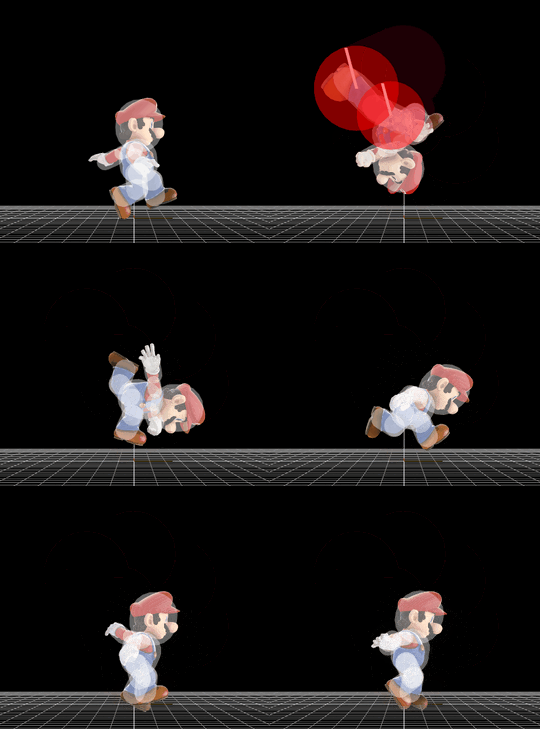
Mario's up aerial is a bicycle kick. It is surprisingly fast for an up aerial, coming out on frame 4, and without counting Luma's (frame 3), it is tied with Diddy Kong, Pikachu, Sheik and his clone Dr. Mario's up aerials as the fastest in the game. Most remarkably, however, this move launches at a vertical angle (75°), hits the entire area above Mario, and has moderate ending lag (23 frames) with low landing lag (12 frames), which combined with Mario's fast air speed and high jumps makes it an extremely powerful combo move.
At low percentages, landing with the move immediately upon hitting a grounded opponent with it allows it to set up a neutral attack, grab, down smash, Super Jump Punch or any of Mario's tilts. It then starts causing tumbling at around the 40%-55% range depending on the opponent's weight (without rage), where it can combo into any of Mario's aerials if landed with (including a forward aerial for a KO near the edge), or into another up aerial if used in the air. By far Mario's most deadly combo sequence, however, is hitting with two up aerials (which can be set up from an up tilt or down throw), landing with the second one on a platform, then continuing with more up aerials to finish with Super Jump Punch, finally KOing the opponent off the upper blast line. Mario's up aerial isn't lacking in KO power itself either, as due to its high knockback scaling, it can KO under 140% near the upper blast line without rage.
By comparison, this up aerial's only real drawbacks lie in its low damage output (7%), short range, and low base knockback making it unsafe on hit against aerial opponents at very low percentages, all of which can be easily alleviated thanks to Mario's excellent neutral game, highly damaging combos and reliable setups into the move. Due to its advantages greatly outshining its flaws, Mario's up aerial is often considered one of Mario's best aerials (if not the best), and one of the driving forces of his top tier placement in the current SSB4 tier list.
Hitboxes[edit]
Timing[edit]
Attack[edit]
| Hitboxes | 4-8 |
|---|---|
| Ending autocancel | 18- |
| Interruptible | 32 |
| Animation length | 33 |
Landing lag[edit]
| Animation length | 12 |
|---|
Lag time |
Hitbox |
Autocancel |
Interruptible |
Similar moves[edit]
External links[edit]
A successful KO combo with up aerials in tournament, as well as an analysis on it.
|
