SSBU Icon.png

Roy (SSBU)/Up special: Difference between revisions

From SmashWiki, the Super Smash Bros. wiki
Jump to navigationJump to search
m (Removed competitive expertise tag)
m (Added update history and rehit rate)
Line 19: Line 19:
It is also one of Roy's only effective methods of [[recovery]], with the ability to be angled to aid in mixups or optimally reaching the [[ledge]]. The hitboxes also add a degree of protection to the recovery, making it slightly harder to intercept. However, it is still noticeably poor for this, with Roy relying heavily on his [[midair jump]] to get back. As such, he remains very vulnerable to [[gimp]]s. Angling the recovery reduces its vertical distance as well, further increasing Roy's reliance on the jump for this move's success.  


==Update History==
'''{{GameIcon|ssbu}} {{SSBU|3.0.0}}'''
*{{buff|Blazer's hits connect more reliably.}}
==Hitboxes==
==Hitboxes==
===Grounded===
===Grounded===
{{UltimateHitboxTableHeader}}
{{HitboxTableTitle|Hit 1|24}}
! {{rollover|Rehit rate|If not 0, hits again every X frames|y}}
{{HitboxTableTitle|Hit 1|25}}
{{UltimateHitboxTableRow
|id=0
|id=0
Line 43: Line 47:
|rebound=f
|rebound=f
}}
}}
{{HitboxTableTitle|Multihits|24}}
|0
{{HitboxTableTitle|Multihits|25}}
{{UltimateHitboxTableRow
|id=0
|id=0
|rehit=3
|damage=1.1%
|damage=1.1%
|angle=367
|angle=367
Line 65: Line 69:
|rebound=f
|rebound=f
}}
}}
|3
{{UltimateHitboxTableRow
|id=1
|id=1
|rehit=3
|damage=1.1%
|damage=1.1%
|angle=367
|angle=367
Line 86: Line 90:
|rebound=f
|rebound=f
}}
}}
{{HitboxTableTitle|Final hit|24}}
|3
{{HitboxTableTitle|Final hit|25}}
{{UltimateHitboxTableRow
|id=0
|id=0
Line 108: Line 113:
|rebound=f
|rebound=f
}}
}}
|0
{{HitboxTableRowNote|Hit 1 and the multihits use weight-independent knockback.|25}}
|}
|}
===Aerial===
===Aerial===
{{UltimateHitboxTableHeader}}
{{HitboxTableTitle|Hit 1|24}}
! {{rollover|Rehit rate|If not 0, hits again every X frames|y}}
{{HitboxTableTitle|Hit 1|25}}
{{UltimateHitboxTableRow
|id=0
|id=0
Line 132: Line 140:
|rebound=f
|rebound=f
}}
}}
{{HitboxTableTitle|Multihits|24}}
|0
{{HitboxTableTitle|Multihits|25}}
{{UltimateHitboxTableRow
|id=0
|id=0
|rehit=3
|damage=1.0%
|damage=1.0%
|angle=367
|angle=367
Line 154: Line 162:
|rebound=f
|rebound=f
}}
}}
|3
{{UltimateHitboxTableRow
|id=1
|id=1
|rehit=3
|damage=1.0%
|damage=1.0%
|angle=367
|angle=367
Line 175: Line 183:
|rebound=f
|rebound=f
}}
}}
{{HitboxTableTitle|Final hit|24}}
|3
{{HitboxTableTitle|Final hit|25}}
{{UltimateHitboxTableRow
|id=0
|id=0
Line 197: Line 206:
|rebound=f
|rebound=f
}}
}}
|0
{{HitboxTableRowNote|Hit 1 and the multihits use weight-independent knockback.|25}}
|}
|}
==Timing==
==Timing==

Revision as of 06:25, July 29, 2020

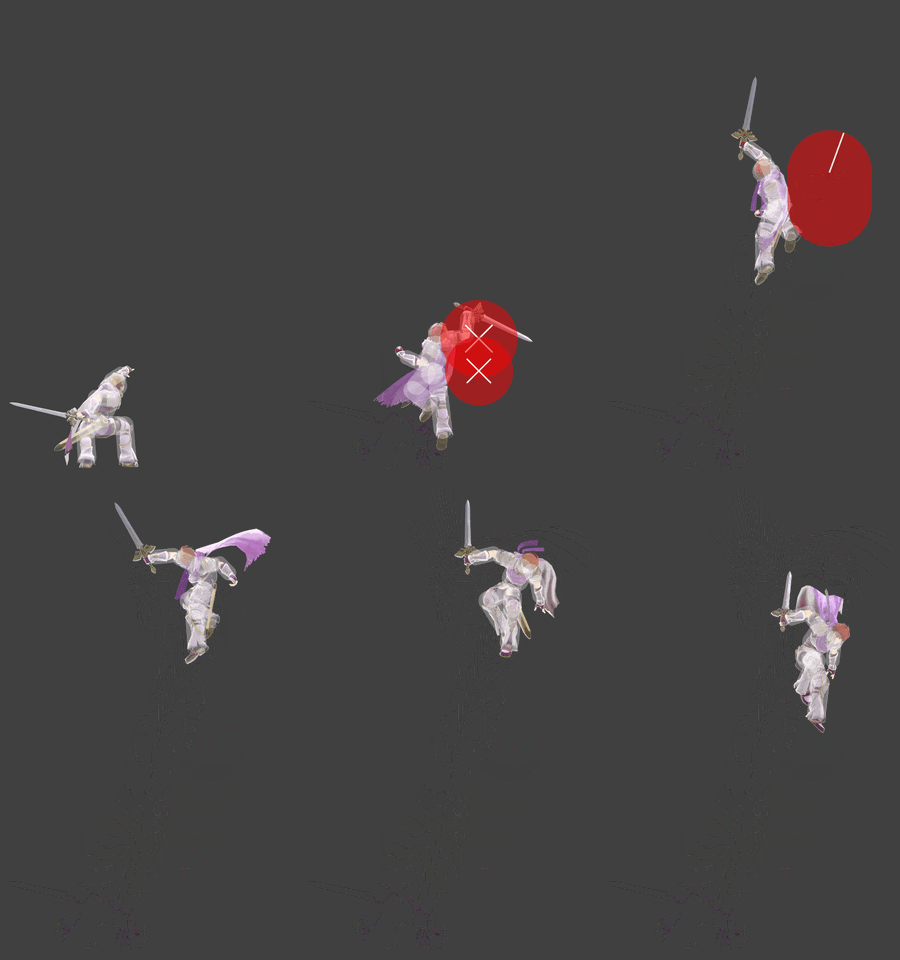
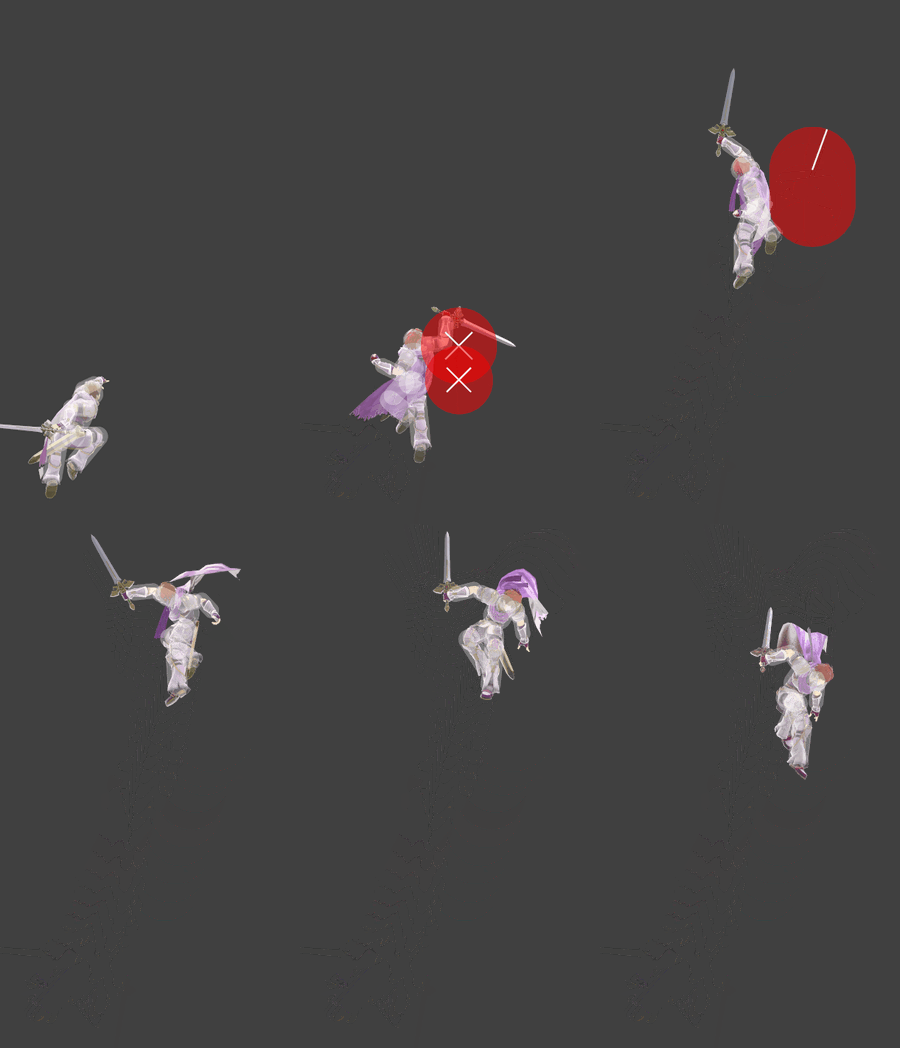
Roy Up Special Hitbox Visualizations
Grounded
RoyBlazerGroundedSSBU.gif
Aerial
RoyBlazerAerialSSBU.gif

Overview

Roy rises up with the sword held backwards to perform Blazer. While it lacks in KO potential, it has super armor and a frame of intangibility on startup when grounded, making it an effective out of shield option. However, it is possible to be grabbed out of it like with any move with armor. The KO potential can be improved if Roy has the support of platforms or if the opponent is near the upper blast zone in general.

It is also one of Roy's only effective methods of recovery, with the ability to be angled to aid in mixups or optimally reaching the ledge. The hitboxes also add a degree of protection to the recovery, making it slightly harder to intercept. However, it is still noticeably poor for this, with Roy relying heavily on his midair jump to get back. As such, he remains very vulnerable to gimps. Angling the recovery reduces its vertical distance as well, further increasing Roy's reliance on the jump for this move's success.

Update History

Super Smash Bros. Ultimate 3.0.0

  • Buff Blazer's hits connect more reliably.

Hitboxes

Grounded

ID Part Rehit rate Damage SD Angle Angle type BK KS FKV Set weight Radius Bone Offset SDI× T% Clang Rebound Effect Type G A Sound Direct Hit bits Hit part Blockable Reflectable Absorbable Flinchless No GFX Heedless Rehit rate
Hit 1
0 0 0 5.5% 0 AngleIcon84.png Standard 0 100 120 HitboxTableIcon(False).png 5.1 top 0.0 11.0 to 7.0 10.0 1.0× 1.0× 0% HitboxTableIcon(NoClang).png HitboxTableIcon(NoRebound).png EffectIcon(Flame).png TypeIcon(Sword).png HitboxTableIcon(GroundedTrue).png HitboxTableIcon(AerialTrue).png L Fire SpecialsDirect.png All All HitboxTableIcon(Blockable).png HitboxTableIcon(Unreflectable).png HitboxTableIcon(Unabsorbable).png HitboxTableIcon(False).png HitboxTableIcon(False).png HitboxTableIcon(False).png 0
Multihits
0 0 0 1.1% 0 Autolink angle (367) Standard 0 100 85 HitboxTableIcon(False).png 6.0 top 0.0 17.0 10.0 1.0× 1.0× 0% HitboxTableIcon(NoClang).png HitboxTableIcon(NoRebound).png EffectIcon(Flame).png TypeIcon(Sword).png HitboxTableIcon(GroundedTrue).png HitboxTableIcon(AerialTrue).png M Fire SpecialsDirect.png All All HitboxTableIcon(Blockable).png HitboxTableIcon(Unreflectable).png HitboxTableIcon(Unabsorbable).png HitboxTableIcon(False).png HitboxTableIcon(False).png HitboxTableIcon(False).png 3
1 0 0 1.1% 0 Autolink angle (367) Standard 0 100 85 HitboxTableIcon(False).png 5.3 top 0.0 12.0 10.0 1.0× 1.0× 0% HitboxTableIcon(NoClang).png HitboxTableIcon(NoRebound).png EffectIcon(Flame).png TypeIcon(Sword).png HitboxTableIcon(GroundedTrue).png HitboxTableIcon(AerialTrue).png M Fire SpecialsDirect.png All All HitboxTableIcon(Blockable).png HitboxTableIcon(Unreflectable).png HitboxTableIcon(Unabsorbable).png HitboxTableIcon(False).png HitboxTableIcon(False).png HitboxTableIcon(False).png 3
Final hit
0 1 0 8.0% 0 AngleIcon70.png Standard 75 93 0 HitboxTableIcon(False).png 6.5 top 0.0 17.0 to 12.0 10.0 2.3× 1.0× 0% HitboxTableIcon(NoClang).png HitboxTableIcon(NoRebound).png EffectIcon(Flame).png TypeIcon(Sword).png HitboxTableIcon(GroundedTrue).png HitboxTableIcon(AerialTrue).png L Fire SpecialsDirect.png All All HitboxTableIcon(Blockable).png HitboxTableIcon(Unreflectable).png HitboxTableIcon(Unabsorbable).png HitboxTableIcon(False).png HitboxTableIcon(False).png HitboxTableIcon(False).png 0
Hit 1 and the multihits use weight-independent knockback.

Aerial

ID Part Rehit rate Damage SD Angle Angle type BK KS FKV Set weight Radius Bone Offset SDI× T% Clang Rebound Effect Type G A Sound Direct Hit bits Hit part Blockable Reflectable Absorbable Flinchless No GFX Heedless Rehit rate
Hit 1
0 0 0 4.5% 0 AngleIcon84.png Standard 0 100 120 HitboxTableIcon(False).png 4.6 top 0.0 11.0 to 7.0 10.0 1.0× 1.0× 0% HitboxTableIcon(NoClang).png HitboxTableIcon(NoRebound).png EffectIcon(Flame).png TypeIcon(Sword).png HitboxTableIcon(GroundedTrue).png HitboxTableIcon(AerialTrue).png L Fire SpecialsDirect.png All All HitboxTableIcon(Blockable).png HitboxTableIcon(Unreflectable).png HitboxTableIcon(Unabsorbable).png HitboxTableIcon(False).png HitboxTableIcon(False).png HitboxTableIcon(False).png 0
Multihits
0 0 0 1.0% 0 Autolink angle (367) Standard 0 100 85 HitboxTableIcon(False).png 5.6 top 0.0 17.0 10.0 1.0× 1.0× 0% HitboxTableIcon(NoClang).png HitboxTableIcon(NoRebound).png EffectIcon(Flame).png TypeIcon(Sword).png HitboxTableIcon(GroundedTrue).png HitboxTableIcon(AerialTrue).png M Fire SpecialsDirect.png All All HitboxTableIcon(Blockable).png HitboxTableIcon(Unreflectable).png HitboxTableIcon(Unabsorbable).png HitboxTableIcon(False).png HitboxTableIcon(False).png HitboxTableIcon(False).png 3
1 0 0 1.0% 0 Autolink angle (367) Standard 0 100 85 HitboxTableIcon(False).png 5.0 top 0.0 12.0 10.0 1.0× 1.0× 0% HitboxTableIcon(NoClang).png HitboxTableIcon(NoRebound).png EffectIcon(Flame).png TypeIcon(Sword).png HitboxTableIcon(GroundedTrue).png HitboxTableIcon(AerialTrue).png M Fire SpecialsDirect.png All All HitboxTableIcon(Blockable).png HitboxTableIcon(Unreflectable).png HitboxTableIcon(Unabsorbable).png HitboxTableIcon(False).png HitboxTableIcon(False).png HitboxTableIcon(False).png 3
Final hit
0 1 0 6.0% 0 AngleIcon70.png Standard 75 78 0 HitboxTableIcon(False).png 6.3 top 0.0 17.0 to 12.0 10.0 2.0× 1.0× 0% HitboxTableIcon(NoClang).png HitboxTableIcon(NoRebound).png EffectIcon(Flame).png TypeIcon(Sword).png HitboxTableIcon(GroundedTrue).png HitboxTableIcon(AerialTrue).png L Fire SpecialsDirect.png All All HitboxTableIcon(Blockable).png HitboxTableIcon(Unreflectable).png HitboxTableIcon(Unabsorbable).png HitboxTableIcon(False).png HitboxTableIcon(False).png HitboxTableIcon(False).png 0
Hit 1 and the multihits use weight-independent knockback.

Timing

Super Armor (grounded only) 4-8, 10
Intangible 9
Hit 1 9
Multihits 11-19
Final hit 20-21
Animation length 49
Hitboxes  FrameIcon(Lag).png FrameIcon(Lag).png FrameIcon(Lag).png FrameIcon(Lag).png FrameIcon(Lag).png FrameIcon(Lag).png FrameIcon(Lag).png FrameIcon(Lag).png FrameIcon(Hitbox).png FrameIcon(Lag).png FrameIcon(Hitbox).png FrameIcon(Hitbox).png FrameIcon(Hitbox).png FrameIcon(Hitbox).png FrameIcon(Hitbox).png FrameIcon(Hitbox).png FrameIcon(Hitbox).png FrameIcon(Hitbox).png FrameIcon(HitboxChangeS).png FrameIcon(HitboxChangeE).png FrameIcon(Hitbox).png FrameIcon(Lag).png FrameIcon(Lag).png FrameIcon(Lag).png FrameIcon(Lag).png FrameIcon(Lag).png FrameIcon(Lag).png FrameIcon(Lag).png FrameIcon(Lag).png FrameIcon(Lag).png FrameIcon(Lag).png FrameIcon(Lag).png FrameIcon(Lag).png FrameIcon(Lag).png FrameIcon(Lag).png FrameIcon(Lag).png FrameIcon(Lag).png FrameIcon(Lag).png FrameIcon(Lag).png FrameIcon(Lag).png FrameIcon(Lag).png FrameIcon(Lag).png FrameIcon(Lag).png FrameIcon(Lag).png FrameIcon(Lag).png FrameIcon(Lag).png FrameIcon(Lag).png FrameIcon(Lag).png FrameIcon(Lag).png
Grounded  FrameIcon(Vulnerable).png FrameIcon(Vulnerable).png FrameIcon(Vulnerable).png FrameIcon(Armour).png FrameIcon(Armour).png FrameIcon(Armour).png FrameIcon(Armour).png FrameIcon(Armour).png FrameIcon(Intangible).png FrameIcon(Armour).png FrameIcon(Vulnerable).png FrameIcon(Vulnerable).png FrameIcon(Vulnerable).png FrameIcon(Vulnerable).png FrameIcon(Vulnerable).png FrameIcon(Vulnerable).png FrameIcon(Vulnerable).png FrameIcon(Vulnerable).png FrameIcon(Vulnerable).png FrameIcon(Vulnerable).png FrameIcon(Vulnerable).png FrameIcon(Vulnerable).png FrameIcon(Vulnerable).png FrameIcon(Vulnerable).png FrameIcon(Vulnerable).png FrameIcon(Vulnerable).png FrameIcon(Vulnerable).png FrameIcon(Vulnerable).png FrameIcon(Vulnerable).png FrameIcon(Vulnerable).png FrameIcon(Vulnerable).png FrameIcon(Vulnerable).png FrameIcon(Vulnerable).png FrameIcon(Vulnerable).png FrameIcon(Vulnerable).png FrameIcon(Vulnerable).png FrameIcon(Vulnerable).png FrameIcon(Vulnerable).png FrameIcon(Vulnerable).png FrameIcon(Vulnerable).png FrameIcon(Vulnerable).png FrameIcon(Vulnerable).png FrameIcon(Vulnerable).png FrameIcon(Vulnerable).png FrameIcon(Vulnerable).png FrameIcon(Vulnerable).png FrameIcon(Vulnerable).png FrameIcon(Vulnerable).png FrameIcon(Vulnerable).png
Aerial  FrameIcon(Vulnerable).png FrameIcon(Vulnerable).png FrameIcon(Vulnerable).png FrameIcon(Vulnerable).png FrameIcon(Vulnerable).png FrameIcon(Vulnerable).png FrameIcon(Vulnerable).png FrameIcon(Vulnerable).png FrameIcon(Intangible).png FrameIcon(Vulnerable).png FrameIcon(Vulnerable).png FrameIcon(Vulnerable).png FrameIcon(Vulnerable).png FrameIcon(Vulnerable).png FrameIcon(Vulnerable).png FrameIcon(Vulnerable).png FrameIcon(Vulnerable).png FrameIcon(Vulnerable).png FrameIcon(Vulnerable).png FrameIcon(Vulnerable).png FrameIcon(Vulnerable).png FrameIcon(Vulnerable).png FrameIcon(Vulnerable).png FrameIcon(Vulnerable).png FrameIcon(Vulnerable).png FrameIcon(Vulnerable).png FrameIcon(Vulnerable).png FrameIcon(Vulnerable).png FrameIcon(Vulnerable).png FrameIcon(Vulnerable).png FrameIcon(Vulnerable).png FrameIcon(Vulnerable).png FrameIcon(Vulnerable).png FrameIcon(Vulnerable).png FrameIcon(Vulnerable).png FrameIcon(Vulnerable).png FrameIcon(Vulnerable).png FrameIcon(Vulnerable).png FrameIcon(Vulnerable).png FrameIcon(Vulnerable).png FrameIcon(Vulnerable).png FrameIcon(Vulnerable).png FrameIcon(Vulnerable).png FrameIcon(Vulnerable).png FrameIcon(Vulnerable).png FrameIcon(Vulnerable).png FrameIcon(Vulnerable).png FrameIcon(Vulnerable).png FrameIcon(Vulnerable).png
Legend (1 square = 1 frame)
FrameIcon(Lag).png
Lag time
FrameIcon(Hitbox).png
Hitbox
FrameIcon(HitboxChangeS).pngFrameIcon(HitboxChangeE).png
Hitbox change
FrameIcon(Vulnerable).png
Vulnerable
FrameIcon(Intangible).png
Intangible
FrameIcon(Armour).png
Armour