Pikachu (SSB)/Down aerial: Difference between revisions
mNo edit summary |
SuperSqank (talk | contribs) No edit summary |
||
| Line 3: | Line 3: | ||
==Overview== | ==Overview== | ||
[[File:Pikachu Down Aerial Hitbox Smash 64.gif|thumb|The [[hitbox]] of Pikachu's down aerial.]] | [[File:Pikachu Down Aerial Hitbox Smash 64.gif|thumb|The [[hitbox]] of Pikachu's down aerial.]] | ||
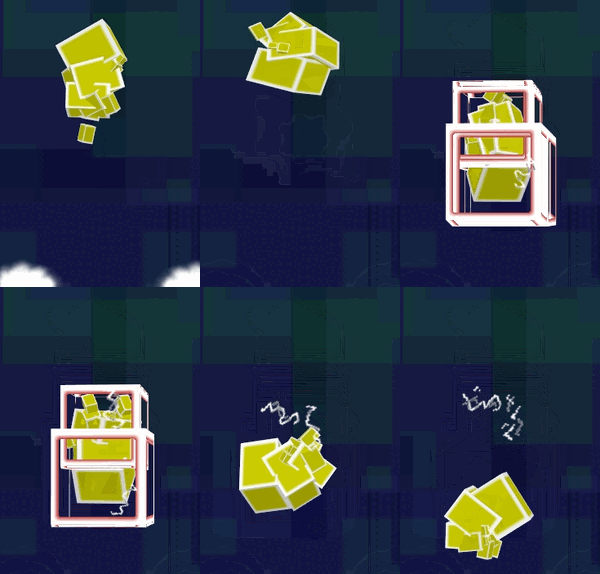
Pikachu thrusts its head downwards whilst covering itself in [[electric]]ity, electrocuting opponents that are within range. The attack | Pikachu thrusts its head downwards whilst covering itself in [[electric]]ity, electrocuting opponents that are within range. The attack deals 13% [[damage]] and average [[knockback]], being a good [[KO]] move offstage. It is also decent for [[combo]]ing floaty characters, and can [[tech-chase]] [[fastfaller]]s, along with having some high [[shield stun]] which allows it to shield [[pressure]] opponents. Like most of Pikachu's other aerials, this move is fairly [[disjointed]] as well. On the downside, however, this move has a decent amount of [[landing lag]] if the move's duration is still taking place whilst Pikachu hits the ground (like {{mvsub|Link|SSB|down aerial|poss=y}}). This leaves Pikachu vulnerable to [[punishing]], though the issue can easily be neglected with [[Z-cancelling]] and the move does [[auto-cancel]] as soon as its hitboxes are no longer active. The move also isn't as quick as Pikachu's other aerials, bar {{mvsub|Pikachu|SSB|back aerial}}. | ||
{{technical data}} | The move is better in the PAL versions of the game due to dealing 14% which allows the move to KO earlier (now being stronger than Pikachu's {{mvsub|Pikachu|SSB|neutral aerial}}) and further improves its shield pressuring potential although this does also hurt its combo and tech-chasing potential at higher percents. | ||
{{technical data|PAL hitbox tables. Also check if the hitboxes in the NTSC-J version are any different.}} | |||
{{SSB64HitboxTableHeader}} | |||
{{SSB64HitboxTableRow | |||
|id=0 | |||
|part=0 | |||
|damage=13% | |||
|angle=361 | |||
|bk=20 | |||
|ks=100 | |||
|fkv=0 | |||
|r=165 | |||
|bn=11 | |||
|ypos=65 | |||
|zpos=15 | |||
|effect=Electric | |||
|type=Head | |||
|sfx=Shock | |||
|slvl=L | |||
}} | |||
{{SSB64HitboxTableRow | |||
|id=1 | |||
|part=0 | |||
|damage=13% | |||
|angle=361 | |||
|bk=20 | |||
|ks=100 | |||
|fkv=0 | |||
|r=140 | |||
|bn=11 | |||
|effect=Electric | |||
|type=Head | |||
|sfx=Shock | |||
|slvl=L | |||
}} | |||
|} | |||
==Timing== | |||
===Attack=== | |||
{|class="wikitable" | |||
!Hitboxes | |||
|8-25 | |||
|- | |||
!Ending autocancel | |||
|26- | |||
|- | |||
!Animation length | |||
|44 | |||
|} | |||
{{FrameStripStart}} | |||
{{FrameStrip|t=Lag|c=7}}{{FrameStrip|t=Hitbox|c=18}}{{FrameStrip|t=Lag|c=19}} | |||
|- | |||
{{FrameStrip|t=Blank|c=25}}{{FrameStrip|t=Autocancel|c=19}} | |||
{{FrameStripEnd}} | |||
===[[Landing lag]]=== | |||
{|class="wikitable" | |||
!Animation length | |||
|40 | |||
|- | |||
!L-cancelled animation length | |||
|13 | |||
|} | |||
{{FrameStripStart}} | |||
|Normal {{FrameStrip|t=Lag|c=40}} | |||
|- | |||
|L-cancelled {{FrameStrip|t=Lag|c=4}}{{FrameStrip|t=Blank|c=46}} | |||
{{FrameStripEnd}} | |||
{{FrameIconLegend|lag=y|hitbox=y|hitboxchange=y|autocancel=y}} | |||
{{MvSubNavPikachu|g=SSB}} | {{MvSubNavPikachu|g=SSB}} | ||
Revision as of 11:27, December 15, 2019
Overview

Pikachu thrusts its head downwards whilst covering itself in electricity, electrocuting opponents that are within range. The attack deals 13% damage and average knockback, being a good KO move offstage. It is also decent for comboing floaty characters, and can tech-chase fastfallers, along with having some high shield stun which allows it to shield pressure opponents. Like most of Pikachu's other aerials, this move is fairly disjointed as well. On the downside, however, this move has a decent amount of landing lag if the move's duration is still taking place whilst Pikachu hits the ground (like Link's down aerial). This leaves Pikachu vulnerable to punishing, though the issue can easily be neglected with Z-cancelling and the move does auto-cancel as soon as its hitboxes are no longer active. The move also isn't as quick as Pikachu's other aerials, bar back aerial.
The move is better in the PAL versions of the game due to dealing 14% which allows the move to KO earlier (now being stronger than Pikachu's neutral aerial) and further improves its shield pressuring potential although this does also hurt its combo and tech-chasing potential at higher percents.
| ID | Part | Damage | SD | Angle | BK | KS | FKV | Radius | Bone | Offset | Clang | Effect | G | A | Sound | ||
|---|---|---|---|---|---|---|---|---|---|---|---|---|---|---|---|---|---|
| 0 | 0 | 13% | 0 | 20 | 100 | 0 | 165 | 11 | 0 | 65 | 15 | ||||||
| 1 | 0 | 13% | 0 | 20 | 100 | 0 | 140 | 11 | 0 | 0 | 0 | ||||||
Timing
Attack
| Hitboxes | 8-25 |
|---|---|
| Ending autocancel | 26- |
| Animation length | 44 |
Landing lag
| Animation length | 40 |
|---|---|
| L-cancelled animation length | 13 |
| Normal | ||||||||||||||||||||||||||||||||||||||||||||||||||
| L-cancelled |
Lag time |
Hitbox |
Hitbox change |
Autocancel |
|
