SSBU Icon.png

Mr. Game & Watch (SSBU)/Down smash: Difference between revisions

From SmashWiki, the Super Smash Bros. wiki
Jump to navigationJump to search
No edit summary
m (Undid edit by 37.228.205.32: Fluff)
Tag: Undo
 
Line 2: Line 2:
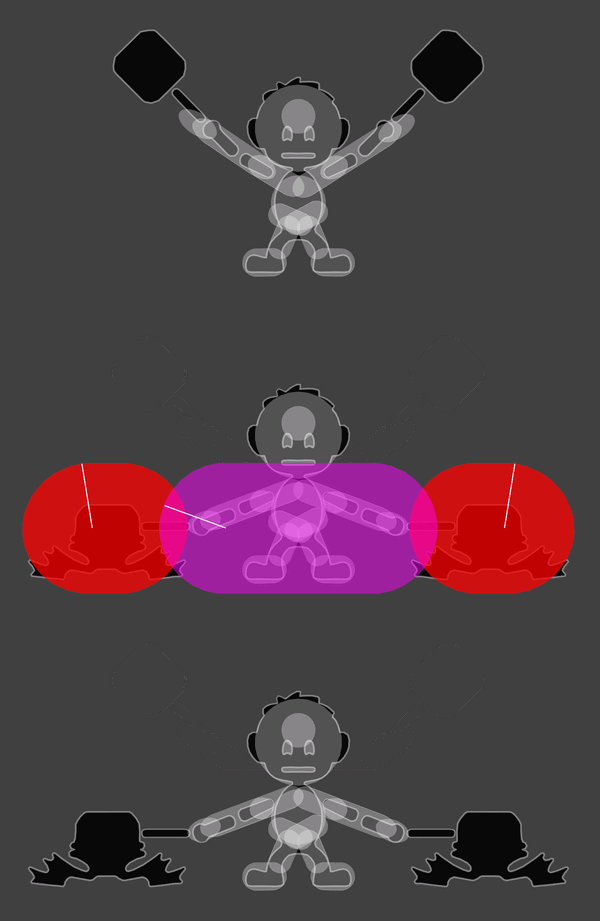
[[File:MrGame&WatchDSmashSSBU.gif|thumb|600px|Hitbox visualization showing Mr. Game & Watch's down smash.]]
[[File:MrGame&WatchDSmashSSBU.gif|thumb|600px|Hitbox visualization showing Mr. Game & Watch's down smash.]]
==Overview==
==Overview==
Mr. Game & Watch simuntaneously slams a pair of hammers onto the ground at both of his surroundings, referencing his game ''Vermin''. The move has large [[hitbox]]es that hit on both sides of Mr. Game & Watch and give it great [[range]] which, along with its minimal [[startup]] (coming out on the 12th frame) and [[ending lag]], makes it difficult to [[punish]] as it can even be safe on shield if it is [[space]]d. Its large hitboxes give it great potential at the ledge for [[edgeguarding]] as it can easily [[2 frame punish|2-frame]] many [[recovery|recoveries]]. The move has [[sweet spot (hitbox)|sweetspot]]s on the hammer-heads which [[bury]] grounded opponents, and can be easily followed up with several powerful finishers for a potential KO; such as [[forward smash]], [[up smash]], [[forward tilt]], [[down tilt]], [[Judge]] and [[Oil Panic]]. If the sweetspots hit an aerial opponent, it will launch them at a vertical angle which is very powerful, being able to KO several of the cast reliably under 100%. The [[sourspot]] that is located on Mr. Game & Watch's body is a [[semi-spike]] that launches the opponents off the stage, making it difficult for the opponent to recover as it also allows for edgeguarding opportunities.  
Mr. Game & Watch swings down two hammers, referencing his game ''Vermin''. The move has large hitboxes that hit on both sides of Mr. Game & Watch and give it great [[range]] which along with its low ending lag, makes it difficult to [[punish]] as it can even be safe on shield if it is [[space]]d. Its large hitboxes give it great potential at the ledge for [[edgeguarding]] as it can easily [[2 frame punish|2-frame]] many recoveries. The move has {{b|sweet spot|hitbox}}s on the hammers which [[bury]] grounded opponents and can be easily followed up with several powerful finishers for a potential KO such as [[../Forward smash|forward smash]], [[../Up smash|up smash]], [[../Forward tilt|forward tilt]], [[../Down tilt|down tilt]], [[../Side special|Judge]] and [[../Down special|Oil Panic]]. If the sweetspots hit an aerial opponent, it will launch them at an upwards angle which is very strong, being able to KO many characters under 100%. The [[sourspot]] that is located on Mr. Game & Watch's body is a [[semi spike]] that launches opponents offstage, making it difficult for the opponent to recover as it also allows for edgeguarding opportunities.  


This is arguably the best [[down smash]] in the game as it buries, 2-frames, semi-spikes, possesses solid range, possesses swift startup and low ending lag, and is safe on shield if properly spaced. It has become one of Mr. Game & Watch's most consistent KO options and one of his best moves overall in his kit.
This is arguably the best [[down smash]] in the game as it buries, 2-frames, semi spikes, has good range, has decent startup and low ending lag, and is safe on shield if properly spaced. It has become one of Mr. Game & Watch's most consistent KO options and one of his best moves overall.


==Hitboxes==
==Hitboxes==

Latest revision as of 17:56, February 5, 2022

Hitbox visualization showing Mr. Game & Watch's down smash.

Overview[edit]

Mr. Game & Watch swings down two hammers, referencing his game Vermin. The move has large hitboxes that hit on both sides of Mr. Game & Watch and give it great range which along with its low ending lag, makes it difficult to punish as it can even be safe on shield if it is spaced. Its large hitboxes give it great potential at the ledge for edgeguarding as it can easily 2-frame many recoveries. The move has sweet spots on the hammers which bury grounded opponents and can be easily followed up with several powerful finishers for a potential KO such as forward smash, up smash, forward tilt, down tilt, Judge and Oil Panic. If the sweetspots hit an aerial opponent, it will launch them at an upwards angle which is very strong, being able to KO many characters under 100%. The sourspot that is located on Mr. Game & Watch's body is a semi spike that launches opponents offstage, making it difficult for the opponent to recover as it also allows for edgeguarding opportunities.

This is arguably the best down smash in the game as it buries, 2-frames, semi spikes, has good range, has decent startup and low ending lag, and is safe on shield if properly spaced. It has become one of Mr. Game & Watch's most consistent KO options and one of his best moves overall.

Hitboxes[edit]

ID Part Rehit rate Damage SD Angle Angle type BK KS FKV Set weight Radius Bone Offset SDI× T% Clang Rebound Effect Type G A Sound Direct Hit bits Hit part Blockable Reflectable Absorbable Flinchless No GFX Heedless
0 0 0 13.0% 0 AngleIcon20.png Standard 30 80 0 HitboxTableIcon(False).png 4.5 top 0.0 3.6 -5.0 to 5.0 1.0× 1.0× 0% HitboxTableIcon(Clang).png HitboxTableIcon(Rebound).png EffectIcon(Normal).png TypeIcon(Weapon).png HitboxTableIcon(GroundedTrue).png HitboxTableIcon(AerialTrue).png M Kick SpecialsDirect.png All All HitboxTableIcon(Blockable).png HitboxTableIcon(Unreflectable).png HitboxTableIcon(Unabsorbable).png HitboxTableIcon(False).png HitboxTableIcon(False).png HitboxTableIcon(False).png
1 0 0 15.0% 0 AngleIcon80.png Standard 20 55 0 HitboxTableIcon(False).png 4.5 top 0.0 3.6 -14.2 to -12.2 1.0× 1.0× 0% HitboxTableIcon(Clang).png HitboxTableIcon(Rebound).png EffectIcon(Bury).png TypeIcon(Weapon).png HitboxTableIcon(GroundedTrue).pngd HitboxTableIcon(AerialFalse).png L Kick SpecialsDirect.png All All HitboxTableIcon(Blockable).png HitboxTableIcon(Unreflectable).png HitboxTableIcon(Unabsorbable).png HitboxTableIcon(False).png HitboxTableIcon(False).png HitboxTableIcon(False).png
2 0 0 15.0% 0 AngleIcon80.png Standard 20 55 0 HitboxTableIcon(False).png 4.5 top 0.0 3.6 14.2 to 12.2 1.0× 1.0× 0% HitboxTableIcon(Clang).png HitboxTableIcon(Rebound).png EffectIcon(Bury).png TypeIcon(Weapon).png HitboxTableIcon(GroundedTrue).pngd HitboxTableIcon(AerialFalse).png L Kick SpecialsDirect.png All All HitboxTableIcon(Blockable).png HitboxTableIcon(Unreflectable).png HitboxTableIcon(Unabsorbable).png HitboxTableIcon(False).png HitboxTableIcon(False).png HitboxTableIcon(False).png
3 0 0 15.0% 0 AngleIcon80.png Standard 60 85 0 HitboxTableIcon(False).png 4.5 top 0.0 3.6 -14.2 to -12.2 1.0× 1.0× 0% HitboxTableIcon(Clang).png HitboxTableIcon(Rebound).png The icon for the "none" effect. TypeIcon(Weapon).png HitboxTableIcon(GroundedTrue).png HitboxTableIcon(AerialTrue).png L Kick SpecialsDirect.png All All HitboxTableIcon(Blockable).png HitboxTableIcon(Unreflectable).png HitboxTableIcon(Unabsorbable).png HitboxTableIcon(False).png HitboxTableIcon(False).png HitboxTableIcon(False).png
4 0 0 15.0% 0 AngleIcon80.png Standard 60 85 0 HitboxTableIcon(False).png 4.5 top 0.0 3.6 14.2 to 12.2 1.0× 1.0× 0% HitboxTableIcon(Clang).png HitboxTableIcon(Rebound).png The icon for the "none" effect. TypeIcon(Weapon).png HitboxTableIcon(GroundedTrue).png HitboxTableIcon(AerialTrue).png L Kick SpecialsDirect.png All All HitboxTableIcon(Blockable).png HitboxTableIcon(Unreflectable).png HitboxTableIcon(Unabsorbable).png HitboxTableIcon(False).png HitboxTableIcon(False).png HitboxTableIcon(False).png

Timing[edit]

Charges between 6-7
Hitboxes 12-16
Interruptible 38
Animation length 40
FrameIcon(Lag).png FrameIcon(Lag).png FrameIcon(Lag).png FrameIcon(Lag).png FrameIcon(Lag).png FrameIcon(LagChargeS).png FrameIcon(LagChargeE).png FrameIcon(Lag).png FrameIcon(Lag).png FrameIcon(Lag).png FrameIcon(Lag).png FrameIcon(Hitbox).png FrameIcon(Hitbox).png FrameIcon(Hitbox).png FrameIcon(Hitbox).png FrameIcon(Hitbox).png FrameIcon(Lag).png FrameIcon(Lag).png FrameIcon(Lag).png FrameIcon(Lag).png FrameIcon(Lag).png FrameIcon(Lag).png FrameIcon(Lag).png FrameIcon(Lag).png FrameIcon(Lag).png FrameIcon(Lag).png FrameIcon(Lag).png FrameIcon(Lag).png FrameIcon(Lag).png FrameIcon(Lag).png FrameIcon(Lag).png FrameIcon(Lag).png FrameIcon(Lag).png FrameIcon(Lag).png FrameIcon(Lag).png FrameIcon(Lag).png FrameIcon(Lag).png FrameIcon(Interruptible).png FrameIcon(Interruptible).png FrameIcon(Interruptible).png
Legend (1 square = 1 frame)
FrameIcon(Lag).png
Lag time
FrameIcon(LagChargeS).pngFrameIcon(LagChargeE).png
Charge interval
FrameIcon(Hitbox).png
Hitbox
FrameIcon(Interruptible).png
Interruptible

Trivia[edit]

  • Due to a programming oversight, the sweetspots do not cause any hit effect to appear on aerial or downed targets. The effect is misspelled as "noamal" in the scripts.