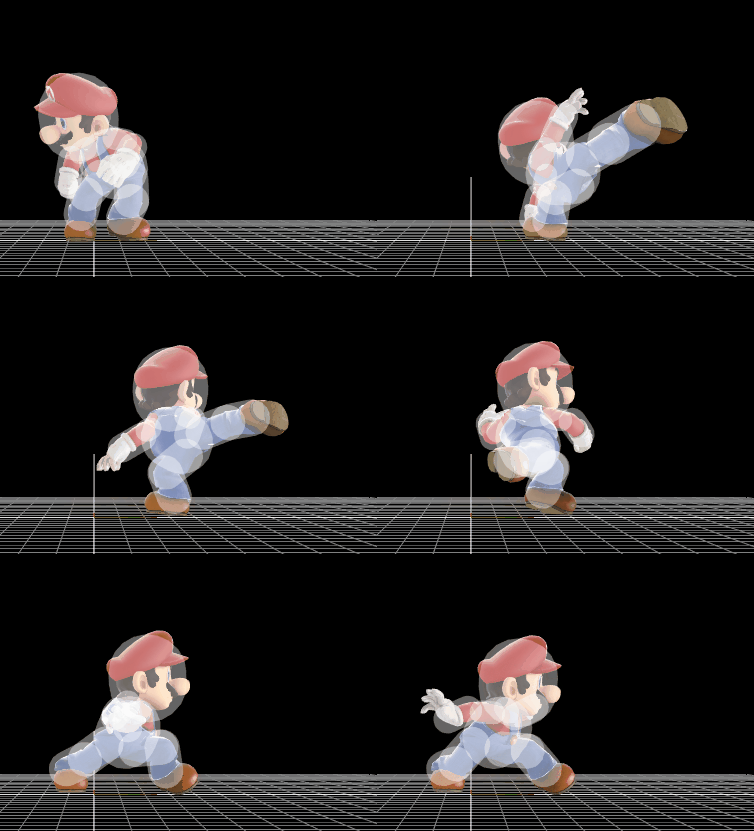
Mario (SSB4)/Forward tilt: Difference between revisions
m (still needs anim length versus interruptibility) |
No edit summary |
||
| (11 intermediate revisions by 4 users not shown) | |||
| Line 1: | Line 1: | ||
{{ArticleIcons|ssb4=y}} | {{ArticleIcons|ssb4=y}} | ||
[[File: | {|class="wikitable" style="float:right; margin:4pt;" | ||
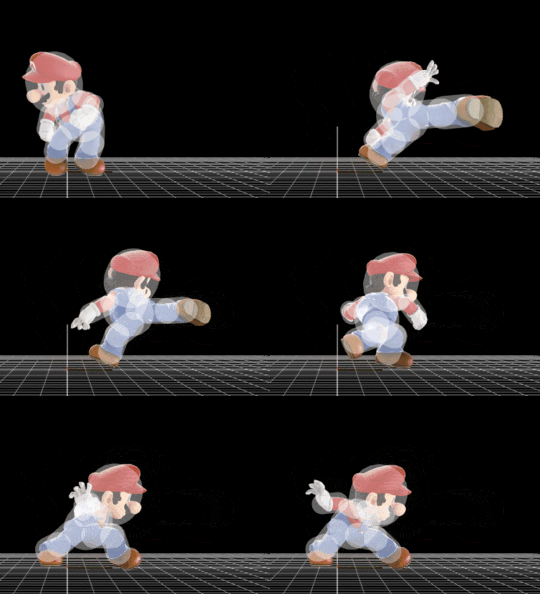
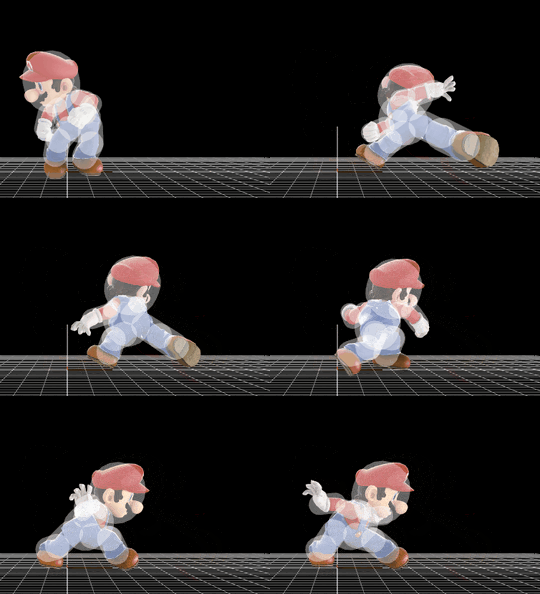
!colspan=2|Mario forward tilt hitbox visualization | |||
|- | |||
!↗ | |||
|[[File:MarioFTiltUp.gif|270px]] | |||
|- | |||
!→ | |||
|[[File:MarioFTilt.gif|270px]] | |||
|- | |||
!↘ | |||
|[[File:MarioFTiltDown.gif|270px]] | |||
|} | |||
==Overview== | ==Overview== | ||
{{SSB4|Mario}}'s [[forward tilt]] is a | {{SSB4|Mario}}'s [[forward tilt]] is a reverse roundhouse kick from his outside leg. Like all of Mario's tilts, it comes out relatively fast, on frame 5. It can be [[angle]]d up or down, though this merely affects the vertical positioning of its hitboxes. The move's combination of low base knockback and launching at the [[Sakurai angle]] also makes it useful for [[jab lock]]ing opponents, as it can deal 21% damage (without counting [[stale-move negation]]) if three are landed, and lock middleweights until around 45%. | ||
However, due to its low base knockback and rather high ending lag (24 frames) relative to the damage it deals, Mario's forward tilt is very easy to punish on [[shield]], as well as on hit at very low percentages. It also lacks any valuable KO power whatsoever, being unable to KO middleweights on edges under 200% without [[rage]]. His [[Mario (SSB4)/Down smash|down smash]] is often considered a better keep away option, due to coming out on the same frame while possessing better damage and knockback by comparison; as a result, aside from jab locking Mario's forward tilt is generally used only to hit opponents from positions that cannot be reached with his [[Mario (SSB4)/Neutral attack|neutral attack]] or down smash, and is rarely used overall. | |||
==Hitboxes== | ==Hitboxes== | ||
| Line 10: | Line 22: | ||
{{SSB4HitboxTableRow | {{SSB4HitboxTableRow | ||
|id=0 | |id=0 | ||
|damage=7 | |damage=7% | ||
|angle=361 | |angle=361 | ||
|bk=8 | |bk=8 | ||
| Line 21: | Line 33: | ||
|type=Foot | |type=Foot | ||
|effect=Normal | |effect=Normal | ||
| | |rebound=t | ||
|slvl=M | |slvl=M | ||
|sfx=Kick | |sfx=Kick | ||
| Line 27: | Line 39: | ||
{{SSB4HitboxTableRow | {{SSB4HitboxTableRow | ||
|id=1 | |id=1 | ||
|damage=7 | |damage=7% | ||
|angle=361 | |angle=361 | ||
|bk=8 | |bk=8 | ||
| Line 37: | Line 49: | ||
|type=Foot | |type=Foot | ||
|effect=Normal | |effect=Normal | ||
| | |rebound=t | ||
|slvl=M | |slvl=M | ||
|sfx=Kick | |sfx=Kick | ||
| Line 43: | Line 55: | ||
{{SSB4HitboxTableRow | {{SSB4HitboxTableRow | ||
|id=2 | |id=2 | ||
|damage=7 | |damage=7% | ||
|angle=361 | |angle=361 | ||
|bk=8 | |bk=8 | ||
| Line 54: | Line 66: | ||
|type=Foot | |type=Foot | ||
|effect=Normal | |effect=Normal | ||
| | |rebound=t | ||
|slvl=M | |slvl=M | ||
|sfx=Kick | |sfx=Kick | ||
| Line 60: | Line 72: | ||
|} | |} | ||
==Timing== | ==Timing== | ||
{|class="wikitable" | {|class="wikitable" | ||
|- | |- | ||
| Line 66: | Line 77: | ||
|5-6 | |5-6 | ||
|- | |- | ||
! | !Interruptible | ||
|31 | |31 | ||
|- | |||
!Animation length | |||
|40 | |||
|} | |} | ||
{{FrameStripStart}} | {{FrameStripStart}} | ||
{{FrameStrip|t=Lag|c=4}}{{FrameStrip|t=Hitbox|c=2}}{{FrameStrip|t=Lag|c=24}} | {{FrameStrip|t=Lag|c=4}}{{FrameStrip|t=Hitbox|c=2}}{{FrameStrip|t=Lag|c=24}}{{FrameStrip|t=Interruptible|c=10}} | ||
{{FrameStripEnd}} | {{FrameStripEnd}} | ||
{{FrameIconLegend|lag=y|hitbox=y}} | {{FrameIconLegend|lag=y|hitbox=y|interruptible=y}} | ||
{{MvSubNavMario|g=SSB4}} | {{MvSubNavMario|g=SSB4}} | ||
Latest revision as of 16:21, April 8, 2018
| Mario forward tilt hitbox visualization | |
|---|---|
| ↗ | 
|
| → | 
|
| ↘ | 
|
Overview[edit]
Mario's forward tilt is a reverse roundhouse kick from his outside leg. Like all of Mario's tilts, it comes out relatively fast, on frame 5. It can be angled up or down, though this merely affects the vertical positioning of its hitboxes. The move's combination of low base knockback and launching at the Sakurai angle also makes it useful for jab locking opponents, as it can deal 21% damage (without counting stale-move negation) if three are landed, and lock middleweights until around 45%.
However, due to its low base knockback and rather high ending lag (24 frames) relative to the damage it deals, Mario's forward tilt is very easy to punish on shield, as well as on hit at very low percentages. It also lacks any valuable KO power whatsoever, being unable to KO middleweights on edges under 200% without rage. His down smash is often considered a better keep away option, due to coming out on the same frame while possessing better damage and knockback by comparison; as a result, aside from jab locking Mario's forward tilt is generally used only to hit opponents from positions that cannot be reached with his neutral attack or down smash, and is rarely used overall.
Hitboxes[edit]
Timing[edit]
| Hitbox | 5-6 |
|---|---|
| Interruptible | 31 |
| Animation length | 40 |
Lag time |
Hitbox |
Interruptible |
|