Falco (SSB4)/Down aerial: Difference between revisions
m (→Overview) |
SuperSqank (talk | contribs) m (→Overview) |
||
| (8 intermediate revisions by 6 users not shown) | |||
| Line 1: | Line 1: | ||
{{ArticleIcons|ssb4=y}} | {{ArticleIcons|ssb4=y}} | ||
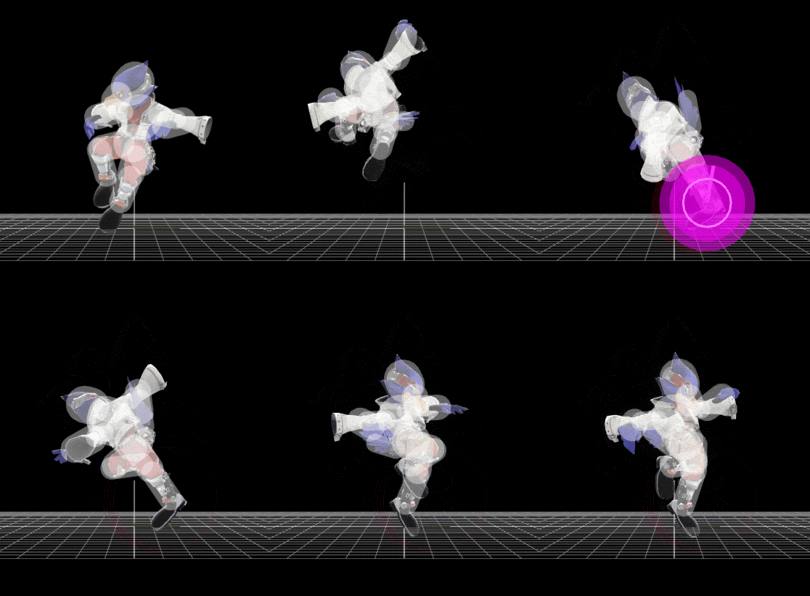
[[File: | [[File:FalcoDAir.gif|thumb|270px|Hitbox visualization showing Falco's down aerial.]] | ||
==Overview== | ==Overview== | ||
Falco turns diagonally and, with one foot extended, performs a downward corkscrew stomp. This move is a | Falco turns diagonally and, with one foot extended, performs a downward corkscrew stomp. This move is a [[meteor smash]] on aerial opponents. Grounded opponents are sent upwards instead, which leaves them open to other moves and prevents them from [[teching]]. | ||
This move has a few interesting properties. As a carryover from ''[[Melee]]'', it is one of the few meteor smashes that sends opponents diagonally downwards, making it more difficult for them to reach the stage. It also benefits greatly from [[frame cancelling]] due to its high [[hitlag]], which will almost eliminate the otherwise high landing lag Falco would suffer. The late hit can also [[jab reset]] any floored opponent, leaving them wide open to anything Falco decides to use. In spite of these valuable assets, this move is rarely used as an [[approach]], due to its slow startup and high landing lag. It is most commonly used in [[edgeguarding]] or as a | This move has a few interesting properties. As a carryover from ''[[Melee]]'', it is one of the few meteor smashes that sends opponents diagonally downwards, more akin to a [[spike]] from that game, making it more difficult for them to reach the stage. It also benefits greatly from [[frame cancelling]] due to its high [[hitlag]], which will almost eliminate the otherwise high landing lag Falco would suffer. The late hit can also [[jab reset]] any floored opponent, leaving them wide open to anything Falco decides to use. In spite of these valuable assets, this move is rarely used as an [[approach]], due to its slow startup and high ending and landing lag. It is most commonly used in [[edgeguarding]] or as a follow-up after a down throw. | ||
==Update history== | |||
'''{{GameIcon|ssb4-3ds}} [[1.0.4]]/{{GameIcon|ssb4-wiiu}} 1.0.0''' | |||
*{{buff|Landing lag (26 frames → 23).}} | |||
'''{{GameIcon|ssb4-3ds}} 1.0.4/{{GameIcon|ssb4-wiiu}} 1.0.1''' | |||
*{{buff|Ending lag (FAF 58 → 52).}} | |||
{{GameIcon|ssb4}} [[1.0.8]] | |||
*{{buff|Clean hit duration (frames 16-18 → 16-19).}} | |||
*{{buff|Clean hit angle against grounded opponents (285° → 80°).}} | |||
*{{buff|Late hit hitbox size (5u → 5.3u).}} | |||
==Hitboxes== | ==Hitboxes== | ||
| Line 79: | Line 92: | ||
==Timing== | ==Timing== | ||
===Attack=== | ===Attack=== | ||
{|class="wikitable" | {|class="wikitable" | ||
| Line 93: | Line 105: | ||
|- | |- | ||
!Ending autocancel | !Ending autocancel | ||
|38 | |38- | ||
|- | |- | ||
!Interruptible | !Interruptible | ||
| Line 99: | Line 111: | ||
|- | |- | ||
!Animation length | !Animation length | ||
| | |63 | ||
|} | |} | ||
{{FrameStripStart}} | {{FrameStripStart}} | ||
{{FrameStrip|t=Lag|c=15}}{{FrameStrip|t=Hitbox|c=4|e=HitboxChangeS}}{{FrameStrip|t=Hitbox|c=11|s=HitboxChangeE}}{{FrameStrip|t=Lag|c=21}}{{FrameStrip|t=Interruptible|c= | {{FrameStrip|t=Lag|c=15}}{{FrameStrip|t=Hitbox|c=4|e=HitboxChangeS}}{{FrameStrip|t=Hitbox|c=11|s=HitboxChangeE}}{{FrameStrip|t=Lag|c=21}}{{FrameStrip|t=Interruptible|c=12}} | ||
|- | |- | ||
{{FrameStrip|t=Autocancel|c=3}}{{FrameStrip|t=Blank|c=34}}{{FrameStrip|t=Autocancel|c= | {{FrameStrip|t=Autocancel|c=3}}{{FrameStrip|t=Blank|c=34}}{{FrameStrip|t=Autocancel|c=26}} | ||
{{FrameStripEnd}} | {{FrameStripEnd}} | ||
===Landing lag=== | ===Landing lag=== | ||
{|class="wikitable" | {|class="wikitable" | ||
!Animation length | !Animation length | ||
|23 | |23 | ||
| Line 120: | Line 131: | ||
{{FrameIconLegend|lag=y|hitbox=y|hitboxchange=y|autocancel=y|interruptible=y}} | {{FrameIconLegend|lag=y|hitbox=y|hitboxchange=y|autocancel=y|interruptible=y}} | ||
{{MvSubNavFalco}} | {{MvSubNavFalco|g=SSB4}} | ||
[[Category:Falco (SSB4)]] | [[Category:Falco (SSB4)]] | ||
[[Category:Down aerials (SSB4)]] | [[Category:Down aerials (SSB4)]] | ||
Latest revision as of 17:53, July 18, 2023
Overview[edit]
Falco turns diagonally and, with one foot extended, performs a downward corkscrew stomp. This move is a meteor smash on aerial opponents. Grounded opponents are sent upwards instead, which leaves them open to other moves and prevents them from teching.
This move has a few interesting properties. As a carryover from Melee, it is one of the few meteor smashes that sends opponents diagonally downwards, more akin to a spike from that game, making it more difficult for them to reach the stage. It also benefits greatly from frame cancelling due to its high hitlag, which will almost eliminate the otherwise high landing lag Falco would suffer. The late hit can also jab reset any floored opponent, leaving them wide open to anything Falco decides to use. In spite of these valuable assets, this move is rarely used as an approach, due to its slow startup and high ending and landing lag. It is most commonly used in edgeguarding or as a follow-up after a down throw.
Update history[edit]
![]() 1.0.4/
1.0.4/![]() 1.0.0
1.0.0
 Landing lag (26 frames → 23).
 Ending lag (FAF 58 → 52).
 Clean hit duration (frames 16-18 → 16-19).
 Clean hit angle against grounded opponents (285° → 80°).
 Late hit hitbox size (5u → 5.3u).
Hitboxes[edit]
Timing[edit]
Attack[edit]
| Initial autocancel | 1-3 |
|---|---|
| Clean hit | 16-19 |
| Late hit | 20-30 |
| Ending autocancel | 38- |
| Interruptible | 52 |
| Animation length | 63 |
Landing lag[edit]
| Animation length | 23 |
|---|
Lag time |
Hitbox |
Hitbox change |
Autocancel |
Interruptible |
|
