SSBU Icon.png

Bowser (SSBU)/Down tilt: Difference between revisions

From SmashWiki, the Super Smash Bros. wiki
Jump to navigationJump to search
(→‎Overview: fists, not claws.)
(added more trip info, it's interesting but so bad lol)
Line 2: Line 2:
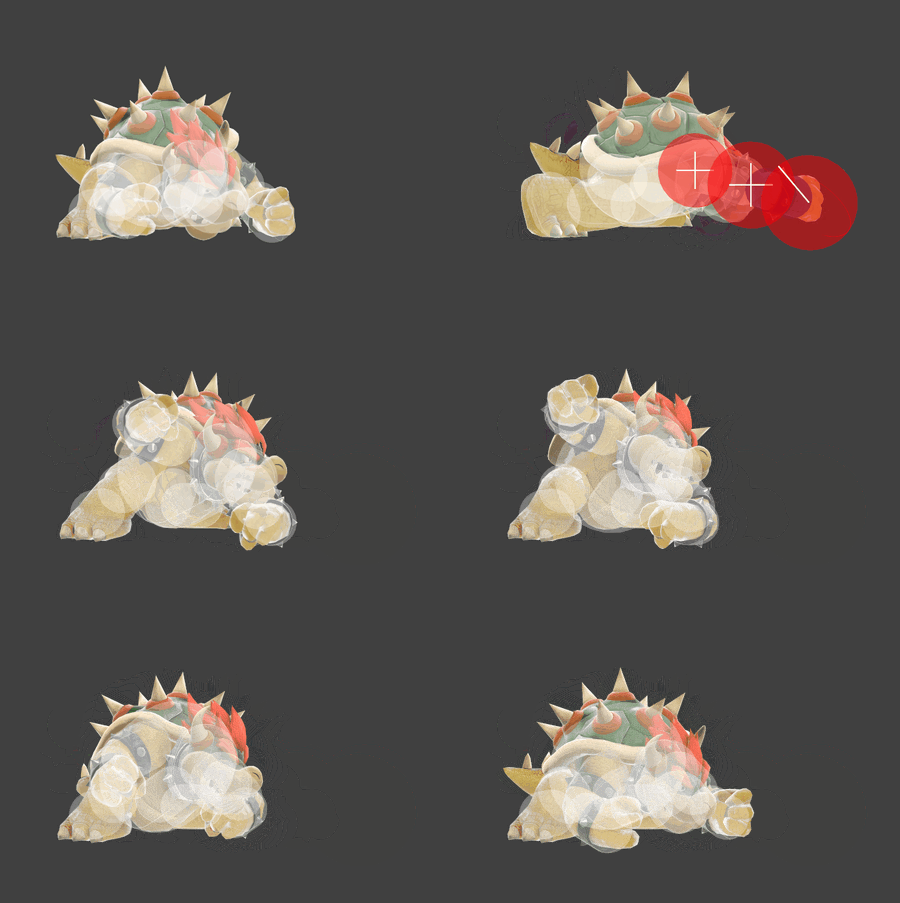
[[File:BowserDTiltSSBU.gif|thumb|450px|Hitbox visualization showing Bowser's down tilt.]]
[[File:BowserDTiltSSBU.gif|thumb|450px|Hitbox visualization showing Bowser's down tilt.]]
==Overview==
==Overview==
Bowser does two forward punches. The first hit has [[set knockback]] while the second hit has base knockback. He grants damage-based [[armor]] right before he begins to swipe. Also grants [[intangibility]] on both of his fists in each hit they process. It can also [[trip]] opponents during the second hit. Can be used to attack opponents on the ledge, although the second hit may miss if it doesn’t hit properly.
Bowser does two forward punches. The first hit has [[set knockback]] while the second hit has base knockback. He grants damage-based [[armor]] right before he begins to swipe. It also grants [[intangibility]] on both of his fists in each hit they progress. Down tilt can be used to attack opponents on the ledge, although the second hit may miss if it doesn’t hit properly; ergo, it is mostly outclassed by a low angled {{mvsub|Bowser|SSBU|forward tilt}}.
 
Both hits of down tilt can trip 30% of the time. However, if the first does, the second hit will make it meaningless, knocking them out of the state. If the second trips, Bowser will have 9 frames of hit advantage overall. While negligible, this is just enough time for Bowser to dash and land [[Flying Slam]]. If aiming to land a successful down tilt trip, it has to be up-close; if spaced, the second hit tends to land while the opponent is airborne, in which they cannot be tripped. Ergo, situations where down tilt trips successfully are few and far between, but rewarding if reacted to adequately.  


==Hitboxes==
==Hitboxes==
Line 125: Line 127:
==Timing==
==Timing==
{|class="wikitable"
{|class="wikitable"
!Heavy armor
!Damage-based armor
|7-9
|7-9
|-
|-

Revision as of 22:22, October 15, 2021

Hitbox visualization for Bowser's down tilt
Hitbox visualization showing Bowser's down tilt.

Overview

Bowser does two forward punches. The first hit has set knockback while the second hit has base knockback. He grants damage-based armor right before he begins to swipe. It also grants intangibility on both of his fists in each hit they progress. Down tilt can be used to attack opponents on the ledge, although the second hit may miss if it doesn’t hit properly; ergo, it is mostly outclassed by a low angled forward tilt.

Both hits of down tilt can trip 30% of the time. However, if the first does, the second hit will make it meaningless, knocking them out of the state. If the second trips, Bowser will have 9 frames of hit advantage overall. While negligible, this is just enough time for Bowser to dash and land Flying Slam. If aiming to land a successful down tilt trip, it has to be up-close; if spaced, the second hit tends to land while the opponent is airborne, in which they cannot be tripped. Ergo, situations where down tilt trips successfully are few and far between, but rewarding if reacted to adequately.

Hitboxes

ID Part Rehit rate Damage SD Angle Angle type BK KS FKV Set weight Radius Bone Offset SDI× T% Clang Rebound Effect Type G A Sound Direct Hit bits Hit part Blockable Reflectable Absorbable Flinchless No GFX Heedless
Hit 1
0 0 0 7.0% 0 Sakurai angle Standard 0 100 50 HitboxTableIcon(False).png 4.0 colonellm 0.0 0.0 1.0 1.0× 1.0× 30% HitboxTableIcon(Clang).png HitboxTableIcon(Rebound).png EffectIcon(Normal).png TypeIcon(Hand).png HitboxTableIcon(GroundedTrue).png HitboxTableIcon(AerialTrue).png M Kick SpecialsDirect.png All All HitboxTableIcon(Blockable).png HitboxTableIcon(Unreflectable).png HitboxTableIcon(Unabsorbable).png HitboxTableIcon(False).png HitboxTableIcon(False).png HitboxTableIcon(False).png
1 0 0 7.0% 0 Sakurai angle Standard 0 100 50 HitboxTableIcon(False).png 4.5 armr -1.0 0.0 0.0 1.0× 1.0× 30% HitboxTableIcon(Clang).png HitboxTableIcon(Rebound).png EffectIcon(Normal).png TypeIcon(Hand).png HitboxTableIcon(GroundedTrue).png HitboxTableIcon(AerialTrue).png M Kick SpecialsDirect.png All All HitboxTableIcon(Blockable).png HitboxTableIcon(Unreflectable).png HitboxTableIcon(Unabsorbable).png HitboxTableIcon(False).png HitboxTableIcon(False).png HitboxTableIcon(False).png
2 0 0 7.0% 0 AngleIcon130.png Standard 0 100 30 HitboxTableIcon(False).png 5.0 armr 6.0 0.0 0.0 1.0× 1.0× 30% HitboxTableIcon(Clang).png HitboxTableIcon(Rebound).png EffectIcon(Normal).png TypeIcon(Hand).png HitboxTableIcon(GroundedTrue).png HitboxTableIcon(AerialTrue).png M Kick SpecialsDirect.png All All HitboxTableIcon(Blockable).png HitboxTableIcon(Unreflectable).png HitboxTableIcon(Unabsorbable).png HitboxTableIcon(False).png HitboxTableIcon(False).png HitboxTableIcon(False).png
Hit 2
0 0 0 8.0% 0 Sakurai angle Standard 20 111 0 HitboxTableIcon(False).png 4.5 colonells 0.0 0.0 -1.0 1.0× 1.0× 30% HitboxTableIcon(Clang).png HitboxTableIcon(Rebound).png EffectIcon(Normal).png TypeIcon(Hand).png HitboxTableIcon(GroundedTrue).png HitboxTableIcon(AerialTrue).png M Kick SpecialsDirect.png All All HitboxTableIcon(Blockable).png HitboxTableIcon(Unreflectable).png HitboxTableIcon(Unabsorbable).png HitboxTableIcon(False).png HitboxTableIcon(False).png HitboxTableIcon(False).png
1 0 0 8.0% 0 Sakurai angle Standard 20 111 0 HitboxTableIcon(False).png 5.0 arml -1.0 0.0 0.0 1.0× 1.0× 30% HitboxTableIcon(Clang).png HitboxTableIcon(Rebound).png EffectIcon(Normal).png TypeIcon(Hand).png HitboxTableIcon(GroundedTrue).png HitboxTableIcon(AerialTrue).png M Kick SpecialsDirect.png All All HitboxTableIcon(Blockable).png HitboxTableIcon(Unreflectable).png HitboxTableIcon(Unabsorbable).png HitboxTableIcon(False).png HitboxTableIcon(False).png HitboxTableIcon(False).png
2 0 0 8.0% 0 Sakurai angle Standard 20 111 0 HitboxTableIcon(False).png 5.6 arml 6.0 0.0 0.0 1.0× 1.0× 30% HitboxTableIcon(Clang).png HitboxTableIcon(Rebound).png EffectIcon(Normal).png TypeIcon(Hand).png HitboxTableIcon(GroundedTrue).png HitboxTableIcon(AerialTrue).png M Kick SpecialsDirect.png All All HitboxTableIcon(Blockable).png HitboxTableIcon(Unreflectable).png HitboxTableIcon(Unabsorbable).png HitboxTableIcon(False).png HitboxTableIcon(False).png HitboxTableIcon(False).png

Timing

Damage-based armor 7-9
First arm intangible 10-12
Hit 1 10-12
Second arm intangible 15-17
Hit 2 15-17
Interruptible 46
Animation length 45
Hitboxes  FrameIcon(Lag).png FrameIcon(Lag).png FrameIcon(Lag).png FrameIcon(Lag).png FrameIcon(Lag).png FrameIcon(Lag).png FrameIcon(Lag).png FrameIcon(Lag).png FrameIcon(Lag).png FrameIcon(Hitbox).png FrameIcon(Hitbox).png FrameIcon(Hitbox).png FrameIcon(Lag).png FrameIcon(Lag).png FrameIcon(Hitbox).png FrameIcon(Hitbox).png FrameIcon(Hitbox).png FrameIcon(Lag).png FrameIcon(Lag).png FrameIcon(Lag).png FrameIcon(Lag).png FrameIcon(Lag).png FrameIcon(Lag).png FrameIcon(Lag).png FrameIcon(Lag).png FrameIcon(Lag).png FrameIcon(Lag).png FrameIcon(Lag).png FrameIcon(Lag).png FrameIcon(Lag).png FrameIcon(Lag).png FrameIcon(Lag).png FrameIcon(Lag).png FrameIcon(Lag).png FrameIcon(Lag).png FrameIcon(Lag).png FrameIcon(Lag).png FrameIcon(Lag).png FrameIcon(Lag).png FrameIcon(Lag).png FrameIcon(Lag).png FrameIcon(Lag).png FrameIcon(Lag).png FrameIcon(Lag).png FrameIcon(Lag).png
Body  FrameIcon(Vulnerable).png FrameIcon(Vulnerable).png FrameIcon(Vulnerable).png FrameIcon(Vulnerable).png FrameIcon(Vulnerable).png FrameIcon(Vulnerable).png FrameIcon(Armour).png FrameIcon(Armour).png FrameIcon(Armour).png FrameIcon(Vulnerable).png FrameIcon(Vulnerable).png FrameIcon(Vulnerable).png FrameIcon(Vulnerable).png FrameIcon(Vulnerable).png FrameIcon(Vulnerable).png FrameIcon(Vulnerable).png FrameIcon(Vulnerable).png FrameIcon(Vulnerable).png FrameIcon(Vulnerable).png FrameIcon(Vulnerable).png FrameIcon(Vulnerable).png FrameIcon(Vulnerable).png FrameIcon(Vulnerable).png FrameIcon(Vulnerable).png FrameIcon(Vulnerable).png FrameIcon(Vulnerable).png FrameIcon(Vulnerable).png FrameIcon(Vulnerable).png FrameIcon(Vulnerable).png FrameIcon(Vulnerable).png FrameIcon(Vulnerable).png FrameIcon(Vulnerable).png FrameIcon(Vulnerable).png FrameIcon(Vulnerable).png FrameIcon(Vulnerable).png FrameIcon(Vulnerable).png FrameIcon(Vulnerable).png FrameIcon(Vulnerable).png FrameIcon(Vulnerable).png FrameIcon(Vulnerable).png FrameIcon(Vulnerable).png FrameIcon(Vulnerable).png FrameIcon(Vulnerable).png FrameIcon(Vulnerable).png FrameIcon(Vulnerable).png
First arm  FrameIcon(Vulnerable).png FrameIcon(Vulnerable).png FrameIcon(Vulnerable).png FrameIcon(Vulnerable).png FrameIcon(Vulnerable).png FrameIcon(Vulnerable).png FrameIcon(Armour).png FrameIcon(Armour).png FrameIcon(Armour).png FrameIcon(Intangible).png FrameIcon(Intangible).png FrameIcon(Intangible).png FrameIcon(Vulnerable).png FrameIcon(Vulnerable).png FrameIcon(Vulnerable).png FrameIcon(Vulnerable).png FrameIcon(Vulnerable).png FrameIcon(Vulnerable).png FrameIcon(Vulnerable).png FrameIcon(Vulnerable).png FrameIcon(Vulnerable).png FrameIcon(Vulnerable).png FrameIcon(Vulnerable).png FrameIcon(Vulnerable).png FrameIcon(Vulnerable).png FrameIcon(Vulnerable).png FrameIcon(Vulnerable).png FrameIcon(Vulnerable).png FrameIcon(Vulnerable).png FrameIcon(Vulnerable).png FrameIcon(Vulnerable).png FrameIcon(Vulnerable).png FrameIcon(Vulnerable).png FrameIcon(Vulnerable).png FrameIcon(Vulnerable).png FrameIcon(Vulnerable).png FrameIcon(Vulnerable).png FrameIcon(Vulnerable).png FrameIcon(Vulnerable).png FrameIcon(Vulnerable).png FrameIcon(Vulnerable).png FrameIcon(Vulnerable).png FrameIcon(Vulnerable).png FrameIcon(Vulnerable).png FrameIcon(Vulnerable).png
Second arm  FrameIcon(Vulnerable).png FrameIcon(Vulnerable).png FrameIcon(Vulnerable).png FrameIcon(Vulnerable).png FrameIcon(Vulnerable).png FrameIcon(Vulnerable).png FrameIcon(Armour).png FrameIcon(Armour).png FrameIcon(Armour).png FrameIcon(Vulnerable).png FrameIcon(Vulnerable).png FrameIcon(Vulnerable).png FrameIcon(Vulnerable).png FrameIcon(Vulnerable).png FrameIcon(Intangible).png FrameIcon(Intangible).png FrameIcon(Intangible).png FrameIcon(Vulnerable).png FrameIcon(Vulnerable).png FrameIcon(Vulnerable).png FrameIcon(Vulnerable).png FrameIcon(Vulnerable).png FrameIcon(Vulnerable).png FrameIcon(Vulnerable).png FrameIcon(Vulnerable).png FrameIcon(Vulnerable).png FrameIcon(Vulnerable).png FrameIcon(Vulnerable).png FrameIcon(Vulnerable).png FrameIcon(Vulnerable).png FrameIcon(Vulnerable).png FrameIcon(Vulnerable).png FrameIcon(Vulnerable).png FrameIcon(Vulnerable).png FrameIcon(Vulnerable).png FrameIcon(Vulnerable).png FrameIcon(Vulnerable).png FrameIcon(Vulnerable).png FrameIcon(Vulnerable).png FrameIcon(Vulnerable).png FrameIcon(Vulnerable).png FrameIcon(Vulnerable).png FrameIcon(Vulnerable).png FrameIcon(Vulnerable).png FrameIcon(Vulnerable).png
Legend (1 square = 1 frame)
FrameIcon(Lag).png
Lag time
FrameIcon(Hitbox).png
Hitbox
FrameIcon(Vulnerable).png
Vulnerable
FrameIcon(Intangible).png
Intangible
FrameIcon(Armour).png
Armour
FrameIcon(Interruptible).png
Interruptible