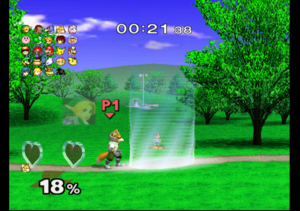
The All-Star rest area in
Super Smash Bros. Melee.
All-Star Mode (オールスター), also referred to as simply All-Star, is a gameplay mode available in Super Smash Bros. Melee, Super Smash Bros. Brawl, and Super Smash Bros. 4, that pits the player against every playable character in the game (other than Mii Fighters in Smash 4). The fights are separated into distinct rounds, and a rest area with a limited number of recovery items available between rounds. All-Star is replaced with All-Star Smash (under Mob Smash) in Super Smash Bros. Ultimate.

An example of the Icons displayed in the All-Star rest area to show the next opponent
All-Star Mode made its debut in Super Smash Bros. Melee, as an unlockable 1-player mode which puts the player up against every fighter in the game. It is automatically unlocked upon unlocking every fighter.
All-Star Mode has 13 stages. The number of opponents per stage increases as the player advances: one opponent per stage for Stages 1 to 4, two per stage for Stages 5 to 8, three per stage for Stages 9 to 12, and a team of 25 Mr. Game & Watch for Stage 13. Similarly to its inspiration, the opponents are selected at random from the entire roster, excluding Mr. Game & Watch (who is always fought last), so that each character is fought once. Each opponent (except Mr. Game & Watch) wears one of their first three alternate costumes, unless the player is wearing one of those three costumes, in which case that character can wear their default costume (but not the costume the player is wearing); Mr. Game & Watch will always wear his default costume, unless the player uses that costume, in which case they will wear the red costume.
The player's percentage does not revert to 0% between battles. Instead, the All-Star Rest Area contains three Heart Containers, which the player can use to restore health between stages. Once one of these Heart Containers is consumed, it does not return for the rest of the mode. These Heart Containers, unlike normal ones, recover 999% damage (as they did in Smash 64) instead of only 100% damage. Due to a glitch, however, entering the portal while damage is being healed will prevent the damage from healing any further, leaving it at the same amount of damage as when the portal was entered.
Other than the Heart Containers in the Rest Area, recovery items (such as food, Maxim Tomatoes, and eggs) do not appear at all in the mode. However, Ness's PSI Magnet and Mr. Game & Watch's Judgment 7 (which can drop a Food item) can still be used to recover health.
As a reward, the player can also collect random trophies that appear after every three battles; trophies that have not been collected are prioritized. Upon clearing All-Star Mode, the player unlocks both Battlefield (the first time only) and a trophy of the character they used that can only be obtained this way or by playing 300 Vs. matches with that character; for all characters except Mr. Game & Watch, this trophy depicts them in a non-default costume.
Each stage is fought on the home stage of the first opponent in the group; for example, if the opponents were Luigi, Pikachu, and Ice Climbers, the stage would be Mushroom Kingdom. No character has Big Blue nor past stages as their home stage for All-Star Mode, so these stages are never fought on in this mode. For some fighters, particularly fighters with a home stage set outside their universe, the stage will have a specially selected track which cannot normally play on the stage; for example, Pichu's stage is set as Fourside, but "Battle Theme" plays. However, Ganondorf, who is fought on Brinstar Depths, uses the default theme for that stage, despite it not being from his universe.
Unlockable stages that have not yet been unlocked are still used. This differs from Brawl and Smash 4's All-Star Modes, in which unlockable stages not yet unlocked will simply not be chosen.
Bold denotes a track that does not play on that stage in Versus Mode. Italics denotes an unlockable stage.
All Star Mode Stages[edit]
1 vs. 1 Stages[edit]
Stage 1[edit]
| Foe |
Level |
Knockback given |
Knockback taken
|
 |
0 |
0.50x |
1.70x
|
 |
1 |
0.70x |
1.40x
|
 |
3 |
0.80x |
1.20x
|
 |
5 |
0.90x |
1.00x
|
 |
7 |
1.00x |
0.95x
|
Stage 2[edit]
| Foe |
Level |
Knockback given |
Knockback taken
|
|
1 |
0.50x |
1.70x
|
|
3 |
0.70x |
1.40x
|
|
4 |
0.80x |
1.15x
|
|
6 |
0.90x |
1.00x
|
|
8 |
1.00x |
0.95x
|
Stage 3[edit]
| Foe |
Level |
Knockback given |
Knockback taken
|
|
2 |
0.50x |
1.70x
|
|
4 |
0.70x |
1.40x
|
|
5 |
0.80x |
1.10x
|
|
7 |
0.90x |
1.00x
|
|
9 |
1.00x |
0.95x
|
Stage 4[edit]
| Foe |
Level |
Knockback given |
Knockback taken
|
|
3 |
0.50x |
1.70x
|
|
5 |
0.70x |
1.40x
|
|
6 |
0.80x |
1.20x
|
|
8 |
0.90x |
1.05x
|
|
9 |
1.00x |
0.95x
|
1 vs. 2 Stages[edit]
Stage 5[edit]
| P2 foe |
Level |
Knockback given |
Knockback taken
|
|
0 |
0.50x |
1.70x
|
|
2 |
0.67x |
1.4x
|
|
3 |
0.78x |
1.20x
|
|
5 |
0.90x |
1.05x
|
|
6 |
1.00x |
1.00x
|
| P3 foe |
Level |
Knockback given |
Knockback taken
|
|
0 |
0.50x |
1.70x
|
|
2 |
0.67x |
1.4x
|
|
3 |
0.78x |
1.20x
|
|
4 |
0.90x |
1.05x
|
|
6 |
1.00x |
1.00x
|
Stage 6[edit]
| P2 foe |
Level |
Knockback given |
Knockback taken
|
|
1 |
0.50x |
1.70x
|
|
3 |
0.67x |
1.4x
|
|
4 |
0.78x |
1.20x
|
|
5 |
0.90x |
1.05x
|
|
7 |
1.00x |
1.00x
|
| P3 foe |
Level |
Knockback given |
Knockback taken
|
|
1 |
0.50x |
1.70x
|
|
3 |
0.67x |
1.4x
|
|
3 |
0.78x |
1.20x
|
|
5 |
0.90x |
1.05x
|
|
7 |
1.00x |
1.00x
|
Stage 7[edit]
| P2 foe |
Level |
Knockback given |
Knockback taken
|
|
2 |
0.50x |
1.70x
|
|
3 |
0.70x |
1.4x
|
|
4 |
0.78x |
1.20x
|
|
6 |
0.90x |
1.05x
|
|
8 |
1.02x |
1.00x
|
| P3 foe |
Level |
Knockback given |
Knockback taken
|
|
1 |
0.50x |
1.70x
|
|
3 |
0.70x |
1.4x
|
|
4 |
0.78x |
1.20x
|
|
5 |
0.90x |
1.05x
|
|
7 |
1.02x |
1.00x
|
Stage 8[edit]
| P2 foe |
Level |
Knockback given |
Knockback taken
|
|
2 |
0.50x |
1.70x
|
|
3 |
0.70x |
1.3x
|
|
5 |
0.80x |
1.10x
|
|
7 |
0.90x |
1.05x
|
|
9 |
1.05x |
1.00x
|
| P3 foe |
Level |
Knockback given |
Knockback taken
|
|
2 |
0.50x |
1.70x
|
|
3 |
0.70x |
1.3x
|
|
4 |
0.80x |
1.10x
|
|
5 |
0.90x |
1.05x
|
|
8 |
1.05x |
1.00x
|
1 vs. 3 Stages[edit]
Stage 9[edit]
| P2 foe |
Level |
Knockback given |
Knockback taken
|
|
0 |
0.50x |
1.70x
|
|
2 |
0.67x |
1.3x
|
|
3 |
0.78x |
1.10x
|
|
4 |
0.89x |
1.00x
|
|
6 |
1.00x |
1.00x
|
| P3 foe |
Level |
Knockback given |
Knockback taken
|
|
0 |
0.50x |
1.70x
|
|
2 |
0.67x |
1.3x
|
|
3 |
0.78x |
1.10x
|
|
4 |
0.89x |
1.00x
|
|
6 |
1.00x |
1.00x
|
| P4 foe |
Level |
Knockback given |
Knockback taken
|
|
0 |
0.50x |
1.70x
|
|
1 |
0.67x |
1.3x
|
|
3 |
0.78x |
1.10x
|
|
4 |
0.89x |
1.00x
|
|
6 |
1.00x |
1.00x
|
Stage 10[edit]
| P2 foe |
Level |
Knockback given |
Knockback taken
|
|
1 |
0.50x |
1.70x
|
|
2 |
0.69x |
1.25x
|
|
4 |
0.75x |
1.10x
|
|
5 |
0.89x |
1.00x
|
|
7 |
1.00x |
1.00x
|
| P3 foe |
Level |
Knockback given |
Knockback taken
|
|
1 |
0.50x |
1.70x
|
|
2 |
0.69x |
1.25x
|
|
4 |
0.75x |
1.10x
|
|
4 |
0.89x |
1.00x
|
|
7 |
1.00x |
1.00x
|
| P4 foe |
Level |
Knockback given |
Knockback taken
|
|
1 |
0.50x |
1.70x
|
|
2 |
0.69x |
1.25x
|
|
3 |
0.75x |
1.10x
|
|
4 |
0.89x |
1.00x
|
|
7 |
1.00x |
1.00x
|
Stage 11[edit]
| P2 foe |
Level |
Knockback given |
Knockback taken
|
|
1 |
0.50x |
1.70x
|
|
3 |
0.70x |
1.25x
|
|
4 |
0.79x |
1.12x
|
|
5 |
0.90x |
1.00x
|
|
8 |
1.00x |
1.00x
|
| P3 foe |
Level |
Knockback given |
Knockback taken
|
|
1 |
0.50x |
1.70x
|
|
3 |
0.70x |
1.25x
|
|
4 |
0.79x |
1.12x
|
|
5 |
0.90x |
1.00x
|
|
8 |
1.00x |
1.00x
|
| P4 foe |
Level |
Knockback given |
Knockback taken
|
|
1 |
0.50x |
1.70x
|
|
3 |
0.70x |
1.25x
|
|


 Dr. Mario
 Mario
Mario
 Luigi
Luigi
 Bowser
 Peach
Peach
 Yoshi
Yoshi
 Donkey Kong
 Captain Falcon
 Ganondorf
 Falco
Falco
 Fox
Fox
 Ness
Ness
 Ice Climbers
 Kirby
Kirby
 Samus
Samus
 Zelda/
 Sheik
Sheik
 Link
Link
 Young Link
 Pichu
Pichu
 Pikachu
 Jigglypuff
 Mewtwo
 Mr. Game & Watch
 Marth
Marth
 Roy
Roy


