Luigi (SSBU)/Neutral attack/Hit 3: Difference between revisions
From SmashWiki, the Super Smash Bros. wiki
Jump to navigationJump to search
No edit summary |
|||
| (3 intermediate revisions by 2 users not shown) | |||
| Line 1: | Line 1: | ||
{{ArticleIcons|ssbu=y}} | {{ArticleIcons|ssbu=y}} | ||
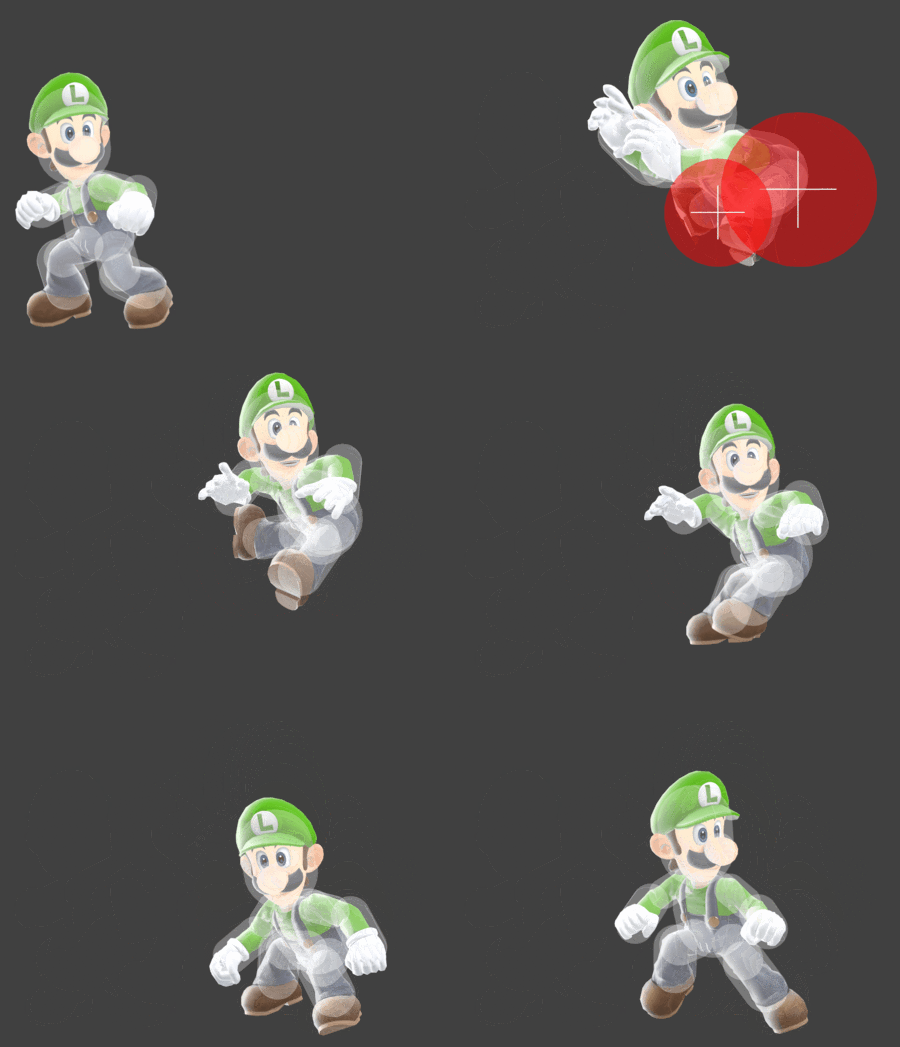
[[File:LuigiJab3SSBU.gif|thumb| | [[File:LuigiJab3SSBU.gif|thumb|450px|Hitbox visualization showing Luigi's third jab.]] | ||
==Overview== | ==Overview== | ||
Luigi bumps the opponent with his behind. | Luigi bumps the opponent with his behind. The slowest overall of all his jabs, meaning that it is also relatively unsafe on shield. With jab 2, it can be used against an unshielding opponent if they do not expect the third hit, which works well with the safety of jab 2. It can lead to niche jablock or tech chase situations at low percents, although the endlag makes them hard to perform. It is also incapable of killing at any realistic percent, making it a move exclusively for getting opponents off of Luigi. Otherwise, it provides decent range, with Luigi moving forwards a decent amount and even having minor disjoint, which helps jab 2 connect into it more easily. | ||
==Update History== | ==Update History== | ||
'''{{GameIcon|ssbu}} {{SSBU|3.1.0}}''' | '''{{GameIcon|ssbu}} {{SSBU|3.1.0}}''' | ||
| Line 13: | Line 13: | ||
|damage=4.0% | |damage=4.0% | ||
|angle=361 | |angle=361 | ||
|af=3 | |||
|bk=60 | |bk=60 | ||
|ks=80 | |ks=80 | ||
| Line 22: | Line 23: | ||
|zpos=9.2 | |zpos=9.2 | ||
|ff=2.0 | |ff=2.0 | ||
|type= | |type=Butt | ||
|effect=Normal | |effect=Normal | ||
|sfx=Kick | |sfx=Kick | ||
| Line 31: | Line 32: | ||
|damage=4.0% | |damage=4.0% | ||
|angle=361 | |angle=361 | ||
|af=3 | |||
|bk=60 | |bk=60 | ||
|ks=80 | |ks=80 | ||
| Line 40: | Line 42: | ||
|zpos=4.0 | |zpos=4.0 | ||
|ff=2.0 | |ff=2.0 | ||
|type= | |type=Butt | ||
|effect=Normal | |effect=Normal | ||
|sfx=Kick | |sfx=Kick | ||
| Line 46: | Line 48: | ||
}} | }} | ||
|} | |} | ||
==Timing== | ==Timing== | ||
{|class="wikitable" | {|class="wikitable" | ||
Latest revision as of 01:31, January 22, 2022
Overview[edit]
Luigi bumps the opponent with his behind. The slowest overall of all his jabs, meaning that it is also relatively unsafe on shield. With jab 2, it can be used against an unshielding opponent if they do not expect the third hit, which works well with the safety of jab 2. It can lead to niche jablock or tech chase situations at low percents, although the endlag makes them hard to perform. It is also incapable of killing at any realistic percent, making it a move exclusively for getting opponents off of Luigi. Otherwise, it provides decent range, with Luigi moving forwards a decent amount and even having minor disjoint, which helps jab 2 connect into it more easily.
Update History[edit]
 Neutral attack's third hit's hitbox was moved forward (Z offset : 8.2 -> 9.2).
Hitboxes[edit]
Timing[edit]
| Hitboxes | 6-7 |
|---|---|
| Interruptible | 31 |
| Animation length | 37 |
Lag time |
Hitbox |
Interruptible |
|
