SSBU Icon.png

Luigi (SSBU)/Down tilt

From SmashWiki, the Super Smash Bros. wiki
Jump to navigationJump to search
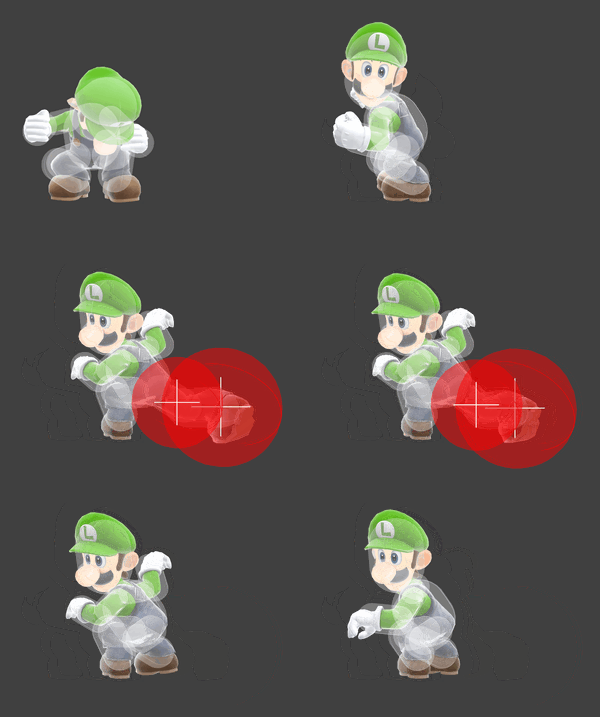
Hitbox visualization showing Luigi's down tilt.

Overview[edit]

Luigi performs a heel kick in front of him. It possesses fast frame 5 startup and very little endlag, at only 5 frames of vulnerability once the hitbox ends. It also possesses 4 active frames, which combined with a good, low-hitting hitbox, makes it an excellent two-frame tool. This makes down tilt a generally low commitment move, even being -2 on shield when fresh, and being +1 should the very last active frame connect, making it one of Luigi's overall safest ways to poke in neutral. Due to its safety, it has a potential shield-break setup in two down tilts then Super Jump Punch. It can be avoided via rolls or a very fast out-of-shield option, however down tilt's sheer safety can allow Luigi to punish if an OOS option is correctly read. It also gives Luigi lots of combo potential, including being able to jablock at low percents, leading to standing grabs at mid percents, then dash grabs at high percents, and the very low endlag of the move even allows moves like up tilt, more down tilts, aerials or Super Jump Punch to be used out of a dash for further combos, KO confirms and mixups.

Down tilt also is useful as a ledgetrapping tool. As a result of its hitbox and sheer speed, it can pressure ledge options from every character in the game, as it is able to hit every single ledgehang animation, and when combined with his grab aerial, can make for a difficult time for opponents to get back to stage. It can also set up for an aerial offstage if hit close to ledge. Down tilt is also one of Luigi's best options out of a perfect shield, as opponents typically will shield themselves after being perfect shielded, allowing down tilt to then pressure them for this, thus conditioning the opponent to do something else which can be punished accordingly.

Hitboxes[edit]

ID Part Rehit rate Damage SD Angle Angle type BK KS FKV Set weight Radius Bone Offset SDI× T% Clang Rebound Effect Type G A Sound Direct Hit bits Hit part Blockable Reflectable Absorbable Flinchless No GFX Heedless
0 0 0 5.0% 0 Sakurai angle Standard 32 72 0 HitboxTableIcon(False).png 4.8 kneer 3.0 0.0 0.0 1.0× 1.0× 0% HitboxTableIcon(Clang).png HitboxTableIcon(Rebound).png EffectIcon(Normal).png TypeIcon(Foot).png HitboxTableIcon(GroundedTrue).png HitboxTableIcon(AerialTrue).png M Kick SpecialsDirect.png All All HitboxTableIcon(Blockable).png HitboxTableIcon(Unreflectable).png HitboxTableIcon(Unabsorbable).png HitboxTableIcon(False).png HitboxTableIcon(False).png HitboxTableIcon(False).png
1 0 0 5.0% 0 Sakurai angle Standard 32 72 0 HitboxTableIcon(False).png 3.8 legr 2.0 0.0 0.0 1.0× 1.0× 0% HitboxTableIcon(Clang).png HitboxTableIcon(Rebound).png EffectIcon(Normal).png TypeIcon(Foot).png HitboxTableIcon(GroundedTrue).png HitboxTableIcon(AerialTrue).png M Kick SpecialsDirect.png All All HitboxTableIcon(Blockable).png HitboxTableIcon(Unreflectable).png HitboxTableIcon(Unabsorbable).png HitboxTableIcon(False).png HitboxTableIcon(False).png HitboxTableIcon(False).png

Timing[edit]

Hitboxes 5-8
Interruptible 14
Animation length 27
FrameIcon(Lag).png FrameIcon(Lag).png FrameIcon(Lag).png FrameIcon(Lag).png FrameIcon(Hitbox).png FrameIcon(Hitbox).png FrameIcon(Hitbox).png FrameIcon(Hitbox).png FrameIcon(Lag).png FrameIcon(Lag).png FrameIcon(Lag).png FrameIcon(Lag).png FrameIcon(Lag).png FrameIcon(Interruptible).png FrameIcon(Interruptible).png FrameIcon(Interruptible).png FrameIcon(Interruptible).png FrameIcon(Interruptible).png FrameIcon(Interruptible).png FrameIcon(Interruptible).png FrameIcon(Interruptible).png FrameIcon(Interruptible).png FrameIcon(Interruptible).png FrameIcon(Interruptible).png FrameIcon(Interruptible).png FrameIcon(Interruptible).png FrameIcon(Interruptible).png
Legend (1 square = 1 frame)
FrameIcon(Lag).png
Lag time
FrameIcon(Hitbox).png
Hitbox
FrameIcon(Interruptible).png
Interruptible