Luigi (SSBU)/Neutral attack/Hit 2: Difference between revisions
From SmashWiki, the Super Smash Bros. wiki
Jump to navigationJump to search
(added an overview for the move.) |
No edit summary |
||
| (3 intermediate revisions by one other user not shown) | |||
| Line 1: | Line 1: | ||
{{ArticleIcons|ssbu=y}} | {{ArticleIcons|ssbu=y}} | ||
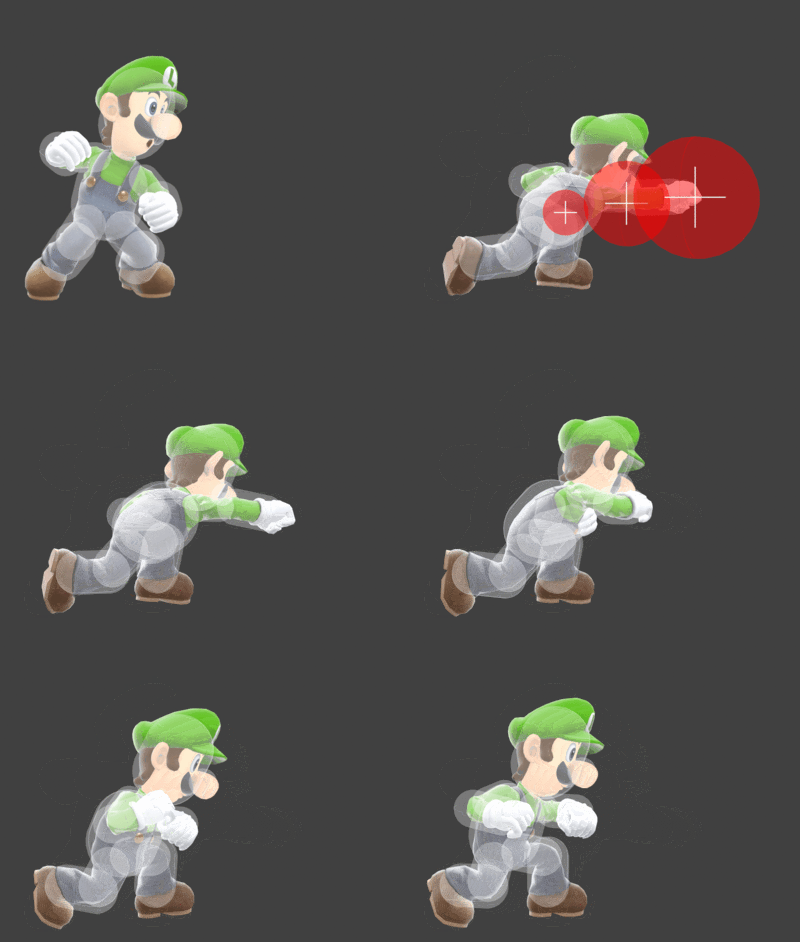
[[File:LuigiJab2SSBU.gif|thumb| | [[File:LuigiJab2SSBU.gif|thumb|400px|Hitbox visualization showing Luigi's second jab.]] | ||
==Overview== | ==Overview== | ||
| Line 7: | Line 7: | ||
==Update History== | ==Update History== | ||
'''{{GameIcon|ssbu}} {{SSBU|3.1.0}}''' | '''{{GameIcon|ssbu}} {{SSBU|3.1.0}}''' | ||
*{{buff|Neutral attack's second hit | *{{buff|Neutral attack's second hit middle hitbox has decreased base knockback and knockback scaling (32 → 25 (base), 25 → 20 (scaling) to match the tip. It also has a higher hitlag multiplier (x1.2 → x1.23). These changes allow it to connect into the third hit better.}} | ||
==Hitboxes== | ==Hitboxes== | ||
{{UltimateHitboxTableHeader}} | {{UltimateHitboxTableHeader}} | ||
| Line 14: | Line 15: | ||
|damage=2.0% | |damage=2.0% | ||
|angle=361 | |angle=361 | ||
|af=3 | |||
|bk=35 | |bk=35 | ||
|ks=25 | |ks=25 | ||
| Line 31: | Line 33: | ||
|id=1 | |id=1 | ||
|damage=2.0% | |damage=2.0% | ||
|af=3 | |||
|angle=361 | |angle=361 | ||
|bk=25 | |bk=25 | ||
| Line 50: | Line 53: | ||
|damage=2.0% | |damage=2.0% | ||
|angle=361 | |angle=361 | ||
|af=3 | |||
|bk=25 | |bk=25 | ||
|ks=20 | |ks=20 | ||
| Line 65: | Line 69: | ||
}} | }} | ||
|} | |} | ||
==Timing== | ==Timing== | ||
{|class="wikitable" | {|class="wikitable" | ||
| Line 70: | Line 75: | ||
|3-4 | |3-4 | ||
|- | |- | ||
! | !Continuability window | ||
|6 | |6-30 | ||
|- | |- | ||
!Interruptible | !Interruptible | ||
| Line 81: | Line 86: | ||
{{FrameStripStart}} | {{FrameStripStart}} | ||
{{FrameStrip|t=Lag|c=2}}{{FrameStrip|t=Hitbox|c=2}}{{FrameStrip|t=Lag|c=1|e=LagContinuableS}}{{FrameStrip|t=Lag|c=13|s=LagContinuableE}}{{FrameStrip|t=Interruptible|c=9}} | {{FrameStrip|t=Lag|c=2}}{{FrameStrip|t=Hitbox|c=2}}{{FrameStrip|t=Lag|c=1|e=LagContinuableS}}{{FrameStrip|t=Lag|c=13|s=LagContinuableE}}{{FrameStrip|t=Interruptible|c=9}}{{FrameStrip|t=Blank|c=3}} | ||
|- | |||
{{FrameStrip|t=Blank|c=5}}{{FrameStrip|t=Continuable|c=25}} | |||
{{FrameStripEnd}} | {{FrameStripEnd}} | ||
{{FrameIconLegend|lag=y|hitbox=y|earliestcontinuable=y|interruptible=y}} | {{FrameIconLegend|lag=y|hitbox=y|earliestcontinuable=y|continuable=y|interruptible=y}} | ||
{{MvSubNavLuigi|g=SSBU}} | {{MvSubNavLuigi|g=SSBU}} | ||
[[Category:Luigi (SSBU)]] | [[Category:Luigi (SSBU)]] | ||
[[Category:Neutral attacks (SSBU)]] | [[Category:Neutral attacks (SSBU)]] | ||
Latest revision as of 13:39, May 14, 2022
Overview[edit]
Luigi throws a quick jab with the opposite hand from the first hit. It possesses better range over the first hit, allowing it to be used for close-range spacing mixups with the first jab, and has a much easier time jablocking opponents with skinnier frames. It can also work alongside the other jabs in mixing up on an opponent's shield, especially due to the fact that it is the safest jab of Luigi's on shield, at -12, a frame safer than the first jab. With the added range, it can be useful for opponents with poor out-of-shield options.
Update History[edit]
 Neutral attack's second hit middle hitbox has decreased base knockback and knockback scaling (32 → 25 (base), 25 → 20 (scaling) to match the tip. It also has a higher hitlag multiplier (x1.2 → x1.23). These changes allow it to connect into the third hit better.
Hitboxes[edit]
Timing[edit]
| Hitboxes | 3-4 |
|---|---|
| Continuability window | 6-30 |
| Interruptible | 19 |
| Animation length | 27 |
Lag time |
Hitbox |
Continuable |
Earliest continuable point |
Interruptible |
|
