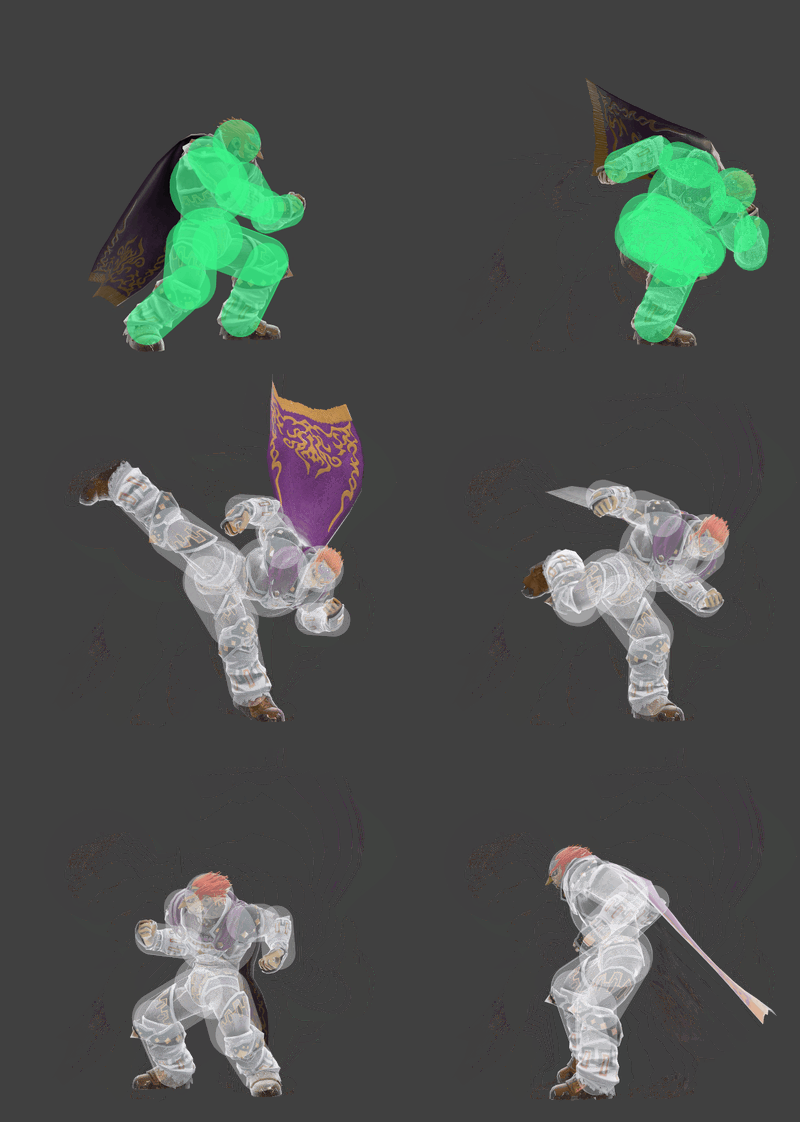
Ganondorf (SSBU)/Back throw: Difference between revisions
From SmashWiki, the Super Smash Bros. wiki
Jump to navigationJump to search
m (→Overview) Tags: Mobile edit Advanced mobile edit |
(Added to overview) |
||
| (6 intermediate revisions by 4 users not shown) | |||
| Line 9: | Line 9: | ||
==Overview== | ==Overview== | ||
Ganondorf kicks the opponent behind him. It is one of Ganondorf's two main [[KO]] throws at the ledge, along with his forward throw. It has low base knockback but high knockback growth, therefore it is usually used to send opponent offstage to set up for | Ganondorf kicks the opponent behind him. It is one of Ganondorf's two main [[KO]] throws at the ledge, along with his forward throw. It has low base knockback but high knockback growth, therefore it is usually used to send opponent offstage to set up for an edgeguard at earlier percents. However, due to its knockback growth, it is capable of being Ganondorf's strongest throw at the center of the stage. Despite having good knockback, it is arguably Ganondorf's worst throw due to its high ending lag. | ||
<!-- Kill%s were done in Ruben's Calculator, which while very accurate does not consider model hurtboxes. As such, give them a 5% margin of error. --> | <!-- Kill%s were done in Ruben's Calculator, which while very accurate does not consider model hurtboxes. As such, give them a 5% margin of error. --> | ||
| Line 29: | Line 29: | ||
==Throw and Hitbox Data== | ==Throw and Hitbox Data== | ||
{{UltimateHitboxTableHeader}} | {{UltimateHitboxTableHeader}} | ||
{{HitboxTableTitle|Hitbox| | {{HitboxTableTitle|Hitbox|42}} | ||
{{UltimateHitboxTableRow | {{UltimateHitboxTableRow | ||
|id=0 | |id=0 | ||
|damage=5.0% | |damage=5.0% | ||
|angle=70 | |angle=70 | ||
|af=3 | |||
|bk=30 | |bk=30 | ||
|ks=100 | |ks=100 | ||
| Line 39: | Line 40: | ||
|r=4.8 | |r=4.8 | ||
|bn=footr | |bn=footr | ||
|ff=1.5 | |ff=1.5 | ||
|type=Foot | |type=Foot | ||
|sfx=Kick | |sfx=Kick | ||
|slvl=L | |slvl=L | ||
| Line 54: | Line 51: | ||
|damage=5.0% | |damage=5.0% | ||
|angle=70 | |angle=70 | ||
|af=3 | |||
|bk=30 | |bk=30 | ||
|ks=100 | |ks=100 | ||
| Line 59: | Line 57: | ||
|r=4.3 | |r=4.3 | ||
|bn=kneer | |bn=kneer | ||
|ff=1.5 | |ff=1.5 | ||
|type=Foot | |type=Foot | ||
|sfx=Kick | |sfx=Kick | ||
|slvl=L | |slvl=L | ||
| Line 74: | Line 68: | ||
|damage=5.0% | |damage=5.0% | ||
|angle=70 | |angle=70 | ||
|af=3 | |||
|bk=30 | |bk=30 | ||
|ks=100 | |ks=100 | ||
| Line 79: | Line 74: | ||
|r=3.7 | |r=3.7 | ||
|bn=legr | |bn=legr | ||
|ff=1.5 | |ff=1.5 | ||
|type=Foot | |type=Foot | ||
|sfx=Kick | |sfx=Kick | ||
|slvl=L | |slvl=L | ||
| Line 102: | Line 93: | ||
|fkv=0 | |fkv=0 | ||
|ff=0.0 | |ff=0.0 | ||
|effect=Normal | |||
|sfx=None | |||
|slvl=S | |||
}} | |||
{{UltimateThrowTableRow | |||
|kind=1 | |||
|id=0 | |||
|type=Throwing | |||
|damage=3.0% | |||
|angle=361 | |||
|bk=60 | |||
|ks=100 | |||
|fkv=0 | |||
|effect=Normal | |effect=Normal | ||
|sfx=None | |sfx=None | ||
| Line 112: | Line 116: | ||
!Invincibility | !Invincibility | ||
|1-14 | |1-14 | ||
|- | |||
!Turnaround | |||
|11 | |||
|- | |- | ||
!Hitbox | !Hitbox | ||
| Line 128: | Line 135: | ||
{{FrameStrip|t=Lag|c=11}}{{FrameStrip|t=Hitbox|c=2|e=HitboxThrowS}}{{FrameStrip|t=Lag|c=36|s=LagThrowE}}{{FrameStrip|t=Interruptible|c=14}} | {{FrameStrip|t=Lag|c=11}}{{FrameStrip|t=Hitbox|c=2|e=HitboxThrowS}}{{FrameStrip|t=Lag|c=36|s=LagThrowE}}{{FrameStrip|t=Interruptible|c=14}} | ||
|- | |- | ||
{{FrameStrip|t=Invincible|c= | {{FrameStrip|t=Invincible|c=10|e=InvincibleStateS}}{{FrameStrip|t=Invincible|c=4|s=InvincibleStateE}}{{FrameStrip|t=Vulnerable|c=49}} | ||
{{FrameStripEnd}} | {{FrameStripEnd}} | ||
{{FrameIconLegend|lag=y|hitbox=y|throw=y|interruptible=y|vulnerable=y|invincible=y}} | {{FrameIconLegend|lag=y|hitbox=y|throw=y|interruptible=y|state=y|vulnerable=y|invincible=y}} | ||
{{MvSubNavGanondorf|g=SSBU}} | {{MvSubNavGanondorf|g=SSBU}} | ||
Latest revision as of 08:33, November 30, 2023
| Ganondorf back throw hurtbox and hitbox visualization | ||||
|---|---|---|---|---|

| ||||
Overview[edit]
Ganondorf kicks the opponent behind him. It is one of Ganondorf's two main KO throws at the ledge, along with his forward throw. It has low base knockback but high knockback growth, therefore it is usually used to send opponent offstage to set up for an edgeguard at earlier percents. However, due to its knockback growth, it is capable of being Ganondorf's strongest throw at the center of the stage. Despite having good knockback, it is arguably Ganondorf's worst throw due to its high ending lag.
| Ganondorf Back Throw KO%s on Final Destination VS Mario w/Optimal DI | ||
|---|---|---|
| Circumstance | Kill% | Stick angle |
| At the ledge | 179.58% | 153° |
| At the ledge (max rage) | 154.78% | 153° |
| Center | 239.84% | 180° |
| Center (max rage) | 209.54% | 180° |
Throw and Hitbox Data[edit]
| Kind | ID | Damage | Angle | Angle type | BK | KS | FKV | H× | Effect | Type | Sound | ||||||||||||
|---|---|---|---|---|---|---|---|---|---|---|---|---|---|---|---|---|---|---|---|---|---|---|---|
| Throw | |||||||||||||||||||||||
| Throw | 0 | 5.0% | Forward | 30 | 130 | 0 | 0.0× | ||||||||||||||||
| Break | 0 | 3.0% | Forward | 60 | 100 | 0 | 0.0× | ||||||||||||||||
Timing[edit]
| Invincibility | 1-14 |
|---|---|
| Turnaround | 11 |
| Hitbox | 12-13 |
| Throw Release | 14 |
| Interruptible | 50 |
| Animation length | 63 |
Lag time |
Hitbox |
Vulnerable |
Invincible |
State change |
Throw point |
Interruptible |
|
