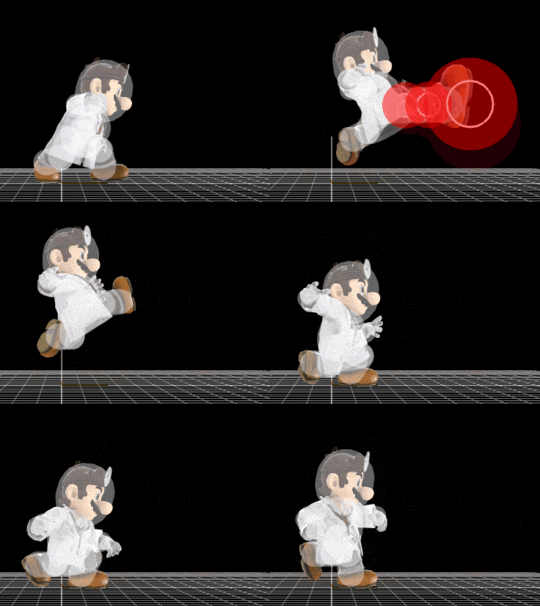
Dr. Mario (SSB4)/Neutral attack/Hit 3: Difference between revisions
From SmashWiki, the Super Smash Bros. wiki
Jump to navigationJump to search
No edit summary |
SuperSqank (talk | contribs) |
||
| (3 intermediate revisions by 2 users not shown) | |||
| Line 1: | Line 1: | ||
[[File:Dr.MarioJab3.gif|thumb|270px|Hitbox visualization showing Dr. Mario's jab 3.]] | [[File:Dr.MarioJab3.gif|thumb|270px|Hitbox visualization showing Dr. Mario's jab 3.]] | ||
== | ==Overview== | ||
The third and final hit of | The third and final hit of Dr. Mario's [[Neutral attack|neutral attack]] is a kick of the leg closer to the camera. While its startup is longer than the other hits and it has less knockback growth, it does more [[Damage|damage]], sending the opponent back even at low percentages. It is mostly used with the rest of the jab combo within the mixups that it provides. Jab 3 is mostly only used to send the opponent away when needed. Otherwise, jab 3 may not connect on certain characters, due to the first two hits having only upwards knockback. | ||
== | ==Hitboxes== | ||
{{SSB4HitboxTableHeader}} | {{SSB4HitboxTableHeader}} | ||
{{SSB4HitboxTableRow | {{SSB4HitboxTableRow | ||
|id=0 | |id=0 | ||
|damage=4 | |damage=4% | ||
|angle=361 | |angle=361 | ||
|bk=45 | |bk=45 | ||
| Line 35: | Line 25: | ||
{{SSB4HitboxTableRow | {{SSB4HitboxTableRow | ||
|id=1 | |id=1 | ||
|damage=4 | |damage=4% | ||
|angle=361 | |angle=361 | ||
|bk=45 | |bk=45 | ||
| Line 52: | Line 42: | ||
{{SSB4HitboxTableRow | {{SSB4HitboxTableRow | ||
|id=2 | |id=2 | ||
|damage=4 | |damage=4% | ||
|angle=361 | |angle=361 | ||
|bk=45 | |bk=45 | ||
| Line 67: | Line 57: | ||
|sfx=Kick | |sfx=Kick | ||
}} | }} | ||
{{HitboxTableRowNote|The damage values are untouched before being affected by Dr. Mario's 1.12x damage multiplier.|24}} | |||
|} | |||
==Timing== | |||
{|class="wikitable" | |||
!Hitboxes | |||
|7-8 | |||
|- | |||
!Interruptible | |||
|36 | |||
|- | |||
!Animation length | |||
|45 | |||
|} | |} | ||
{{FrameStripStart}} | |||
{{FrameStrip|t=Lag|c=6}}{{FrameStrip|t=Hitbox|c=2}}{{FrameStrip|t=Lag|c=27}}{{FrameStrip|t=Interruptible|c=10}} | |||
{{FrameStripEnd}} | |||
{{FrameIconLegend|lag=y|hitbox=y|interruptible=y}} | |||
==References== | ==References== | ||
Latest revision as of 17:31, August 2, 2020
Overview[edit]
The third and final hit of Dr. Mario's neutral attack is a kick of the leg closer to the camera. While its startup is longer than the other hits and it has less knockback growth, it does more damage, sending the opponent back even at low percentages. It is mostly used with the rest of the jab combo within the mixups that it provides. Jab 3 is mostly only used to send the opponent away when needed. Otherwise, jab 3 may not connect on certain characters, due to the first two hits having only upwards knockback.
Hitboxes[edit]
Timing[edit]
| Hitboxes | 7-8 |
|---|---|
| Interruptible | 36 |
| Animation length | 45 |
Lag time |
Hitbox |
Interruptible |
References[edit]
|
