SSBU Icon.png

Bowser (SSBU)/Down throw: Difference between revisions

From SmashWiki, the Super Smash Bros. wiki
Jump to navigationJump to search
(Added description.)
Tag: Mobile edit
 
(3 intermediate revisions by 3 users not shown)
Line 8: Line 8:


==Overview==
==Overview==
Bowser places the opponent on the ground and body slabs them with high [[damage]], making it one of the strongest throws in the game. With high base knockback, low [[knockback scaling]] and high [[ending lag]] helps Bowser to prevent getting any follow-ups. Although he gets easily [[Punishment|punishable]] after the throw.
Bowser places the opponent on the ground and body slams them with high [[damage]], making it one of the most damaging throws in the game. With high base knockback, low [[knockback scaling]] and high [[ending lag]], however, this throw has near nonexistent combo or KO potential, making it strictly useful for damage racking and repositioning; its 0 degrees [[semi-spike]] angle coupled with high damage makes it good for setting up edgeguards and tech chases.
 
==Throw and Hitbox Data==
{{UltimateHitboxTableHeader}}
Line 15: Line 16:
|damage=10.0%
|damage=10.0%
|angle=0
|angle=0
|af=3
|bk=0
|bk=0
|ks=100
|ks=100
Line 35: Line 37:
|damage=10.0%
|damage=10.0%
|angle=0
|angle=0
|af=3
|bk=0
|bk=0
|ks=100
|ks=100
Line 63: Line 66:
|fkv=0
|fkv=0
|ff=0.0
|ff=0.0
|effect=Normal
|sfx=None
|slvl=S
}}
{{UltimateThrowTableRow
|kind=1
|id=0
|type=Throwing
|damage=3.0%
|angle=361
|bk=40
|ks=100
|fkv=0
|effect=Normal
|effect=Normal
|sfx=None
|sfx=None
Line 92: Line 108:
{{FrameStripEnd}}
{{FrameStripEnd}}


{{FrameIconLegend|lag=y|hitbox=y|hitboxchange=y|throw=y|interruptible=y|vulnerable=y|invincible=y}}
{{FrameIconLegend|lag=y|hitbox=y|throw=y|interruptible=y|vulnerable=y|invincible=y}}


{{MvSubNavBowser|g=SSBU}}

Latest revision as of 22:47, July 19, 2022

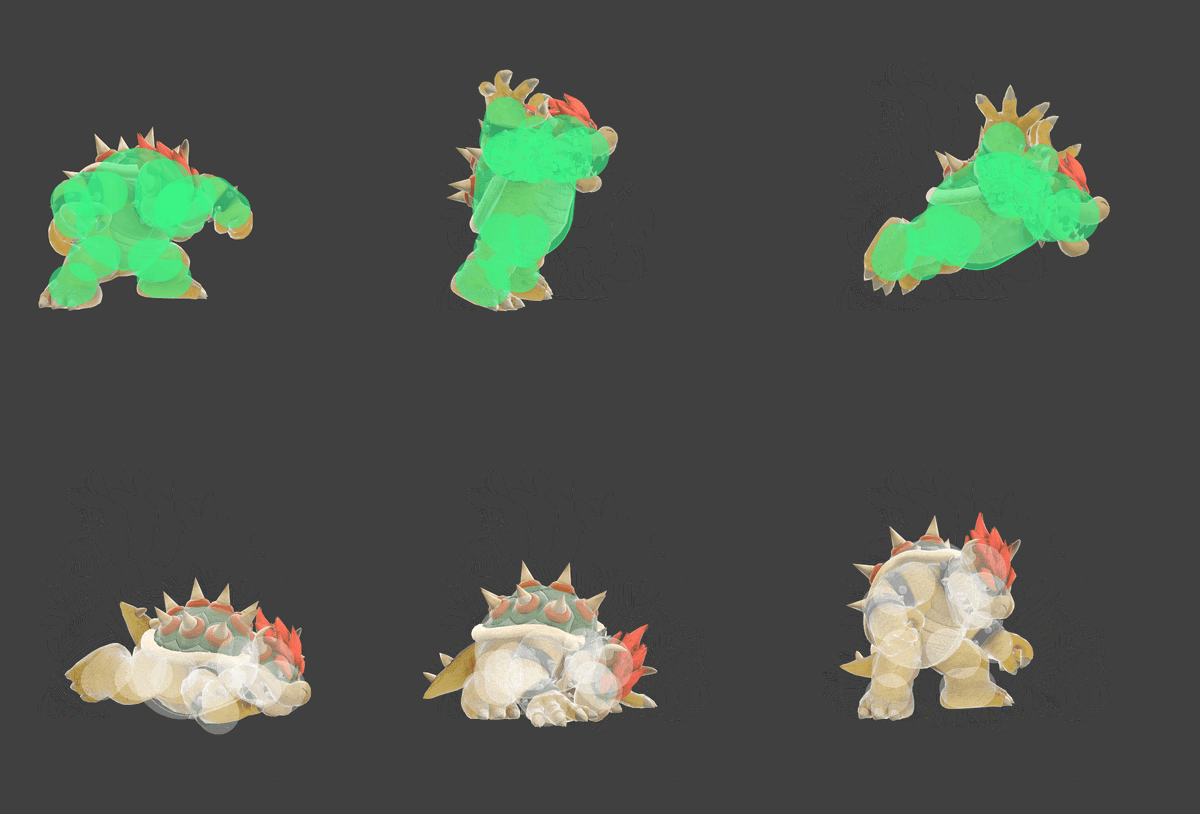
Bowser down throw hurtbox and hitbox visualization
Hitbox visualization for Bowser's down throw

Overview[edit]

Bowser places the opponent on the ground and body slams them with high damage, making it one of the most damaging throws in the game. With high base knockback, low knockback scaling and high ending lag, however, this throw has near nonexistent combo or KO potential, making it strictly useful for damage racking and repositioning; its 0 degrees semi-spike angle coupled with high damage makes it good for setting up edgeguards and tech chases.

Throw and Hitbox Data[edit]

ID Part Rehit rate Damage SD Angle Angle type BK KS FKV Set weight Radius Bone Offset SDI× T% Clang Rebound Effect Type G A Sound Direct Hit bits Hit part Blockable Reflectable Absorbable Flinchless No GFX Heedless
0 0 0 10.0% 0 AngleIcon0.png Forward 0 100 0 HitboxTableIcon(False).png 9.6 waist -0.5 3.2 0.0 1.0× 1.0× 0% HitboxTableIcon(NoClang).png HitboxTableIcon(NoRebound).png EffectIcon(Normal).png TypeIcon(Body).png HitboxTableIcon(GroundedTrue).png HitboxTableIcon(AerialTrue).png L Kick SpecialsDirect.png All All HitboxTableIcon(Blockable).png HitboxTableIcon(Unreflectable).png HitboxTableIcon(Unabsorbable).png HitboxTableIcon(False).png HitboxTableIcon(False).png HitboxTableIcon(False).png
1 0 0 10.0% 0 AngleIcon0.png Forward 0 100 0 HitboxTableIcon(False).png 9.6 head 0.0 3.2 0.0 1.0× 1.0× 0% HitboxTableIcon(NoClang).png HitboxTableIcon(NoRebound).png EffectIcon(Normal).png TypeIcon(Body).png HitboxTableIcon(GroundedTrue).png HitboxTableIcon(AerialTrue).png L Kick SpecialsDirect.png All All HitboxTableIcon(Blockable).png HitboxTableIcon(Unreflectable).png HitboxTableIcon(Unabsorbable).png HitboxTableIcon(False).png HitboxTableIcon(False).png HitboxTableIcon(False).png
Kind ID Damage Angle Angle type BK KS FKV Effect Type Sound
Throw
Throw 0 4.0% AngleIcon50.png Forward 90 80 0 0.0× EffectIcon(Normal).png TypeIcon(Throwing).png S None
Break 0 3.0% Sakurai angle Forward 40 100 0 0.0× EffectIcon(Normal).png TypeIcon(Throwing).png S None

Timing[edit]

Invincibility 1-37
Hitbox 35-45
Throw Release 37
Interruptible 85
Animation length 91
FrameIcon(Lag).png FrameIcon(Lag).png FrameIcon(Lag).png FrameIcon(Lag).png FrameIcon(Lag).png FrameIcon(Lag).png FrameIcon(Lag).png FrameIcon(Lag).png FrameIcon(Lag).png FrameIcon(Lag).png FrameIcon(Lag).png FrameIcon(Lag).png FrameIcon(Lag).png FrameIcon(Lag).png FrameIcon(Lag).png FrameIcon(Lag).png FrameIcon(Lag).png FrameIcon(Lag).png FrameIcon(Lag).png FrameIcon(Lag).png FrameIcon(Lag).png FrameIcon(Lag).png FrameIcon(Lag).png FrameIcon(Lag).png FrameIcon(Lag).png FrameIcon(Lag).png FrameIcon(Lag).png FrameIcon(Lag).png FrameIcon(Lag).png FrameIcon(Lag).png FrameIcon(Lag).png FrameIcon(Lag).png FrameIcon(Lag).png FrameIcon(Lag).png FrameIcon(Hitbox).png FrameIcon(HitboxThrowS).png FrameIcon(HitboxThrowE).png FrameIcon(Hitbox).png FrameIcon(Hitbox).png FrameIcon(Hitbox).png FrameIcon(Hitbox).png FrameIcon(Hitbox).png FrameIcon(Hitbox).png FrameIcon(Hitbox).png FrameIcon(Hitbox).png FrameIcon(Lag).png FrameIcon(Lag).png FrameIcon(Lag).png FrameIcon(Lag).png FrameIcon(Lag).png FrameIcon(Lag).png FrameIcon(Lag).png FrameIcon(Lag).png FrameIcon(Lag).png FrameIcon(Lag).png FrameIcon(Lag).png FrameIcon(Lag).png FrameIcon(Lag).png FrameIcon(Lag).png FrameIcon(Lag).png FrameIcon(Lag).png FrameIcon(Lag).png FrameIcon(Lag).png FrameIcon(Lag).png FrameIcon(Lag).png FrameIcon(Lag).png FrameIcon(Lag).png FrameIcon(Lag).png FrameIcon(Lag).png FrameIcon(Lag).png FrameIcon(Lag).png FrameIcon(Lag).png FrameIcon(Lag).png FrameIcon(Lag).png FrameIcon(Lag).png FrameIcon(Lag).png FrameIcon(Lag).png FrameIcon(Lag).png FrameIcon(Lag).png FrameIcon(Lag).png FrameIcon(Lag).png FrameIcon(Lag).png FrameIcon(Lag).png FrameIcon(Lag).png FrameIcon(Interruptible).png FrameIcon(Interruptible).png FrameIcon(Interruptible).png FrameIcon(Interruptible).png FrameIcon(Interruptible).png FrameIcon(Interruptible).png FrameIcon(Interruptible).png
FrameIcon(Invincible).png FrameIcon(Invincible).png FrameIcon(Invincible).png FrameIcon(Invincible).png FrameIcon(Invincible).png FrameIcon(Invincible).png FrameIcon(Invincible).png FrameIcon(Invincible).png FrameIcon(Invincible).png FrameIcon(Invincible).png FrameIcon(Invincible).png FrameIcon(Invincible).png FrameIcon(Invincible).png FrameIcon(Invincible).png FrameIcon(Invincible).png FrameIcon(Invincible).png FrameIcon(Invincible).png FrameIcon(Invincible).png FrameIcon(Invincible).png FrameIcon(Invincible).png FrameIcon(Invincible).png FrameIcon(Invincible).png FrameIcon(Invincible).png FrameIcon(Invincible).png FrameIcon(Invincible).png FrameIcon(Invincible).png FrameIcon(Invincible).png FrameIcon(Invincible).png FrameIcon(Invincible).png FrameIcon(Invincible).png FrameIcon(Invincible).png FrameIcon(Invincible).png FrameIcon(Invincible).png FrameIcon(Invincible).png FrameIcon(Invincible).png FrameIcon(Invincible).png FrameIcon(Invincible).png FrameIcon(Vulnerable).png FrameIcon(Vulnerable).png FrameIcon(Vulnerable).png FrameIcon(Vulnerable).png FrameIcon(Vulnerable).png FrameIcon(Vulnerable).png FrameIcon(Vulnerable).png FrameIcon(Vulnerable).png FrameIcon(Vulnerable).png FrameIcon(Vulnerable).png FrameIcon(Vulnerable).png FrameIcon(Vulnerable).png FrameIcon(Vulnerable).png FrameIcon(Vulnerable).png FrameIcon(Vulnerable).png FrameIcon(Vulnerable).png FrameIcon(Vulnerable).png FrameIcon(Vulnerable).png FrameIcon(Vulnerable).png FrameIcon(Vulnerable).png FrameIcon(Vulnerable).png FrameIcon(Vulnerable).png FrameIcon(Vulnerable).png FrameIcon(Vulnerable).png FrameIcon(Vulnerable).png FrameIcon(Vulnerable).png FrameIcon(Vulnerable).png FrameIcon(Vulnerable).png FrameIcon(Vulnerable).png FrameIcon(Vulnerable).png FrameIcon(Vulnerable).png FrameIcon(Vulnerable).png FrameIcon(Vulnerable).png FrameIcon(Vulnerable).png FrameIcon(Vulnerable).png FrameIcon(Vulnerable).png FrameIcon(Vulnerable).png FrameIcon(Vulnerable).png FrameIcon(Vulnerable).png FrameIcon(Vulnerable).png FrameIcon(Vulnerable).png FrameIcon(Vulnerable).png FrameIcon(Vulnerable).png FrameIcon(Vulnerable).png FrameIcon(Vulnerable).png FrameIcon(Vulnerable).png FrameIcon(Vulnerable).png FrameIcon(Vulnerable).png FrameIcon(Vulnerable).png FrameIcon(Vulnerable).png FrameIcon(Vulnerable).png FrameIcon(Vulnerable).png FrameIcon(Vulnerable).png FrameIcon(Vulnerable).png
Legend (1 square = 1 frame)
FrameIcon(Lag).png
Lag time
FrameIcon(Hitbox).png
Hitbox
FrameIcon(Vulnerable).png
Vulnerable
FrameIcon(Invincible).png
Invincible
FrameIcon(BlankThrowS).pngFrameIcon(BlankThrowE).png
Throw point
FrameIcon(Interruptible).png
Interruptible