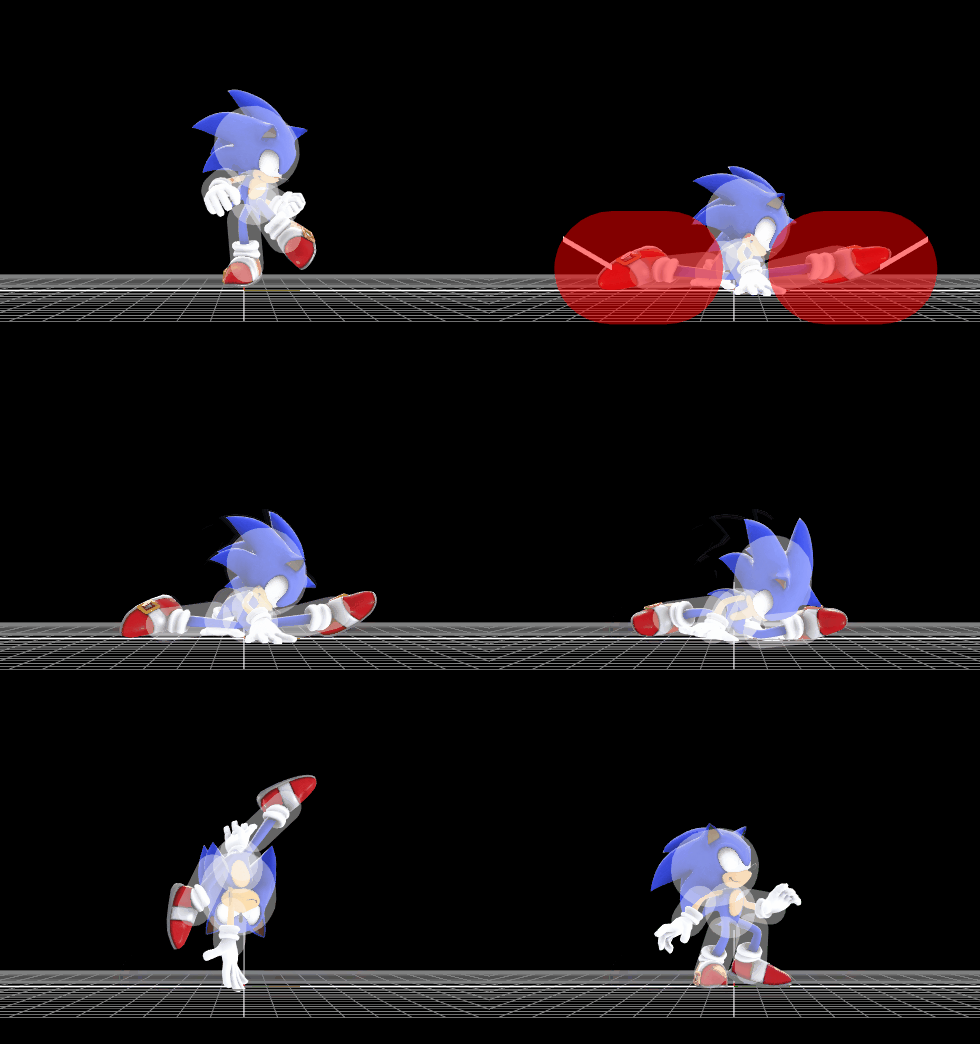
Sonic (SSB4)/Down smash: Difference between revisions
From SmashWiki, the Super Smash Bros. wiki
Jump to navigationJump to search
Smash Master (talk | contribs) (New Page: {{ArticleIcons|ssb4=y}} ==Overview== A split kick, similar to {{SSB4|Fox}}'s and {{SSB4|Falco}}'s down smashes. It is a semi-spike and has less start-up lag than his other smash att...) |
SuperSqank (talk | contribs) (→Timing) |
||
| (3 intermediate revisions by 3 users not shown) | |||
| Line 1: | Line 1: | ||
{{ArticleIcons|ssb4=y}} | {{ArticleIcons|ssb4=y}} | ||
[[File:SonicDSmash.gif|thumb|270px|Hitbox visualization showing Sonic's down smash.]] | |||
==Overview== | ==Overview== | ||
A split kick, similar to {{SSB4|Fox}}'s and {{SSB4|Falco}}'s down smashes. It is a [[semi-spike]] and has less start-up lag than his other smash attacks, due to coming out on frame 12. However, it has below average knockback overall, lasts for only | A split kick, similar to {{SSB4|Fox}}'s and {{SSB4|Falco}}'s down smashes. It is a [[semi-spike]] and has less start-up lag than his other smash attacks, due to coming out on frame 12. However, it has below average knockback overall, lasts for only 2 frames and has 41 frames of ending lag. As a result, it is better suited for setting up edgeguards and punishing rolls, rather than KOing. | ||
==Hitboxes== | ==Hitboxes== | ||
{| | {{SSB4HitboxTableHeader}}} | ||
| | {{SSB4HitboxTableRow | ||
|id=0 | |||
| | |damage={{ChargedSmashDmgSSB4|12}} | ||
|Foot || 12 | |sd=0 | ||
|angle=30 | |||
|bk=55 | |||
|ks=63 | |||
|fkv=0 | |||
|r=5.0 | |||
|bn=0 | |||
|xpos=0.0 | |||
|ypos=2.0 | |||
|zpos=13.0 | |||
|type=Foot | |||
|sfx=Kick | |||
|slvl=M | |||
}} | |||
{{SSB4HitboxTableRow | |||
|id=1 | |||
|damage={{ChargedSmashDmgSSB4|12}} | |||
|sd=0 | |||
|angle=30 | |||
|bk=50 | |||
|ks=80 | |||
|fkv=0 | |||
|r=5.0 | |||
|bn=0 | |||
|xpos=0.0 | |||
|ypos=2.0 | |||
|zpos=-11.0 | |||
|type=Foot | |||
|effect=Normal | |||
|sfx=Kick | |||
|slvl=M | |||
}} | |||
|} | |} | ||
==Timing== | ==Timing== | ||
{|class="wikitable" | {|class="wikitable" | ||
!Charges between | |||
|5-6 | |||
|- | |||
!Hitboxes | !Hitboxes | ||
|12-13 | |12-13 | ||
| Line 21: | Line 55: | ||
|- | |- | ||
!Animation length | !Animation length | ||
| | |61 | ||
|} | |} | ||
{{FrameStripStart}} | {{FrameStripStart}} | ||
{{FrameStrip|t=Lag|c= | {{FrameStrip|t=Lag|c=5|e=LagChargeS}}{{FrameStrip|t=Lag|c=6|s=LagChargeE}}{{FrameStrip|t=Hitbox|c=2}}{{FrameStrip|t=Lag|c=41}}{{FrameStrip|t=Interruptible|c=7}} | ||
{{FrameStripEnd}} | {{FrameStripEnd}} | ||
{{FrameIconLegend|lag=y|hitbox=y|interruptible=y}} | {{FrameIconLegend|lag=y|charge=y|hitbox=y|interruptible=y}} | ||
{{MvSubNavSonic|g=SSB4}} | {{MvSubNavSonic|g=SSB4}} | ||
[[Category:Sonic (SSB4)]] | [[Category:Sonic (SSB4)]] | ||
[[Category:Down smashes (SSB4)]] | [[Category:Down smashes (SSB4)]] | ||
Latest revision as of 05:28, August 18, 2020
Overview[edit]
A split kick, similar to Fox's and Falco's down smashes. It is a semi-spike and has less start-up lag than his other smash attacks, due to coming out on frame 12. However, it has below average knockback overall, lasts for only 2 frames and has 41 frames of ending lag. As a result, it is better suited for setting up edgeguards and punishing rolls, rather than KOing.
Hitboxes[edit]
Timing[edit]
| Charges between | 5-6 |
|---|---|
| Hitboxes | 12-13 |
| Interruptible | 55 |
| Animation length | 61 |
Lag time |
Charge interval |
Hitbox |
Interruptible |
|
